Members Write ups
#1
 08-21-2006, 10:35 PM


Anyone that wants to conrtibute in Doing a Write up on something they have done on any of their cars Please put it here.
Pictures will help Also.
There is another one started But I think that one should be for the Moderators to Do ours.(S70 if you disagree please let me know)
So Please Contribute it will only Help Others.
Pictures will help Also.
There is another one started But I think that one should be for the Moderators to Do ours.(S70 if you disagree please let me know)
So Please Contribute it will only Help Others.


#5
09-13-2006, 06:35 PM

I replaced the front and rear ambers with chrome coated ones, the small light in the bright bulb housing with chrome coated suber white, the dim projectors with Luminics H11 Ultra Whites, the fog lights with Luminics H11 Ultra Whites, and the brights with Luminics 9005 Titanum White.
The step is most important...make sure you use tape on the bumper so you dont scratch up the car during removal.
The first pic is a comparison of stock vs upgrade. The second is all lights replaced with brights on.
All comments or questions appreciated.
[IMG]local://upfiles/6877/F189F90A3794400A93F49ACFDF90B0BA.jpg[/IMG]
[IMG]local://upfiles/6877/CC02239C310E4C39832B1B81BFF90891.jpg[/IMG]
#6
09-14-2006, 10:22 PM

I replaced the air filter on my 2006 C70. It's very simple to do.
The filter is located in the black plastic assembly on the fron of the engine on the left side as you face the car.
On the left side of the assembly you will see two phillip screws, take them out. The filter is in a drawer type sliding box. Pull on the handle like plastic piece on top of the assembly. It will click and pull out.
There is a rubber gasket that seals the filter drawer against the assembly. Make sure you grab it or it will fall into the engine compartment and you will be fishing it out like me with a hanger.
The OEM filter is huge, with paper pleats and a mesh layer attached to the pleats. IMO the intake must not be getting much air with this filter. Its very thick. Pop the OEM filter out, its held by preassure only.
Replace with the K&N filter. Place the rubber gasket back on and hold it well. Push the drawer in until it clicks and re-install the phillip screws and you are done!
#7
09-19-2006, 11:22 AM

I must admit that the tranny flush is a total success. More or less I followed whats posted on the link that Tech posted. Just to sumarize what I did:
1. Drained fluid using the drain plug located in the tranny oil pan and measured the amount of drained fluid (I used old coolant 1 gal canister with marked 1 qt measurements).
2. Cleaned the pan inside and applied new "chemical seal" (for some reseaon volvo didn't put a seal between tranny and pan but they use this chemical seal).
3. Refilled fluid.
4. Disconnected the upper (looking from the front of the engine bay) ATF cooling line from the radiator - this is the return line from the radiator to the tranny.
5. Using a funnel with attached to it a clear 3/8" hose (got the funnel/hose as one part at auto zone for like few $$$) and using the old coolant canister with marked 1 qt marks (this canister fits nicely in the open space on the right side of the engine) I flushed the fluid by starting and turning off the engine untill new ATF was flowing from the radiator (I had to start/turn off engine because the flow rate of the ATF was higher than the capacity of the funnel allow). During the flushing process, I measured the amount of flushed out fluid and added new fluid accordingly. This is a 2 man operation.
If someone is attempting to flush the ATF, make sure that you have enough of the fluid. I used 24 qt of fluid.
#8
09-29-2006, 10:50 AM
This a write from a member (willko1) from awhile ago.
Leather Seat Cleaning
Well just cleaned all the Tan leather in my Volvo 1999 v70 for the first time and from what I suspect is the first time ever for this car. Purchased the Lexol conditioner and cleaner. Started with the cleaner first using the (Yellow on one side green abrasive on the other side) non-abrasive side of a standard two-sided sponge as per instructions. Not a very good result but since I have cleaned many leather shoes, baseball cloves, saddles etc I thought I would use and share a few tricks.
1st if leather is very aged and hard it will need to be conditioned first in order to soften it up so the dirt can be extracted. Applied conditioner to all leather in car and let sit for 10-15 min.
2nd Used a moist almost wet sponge with Lexol cleaner and a little bit of saddle soap applied with green abrasive side (note sponge was used so green abrasion was worn I would not use a new sponge). Worked in small areas and kept wiping dirty foam away with moist cloth rinsing both sponge and cloth numerous times. Compared with trying to clean pre conditioned leather to non pre conditioned leather was like night and day the dirt seemed to just lift out with minimal effort on the pre conditioned leather.
3rd Cleaned all leather like this and gave car interior final moist wipe with new clean cloth after above was complete.
4th Used the Lexol leather conditioner and applied with new dry cloth soaked in Lexol went over interior twice and let sit for 2 hours.
5th wiped down interior with clean dry cloth *note much of the dirty spots that I did miss came up with a little bit of effort on the final wipe down.
Synopsis. Leather looks great, all the valleys in the leather that were two tones due to dirt build up are gone and it looks great, slight greasiness to leather but it is going away. Time it took to complete entire job 5 hours feeling I get sliding into nearly new leather seats priceless.
The following users liked this post:
Goldfish888 (07-04-2023)
#9
10-11-2006, 11:17 AM
2006 c70 Oil Change
Things you will need to succeed.
-36mm socket to loosen oil filter plastic cover/cap.
-Rhino ramps or equivalent, they need to have a slow rise to prevent car/ramp contact
-Flexible long socket extension and or universsal extension
-Cartridge type oil filter. Use Volvo's to keep things simple
-Drain plug aluminum washer
Raise the car and remove the cover bellow. The screws holding the cover come out easily. The screws go back too easily and most of them will not tighten. I had two that went back on tight and the rest just turned for ever.
Remove the engine oil drain plug and drain the oil. I reused the aluminum crush washer. Replace it if you can. Mine did not leak afterwards. I'll definitely replace next time.
The filter is located on the front of the engine, left side, mid-way down behind the air intake tract. Yes, you will have to remove it. The intake tract pops of the front (use a large screwdriver and pop back from the two tabs, then twist clockwise and it will pull up.
There is not much room to get to the filter. The filter is under a cap/cover that is dark brown almost black, it has a 36mm nut on top. You will need an extension and an angle universal extension (don't know the correct name), or flexible etension so you can deal with the angle. Unscrew the filter cover and remove with your hand. The filter will stay in the hole. Work the cap out, there isn't much room. Then pull out the old filter. The new filter comes with a rubber seal that goes on the cap on a groove, not on the last groove at the top of the filter cap flange, but the groove bellow. Just look at it when you take the original one out. Replace the oil filter and install the cap. Install the intake tract. Replace the oil drain plug.
Replace the oil. I used Mobil1 5W 30. It used 6.1 Qts like the owners manual said.
#10
10-15-2006, 10:32 PM

Having difficulty getting your tailgate to stay up? The tailgate is held up by two very-high pressure struts, which tend to lose their effectiveness after a few years. Follow these directions for tailgate strut replacement. As always, you are doing so at your own risk, and I am assuming no responsibility if you hurt yourself or your car. It is recommended that you be prudent and careful!!!
1. Buy some replacement struts. I got mine from eeuroparts.com. The cheapest ones they sell are Scantech, which are the ones I used ($43 total for both). They work great. How long will tey last? Time will tell.
2. Remove the rear courtesy light. Use a small screw driver to pry in the metal tab on one end, and it will pivot out.
3. Pry out the two plastic round caps from the center rear plastic roof trim. Use an awl or a very small screw driver, and be careful to not scratch the plastic. Then remove the two torx screws behihnd them. Carefully pry off the roof trim piece, which is held in place by clips.
4. There are plastic panels that run down each D pillar and along the headliner, above the rear side windows. In my car, there was one torx screw on each side, by the hook buildtinto each plastic panel, that needs to be removed. After removing the screw, carefully pry the plastic panel from the car. Work from the D pillar up, carefully prying the plastic panel from its clips. After you remove these panels, you will see the struts.
3. Support the tailgate. I used a 4 foot level, and jammed it in between the tailgate and the bumper. There are probably safer ways to support the tailgate. Note: the tailgate is heavy, and after you start removing tailgate struts it can fall down in a hurry. Be careful.
4. Unbolt the bracket holding the strut to the roof of the car. Note, only remove the bracket on the end of the strut that is toward the front of the car.
5. After removing this bracket, one end of the strut will "fall down." It is then easy to remove the old strut and replace it with the new one.
6. Installation is the reverse. Note, however, when you are re-installing the brackets that connect the strut to the roof, before you tighten them completely, I recommend that you have someone hold the tailgate up to its highest point.
#11
10-21-2006, 01:03 PM

I needed front seats for my 93 Volvo 850 GLT sedan and bought some in near MINT condition front and rear leather for $455.00. Paid for them today and they will be at my door tomorrow! Talk about service! I AM IMPRESSED!!! Here's a link in case anyone needs parts!!! http://www.swedishengineeringusedparts.com
The whole seat exchange was so simple. Unbolt, unplug and reinstall. Only issue I've encountered is the heated seats aren't working. Not sure what to check will have to play around w/wiring to see. These are newer (1997) leather seats and all the plugs and associated hardware plugged rite in! I did have to take the dremel and cut out about a 1/2 of plastic on the electric seat switch. The newer seats have the side impact air bags and required a bit of plastic removal to make it work, no biggie! I'm stoked! Seats look like new!! [sm=yeahsmile.gif]
[IMG]local://upfiles/7306/7E3730970EE8468ABA429C9F70CB930E.jpg[/IMG]
#12
01-12-2007, 01:17 AM

Timing Belt ReplacementTIPS for Volvo 850
My Car: 1994 850 Turbo T5 Sedan, Auto-Gearbox.
My Servicing Interval Preference:
1-Belt only for 60,000 miles/5 years (Volvo recommends every 70,000 miles)
2-Belt, Idler Pulley, Tensioner Pulley, Hydraulic Tensioner & Water Pump for every other belt change.
This write-up concentrates on replacing all parts mentioned above (applies to every other servicing). Please refer to maintenance manuals/instructions for general procedures, I will onlywrite things that require utmost attention that may/may not have been covered anywhere.
REQUIRED PARTS:
1. Timing Belt (Continental Tech, German)*
2. Idler Pulley (Continental Tech, German)*
3. Tensioner Pulley (Continental Tech, German)*
4. Hydraulic Tensioner (Febi/Aisin, German)
5. Water Pump, Gasket & New Bolts (Volvo Swedish or Hepu German)
6. High-Quality Coolant (50/50) (I used Prestone)
*Items 1~3 are available in one package of kit.
REQUIRED TOOLS & SUPPLIES:
1. Various sizes of socket tools, including Torx sockets & universal joint
2. 1/2" drive breaker bar & 12" or longer extension
3. 2-3 sizes of Vise-grip/locking plier
4. 1/2" to 3/4" adapter
5. Torque wrench
6. Engine degreaser (if timing belt/crank pulleyarea is oily)
7. Good lighting (bright LED type is recommended, hands-free type is preferred)
8. Correction fluid/white-out
9. Floor jack & jack stands & wheel chocks
10. Creeper
11. Service manual (I used Haynes) & instructions from:
http://www.volvospeed.com/Repair/timingbelt.htm
Before beginning the procedure, be sure to read & understand the procedure in manuals/on-line instructions. Lift the front-end and rest the car on jackstands, shake it to make sure it's secure. Remove pax-side wheel (loosen the lug bolts before lifting) and fold plastic liner & lock it there with a vise-grip.
Remove serpentine accessory belt by relaxing the tensioner pulley by a breaker bar & 3/4" adapter, it may slip but you'll get the hang of it. At full-relaxed position, insert an Allen wrench/drill bit. Take the belt off.
Following manuals/instructions, align the timing marks on camshafts & crank pulley at cyl-#1 TDC and remove all components that need to be replaced. Enhance the timing marks with correction fluid, but DO NOT mark your own. The crank pulley actually has a big timing botch closer to the pulley, which nobody mentioned. If you can't find it, enhance the existing mark with correction fluid.
TIP-1: TENSIONER PULLEY TORX BOLT DOESN'T COME OFF!
Here's what I did & some alternatives. The access is limited, and the Torx is extremely tight. I ended up stripping the Torx and felt despair. I tried a chisel & hammer belting method but to no avail. I finally took out a 10WR Vise-grip and grabbed the flange around the Torx, turned it CCW. This broke the initial torque and the rest turned like nothing. If this method fails, you may have to drill a hole in the fender and drill-out the Torx. Before resorting to these steps, make sure that you have perfect fit onto the Torx, do the best not to strip it.
TIP-2: THE BELT DOESN'T GO BEYOND THE CRANK PULLEY!
The instructions I used noted that this could be done with the pulley in place. If you have an access to impact tools, you can remove the pulley off, but I had to do it with the pulley in place. It takes a bit of trial, and the belt may have to be bent/crimped in order to get it past the pulley. This shouldn't weaken the belt, unless you really abuse it.
TIP-3: WHAT TO DO WITH THE HYDRAULIC TENSIONER!?
If this item is to be re-used, it has to be compressed by a 7" bench vise and has to be locked with a drill bit (Allen key will be bent). (A new tensioner should come with lock pin already in place). Compress this VERY SLOWLY,spend 10 minutes to do this, or you will damage the seal. When the holeon thepiston and the body align, insert a drill bit to lock it. Install the tensioner on the engine block, noting the correct facing direction and tighten bolts to the specified torque. When everything is in place, remove the drill bit with a Vise-grip and yank it out FAST! If you try it slow, the drill bit will get jammed and you'll have to force it out with a Vise-grip. After the tensioner is in place and the lock pin removed,rotate the crankshaft with a breaker bar for 5 times (or more if you like) to make sure that the valves are not hitting the pistons. Also, make sure that alltiming marks align. There is a white plastic spacer that goes between the tensioner & the tensionerpulley, this can be snapped in place after the tensioner is in place.
When doing the water pump, the pump cannot be lifted up, it has to be dropped down (as far as I know). Clean the pump-mating surface with brass scraper/scotch brite, taking care not to score the mating surface. I used an inspection mirror to get to hard-to-reach areas. Once clean, I put water pumpsealant as well as the gasket on the mating surfaces to ensure leak-free installation. The new bolts came with pre-applied thread sealant, but I put additional sealant.
After the work is done, the engine has to re-learn idle. Turn off ALL electrical devices, even a parking light could screw up the idle if turned on. Let the engine idle for approx 10 minutes.
The access for above procedure is extremely limited, so allow enough time to do this, and do not try to hurry. Again, read the manuals/instructions a few times to get the picture before proceeding. Do not allow oil, grease or coolant onto the timing belt as it weakens the belt.
I wish you luck with your timing belt replacement. Remember that safety is the priority.
JPN
#13
01-30-2007, 01:55 AM

After i bought my 960 i`ve noticed that half of the dashboard switches was not illuminated
burned bulbs, I`ve also found that those bulbs are not very easly reachable, so.... i`ve made this...
http://he3r0.ovh.org/led.html
hope this will be helpfull
burned bulbs, I`ve also found that those bulbs are not very easly reachable, so.... i`ve made this...
http://he3r0.ovh.org/led.html
hope this will be helpfull
#14
02-07-2007, 10:05 AM

with winter here thought id share simple 10 step plan
1: tree trouble
if like me you parknear trees clean all the dead leaves from those hard to reach spots if you leave them to long they turn to mush which is harder to clean and will have your car smelling like a compost heap
2: keep it clean
protect the bodywork by washing the car with a premium product meguiers gold class products are my weapon of choice soften dirt with warm water then lightly rub with sponge or wash mit always wash from top to bottom.
3: rinse well
when bodys clean rinse with hose or watering can if your eco freindly use a chamois leather to remove water and dry surface to eliminate unsightly drying marks
4: getting waxed
once cars dry use a qaulity wax, there not cheap but its not time to skrimp if you really value your motor wax and polish off the whole car to get greast level of shine
5: chilling out
check your antifreeze levels when the engines cold at this time of year 50/50 mix isa good idea if in doubt of dilution top up the reservoir with antifreeze while your there check your oil aswell
6 clear view
good visabilitys crucial for winter driving. give your lights a good seing to and clean all your glass inside and out top up your washer resoiver and make sure have decent amount of screenwash in there so it dosnt freeze
7: battery power
if in doubt change it winter driver uses alot more power (lights wipers heating etc) sods law decrees that it will pack up when its most inconveniant
8: under pressure
check your tyres pressure are right and you ahve atleast 1.6 mm of tread depth you should think about changing them at about 3mm
9: cut out salt
salty roads eat alloy wheels so give them some extra tlc use meguiers gold class wheel cleaner finally add layer of polish for extra protection
10 stock up
go to local car accesories shop stock up on screenwash two cloths one for interior condensation other for exterier grab some glass/dash wipes keep them handy in your trunk
#15
09-09-2007, 02:08 PM
This was done by Auburn T5.
----------------------------------------
FMIC INSTALL
It took about 6 hours of sort of figuring stuff out as I went along but everything came together nicely and everything is running great.
Anyways, I ordered a precision turbo intercooler along with the following pieces of 2.25" piping
http://www.nolimitmotorsport.com/prod/AS1021
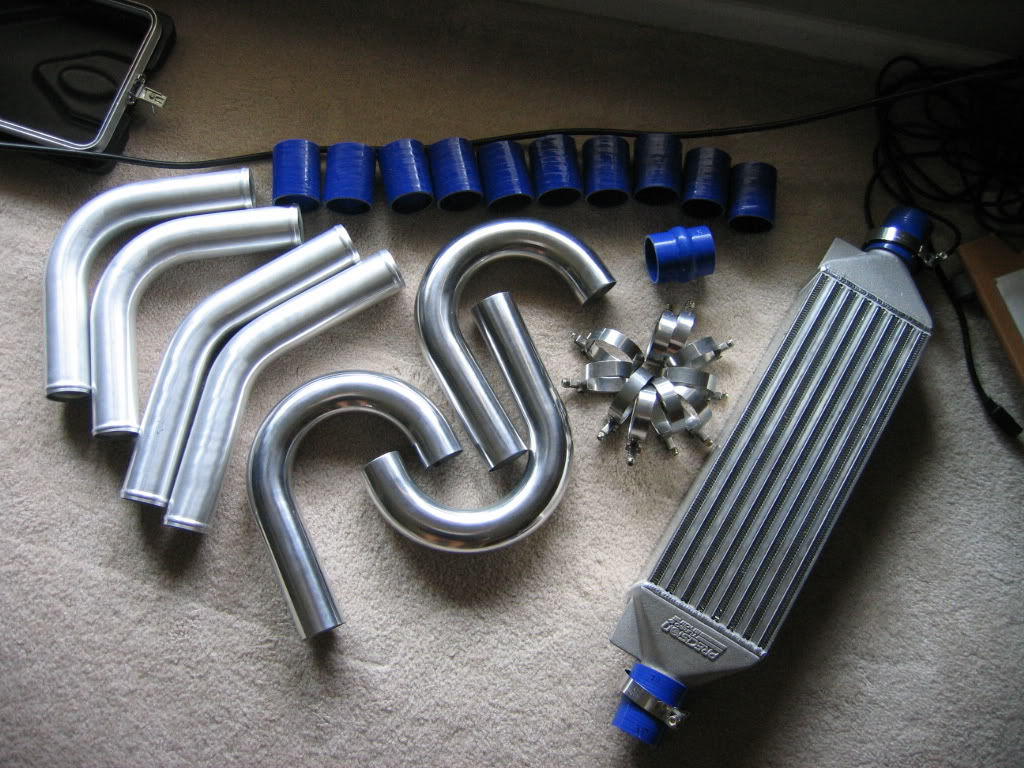
The only things not pictured that were needed were a few extra T bolt clamps and a 2.5" to 2.25" reducer for the throttle body. I thought it was 2.25" but it's a little bigger (<_< I'm using a 2" plumbing coupler at the moment I got from Homedepot until I can make it back out to the shop to get my reducer. It's working but not holding tight on the TB (more on that later) Also not pictured is one of those little aluminum nipples that would be welded to the piping right at the throttle body inlet for the air idle control hose to plug into. No one locally has them and I couldn't wait to have one shipped so I got a brass plumbing 1/2" to 3/8" union as I wasn't sure what the inner diameter of the IAC hose was. Turns out it's 1/2" so what I did was took a drill and drilled out the inside of the piece to a single diameter as it get smaller at the 3/8" end. After that, I took a 1/2" drill bit and drilled a hole in the intercooler pipe right at the TB connector. The hole was a little too small to screw the brass fitting in so I used a dremel grinding stone to lightly grind a little bit more out. Just enough to screw the brass fitting in. It was extremely tight but not wanting to take any chances, I coated both the inside joint and outside where the brass fitting screws in with a couple of layers of JB weld. It doesn't look too pretty but it will do until I can get an aluminum nipple to have welded on in place of the brass fitting.
So when you're ordering your piping, try and get the aluminum nipple piece to weld onto the pipe to save yourself that headache. It wasn't hard just a lot of work.
Anyways, moving along...
The bumper removal was easy. Drilled out the 4 rivets holding the wheel well liner to the back of the bumper. (turn the wheels to get a good angle on the rivets.
Next I removed the splash guard. 2 screws hold it in and a small tab on the back of it releases it.
After that, I used a torx bit to remove all the screws holding a second plastic guard piece to the bumper.
After that, there will be 2 large bolts to remove. It uses I think a 15mm socket. They're the only ones that big so they're hard to miss. Mine put up a fight so I had to pop out the plastic pieces in the bumper that are next to the fog lights and use a breaker bar to break them loose. I was rewarded by tons of the most disgusting rusty muddy sludge water pouring out of the bolt hole as I loosened the bolt. I recommend sitting on teh ground in front of the bumper when doing this and having a towel below the bumper in case this happens to you.
So after those bolts were removed, (and the fog lights are unplugged) the bumper slides straight off. If it doesn't come off, you probably missed a couple of torx screws.
After this is done, remove all the factory intercooler piping along with the snorkel that connects the air box to the air inlet at the front of the air dam.
At this point, the battery needs to be removed. Following that, there are 2 large screws holding the battery tray to the frame and 2 smaller screws on the top of the battery tray holding the cruise control module. Remove these and the cruise control module under the battery tray can be removed. Unplug it's power connector and vacuum line and set it aside.
Now, for the air pump, it's no secret that it has to be removed from it's factory location in order for the cold side of the intercooler piping to get to the throttle body so before I decided whether or not to totally remove it or leave it, I unbolted it and moved it up to where the battery tray used to be.
In this pic, one of the bolts holding it to the frame is partially out and the bolt just above it is the 2nd one. Remove both of these to free the air pump.
The final obstacle is the tow hook. This had to be removed to get the hot side of the piping around the black AC canister and up to the turbo so we used a plasma cutter to eat through it. It can probably be done with a reciprocating saw (sawzall) or even a dremel but the metal in the hook is extremely strong and would take forever with a dremel. So if you know of any shops (most exhaust shops) that you cold drive the car to and have them cut the hook off, it will save you a lot of time.
Once this was out of the way, it was time to mount the intercooler. I'm not sure if all the cars have them or not but there are 3 screw holes in the frame right where the intercooler is mounted that I was able to thread a couple of zip ties through (drilled a hole in each mounting bracket on the intercooler) and get an easy mock up location for the intercooler.
Now it was time to start playing with the intercooler piping to see what would need to be done.
At first, it may seem like there isn't enough piping but as Mark (BlackT5) said, the pipes can really only go one way and going that one route from turbo to throttle body, it WILL be enough piping unless you screw up so pay attention as I explain where the pipes were cut.
Starting at the turbo, a 90* bend comes over the engine (a la RIP kit) to a pair of 45* bend pipes.
The first pipe connecting to the turbo, I cut about 2 or 3 inches off the end so that it didn't sit so high over the engine. The hood wouldn't close all the way with it sitting that high so I had to remove enough to let the hood close but not so much so that it laid down on the engine.
The 45* piece coming after that had a little cut off from each end and the second 45* piece had a little cut off of the end that connects to the first 45* pipe. I made these cuts last becuase I started running the pipes from the intercooler.
From the passenger (hot) side of the intercooler, I used a 180* J pipe. I cut it in half directly in the center of the bend becuase that U has to be extended out wider to wrap around the black AC canister (I have no idea what it's technically called but I'm sure someone will enlighten me). Seeing as to how Sam was busy getting his car ready for the SE turbo bricks meet that starts in about 6 hours, he didn't have time to weld up a piece of the extra pipe that was cut from the other pieces into that U to extend it out so I used a silicone coupler. It got the job done until we have a free weekend to weld a lot of these together.
The J pipe end that goes into the intercooler's coupler had a little bit cut off so that it didn't extend out so far past the black AC thing. I cut enough of it off so it gets closer but not too close. I don't have a picture of the hot side of my piping but I used Mark's picture below for a reference.

Ok. After that bend is made, I took another J pipe and cut it in half at the center of the bend. Here comes the hard part. Getting the piping up from that U bend up to the 45* piece going to the turbo requires some elbow grease, a little wire moving and lots of PATIENCE.
What
----------------------------------------
FMIC INSTALL
It took about 6 hours of sort of figuring stuff out as I went along but everything came together nicely and everything is running great.
Anyways, I ordered a precision turbo intercooler along with the following pieces of 2.25" piping
http://www.nolimitmotorsport.com/prod/AS1021
The only things not pictured that were needed were a few extra T bolt clamps and a 2.5" to 2.25" reducer for the throttle body. I thought it was 2.25" but it's a little bigger (<_<
I'm using a 2" plumbing coupler at the moment I got from Homedepot until I can make it back out to the shop to get my reducer. It's working but not holding tight on the TB (more on that later) Also not pictured is one of those little aluminum nipples that would be welded to the piping right at the throttle body inlet for the air idle control hose to plug into. No one locally has them and I couldn't wait to have one shipped so I got a brass plumbing 1/2" to 3/8" union as I wasn't sure what the inner diameter of the IAC hose was. Turns out it's 1/2" so what I did was took a drill and drilled out the inside of the piece to a single diameter as it get smaller at the 3/8" end. After that, I took a 1/2" drill bit and drilled a hole in the intercooler pipe right at the TB connector. The hole was a little too small to screw the brass fitting in so I used a dremel grinding stone to lightly grind a little bit more out. Just enough to screw the brass fitting in. It was extremely tight but not wanting to take any chances, I coated both the inside joint and outside where the brass fitting screws in with a couple of layers of JB weld. It doesn't look too pretty but it will do until I can get an aluminum nipple to have welded on in place of the brass fitting.So when you're ordering your piping, try and get the aluminum nipple piece to weld onto the pipe to save yourself that headache. It wasn't hard just a lot of work.
Anyways, moving along...
The bumper removal was easy. Drilled out the 4 rivets holding the wheel well liner to the back of the bumper. (turn the wheels to get a good angle on the rivets.
Next I removed the splash guard. 2 screws hold it in and a small tab on the back of it releases it.
After that, I used a torx bit to remove all the screws holding a second plastic guard piece to the bumper.
After that, there will be 2 large bolts to remove. It uses I think a 15mm socket. They're the only ones that big so they're hard to miss. Mine put up a fight so I had to pop out the plastic pieces in the bumper that are next to the fog lights and use a breaker bar to break them loose. I was rewarded by tons of the most disgusting rusty muddy sludge water pouring out of the bolt hole as I loosened the bolt. I recommend sitting on teh ground in front of the bumper when doing this and having a towel below the bumper in case this happens to you.
So after those bolts were removed, (and the fog lights are unplugged) the bumper slides straight off. If it doesn't come off, you probably missed a couple of torx screws.
After this is done, remove all the factory intercooler piping along with the snorkel that connects the air box to the air inlet at the front of the air dam.
At this point, the battery needs to be removed. Following that, there are 2 large screws holding the battery tray to the frame and 2 smaller screws on the top of the battery tray holding the cruise control module. Remove these and the cruise control module under the battery tray can be removed. Unplug it's power connector and vacuum line and set it aside.
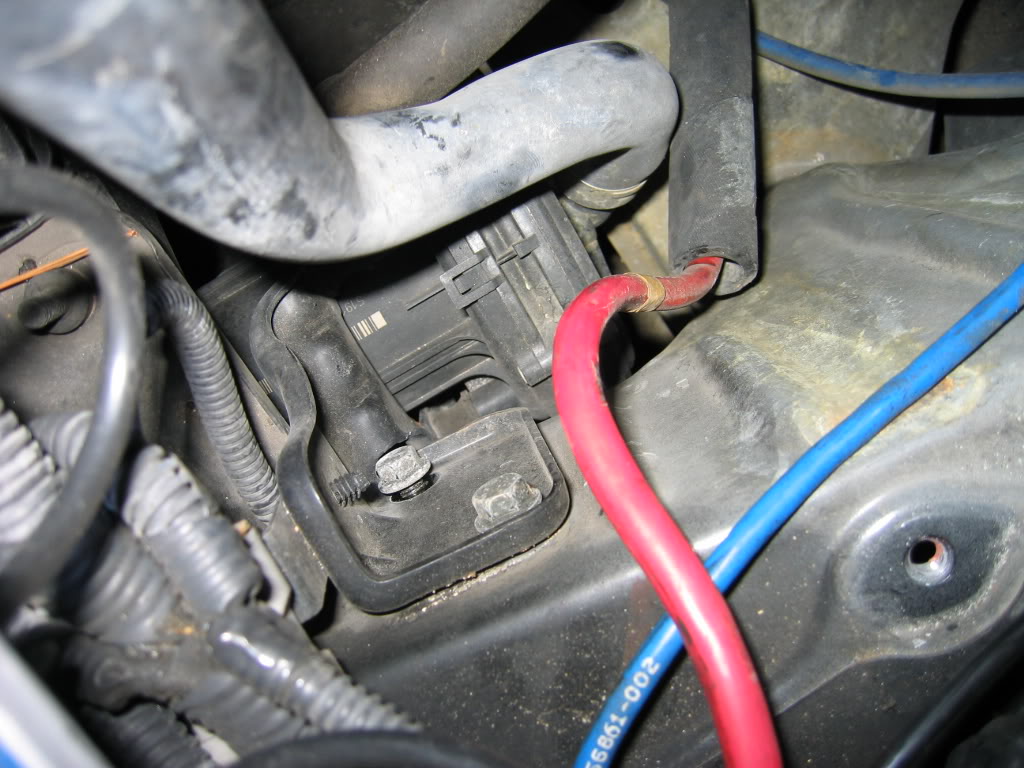
Now, for the air pump, it's no secret that it has to be removed from it's factory location in order for the cold side of the intercooler piping to get to the throttle body so before I decided whether or not to totally remove it or leave it, I unbolted it and moved it up to where the battery tray used to be.
In this pic, one of the bolts holding it to the frame is partially out and the bolt just above it is the 2nd one. Remove both of these to free the air pump.
The final obstacle is the tow hook. This had to be removed to get the hot side of the piping around the black AC canister and up to the turbo so we used a plasma cutter to eat through it. It can probably be done with a reciprocating saw (sawzall) or even a dremel but the metal in the hook is extremely strong and would take forever with a dremel. So if you know of any shops (most exhaust shops) that you cold drive the car to and have them cut the hook off, it will save you a lot of time.
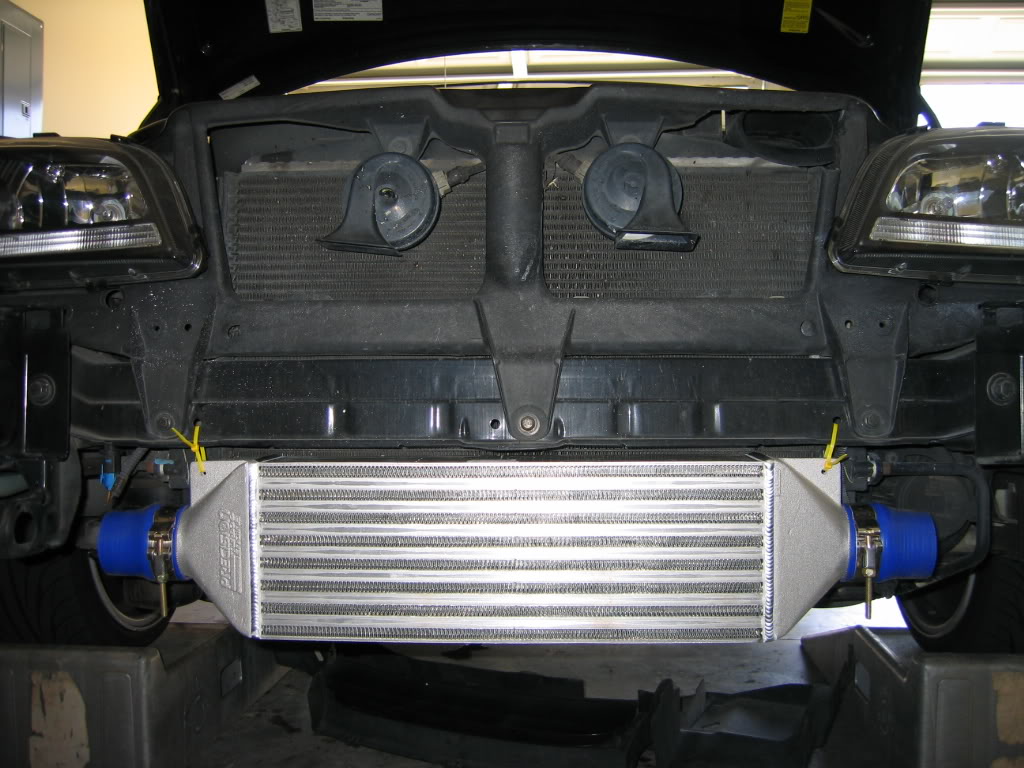
Once this was out of the way, it was time to mount the intercooler. I'm not sure if all the cars have them or not but there are 3 screw holes in the frame right where the intercooler is mounted that I was able to thread a couple of zip ties through (drilled a hole in each mounting bracket on the intercooler) and get an easy mock up location for the intercooler.
Now it was time to start playing with the intercooler piping to see what would need to be done.
At first, it may seem like there isn't enough piping but as Mark (BlackT5) said, the pipes can really only go one way and going that one route from turbo to throttle body, it WILL be enough piping unless you screw up so pay attention as I explain where the pipes were cut.
Starting at the turbo, a 90* bend comes over the engine (a la RIP kit) to a pair of 45* bend pipes.
The first pipe connecting to the turbo, I cut about 2 or 3 inches off the end so that it didn't sit so high over the engine. The hood wouldn't close all the way with it sitting that high so I had to remove enough to let the hood close but not so much so that it laid down on the engine.
The 45* piece coming after that had a little cut off from each end and the second 45* piece had a little cut off of the end that connects to the first 45* pipe. I made these cuts last becuase I started running the pipes from the intercooler.
From the passenger (hot) side of the intercooler, I used a 180* J pipe. I cut it in half directly in the center of the bend becuase that U has to be extended out wider to wrap around the black AC canister (I have no idea what it's technically called but I'm sure someone will enlighten me). Seeing as to how Sam was busy getting his car ready for the SE turbo bricks meet that starts in about 6 hours, he didn't have time to weld up a piece of the extra pipe that was cut from the other pieces into that U to extend it out so I used a silicone coupler. It got the job done until we have a free weekend to weld a lot of these together.
The J pipe end that goes into the intercooler's coupler had a little bit cut off so that it didn't extend out so far past the black AC thing. I cut enough of it off so it gets closer but not too close. I don't have a picture of the hot side of my piping but I used Mark's picture below for a reference.
Ok. After that bend is made, I took another J pipe and cut it in half at the center of the bend. Here comes the hard part. Getting the piping up from that U bend up to the 45* piece going to the turbo requires some elbow grease, a little wire moving and lots of PATIENCE.
What
#16
02-14-2008, 10:49 AM

Senior Member
Join Date: Nov 2006
Location: clarksville, tn
Posts: 101
Likes: 0
Received 0 Likes
on
0 Posts
since i had to take the door panels off our s60 anyway to put some sound damping mats inside i finally have the car "beep" when i lock the doors through the fob. i looked for the wires that run to the locking device and connected a 12 volt buzzer (radio shack) to the yellow and blue one. the buzzer is pretty small and light, so i just secured it to the wires with cable ties - works perfectly. and depending on which buzzer you use, the "beep" is different in sound and volume - so now i think i have a unique closing "beep".
i put the buzzer in the driver side door, because when i am driving by myself the other doors might not have been unlocked.
since i was already done with the that job before i put in in the forum the following little write up and the pictures are from the passenger side door - but everything is the same on the driver's side.
downside of the whole thing is that if you are in the car and hit the lock button on your door or if you have autolock programmed it will also beep/buzz.
after the door panel is off you have to either cut the grey foam that covers the opening in the door open or pull it off the metal. I pulled it off and put it on again after I was finished with silicone sealant. on the top left corner of the opening you will see an insulated bundle of wires. take the insulation off, pull out the yellow and blue wire and connect the buzzer/beeper to hose two wires (easiest way is with two parallel wire clamps, but it can be soldered too). if it doesn’t work, just reverse the two wires of the beeper/buzzer. i tried a few different ones and found that some worked without a diode, other required one, because the kept on buzzing on very low volume without me using the remote. the diode just needs to be put in between the yellow wire and one wire of the buzzer. i used a 1N4742 (about $1.40 for two at radio shack, where i also got the buzzers)
here is alink to the diodes:
http://www.radioshack.com/product/in...entPage=search
here is the buzzer that requires the diode - i used that one because it is a little louder than the other one: http://www.radioshack.com/product/in...entPage=search
this buzzer worked without diode, i just found it not quite loud enough.
http://www.radioshack.com/product/in...entPage=search
[IMG]local://upfiles/7926/617D310A93DA4DDC89011C010A38230B.jpg[/IMG]
#17
02-14-2008, 10:55 AM
Senior Member
Join Date: Nov 2006
Location: clarksville, tn
Posts: 101
Likes: 0
Received 0 Likes
on
0 Posts
#18
02-14-2008, 10:57 AM
Senior Member
Join Date: Nov 2006
Location: clarksville, tn
Posts: 101
Likes: 0
Received 0 Likes
on
0 Posts
#19
02-14-2008, 10:58 AM
Senior Member
Join Date: Nov 2006
Location: clarksville, tn
Posts: 101
Likes: 0
Received 0 Likes
on
0 Posts
#20
02-14-2008, 10:59 AM
Senior Member
Join Date: Nov 2006
Location: clarksville, tn
Posts: 101
Likes: 0
Received 0 Likes
on
0 Posts

