Moderator Writeups
#1
 08-21-2006, 12:09 PM


Ok so here is a place to type up writeups of things you have done to your car. I.E. strut brace painting, Turbo Hose install, HID install, Etc...
However please do not use writeups from other forums. These have to be your very own writeups.
In doing this, we hope that it will help others. Please no double posts, if someone has done something before and posted and you did we don't need more duplicates how a HOW TO.
Thank you
However please do not use writeups from other forums. These have to be your very own writeups.
In doing this, we hope that it will help others. Please no double posts, if someone has done something before and posted and you did we don't need more duplicates how a HOW TO.
Thank you
#2
08-21-2006, 12:11 PM
Stylin Motors Turbo Hose Writeup / Volvo's with ETM
Tools Needed:
1. Flathead screw driver (One normal length one and one short length for hard to reach areas)
2. Sockets and socket wrench (10mm I believe not sure what it was)
3. Jack stands and or Rhino Ramps (Rhino Ramps are better IMO)
--------------------------------------------------------------------------------------------------------------------------------
I will start with the rear Upper IC to turbo silicone hose. Use the short length flathead screw driver to take the two hose clamps off. It is easier to get at the bottom one with the short legnth screw driver, at least in my case. Set the Upper IC pipe to the side as much as possible. Take off the old rubber turbo hose. Put the new silicone turbo hose on the same was you took the hold rubber one off. The bigger end should be at the bottom and the smaller at facing the sky. Put your hose clamps back on, put the Upper IC pipe into the hole and tighten your clamps.
Next I will talk about the long silicone hose that goes to the lower IC area. Very simple use the short legnth or normal length flathead screw driver and remove the upper and lower hose clamps. Install new silicone hose with the small bend going out toward the passanger side of the car, with hose clamps already on the new hose. Put hose clamps into position and tighten them. You can leave the bottom one off as your going to have to remove the whole lower IC assembly (The lower black metal pipe and rubber elbow hose) later for the next silicone hose.
Place your Rhino Ramps in front of your car and put your car into "L" and slowly drive up onto the ramps. When you feel the two front tires move onto the flat platform stop and put car in PARK and put your E-brake on for extra security. Or if your using Jackstands jack the car up.
Now to get at the bottom rubber elbow hose that goes to the bottom of the intercooler. Take off the shroud that is held on by one screw on either side. To remove use the socket wrench, which I believe might have been 10mm I forget. Once these are removed there is a little tab that is still holding it in place in the middle of the shroud push it out and pull the shroud back. It should come out without any problems.
You now can see the bottom hose right in your face. Like I said before make sure that the long silicone hoses bottom hose clamp isn't on. As your going to be taking out the bottom assembly (Black metal pipe and lower elbow hose). Untighten the hose clamp that holds the lower hose to the bottom of the intercooler and pull it off and take the lower assembly out.
Now that you have it out, remove the other hose clamp and remove the rubber elbow. Now install your new silicone hose. Put the hose clamp back on and tighten it and put the other hose clamp on, that connect to the bottom of the intercooler but don't tighten it. Now put the assembly back in and put the silicone hose over the lower IC plastic or metal tube that protrudes from the intercooler tighten your hose clamp.
Don't forget to reconnect the long silicone hose to the lower assembly and tighten the bottom hose clamp.
Now for the Upper Intercooler elbow hose. Even though it isn't installed on mine yet I didn't take apart what needed to come off to take the stock one off to take pictures of them. Anyways...
I have not yet done this one yet. I just looked at it and saw how it needed to be done.
First take the black plastic peice that covers the stock rubber hose off. Do this by using your hands and give it a good jank it should come out after one or a few good janks. Don't yank too too hard because there is like a little control module for something attached to it. However once you have yank the shroud out you can set it to the side. Now you have gained access to the second hose clamp on the Upper IC elbow hose. Untighten both hose clamps and remove the stock hose. You will notice that one side has a big hole and the other side has a small hole. Big hole to top of intercooler, small hole to black plastic pipe that the stock one was connected to. Just put the new silicone one in the same way you took the stock one out. Tighten up the hose clamps and then replace the plastic shroud like object you removed to gain access to the second hose clamp. It might not fit perfectly back in place as mine didn't.
Now your ETM turbo hose upgrade is complete!!!
#3
08-21-2006, 12:26 PM
Strut Brace Painting
----------------------------------------------------------------------------------------------------------------------------------------------
Tools Needed:
1. Socket wrench, to take off the strut brace and put it back on, 10mm I believe.
2. Sandpaper, 200/300/400/500/600/800/1000
3. Soap and water for wet sanding
3. Paint primer, high temp
4. Spray paint you choose color you want, I went with black, High temp
5. Newspapers
6. Clear coat, High temp
-----------------------------------------------------------------------------------------------------------------------------------------------
1. Start by taking the strut brace off the car.
2. Lay down a few layers of newspaper in a well ventilated area. And put the strut brace on them.
3. Clean the strut brace with some soap and water or other metal cleaners appropriate for the type of metal your strut brace is made from.
4. Now you can start to sand your strut brace. Start with the 200 grit paper and work that a little bit and gradually work up to the 1000 grit sand paper. I would say you should spend a good hour on sanding this strut brace. You can also wet sand it with some 2000 grit sand paper if you want more of a metal shine look instead of painting it.
5. Prime the strut brace with the can of paint primmer you bought. A few coats will do or just read the directions on the spray can.
Lets this setup.
6. Once this is setup you may want to go over the primmer a few times with some sand paper to smooth it out some.
7. Now you ready to paint. Try smooth long passes with the spray can until the strut brace is coated once. Lets this setup for about 30 minutes or so and go back for another coat. Do this until your satified with the look. Let this dry over night or until it is fully dried. I used a glossy balck paint and just left it as is.
8. Once that is all said and done, your going to want to clear coat the strut brace. Do the same as you did for the paint. Then you can wet sand this when it is all dried to get a good glossy look.
9. Let it dry and then reinstall it. Your finished.
#4
08-21-2006, 06:10 PM
Emblem Debadgging
---------------------------------------------------------------------------------------------------------------
Tools Needed:
1. Fishing line
2. Hair dryer
3. Rag
4. Goo Gone
5. Car polish
6. Car wax
----------------------------------------------------------------------------------------------------------------
1. If your car has been sitting in the sun for awhile try just using the fishing line and dragging it behind the emblems to cut through the adhesieve. If your car hasn't been in the sun try using a hair dryer on high for a second or so not too long, to heat up the adhesieve in the back and then try using the fishing like to slice off the emblem from the adhesieve.
2. Take the Goo Gone and the rag once all the emblems are off squirt the Goo Gone on the leftover adhesieve and rub it off with the rag. Make sure it all comes off and that you dry the area.
3. Take the car polish now and a clean rag and polish the area that the emblems were on. You may want to clean the area first with a little soap and water, then dry it and then polish it.
4. Take the wax and just wax the area as a final step to making it look nice.
5. Your done stand back and look at the nice clean look of a debadged car.
#5
08-21-2006, 07:16 PM
Upper IC Pipe Polishing
This is a writeup about polishing your Upper IC pipe, but it has to be made from Aluminum.
----------------------------------------------------------------------------------------------------------------------
Tools Needed:
1. Paint stripper, spray can kind.
2. Hard wire brush
3. Sandpaper (200/400/600/800/1000/1500/2000)
4. Steel wool
5. Metal Polish
6. Dish Soap and water
7. Screwdriver flat head
-----------------------------------------------------------------------------------------------------------------------
1. Start by opening youe hood up and locating the Upper IC pipe. It will be the Aluminum pipe painted black that goes over your engine. BEFORE DOING THIS PROJECT MAKE SURE YOURS IS MADE FROM ALUMINUM or METAL.
2. Take the flat head screw driver and unscrew the two hose clamps that hold the IC pipe on. Then remove the IC pipe.
3. In a well ventilated area take the Pipe/Paint Stripper/Wire brush. Spray the pipe with the stripper and let it eat away at the black paint on the Upper IC pipe. Then take the wire brush and scrape off the paint. Keep doing this until the Upper IC pipe is just bare Aluminum.
4. Now clean off your IC pipe with a clean rag to get rid of other debrie.
5. Take the 200 grit sandpaper and sand start to sand the Upper IC Pipe. Do this for awhile all over the pipe and then move up to the higher grits if sand paper. After each time clean it off with the rag.
6. With the 1500 and 2000 grit sandpaper your going to want to wet sand the pipe with these. Get a dish with water and soap in it, dish soap worls fine. Wet the sand paper well and start to sand the pipe. Keep doing this for awhile. Then move onto the 2000 grit paper and do the same thing. This will help polish and shine the Upper IC pipe really well and give it a good look.
7. After you have done this dry the pipe and let it dry for a little bit as you will soak the pipe in the tub of water to rise it off.
8. Take the steel wool and rub the pipe with this, this will also help ploish and shine the pipe.
9. With the rag wipe the pipe off.
10. Use the metal polish I used MOTHERS and it turned out great. Take the rag and or a new clean rag for sure and start to use the metal polish to polish the pipe. This is the last step basically. After you have rubbed the polish in small areas at a time wipe the polish off. Do this till the pipe is all polished.
11. If the inside of the pipe is still wet let it dry over night.
12. Reinstall on the car.
#6
08-21-2006, 08:27 PM
Car Washing, My Method
I know this is going to sound a little weird, but this is my writeup on how to was a car.
-----------------------------------------------------------------------------------------------------------
Tools Needed:
1. Bucket
2. Car Soap
3. Sponge
4. Water of course, LOL
5. Chamoi cloth
6. Wax, I prefer MOTHERS; California Gold: Carnauba Cleaner Wax
7. Ammonia Free WINDEX
8. Clean Terry cloths
-----------------------------------------------------------------------------------------------------------
Ok here it goes.
1. I start by doing a litle rinse off with the hose all over the car.
2. I then wash the car with car soap and water with the sponge and rinse the car off again.
3. I put on a high pressure nozzle get get more dirt and grime off.
4. I then again use the soap and water with the sponge to wash the car with. Then rinse the car off again.
5. I use the chamoi cloth to dry the car. Make sure to rinse the chamoi cloth out constantly as it builds up with water.
6. I then wax the car with the MOTHERS; California Gold: Carnauba Cleaner Wax. I start on the roof and do one side at a time. Then the trunk lid and finally the hood. I finish by doing the doors and sides. I rub the wax in with a damp TERRY CLOTH and remove it with a clean dry TERRY CLOTH. This wax is great, I love it.
7. I clean the windows inside and out with Ammonia Free WINDEX. I have tint and sometime Ammonia reacts with tint.
#7
08-21-2006, 08:32 PM
Floor Mat Cleaning
-----------------------------------------------------------------------------------------------------
Tools Needed:
1. Resolve Carpet Cleaner
2. Rag or rags
3. A hose and somewhat of a high pressure nozzle
-----------------------------------------------------------------------------------------------------
A pressure washer would be too much for these floor mats I believe.
1. I start by soaking my floor mats with water. Then attach the high pressure nozzle and go over the mats very throughly to get dirt out that is dug deep into the floor mats.
2. I spray each floor mat with a generous helping of Resolve Carpet Cleaner. I let this soak into the floor mats for about 3-5 minutes. Do each mat seperately.
3. I then dab the floor mats with the rag and finally scrub then down with the rag.
4. I then wash them off again. And I repeat STEPS 2 and 3.
5. I use the high pressure nozzle to get all the Resolve off the carpets. Then remove the nozzle and let the water run over the mats to get any excess gunk off of the mats.
6. Let them dry in the sun before putting them back in your car.
7. Then after they are dry, reinstall them in the car.
-----------------------------------------------------------------------------------------------------
Tools Needed:
1. Resolve Carpet Cleaner
2. Rag or rags
3. A hose and somewhat of a high pressure nozzle
-----------------------------------------------------------------------------------------------------
A pressure washer would be too much for these floor mats I believe.
1. I start by soaking my floor mats with water. Then attach the high pressure nozzle and go over the mats very throughly to get dirt out that is dug deep into the floor mats.
2. I spray each floor mat with a generous helping of Resolve Carpet Cleaner. I let this soak into the floor mats for about 3-5 minutes. Do each mat seperately.
3. I then dab the floor mats with the rag and finally scrub then down with the rag.
4. I then wash them off again. And I repeat STEPS 2 and 3.
5. I use the high pressure nozzle to get all the Resolve off the carpets. Then remove the nozzle and let the water run over the mats to get any excess gunk off of the mats.
6. Let them dry in the sun before putting them back in your car.
7. Then after they are dry, reinstall them in the car.
#8
08-21-2006, 10:02 PM
1999 s70 ECU removal, without special tool
Should work for other 1999 models possibly 1999+ models.
----------------------------------------------------------------------------------------------------------------
Tools Needed:
1. Short screwdriver, flathead or Phillipshead
----------------------------------------------------------------------------------------------------------------
1. Open up your hood and locate the ECU box on the left hand side of the engine bay. It will be a black box with a plastic hose running into it. That is the part that draws in cool air to cool the ECU and TCU.
2. Take off the top of the ECU box and lay it to the side.
3. You may want to take the Powersteering fluid tank and coolant tank off where it is resting and lay it to the side. This way you can get more access to the ECU box.
4. There are three or four clips on the the ECU box that you need to pry open, located near the middle to bottom of the ECU box.. Doing this will release the ECU box. Once it is released remove it from the engine bay. It should come right out once all the clips are depressed.
5. Now you have access to the ECU. If your car is automatic you will see two silver cases for a better term to use. One is the ECU (Engine Control Unit) and one is the TCU (Transmission Control Unit). You want the ECU, it should say BOSCH on it. I also believe it is the one on the left, but do not quote me on that.
6. There are two PURPLE clips that hold the ECU into place. Your going to need to push them towards the front of the car. This is where the screwdriver comes in handy.
7. Start by pressing one forward a little bit, then the other. Keep doing this till you see them out the other side. Do not press them too too far.
8. Pull lightly up on the ECU and it should come out freely. If not you haven't pushed the PURPLE clips out far enough.
9. Now your ECU is ready to be sent off to a tuner. IPD/RICA/Upsolute/SpeedTuning USA/Inmotion.
10. Your car will not be operable without the ECU so your stuck until you get the ECU back.
To put your ECU back in, just put the ECU back in its spot and then push the PURPLE clips back like you did in the steps above. Then replace the ECU box back on and then the top back on and put the coolant and power steering fluid tanks back in place.
Start your car and it should work, if not you installed it wrong which I don't think you can do, but if so look and also the TUNER screwed something up.
#9
08-22-2006, 02:23 AM
Cone filter install
---------------------------------------------------------------------------------------
Tools Needed:
1. Cone filter
2. Torx screw driver, I believe a T-10 OR T-25 Torx screwdriver.
3. Hose clamp if your cone filter didn't come with it. 3" or 4" should be good.
4. Flathead screw driver
---------------------------------------------------------------------------------------
1. Open your hood a locate the stock air box. Unclip all of the clips that hold the top on the airbox setup.
2. Take the Torx screwdriver and unscrew the two torx screws on the MAF. After that pull the MAF out of the air box.
3. Remove the top of the airbox and take out the panel filter.
4. Put the cone filter on the end of the MAF. And tighten the hose clamp.
5. Let it rest in the bottom of the airbox.
Now your done.
Yes there is be heatsoak with this setup but if you cannot fab a heatshield and this is something you want, then this is what you can do.
---------------------------------------------------------------------------------------
Tools Needed:
1. Cone filter
2. Torx screw driver, I believe a T-10 OR T-25 Torx screwdriver.
3. Hose clamp if your cone filter didn't come with it. 3" or 4" should be good.
4. Flathead screw driver
---------------------------------------------------------------------------------------
1. Open your hood a locate the stock air box. Unclip all of the clips that hold the top on the airbox setup.
2. Take the Torx screwdriver and unscrew the two torx screws on the MAF. After that pull the MAF out of the air box.
3. Remove the top of the airbox and take out the panel filter.
4. Put the cone filter on the end of the MAF. And tighten the hose clamp.
5. Let it rest in the bottom of the airbox.
Now your done.
Yes there is be heatsoak with this setup but if you cannot fab a heatshield and this is something you want, then this is what you can do.
#10
08-24-2006, 04:01 PM
Magnetic Moose decal application to EST or IPD mesh grilles
--------------------------------------------------------------------------------------------
Tools Needed:
1. Moose magnetic decal
2. Doublesided tape
3. One 1" to 1.5" screw
4. One nut that fits the screw
--------------------------------------------------------------------------------------------
Before going at this, be sure the screw can fit through the mesh grille and make sure also that it isn't too too loose.
1. Ok so turn your Moose magnet over so the magnetic part is facing upwards.
2. Cut off a piece of doublesided tape about 1" to 1.5" in legnth so that it covers most of the back of the magnet. Place it on the back of the magnet in the middle.
3. Now cut another piece of doublesided tape the same size as the other one you cut. This one your going to fold in half, be sure to leave the wrapper (Plastic covering) on it so that it doesn't stick to itsself. Fold it in half and cut a small slit in the middle of it.
4. Now press the screw through that small slit in the doublesided tape. And take off the plastic wrapper. And line it up on the doublesided tape that is already on the back of the magnet and press it together.
Now your almost done.
5. Take it out to your car and open your hood. Place it where you like on your IPD or EST grille and then put the nut on the back of the screw to hold it in place. Press down some but not too hard so that the doublesided tape sticks a little to the grille.
Now your finished and you have a cool emblem on your grille.
Pictures

Sorry for it being blurry. But you can see the screw, nut and two pieces of doublesided tape.

Installed

--------------------------------------------------------------------------------------------
Tools Needed:
1. Moose magnetic decal
2. Doublesided tape
3. One 1" to 1.5" screw
4. One nut that fits the screw
--------------------------------------------------------------------------------------------
Before going at this, be sure the screw can fit through the mesh grille and make sure also that it isn't too too loose.
1. Ok so turn your Moose magnet over so the magnetic part is facing upwards.
2. Cut off a piece of doublesided tape about 1" to 1.5" in legnth so that it covers most of the back of the magnet. Place it on the back of the magnet in the middle.
3. Now cut another piece of doublesided tape the same size as the other one you cut. This one your going to fold in half, be sure to leave the wrapper (Plastic covering) on it so that it doesn't stick to itsself. Fold it in half and cut a small slit in the middle of it.
4. Now press the screw through that small slit in the doublesided tape. And take off the plastic wrapper. And line it up on the doublesided tape that is already on the back of the magnet and press it together.
Now your almost done.
5. Take it out to your car and open your hood. Place it where you like on your IPD or EST grille and then put the nut on the back of the screw to hold it in place. Press down some but not too hard so that the doublesided tape sticks a little to the grille.
Now your finished and you have a cool emblem on your grille.
Pictures
Sorry for it being blurry. But you can see the screw, nut and two pieces of doublesided tape.
Installed
#11
10-12-2006, 07:09 PM
Car Washing, My Method Number Two
I know this is going to sound a little weird, but this is my writeup on how to was a car.
-----------------------------------------------------------------------------------------------------------
Tools Needed:
1. Bucket
2. Car Soap
3. Sponge
4. Water of course, LOL
5. Chamoi cloth
6. Wax, I prefer MOTHERS; California Gold: Carnauba Cleaner Wax
7. Ammonia Free WINDEX, if you have tint
8. Clean Terry cloths (4)
9. Mother California Gold Clay Bar System
10. Mequiars Deep Crystal Polish
-----------------------------------------------------------------------------------------------------------
Ok here it goes.
1. I start by doing a rinse off with the hose all over the car.
2. I then wash the car with car soap and water with the sponge and rinse the car off again.
3. I then again use the soap and water with the sponge to wash the car with. Then rinse the car off again.
4. I use the chamoi cloth to dry the car. Make sure to rinse the chamoi cloth out constantly as it builds up with water.
5. Now this is when I use the Mother Claifornia Gold Clay Bar System. Follow the directions on the paper insert provided.
6. After using the Clay Bar I polished the car with the Mequiars Deep Crystal Polish. Again follow the provided instructions.
7. I then wax the car with the MOTHERS; California Gold: Carnauba Cleaner Wax. I start on the roof and do one side at a time. Then the trunk lid and finally the hood. I finish by doing the doors and sides. I rub the wax in with a damp TERRY CLOTH and remove it with a clean dry TERRY CLOTH. This wax is great, I love it. Now if you use the provided Carnauba wax cleaner the comes with the Clay Bar system follow the directions on the bottle.
8. I end by cleaning the windows with WINDEX, the Ammonia free kind.
Now your done. I just did this today to my car and it took me 5 hours to do. But the results were worth it.
The lines you see in the two pictures are powerlines above the car.
#12
10-21-2006, 06:45 PM
E-code Headlight and turn signal INSTALL
Ok so I thought I would do an E-code headlight install for those wanting them for your 70 series Volvo.
----------------------------------------------------------------------------------------------------------------------------
Tools Needed
1. Screwdriver, just bring both kinds. I forget which. Phillips I think, but not sure. You will need them.
2. Super Glue
----------------------------------------------------------------------------------------------------------------------------
Ok start by opening up your hood. And locating the three screws the hold the headlamp assembly in place. Unscrew these, I believe they are pretty long so take your time.
Once these have come out, you should be able to take out the headlamp assembly. There should be 6 or 8 black clips holding the lens on. With the flathead screw driver gently pry the clips off. Besure to keep track of these as you will reuse them and or use the ones provided with your E-codes. Once the clips are all off gently pry the lens out and gently set it down somewhere safe.
Now if your E-codes come with weather stripping like mine did you going to have to cut it and put it in yourself. Cut it to legnth and then put the stripping in the E-code lens. Once you get to where the two ends meet there will be a small gap. Use some Super Glue and glue the two end together to finish the gasket. Mine have not fogged or anything. Once this is done put the E-code lens on the assembly.
This might take some time to do, to get it correct. Once it is fitted right put the clips back on. You will or should notice where they go.
Now put the assembly back in and put the three screws back in to secure it. Then you done.
#13
10-21-2006, 06:46 PM
70 series Projector Light Install
---------------------------------------------------------
Tools Needed
1. T-25 torx driver
2. 10mm socket and wrench
---------------------------------------------------------
1. Open your hood up.
2. I started with the drivers side. Locate the three bolts that hold the headlight in place. You will use the 10mm socket and wrench for this part. Before this remove the turn signal by depressing the tab that hold it to the headlight and pull forward. Take the wiring harness off and set to the side.
Now take the 10mm socket and wrench and remove the three bolts in the back of the headlight. Be sure to put these somewhere accessable as you will need them later. Also remove the wiring harness from the back of the headlight as well. Now the headlight will come out.
Now if you have headlight wipers like I do, your going to want to take the tabs off the old headlights and put them on the new one. Flip the old headlights over and you will see a torx screw holding it in place. Take the T-25 torx driver and remove it and install into new headlight. Same with passenger side as well.
3. Now your ready to install the new projectors. Take the bulbs out of the old housings and install them into the new housings. Once this is done put the new assembly into the spot where the old one was. Line up the bolt holes and then put the b
olts back into the new headlights. Make sure they are nice and tight.
4. Do the same for the Passenger side by following steps 2 and 3 again.
5. Now plug the wiring harnesses back into the headlights.
6. Put the turn signals back in now. Make sure that all the guide tabs go into their rightfull places. Once this is done, your finished.


---------------------------------------------------------
Tools Needed
1. T-25 torx driver
2. 10mm socket and wrench
---------------------------------------------------------
1. Open your hood up.
2. I started with the drivers side. Locate the three bolts that hold the headlight in place. You will use the 10mm socket and wrench for this part. Before this remove the turn signal by depressing the tab that hold it to the headlight and pull forward. Take the wiring harness off and set to the side.
Now take the 10mm socket and wrench and remove the three bolts in the back of the headlight. Be sure to put these somewhere accessable as you will need them later. Also remove the wiring harness from the back of the headlight as well. Now the headlight will come out.
Now if you have headlight wipers like I do, your going to want to take the tabs off the old headlights and put them on the new one. Flip the old headlights over and you will see a torx screw holding it in place. Take the T-25 torx driver and remove it and install into new headlight. Same with passenger side as well.
3. Now your ready to install the new projectors. Take the bulbs out of the old housings and install them into the new housings. Once this is done put the new assembly into the spot where the old one was. Line up the bolt holes and then put the b
olts back into the new headlights. Make sure they are nice and tight.
4. Do the same for the Passenger side by following steps 2 and 3 again.
5. Now plug the wiring harnesses back into the headlights.
6. Put the turn signals back in now. Make sure that all the guide tabs go into their rightfull places. Once this is done, your finished.
#14
03-26-2007, 05:53 PM
Polished Fuel Rail Cover Polishing
Tools Needed:
1. Sandpaper (60,150,220,320,400,600,800,1000 and 2000 for wetsanding)
2. A couple rags
3. A metal polish I used, MOTHERS Mag & Aluminum Polish.
4. Soap, Nothing to harsh. Hand soap will do just fine.
5. Water, of course for the wetsanding. Might want to have a small dish too or just use the sink.
6. Paint stripper, I used Aircraft Coating Remover.
7. Sanding block
8. Steel Wool
------------------------------------------------------------------------------------------------------------------
Steps
1. Remove the Fuel Rail Cover from the engine bay. It is very easy as it just pops right off.
2. Clean any dirt and grime off now with some soap and water and then dry it off with a rag.
3. In a well ventilated area lay the fuel rail cover out on some newspapers or inside a box top of some kind.
4. Spray a medium to heavy coating of the Aircraft Coating Remover on. Let it sit for 30 minutes.
5. Rinse the fuel rail cover off good and start to sand using the 60 grit paper. You will have to sand kind of hard to start taking off the clear coat that is on the fuel rail cover.
6. Repeat steps 4 and 5 until all that is left is bare Aluminum. Inbetween sandings with the 60 grit clean the fuel rail cover of all grime and dirt etc... This took me a better part of a day to do. I also used up almost the entire can of Aircraft Coating Remover.
7. Now we can start sanding with the other grit sandpapers. Take your 150 grit now and start sanding away. I would suggest going over the entire piece twice then rinsing it off and drying it and sanding it again with the 150, rinse it off again and sand again with the 150 then rinse off again. So basically sand the fuel rail cover three seperate times with the 150 grit.
8. Do the same as in step 7 with the 220,320,400,600,800 grit sandpapers.
9. Once you have finsihed with the 800 grit sandpaper your ready to wetsand with the 1000 and 2000 grit sand papers. Again clean the fuel rail cover off again but don't dry it this time. Leave it wet. In the dish and or a sink fill wil water and put the soap in it as well. Soapy water is what we are looking for here guys and gals.
10. Squirt some extra soap onto the fuel rail cover as well. Now dunk your 1000 grit sandpaper in the soapy water and let any extra water drain off before sanding. Now sand the fuel rail cover with the 1000 grit paper. You will see it starting to get grey looking. Keep sanding it. Now rinse the fuel rail cover off and sand the fuel rail cover another three times. Just repeat step 10 three more times.
11. No repeat step 10 with the 2000 grit paper.
12. Once your done with the 2000 grit paper dry the fuel rail cover off. Your ready to rub it down with some Steel Wool. Do this a few times and then wipe the fuel rail cover down.
13. Now apply the polish you picked out. Wipe the polish off then...
And your done!
#15
09-26-2009, 10:36 AM

I'll contribute!
How to paint your brake calipers the right way! (G2 Epoxy Paint Kit)
This is my first how-to so please be nice. :roll:
1.) Buy the kit from your chosen retailer: http://www.amazon.com/s/ref=nb_ss_0_6?url=search-alias%3Daps &field-keywords=g2+caliper+paint&x=0&y=0&spr efix=g2+cal
2.) Remove wheels. I started with the rear, supporting the car on jack stands at the jack points. I also took the opportunity to test fit my new rims.

3.) Decide how far back on the caliper you want to paint. I put the rims on and looked at how much was showing to decide.
4.) Clean the rust off the calipers. I used a drill with a wire brush attachment, steel-wool, and nylon bristle brush.
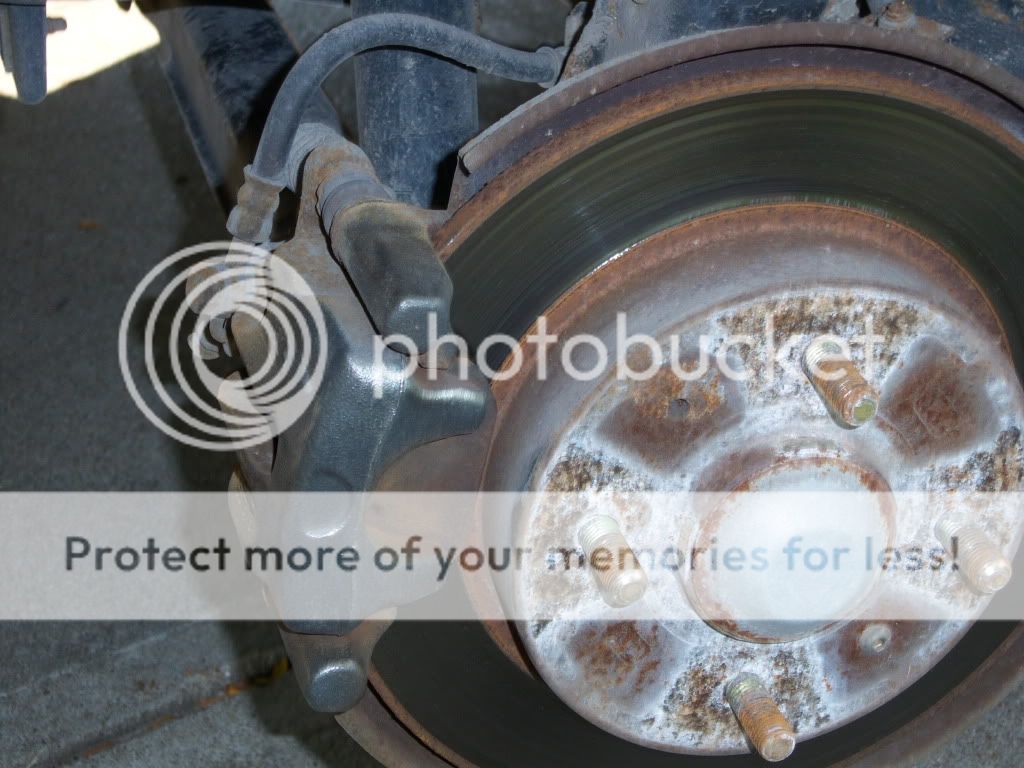
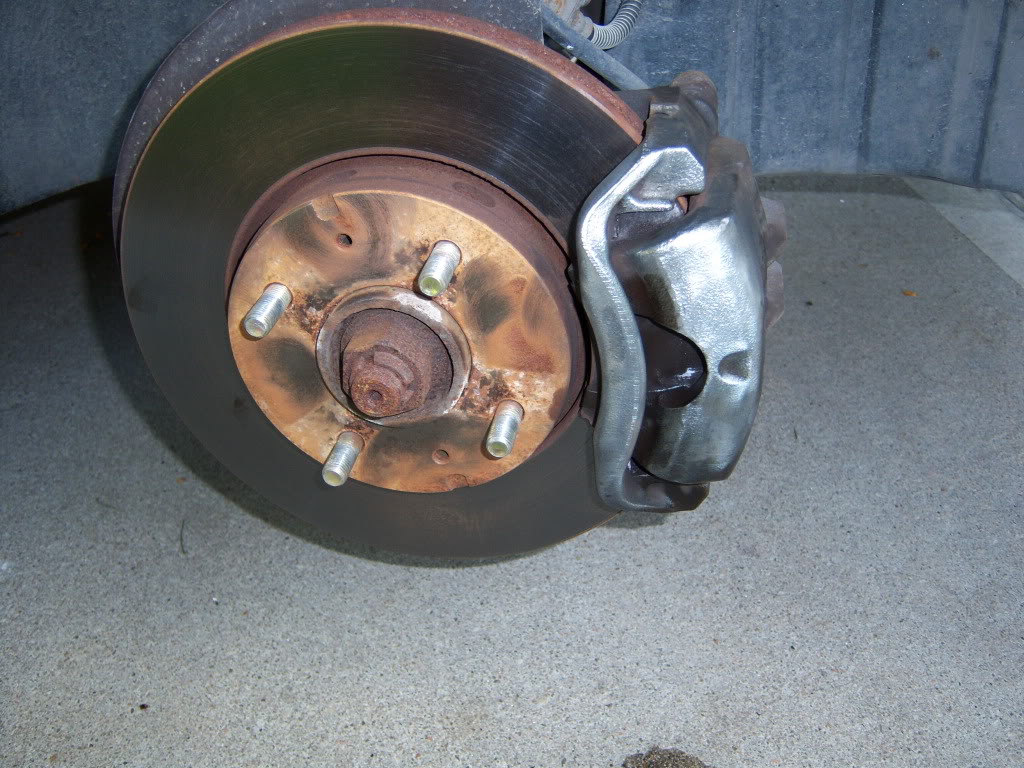
5.) After they are reasonably clean, spray with the included brake cleaner to remove dust, etc. Allow to dry.
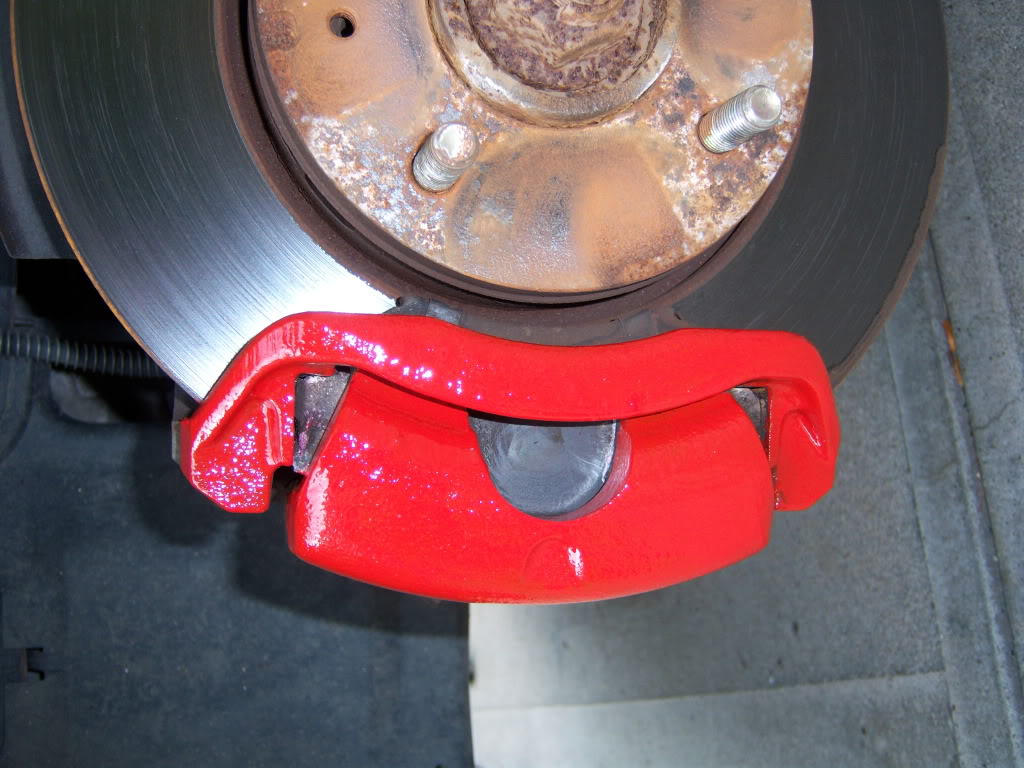
6.) Now you are ready to mix the paint according to the instructions. Dump the small glass bottle of reactor into the tin of your chosen color (red). Stir and allow it to react for 5 minutes.
7.) Coat brush in paint and start painting. The paint is very thick so start small and work it around. It is self leveling so you don't have to worry too much about consistency. Paint over all surfaces of the caliper evenly, and move on to the next one. Wait 15 minutes in between coats. I ended up doing 2 coats, but I had plenty left in the can to do more.
8.) Repeat steps on front caliper. The fronts are bigger, but there is plenty of paint left to give them a good two coats.
9.) Re-install wheels to 81 ft/lbs tq, and you're done!
STATS:
Time: 3-4 hours (depends on how perfect you are about cleaning the calipers)
Cost: $40.00 + or -
Was it worth it?: absolutely!
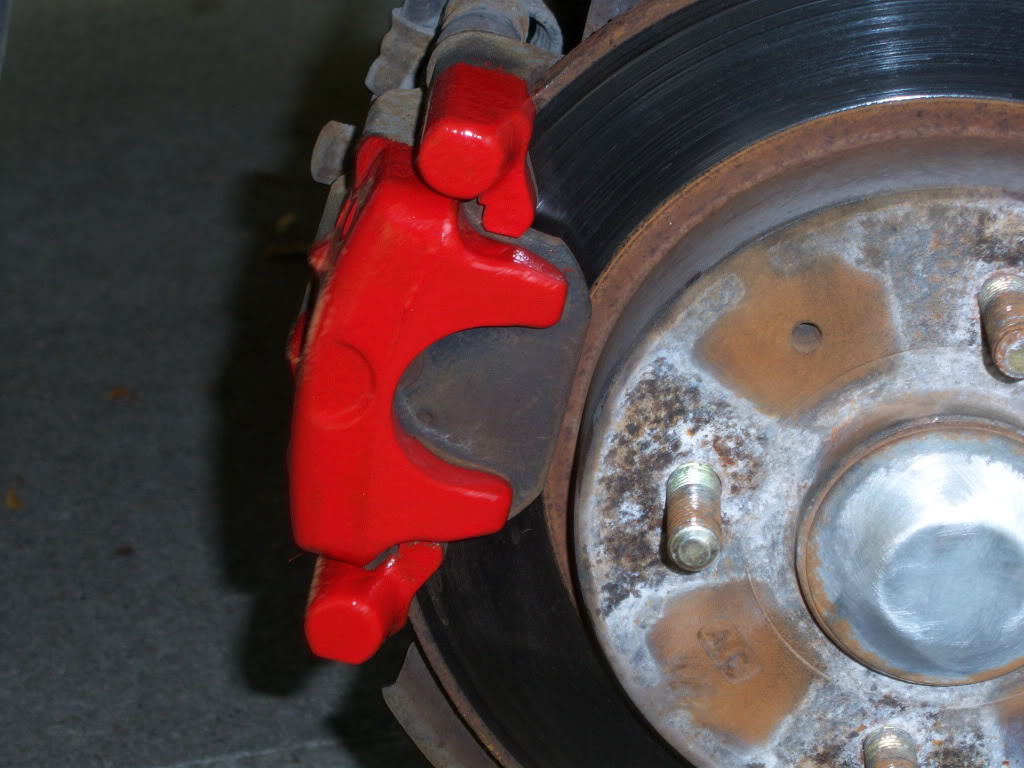
END RESULT:
How to paint your brake calipers the right way! (G2 Epoxy Paint Kit)
This is my first how-to so please be nice. :roll:
1.) Buy the kit from your chosen retailer: http://www.amazon.com/s/ref=nb_ss_0_6?url=search-alias%3Daps &field-keywords=g2+caliper+paint&x=0&y=0&spr efix=g2+cal
2.) Remove wheels. I started with the rear, supporting the car on jack stands at the jack points. I also took the opportunity to test fit my new rims.
3.) Decide how far back on the caliper you want to paint. I put the rims on and looked at how much was showing to decide.
4.) Clean the rust off the calipers. I used a drill with a wire brush attachment, steel-wool, and nylon bristle brush.
5.) After they are reasonably clean, spray with the included brake cleaner to remove dust, etc. Allow to dry.
6.) Now you are ready to mix the paint according to the instructions. Dump the small glass bottle of reactor into the tin of your chosen color (red). Stir and allow it to react for 5 minutes.
7.) Coat brush in paint and start painting. The paint is very thick so start small and work it around. It is self leveling so you don't have to worry too much about consistency. Paint over all surfaces of the caliper evenly, and move on to the next one. Wait 15 minutes in between coats. I ended up doing 2 coats, but I had plenty left in the can to do more.
8.) Repeat steps on front caliper. The fronts are bigger, but there is plenty of paint left to give them a good two coats.
9.) Re-install wheels to 81 ft/lbs tq, and you're done!
STATS:
Time: 3-4 hours (depends on how perfect you are about cleaning the calipers)
Cost: $40.00 + or -
Was it worth it?: absolutely!
END RESULT:
Last edited by Lyonsroar; 12-16-2009 at 04:48 PM.
#16
05-02-2011, 12:19 AM

Yes, ricers call them "brake stoppers", but I was modifying cars before ricers were born, so I shall continue to call them a master cylinder brace!
The purpose of a master cylinder brace is to reduce the movement in the master cylinder/brake booster assembly when you push on the brakes. I haven't come across a production car that didn't have some movement. Production cars are built in large volume, a manufacturer is building to the majority, a majority who couldn't care if the brakes feel good enough. Some of us want great though!
What happens when you apply the brakes is: the firewall, being pressed metal deflects a certain amount when you push that big, long lever known as a brake pedal. Any movement in the firewall when you push the pedal translates into wasted brake pedal movement and makes the brakes feel soft. The movement also disconnects your foot from feeling the brake pedal, you can feel when a wheel is about to lock up (pedal pressure spikes) and it generally makes the brakes much nicer to use, more direct brake feel is always nice.
Remember, with hydraulic brakes, we are using force, not pedal travel, to apply the brakes. Unfortunately with all the slop in a production car, travel comes with increasing force, as components like the firewall flex.
So, I'm sure you've seen "brake stoppers" for sale for ridiculous amounts, I have! All we really need is a bar to take tension in the vertical plane (assuming your brake pedal is conventional and pivots at the top of the firewall).
This was the process for my 740 Turbo, it can be adapted to any car. All you need to do is think about what you are trying to achieve.
This is the master cylinder on the 740, a conventional setup, ATE master and booster bolted to firewall.

As you can see, it's fairly tight in around the master cylinder near the strut tower, but there's more than enough room for what we want to achieve. The first thing to do is have a look and think about where a master cylinder brace is going to go. The top is easy enough, you want to pick up one of the bolts or studs that holds the master cylinder onto the booster. This is the best place, as the bolts are always way too long (to allow for the thickness of our brace) and it's nice and strong. For the body end of the brace, we really want to bolt onto the sheet metal at as flat an angle as possible. This will eliminate the sheet metal we're bolting to flexing, something we're trying to cure in the first place! Sheet steel bodies work by carrying forces in shear, that is, the large sheets of steel resist bending loads etc by spreading them out over their surface, much like a cardboard box.
So we really want to bolt onto sheet metal so the bolt we put through is in shear, this way the load is spread all over that piece of metal and won't flex. We also want the brace to be as close to parallel to the firewall as we can reasonably get it, and as close to vertical as we can get it as well. Up to 30 degrees out is O.K, but the closer the better.
This is really easy on cars with macpherson strut suspension, as the strut tower is usually fairly close to the master cylinder.
So, I decided on my car where I wanted the brace to go, on the sheet metal behind the reinforcement in the strut tower, and above the chassis rail. This is a nice strong spot as loads will be transferred through the sheet metal into the chassis rail and there is very little flex in such a strong part of the car's body.
The first step is to measure roughly how long your brace will be, and cut a suitably sized piece of bar stock. You can use angle or whatever, but bar stock is easy to work with. Remember, it's going to be working in tension, so it doesn't have to resist bending. Therefore it can just be flat bar. I cut the bar too long, then I drill a hole in the top to suit the master cylinder bolt. Once I have that done, I loosely bolt it to the car and let it hang. You can see it there, the rusty piece of metal under the master cylinder bolt.

Once the brace is hanging, I decide what it needs in the way of bending, doing one bend at a time and offering it back up to check. The first bend you should do is put a twist into the brace to align the brace with the sheet metal you are bolting to. It's easiest to heat the brace to put the twist in it, but you can bend it in a vise easily enough without heat.
Once you get that twist sorted out, you can Then re fit and bend the brace below the twist to suit the sheet metal you are bolting to. Again, bend a bit, trial fit etc. It doesn't take long.
Once I have the brace in the shape I want it, I decide where I want the hole in the body. You might be lucky and have a hole you can already use. In that case, just use it. To mark the hole in the body, drill a hole in the brace, reinstall, mark the sheet metal through the hole and drill. Be careful of brake lines and ABS cables please! If you don't have room to drill from the inside, You can measure up from a reference point (like the chassis rail) and transfer that measurement to the outside of the inner fender.

If you go this way, I suggest not drilling the lower end of the brace, just decide where you want the hole, drill from the outside, then mark the brace through the sheet metal hole. It's more foolproof.
So we end up with something like this:

Once you're confident the brace fits just right, smooth it all up and paint it. If you make it look nice and neat, it will pass as a factory job. I painted my brace with engine enamel as it'll be living close to a turbocharger. Here it is drying on my kerosene heater:

Once the paint is dry, you can bolt the brace in place. You really want to use a large, hardened washer to back the brace up, we want to get a good firm clamping force on the sheet metal, we don't want to rely on the hole in the sheet metal, it's not the strongest way to do it. So, find yourself a nice hardened washer and a grade 8 bolt. I also used a Nyloc nut on the other side of the bolt, purely because I had one. If you don't have one, use a spring washer or Loctite please! Get the bolt nice and tight in the sheet metal, we want it to clamp.

When it's all bolted up, apply your favourite anti rust coating. I used body deadener because I had some and it looks factory.
The finished job. It should be almost invisible if done right:


See how I left the brace long under the bolt? It helps spread the load over the sheet metal.
And this is a brace I made for my Alfa, so you get an idea of what we're trying to achieve:

Regards, Andrew.
The purpose of a master cylinder brace is to reduce the movement in the master cylinder/brake booster assembly when you push on the brakes. I haven't come across a production car that didn't have some movement. Production cars are built in large volume, a manufacturer is building to the majority, a majority who couldn't care if the brakes feel good enough. Some of us want great though!
What happens when you apply the brakes is: the firewall, being pressed metal deflects a certain amount when you push that big, long lever known as a brake pedal. Any movement in the firewall when you push the pedal translates into wasted brake pedal movement and makes the brakes feel soft. The movement also disconnects your foot from feeling the brake pedal, you can feel when a wheel is about to lock up (pedal pressure spikes) and it generally makes the brakes much nicer to use, more direct brake feel is always nice.
Remember, with hydraulic brakes, we are using force, not pedal travel, to apply the brakes. Unfortunately with all the slop in a production car, travel comes with increasing force, as components like the firewall flex.
So, I'm sure you've seen "brake stoppers" for sale for ridiculous amounts, I have! All we really need is a bar to take tension in the vertical plane (assuming your brake pedal is conventional and pivots at the top of the firewall).
This was the process for my 740 Turbo, it can be adapted to any car. All you need to do is think about what you are trying to achieve.
This is the master cylinder on the 740, a conventional setup, ATE master and booster bolted to firewall.
As you can see, it's fairly tight in around the master cylinder near the strut tower, but there's more than enough room for what we want to achieve. The first thing to do is have a look and think about where a master cylinder brace is going to go. The top is easy enough, you want to pick up one of the bolts or studs that holds the master cylinder onto the booster. This is the best place, as the bolts are always way too long (to allow for the thickness of our brace) and it's nice and strong. For the body end of the brace, we really want to bolt onto the sheet metal at as flat an angle as possible. This will eliminate the sheet metal we're bolting to flexing, something we're trying to cure in the first place! Sheet steel bodies work by carrying forces in shear, that is, the large sheets of steel resist bending loads etc by spreading them out over their surface, much like a cardboard box.
So we really want to bolt onto sheet metal so the bolt we put through is in shear, this way the load is spread all over that piece of metal and won't flex. We also want the brace to be as close to parallel to the firewall as we can reasonably get it, and as close to vertical as we can get it as well. Up to 30 degrees out is O.K, but the closer the better.
This is really easy on cars with macpherson strut suspension, as the strut tower is usually fairly close to the master cylinder.
So, I decided on my car where I wanted the brace to go, on the sheet metal behind the reinforcement in the strut tower, and above the chassis rail. This is a nice strong spot as loads will be transferred through the sheet metal into the chassis rail and there is very little flex in such a strong part of the car's body.
The first step is to measure roughly how long your brace will be, and cut a suitably sized piece of bar stock. You can use angle or whatever, but bar stock is easy to work with. Remember, it's going to be working in tension, so it doesn't have to resist bending. Therefore it can just be flat bar. I cut the bar too long, then I drill a hole in the top to suit the master cylinder bolt. Once I have that done, I loosely bolt it to the car and let it hang. You can see it there, the rusty piece of metal under the master cylinder bolt.
Once the brace is hanging, I decide what it needs in the way of bending, doing one bend at a time and offering it back up to check. The first bend you should do is put a twist into the brace to align the brace with the sheet metal you are bolting to. It's easiest to heat the brace to put the twist in it, but you can bend it in a vise easily enough without heat.
Once you get that twist sorted out, you can Then re fit and bend the brace below the twist to suit the sheet metal you are bolting to. Again, bend a bit, trial fit etc. It doesn't take long.
Once I have the brace in the shape I want it, I decide where I want the hole in the body. You might be lucky and have a hole you can already use. In that case, just use it. To mark the hole in the body, drill a hole in the brace, reinstall, mark the sheet metal through the hole and drill. Be careful of brake lines and ABS cables please! If you don't have room to drill from the inside, You can measure up from a reference point (like the chassis rail) and transfer that measurement to the outside of the inner fender.
If you go this way, I suggest not drilling the lower end of the brace, just decide where you want the hole, drill from the outside, then mark the brace through the sheet metal hole. It's more foolproof.
So we end up with something like this:
Once you're confident the brace fits just right, smooth it all up and paint it. If you make it look nice and neat, it will pass as a factory job. I painted my brace with engine enamel as it'll be living close to a turbocharger. Here it is drying on my kerosene heater:
Once the paint is dry, you can bolt the brace in place. You really want to use a large, hardened washer to back the brace up, we want to get a good firm clamping force on the sheet metal, we don't want to rely on the hole in the sheet metal, it's not the strongest way to do it. So, find yourself a nice hardened washer and a grade 8 bolt. I also used a Nyloc nut on the other side of the bolt, purely because I had one. If you don't have one, use a spring washer or Loctite please! Get the bolt nice and tight in the sheet metal, we want it to clamp.
When it's all bolted up, apply your favourite anti rust coating. I used body deadener because I had some and it looks factory.
The finished job. It should be almost invisible if done right:
See how I left the brace long under the bolt? It helps spread the load over the sheet metal.
And this is a brace I made for my Alfa, so you get an idea of what we're trying to achieve:
Regards, Andrew.
Last edited by Typhoon; 05-02-2011 at 12:26 AM.


Thread
Thread Starter
Forum
Replies
Last Post
VDonkey
Volvo 260, 760 & 960
4
06-12-2016 01:44 AM
S70driver
Volvo S70
5
07-25-2006 02:37 PM