1990 240DL radio wiring diagram
#1
 12-26-2004, 01:28 PM


#2
12-26-2004, 05:01 PM


#4
12-28-2004, 03:18 AM
#5
12-28-2004, 11:49 AM
#6
07-30-2007, 07:30 PM

i have an 86 240dl and am trying to install a cd player and am having the same problem. wires go directly into the back of the radio with no connector to hook up to my wiring kit i baught. i have to cut the wires and splice them all. anyone have a diagram or could tell me what each of the five wires are for? thanks a lot!
#7
07-30-2007, 11:53 PM

I recently underwent this project with success! Now, as far as actually fitting the radio in...that was a little different as you can see from the pictures.
The project took me 14 hours and A LOT of frustration, but i'm not one to give up on it. I will try to explain it to the best of my ability.
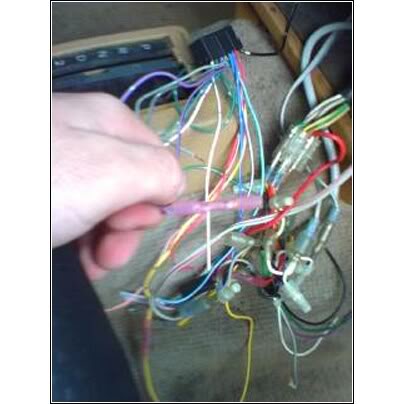
Unfortunately I only have one picture of the actual wiring, I wish I would have taken more.
Don't waste your money on a wiring harness. They're too hard to find anyways, no one carrys them for 240's.
Now...You need to determine what kind of harness you started with in your car. I had a very, very old 9 pin harness. I essentially cut the thing out, because the new radio had a different type of harness. The stereo should come with a piece of paper that identifies all your wires. I only remember a few wires. Red is your master power - its the power that runs your stereo when the car is on. Yellow is power to the battery -It keeps the radiorunning even if the car power is on. Orange is illumination, I have no idea what this does. I didn't even install it. Black is ground. I used pink caps to connect all my wires together. I cut off the old harness, and essentially traced all the old ones to the new harness and connected them together. The black (ground) wire has to be connected to a ground. Connect it to a screw in the dash. Voila! you have your first wirein the new harness. Then do your 4 speakers. Trace them from your speakers, so you know what color wires your looking for. Connect the positive and negative wires from each speaker into the speaker positive and negative wires from the harness. You can find out which wires these are from your diagram! thats 8 more wires you've taken care of. Only 2 more. Connect the red wire from the harness to the wire that the old red wire used to go too. Do the same with the yellow and your done.
[edit]Also, don't forget to install the antennae! Its the big gray wire that has what looks like a plug. That has its on slot in the back of the radio. Don't get taken aback by the other wires. There for subwoofers and amps. Just ignore them.
Pictures:
removing the harness. You can see the new aftermarket harness. The picture looks a lot more complicated than it was. All those wires under the white plastic piece were removed. The purple, green, gray, and blue wires were all the speaker wires that connected straight to the speakers.
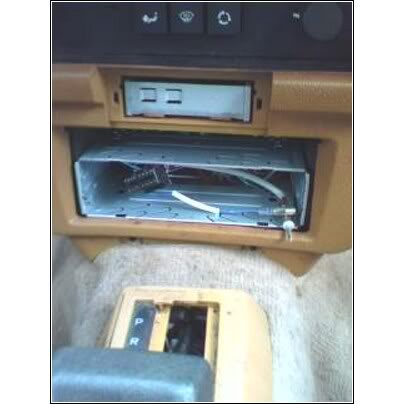
This was my biggest problem. I had to find a way to get the sleek new, narrow radio into the old HUGE radio slot. You can see the new harness installed inthis picture.
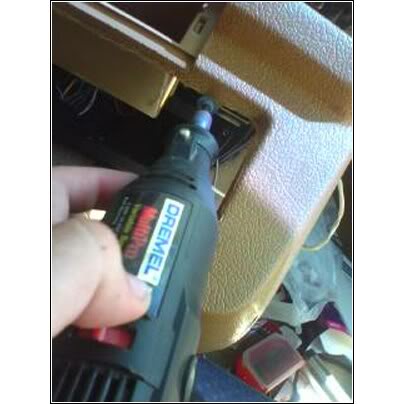
haha, this was either the worst or best idea. I bought a radio holder for I think it wasa ford? Finding things for a volvo as old as mine are near-impossible. So I decided to dremel out some of the plastic dash to MAKE it fit.
The final product: Sloppy, but functional!
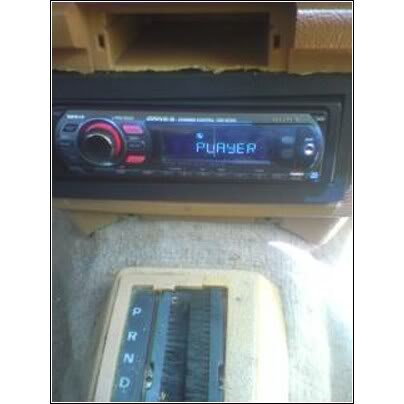
the result after all the dremelling?A Mess.
If anyone has any questions, ask. I may not have been clear in these instructions, but hopefully you can learn from my mistakes. pray it doesn't take you as long and near as frustration as it took me.
The project took me 14 hours and A LOT of frustration, but i'm not one to give up on it. I will try to explain it to the best of my ability.
Unfortunately I only have one picture of the actual wiring, I wish I would have taken more.
Don't waste your money on a wiring harness. They're too hard to find anyways, no one carrys them for 240's.
Now...You need to determine what kind of harness you started with in your car. I had a very, very old 9 pin harness. I essentially cut the thing out, because the new radio had a different type of harness. The stereo should come with a piece of paper that identifies all your wires. I only remember a few wires. Red is your master power - its the power that runs your stereo when the car is on. Yellow is power to the battery -It keeps the radiorunning even if the car power is on. Orange is illumination, I have no idea what this does. I didn't even install it. Black is ground. I used pink caps to connect all my wires together. I cut off the old harness, and essentially traced all the old ones to the new harness and connected them together. The black (ground) wire has to be connected to a ground. Connect it to a screw in the dash. Voila! you have your first wirein the new harness. Then do your 4 speakers. Trace them from your speakers, so you know what color wires your looking for. Connect the positive and negative wires from each speaker into the speaker positive and negative wires from the harness. You can find out which wires these are from your diagram! thats 8 more wires you've taken care of. Only 2 more. Connect the red wire from the harness to the wire that the old red wire used to go too. Do the same with the yellow and your done.
[edit]Also, don't forget to install the antennae! Its the big gray wire that has what looks like a plug. That has its on slot in the back of the radio. Don't get taken aback by the other wires. There for subwoofers and amps. Just ignore them.
Pictures:
removing the harness. You can see the new aftermarket harness. The picture looks a lot more complicated than it was. All those wires under the white plastic piece were removed. The purple, green, gray, and blue wires were all the speaker wires that connected straight to the speakers.
This was my biggest problem. I had to find a way to get the sleek new, narrow radio into the old HUGE radio slot. You can see the new harness installed inthis picture.
haha, this was either the worst or best idea. I bought a radio holder for I think it wasa ford? Finding things for a volvo as old as mine are near-impossible. So I decided to dremel out some of the plastic dash to MAKE it fit.
The final product: Sloppy, but functional!
the result after all the dremelling?A Mess.
If anyone has any questions, ask. I may not have been clear in these instructions, but hopefully you can learn from my mistakes. pray it doesn't take you as long and near as frustration as it took me.
#8
04-26-2008, 09:51 AM

My bone head kidhad theplug, all he had to do was wait for the harness, but he dove right in (without consulting me) because he couldn't wait. He cut the plug off. He has a 1993 240 wagon, will the above post get him through what he needs to do (I'll be damned if I'm gonna help him  )
)
)


Thread
Thread Starter
Forum
Replies
Last Post
silver260
Volvo S60 & V60
4
05-29-2008 02:27 PM