Water in the driver's side floor = rust
#1
 03-12-2011, 07:56 PM


My 89 740T Has car cancer. I'm performing a biopsy. Under the driver's side carpet is all wet. The sound dampening foam is soaked. So now I have some rust down there. I'm letting it dry out, then I'll wire brush it and paint it. But first, I need to figure out how water got there so I can stop this from happening again. Any ideas?
The car's been sitting for a week and a half. We've had a little rain and such. Some snow this winter, but most of the time the car sit under a roof. Is there a suspect drain that could be the culprit?
The car's been sitting for a week and a half. We've had a little rain and such. Some snow this winter, but most of the time the car sit under a roof. Is there a suspect drain that could be the culprit?
#2
03-12-2011, 09:46 PM

Senior Member
Join Date: Apr 2010
Location: PA
Posts: 374
Likes: 0
Received 0 Likes
on
0 Posts
I just found out that the 240 I bought has some major water problems on the passenger side floor. Found tons of water there after a good downpour.
Let me know what turns up. I'd imagine that mine is a windshield issue. I read about some drains needing to be cleaned on the Volvos, where are these located?
Thanks for any help.
Let me know what turns up. I'd imagine that mine is a windshield issue. I read about some drains needing to be cleaned on the Volvos, where are these located?
Thanks for any help.
#3
03-13-2011, 08:48 AM

Junior Member
Join Date: Mar 2011
Location: Connecticut
Posts: 1
Likes: 0
Received 0 Likes
on
0 Posts
My answer is for an '89 760, but i would expect them to be identical. The plugged drain is not uncommon. Although the drains and the hoses are fairly large, the can still clog, especially if you typically park where leaves or pine needles land on the car. An easy fix. Open the hood and look in the left and right corners of the shroud that your wipers go through. You will see the hoses connected below them. Water will normally flow to these low points. Poke a coat hanger or similar in after pulling whatever you can by hand. To test, pour water in, it should flow out under the car.
#4
03-13-2011, 11:07 PM
#5
03-14-2011, 10:49 AM

Super Moderator
Yeah, I'm thinking the front sunroof drain is clogged and water is backing up. The hose runs through the A pillar so be sure to not blow it out w/ compressed air. It's probably clogged on the bottom of the car, but I like to run water from the top through the drain hole to make certain it's clear. Remember, Volvo sunroof seals are really to just keep the last bit of water from spritzing you. They are designed to leak and then drain into the four corner drains. Wet trunk means often the rears are clogged...front floorboards, the A pillar drains.
On 240's, there are 2 drains under the window trim near the bottom corners. This drains into the area under the cowl vents. This in turn drains between the corner of the firewall and fender. Over time. leaves work there way down into where the firewall corner and fender meet. Water backs up and the result is wet feet. Cleaning them out w/o pulling the fender is time consuming...I use a coat hanger, shop vac and an air hose. The final test is to use a water hose and ascertain you have a nice stream of water coming out of the body drains.
On 240's, there are 2 drains under the window trim near the bottom corners. This drains into the area under the cowl vents. This in turn drains between the corner of the firewall and fender. Over time. leaves work there way down into where the firewall corner and fender meet. Water backs up and the result is wet feet. Cleaning them out w/o pulling the fender is time consuming...I use a coat hanger, shop vac and an air hose. The final test is to use a water hose and ascertain you have a nice stream of water coming out of the body drains.

#7
03-14-2011, 05:14 PM
Super Moderator
If you want to get all the 20-30 years of crud out, the fender has to come off! That's why I use a coat hanger from down below and ream it out, run water from up above and an ait hose from below to break it up and get it the best it can.
#8
03-14-2011, 05:20 PM

#9
03-15-2011, 03:21 PM
The car's been garage kept for most of it's life, so I wasn't surprised to find that they all drain fine. I may pull the front cowl (in front of the windshield, and check for drains), but I found what my be the culprit: 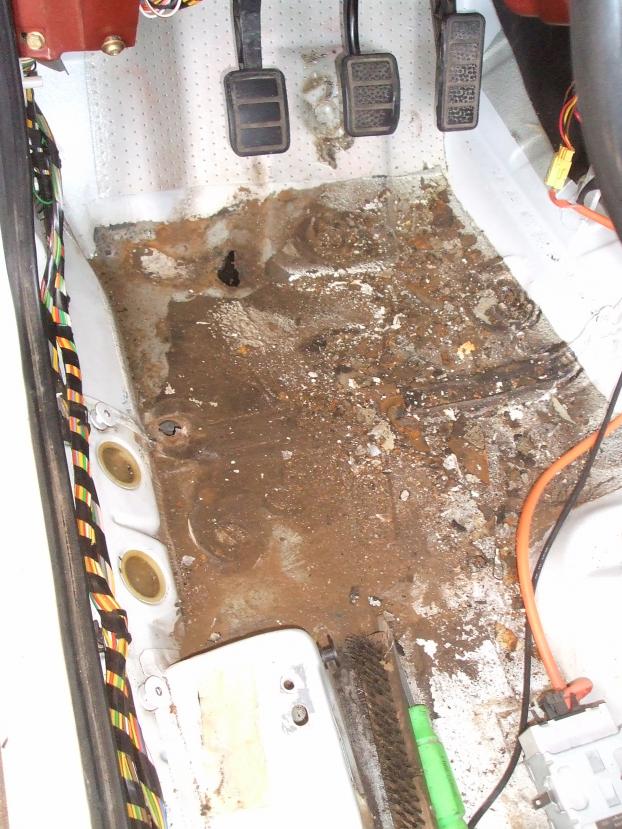
I have a hole in the floor. It was covered in rusty metal, but now I can see that it probably wasn't sealing anymore. An drive in the rain and water would get thrown up by the wheel. It probably started as a rock chip. If only 700's came with mudflaps. I may have to invest in some.
So now I'm going to weld in a patch. The Volvo green books say to "disconnect control unit when carrying out welding repairs." Who here thinks that's important? Who here thinks I should pull them out? And who thinks what that includes: Fuel, Ignition, radio, SRS, ABS, SOS, CQD, and anything else?
As another note, I talked to some people who sold POR-15, for my rust prevention. They actually recommended Zero Rust over POR-15. They guy said that Zero Rust is pretty new and it does not require the metal prep that POR-15 does. It's in the paint itself. He said just knock off the flaky rust and it goes over it. One quart of Rust Zero was cheaper than one pint of POR-15. Plus you would still have to get the prep stuff. So the guy said he and people who are restoring cars favor the Rust Zero. It's UV sensitive just like POR-15, but under the carpet, it should never have any problems.
#10
03-15-2011, 03:48 PM
Super Moderator
Hey, they did sell mud flaps for pre 90 740's...they're very rare...weren't too popular in the States. I'll have to try the Rust Zero...wonder if it's any better than Rust-O-Leum? I used quite a bit of POR-15 on my 144. I didn't use any sort of rust prep compound. I just wire wheeled and bead blasted. Seems to be holding up fine. Can't believe POR-15 would need a prep chemical...that stuff is impossible to get off your skin! I used that stuff two years ago on Valentine's Day...totally forgot I was taking the wife out to dinner at a high end restaurant that night. My hands were in foul shape!
#12
03-17-2011, 12:38 AM
#13
03-18-2011, 02:54 AM

i just discovered my 88 240 had a bunch of water on the front passenger side i wasn't aware of so didn't air it out. i knew there was a leak already on the drivers side, so i kept it under a tarp. but was raining for like 3 weeks straight in seattle, so when i discovered that the passenger side was wet, there was mold everywhere on the seatbelts, seats, dash, books and other items that were left in there. spent all day decon-ing it and airing it out. i also discovered some dead maggots in the center pocket (yea i know gross, have no idea what they were feeding on). so now i'll have to figure out where the leak(s) are coming from (sigh).
#14
03-18-2011, 06:31 AM
Super Moderator
#17
03-31-2011, 12:17 AM
So now I'm done with the floor!
I cut back to good solid metal and welded in small patches (I got the metal from a computer case). In two places I left it open. These are because they are inside the frame runners that go forward from the firewall to the bumper and I need to paint them up the seal them. After the welding, I wire brushed the floor a little more and painted 'Zero Rust' with a brush over all bare metal and rusty spots. This stuff is supposed to use any moisture also as catalyst and seal out all the air while chemically digging into the rust. It's like POR-15. So far, it looks good. After it dried, replaced all the plugs I pulled out for painting access and also plugged the holes I left into the runners. On place I use a chunk of stainless steel to make a plug. Then I filled any other places that I dug out the sealant, back up with new sealant. Tomorrow I think I'll put down the carpet and start the car for the first time in about 3 weeks. Now I can finally go buy food.
I cut back to good solid metal and welded in small patches (I got the metal from a computer case). In two places I left it open. These are because they are inside the frame runners that go forward from the firewall to the bumper and I need to paint them up the seal them. After the welding, I wire brushed the floor a little more and painted 'Zero Rust' with a brush over all bare metal and rusty spots. This stuff is supposed to use any moisture also as catalyst and seal out all the air while chemically digging into the rust. It's like POR-15. So far, it looks good. After it dried, replaced all the plugs I pulled out for painting access and also plugged the holes I left into the runners. On place I use a chunk of stainless steel to make a plug. Then I filled any other places that I dug out the sealant, back up with new sealant. Tomorrow I think I'll put down the carpet and start the car for the first time in about 3 weeks. Now I can finally go buy food.
#18
04-01-2011, 08:18 PM
Senior Member
Join Date: Apr 2010
Location: PA
Posts: 374
Likes: 0
Received 0 Likes
on
0 Posts
Nice work. you pointed me here from another thread, but I think that the floor pan in my 240 is going to be a much bigger project. It's the rear left side, and it's about the entire floor on that side from the looks of it (haven't pulled up the carpet yet). I'll probably have to cut a 2'x1' section out, and I've been racking my brain thinking about what material to replace the hole with.
Since I have no idea how to weld, nor have access to a welder, I'm considering riveting the new material into place, unless someone has a good reason not to do that or has a better idea of putting a new section of floor down.
Any ideas on how to cut out the cancer? My grinder was stolen not too long ago.
Any brilliant ideas to get this show on the road? I'd love to get that section cut out. It looks like the bottom of the car had some sort of rustproofing, but it is pretty clean now. I'm sure that all the transmission fluid that leaked out dissolved that stuff where it's missing.
#19
04-02-2011, 02:03 AM
A metal scrap place might be a good place to get some steel. At a junk yard you may be able to get a sawzall and drill to cut out a section that you need if the floor has some special shapes to it. A local machine shop may be able to weld it. You could make some calls and talk to some local welders. They might do the welding for a pretty cheap price. My patches were chunks from my computer case (the one I'm typing on). Rust is a tough one. A grinder or sawzall is your best bet on cutting out the old material. Once you get all of it fixed, then you need to paint it. I used Zero Rust, but POR-15 is another good product from what I've heard. Right now it my first bit of experience, so I can't really say how well it did. Just remember, every bit of bare metal must be painted, even stuff that might get welded over. You could rivet in a patch too. The whole car body is sport welded together. They used seam sealer to fill the gaps. If you went that route, I would fit the patch, prep the metal, paint it all and then apply the seam sealer to the overlap areas and then rivet. To do that I would not expect this part of the body to be a supporting part of the unibody. When you dig in, post some pics.

Thread
Thread Starter
Forum
Replies
Last Post
ed schuler
1998-2000 model year V70
2
08-04-2011 06:56 AM

