A how to for PCV system for beginners
#1
 03-23-2008, 10:44 PM


If you stop by the mechanic because you have oil on the top of the engine, under the spark plug cover, or smoke is coming out of the dip stick, they will probably tell you your crankcase ventilation system is shot. They will then say its between $600-$800 to replace it. Say thanks, but I can do it myself. I am fairly new to working on cars, escpecially volvos, but found the system to be easy to replace, for the most part. I did it on a 95 850 turbo. 3 weeks ago I had no idea what a PCV system was, but through this site I found out and knew my car needed it replaced. In 12 hours I had it done. If you follow my tidbits of advice a newbie could be done in 8 hours.
1st go to fcpgroton.com and order the correct system for your car. Order the whole system, except for the expensive intake hose unless your car needs a new one. Order a EGR valve gasket and throttle body gasket while your at it. Also order all knew gaskets/seals for your fuel ignitors. There are 4 per ignitor, totalling 20. You can do it without new ones, as long as your willing to scrub them with a soft bristled brush and use mechanic style soap you use on your hands. No dish detergent. They will clean up, but when you take the injectors out you may lose a few seals, that why I would buy all new ones. Also buy a mixed assortment of hose clamps to replace all hoses, unless you want to use the ones that come with your order. They are the standard volvo ones that are a pain in the neck. Once you have all these parts its time to begin.
The system runs from underneath your intake manifold, up over to the top of the engine, and around the engine block to the rear into the turbo. 1 hose connects to the manifold itself, 1 into the top of the engine, under the spark plug cover, and 2 around the side of the engine into that large hose behind the engine. That hose is "accordian instrument" like. It does not need to be taken off unless you want to.
To start, take out the battery, airbox, and unhook all hoses in your way. Drain the engine coolant, you'll find out later if you forget to do it. Behind the engine is that large black hose that has the 2 lines connected to it, which are part of the PCV system. Unhook those 2 lines. I believe there is an electrical connection on it as well. They are connected to a weird shaped plastic part that needs cleaned. It can be pulled out of the large hose, but can be difficult to put back in. If you need to take the hose out completely and clean that piece, but make sure you reinstall it before you start hooking up the new system. Otherwise you will crack your new hoses. It just pushes back in place. OK now that you made some room its time to move on. Take off the spark plug cover and unhook that black hose running through the manifold into the top of the engine.
Next you need to unhookthe fuel injector rail. The top piece is pushed in place. It will pull of. It is the 1st piece of metal covering the ignitor wires. Then unboltthe lower piece, but do not remove. The fuel lines need loosened first. The lower piece, fuel ignitor rail, is held in place by 2 bolts. Unhook the electronic connections (5). There are 2 fuel lines running from up behind the engine on the passengers side. There are 1-2 bolts holding them in place. Remove them. There is also a clamp that holds them together. They are the 2 black narrow lines connected to the top of the engine.
Now you need to remove the ignitors which are connected to that metal ignitor rail. You can use the special tool to remove them together, or just pull as evenly as you can. This is when you will lose your ignitor seals. Take all 5 ignitors out, clean the seals, or replace them. The seals go as follows. The uppermost goes in the fuel rail, its a flat seal, like a washer. It sits above the ignitor. The next seal is a donut, goes on top of the ignitor. The third goes on the bottom of the ignitor, also a donut, same seal. The 4th is placed inside the manifold where the bottom of the ignitor goes in. Its a larger, round seal. I will explain how to install the top seals when you reasseble later. Once you have removed the ignitors from the rail, place the rail on top of the engine. If you loosened the fuel lines it should move enough so that it sits up out of your way to remove the manifold.
Next unhook the throttle cable, remove that pulley, and remove the throttle body. Clean it good while your at it. They are on the front of the engine to the drivers side if your not sure. There are like 8 bolts. Take notes of how everything goes in. Lots of hoses, etc. Underneath is the EGR valve. It is connected to a large gold pipe. It is a royal pain in the neck, but get it off however you can. DO NOT BREAK IT!!!!! $200 to fix. Its the weird shaped valve held to the manifold by 2 longbolts, very strange looking bolts. DO NOT BREAK!!!! I did.
Now take out the thermostat to allow you to gain access to all the manifold bolts. If you forgot to drain the coolant your about to make a mess. The thermostat is located on the passenger side next to the manifold. The engine coolant resevior tank hose connects to it.
Now its time to remove the manifold. There are 2 bolts underneath holding the bottom of the manifold in place. 1st is the bolt connecting the dip stick to the manifold and the 2nd is just above it. You can feel them both from reaching underneath the manifold from on top. Or you can see them from underneath the car with a flashlight. I found it easiset to remove them with a 1/4 ratchet from on top by reaching under the manifold. I hope you have smaller arms. Once these 2 bolts are removed remove all the manifold bolts. I think 7 on top. This part can be painful. Do not forget about the bolt in the corner that the thermostat was hiding.
Pull out the manifold. In order to do so you need to have removed that black hose running through it up over into the top of the engine. There is a thin hose connected to the side of the manifold from the PCV system. Remove it. Clean the manifold and be sure to have a new gasket.
Now you can see the whole PCV system. It starts with that black box and has a few hoses connected to it. 1 to the manifold, 1 up over to the top of the engine, and 2 around the engine to the large hose in the back. Be delicate, they will break. You simply install the new stuff just as you found it.
Now reassemble. Do not forget to run that black hose through the manifold up over to the top of the engine. Also there is the thin hose connected to the passenger side of the manifold. Connect the lower 2 bolts to the manifold 1st. If you do the top 1st, youll have to take it off later. Now insert the new manifold gasket. Put 2 bolts through the manifold and gasketto hold the gasket in place. Now push the manifold into place and screw a few bolts in to even it out. Tighten them all as neccessary. Have a magnet ready for dropped bolts. The hardest bolt is the one in the corner behind where the thermostat was. I recomend duct taping the bolt to a strong magnet and inserting it and getting a few threads in. Once its not going to pop out, take off the duct tape and finish tightening it up. Now keep reassembling.
Thermostat, egr valve, throttle body, pully.
Now the ignitors. Use a slite bit of vasoline on the washer shaped seal for the top of the fuel rail if the seals wont stay in place. I recommmend putting the top seal in, then the injector. Do it 1 at a time. 1 seal, 1 injector into the rail. 2nd seal, 2nd injector into the rail, etc. Now install all 5 injectors connectedto the railinto the manifold. Make sure there sitting nice and even. Connect the electrical connections, bolt the rail, and install the upper piece of metal over the electrical wiring. Dont forget about that thin

#3
03-26-2008, 09:19 PM

just did mine on a 98 XC and was able to skip many steps, left injectors and throttle linkage attached to intake and just rotated up and back. also no need to drain coolant or remove thermostat, thankfully they must have relocated some of these items. also on mine you don't need to remove lower bolts, just loosen as intake is slotted on bottom, very handy. wish I had read your post first, I followed directions I read somewhere else and they did't mention that other bolt underneath intake just behind dipstick bolt, I had all bolts out or loose (or so I thought) yet couldn't lift off intake, finally found it after feeling around to see what was still holding it. Repair has reduced the oil puddling on top of engine, but not totally elimanated it, so I don't know what else I can do? New oil cap?
#4
03-26-2008, 11:15 PM
The lower bolts on the manifold do not need to be removed!! Of course I didn't realize that until after the fact. I am not the person to give much advice, but I will tell you what I heard. Over time from overpressurization it makes sense for all the seals to gradually loosen or weaken. It happens from regular heat and weather so why wouldn't overpressurization cause it to happen quicker? I think the mechanic had a good point, but not worth replacing all the seals in the engine to me. I replaced the oil return line gasket and o-ring. Wow did it need it, and the PCV system. I am still getting some smoke when I pull the dipstick, but I am hoping that will dispate with time. Maybe old oil, etc burning off. There is a gasket that you can buy for the oil cap. I would change that out.
Luke
Luke
#5
03-29-2008, 10:46 AM

#6
03-29-2008, 09:41 PM
#7
03-29-2008, 09:59 PM
#8
04-01-2008, 04:52 PM

Poking around and found this thread.
I did a write-up with pictures, hope it helps.
PCV Write-up
-Rob
I did a write-up with pictures, hope it helps.
PCV Write-up
-Rob
#9
01-27-2010, 09:45 PM

#10
08-12-2010, 07:07 PM

Senior Member
Join Date: Jul 2009
Location: New Zealand
Posts: 196
Likes: 0
Received 0 Likes
on
0 Posts
biggest mechanical danger i believe is blowing the rear main seal. Costly repair once that happens.
I think you will find ordering the kit from ipd or fcp groton is the best way to go. I never came across a kit in Canada. Not great if you want to do the job this weekend but maybe somebody else has found a good kit in Canada and can chime in
I think you will find ordering the kit from ipd or fcp groton is the best way to go. I never came across a kit in Canada. Not great if you want to do the job this weekend but maybe somebody else has found a good kit in Canada and can chime in
#11
08-13-2010, 04:36 AM

#12
08-06-2011, 09:09 AM

I'm with VPatrol, neglecting the PCV system can be as big as breaking a timing belt. If you blow a RMS you will have the cost of doing that plus the PCV which can run about the same as a valve job.
I picked up the 850 wagon and did NOT see any smoke out of the dip stick nor did I have any oil on top of the motor so I figured the system had been serviced and was probably fine. I was having the transmission replaced and noticed a little oil at the bottom of the motor so I had the mechanic do the RMS while there (it's really a no brainer).
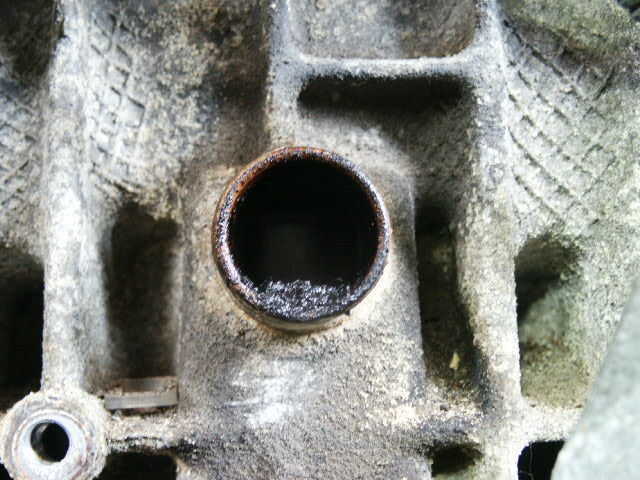
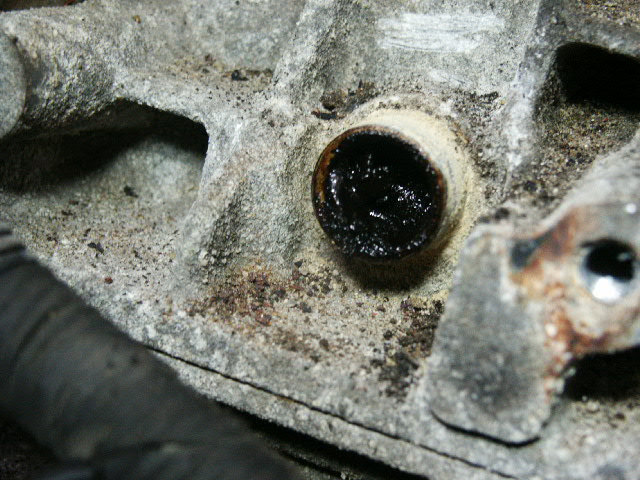
With NO service records and the advise of a few of the guys here, they convinced me to do it. I got a kit and replaced with yesterday (within 100 miles of having the RMS replaced). The tubes seem to be in good condition but when I pulled the box off the block I was very surprised as to the buildup in the lower block port. I had been driving the car gently since picking it up, especially due to the condition of the other transmission. That probably saved me some other seals.
Top hole:
Bottom hole:
I picked up the 850 wagon and did NOT see any smoke out of the dip stick nor did I have any oil on top of the motor so I figured the system had been serviced and was probably fine. I was having the transmission replaced and noticed a little oil at the bottom of the motor so I had the mechanic do the RMS while there (it's really a no brainer).
With NO service records and the advise of a few of the guys here, they convinced me to do it. I got a kit and replaced with yesterday (within 100 miles of having the RMS replaced). The tubes seem to be in good condition but when I pulled the box off the block I was very surprised as to the buildup in the lower block port. I had been driving the car gently since picking it up, especially due to the condition of the other transmission. That probably saved me some other seals.
Top hole:
Bottom hole:
#13
08-06-2011, 12:43 PM

WOW! I really need to replace the PCV on my 850...its so clogged, oil bubbles from the dip stick tube at the block. Just gotta save up the $155 to buy the kit...
A question about the intake manifold gasket: Do they bake onto the head surface? I've always been a Honda guy and the one thing that always pissed me off was replacing intake manifold gaskets. They use cheap paper gaskets that get stuck on the head and the only way to clean it is with a razor blade and a lot of patience.
Does anyone make a reusable gasket for the 850 (96 glt)?
#14
08-06-2011, 01:36 PM
#15
08-07-2011, 10:06 AM

Senior Member
Join Date: Feb 2009
Location: Glen Ellyn, IL
Posts: 564
Likes: 0
Received 0 Likes
on
0 Posts
Having just completed this job several weeks ago, I have a few suggestions for this write-up. I used JABLACKBURN's write-up over on MVS and it's much easier than this one.
You do not want to mess with your injectors so don't worry about getting these.
You do not have to do this. It may help to remove the cooling fan, but that depends on if you are having problems getting to the two bolts that are on the bottom-side of the manifold.
No, you do not have to touch the rail. You do have to disconnect the two fuel lines. For the return line, I found that on my '97 it was a solid tube and I didn't want to bend it, so I disconnected it from the lower part of the return hose, which is easy to get at by pulling the passenger wheel.
You can leave everything attached to the manifold.
Leave it in place. You can access the bolts with a few wobble & u-joint attachments - much easier than dealing with this mess.
If you remove the fan, it might be easier to access those two bolts on the bottom-side. I struggled with the wobble & u-joint extensions and gave up. Removing the fan allowed my meat-hands to reach the bolts easier.
You need to remove the upper bolts from the mani, but just loosen the bottom bolts - the mani sits on these bottom ones and it makes it much easier to move the mani around. Yes, when you're ready to replace the gasket you do remove the bottom bolts, but you'll figure that out...
Once everything is loose, you'll note the throttle cable is still attached. Gently raise the manifold and have it pivot on the right-hand side, by the throttle. You can place a 2x4 under the mani so it'll be supported and out of your way to get at the bits under the manifold that need replacing.
Keep an eye on where all of the hoses run. It may also be a good idea to replace any vacuum hoses since you'll have access to almost all of them.
You do not have to do this. It may help to remove the cooling fan, but that depends on if you are having problems getting to the two bolts that are on the bottom-side of the manifold.
No, you do not have to touch the rail. You do have to disconnect the two fuel lines. For the return line, I found that on my '97 it was a solid tube and I didn't want to bend it, so I disconnected it from the lower part of the return hose, which is easy to get at by pulling the passenger wheel.
Now its time to remove the manifold. There are 2 bolts underneath holding the bottom of the manifold in place. 1st is the bolt connecting the dip stick to the manifold and the 2nd is just above it. You can feel them both from reaching underneath the manifold from on top. Or you can see them from underneath the car with a flashlight. I found it easiset to remove them with a 1/4 ratchet from on top by reaching under the manifold. I hope you have smaller arms. Once these 2 bolts are removed remove all the manifold bolts. I think 7 on top. This part can be painful. Do not forget about the bolt in the corner that the thermostat was hiding.
You need to remove the upper bolts from the mani, but just loosen the bottom bolts - the mani sits on these bottom ones and it makes it much easier to move the mani around. Yes, when you're ready to replace the gasket you do remove the bottom bolts, but you'll figure that out...
Once everything is loose, you'll note the throttle cable is still attached. Gently raise the manifold and have it pivot on the right-hand side, by the throttle. You can place a 2x4 under the mani so it'll be supported and out of your way to get at the bits under the manifold that need replacing.
Keep an eye on where all of the hoses run. It may also be a good idea to replace any vacuum hoses since you'll have access to almost all of them.
#16
08-07-2011, 11:44 AM
If you google hondata intake manifold gasket, you will see the type I was referring to. they are designed to aid in preventing heat soak of the intake manifold and are also reusable.

#17
08-07-2011, 02:03 PM
VJaneczko: I'm with you, remove as little as possible.
I have done the job 3 times now, S70, and 2 T-5R's. I have never removed anything from the fan. I'm a small guy so I was able to reach my hand under the intake to get the manifold bracket bolts in, even though I was able to see them from under the car when it is on the ramps.
I did remove the manifold the last time, mainly because I wasn't paying attention. However, I would do it again, every other time just to get at the EGR valve. I just don't see how anyone could get at the EGR without taking the manifold off. Also, there was so much GUNK in that EGR port that I would NOT want that stuff dumped into the manifold or EGR valve in the event that I cleaned the port without the manifold off, where would all that gunk go?
The last time, I did make the mistake of removing the fuel rail from the manifold. I didn't realize how many rubber parts are between the rail and manifold but I did figure it out. I cleaned the rubber seals and oiled them with WD-40. Hopefully that was a good thing to do. I'll find out soon. I was able to strip all the dirt etc. off of the rail and cover while it was off. Nice and clean now.
As for prices, yes FCP does offer a discount to orders over $150 just about every time, along with free shipping with orders over $150. I believe the discount is 10% and there is usually a code on this site somewhere. If you do a search for FCP their banner will appear at the top of the page and show the discount code. Also, there are a few different kits that are priced according as to how many parts you need. I NEVER get the intake tube between the MAF and turbo valve (or whatever that is), that tube is expensive. I believe my kit is the lowest price kit made.
Last edited by rspi; 01-26-2012 at 10:45 PM. Reason: correction
#18
08-08-2011, 06:01 AM
#19
08-21-2011, 06:09 PM
So I ordered the stuff from fcp last weekend and did the work yesterday. I found the intake arm btw. This job took me about 3 hours with a couple of short breaks to get some water. Working on the car in the sun sucks. A swivel adapter and swivel extensions are a must! you also need a shallow 12mm socket or else you wont be able to get all the manifold bolts. I don't remember seeing this in the writeup but for my IM, the bottom bolts didnt need to be removed; just loosened a good bit. The manifold was cut out where the bottom bolts are so you can sit it over them. I found this to be VERY handy during the installation process.
My ports weren't very clogged at all. The top one had almlmost nothing in it but the bottom one had a little sludge. I used a pick to scrape it out but I didn't get a whole lot. My guess is that the hoses were clogged. But it fixed my issue. No more oil coming from the dipstick tube and no smoke from it either. I hope this fixed my oil leak. It seems to be better. Just residual oil from the chassis dripping on the ground now.
Anyone know why FCP includes an extra fire trap with the kit if the hoses already have a new firetrap on them? I noticed I had to use the plastic honeycomb filter thing from the extra fire trap, but that was it. Also, I couldn't get it to twist into the intake arm. I could barely move it at all, let alone twist it to lock it in. It's in there, but not locked in.
Also included in the kit was some braided vacuum hose and a hard plastic vacuum hose. Any ideas where these are to be used? The only hose I had that needed replacing was a good bit larger than the one supplied in the kit. It runs from the IM to something in front of the radiator opposite from the TB.
Last edited by Chris 850T; 08-21-2011 at 06:17 PM.
#20
08-22-2011, 06:37 AM
So I ordered the stuff from fcp last weekend and did the work yesterday. I found the intake arm btw. This job took me about 3 hours with a couple of short breaks to get some water. Working on the car in the sun sucks. A swivel adapter and swivel extensions are a must! you also need a shallow 12mm socket or else you wont be able to get all the manifold bolts. I don't remember seeing this in the writeup but for my IM, the bottom bolts didnt need to be removed; just loosened a good bit. The manifold was cut out where the bottom bolts are so you can sit it over them. I found this to be VERY handy during the installation process.
My ports weren't very clogged at all. The top one had almlmost nothing in it but the bottom one had a little sludge. I used a pick to scrape it out but I didn't get a whole lot. My guess is that the hoses were clogged. But it fixed my issue. No more oil coming from the dipstick tube and no smoke from it either. I hope this fixed my oil leak. It seems to be better. Just residual oil from the chassis dripping on the ground now.
Anyone know why FCP includes an extra fire trap with the kit if the hoses already have a new firetrap on them? I noticed I had to use the plastic honeycomb filter thing from the extra fire trap, but that was it. Also, I couldn't get it to twist into the intake arm. I could barely move it at all, let alone twist it to lock it in. It's in there, but not locked in.
Also included in the kit was some braided vacuum hose and a hard plastic vacuum hose. Any ideas where these are to be used? The only hose I had that needed replacing was a good bit larger than the one supplied in the kit. It runs from the IM to something in front of the radiator opposite from the TB.
My ports weren't very clogged at all. The top one had almlmost nothing in it but the bottom one had a little sludge. I used a pick to scrape it out but I didn't get a whole lot. My guess is that the hoses were clogged. But it fixed my issue. No more oil coming from the dipstick tube and no smoke from it either. I hope this fixed my oil leak. It seems to be better. Just residual oil from the chassis dripping on the ground now.
Anyone know why FCP includes an extra fire trap with the kit if the hoses already have a new firetrap on them? I noticed I had to use the plastic honeycomb filter thing from the extra fire trap, but that was it. Also, I couldn't get it to twist into the intake arm. I could barely move it at all, let alone twist it to lock it in. It's in there, but not locked in.
Also included in the kit was some braided vacuum hose and a hard plastic vacuum hose. Any ideas where these are to be used? The only hose I had that needed replacing was a good bit larger than the one supplied in the kit. It runs from the IM to something in front of the radiator opposite from the TB.