2003 S40 VVT cam seal replacement
#21
 04-01-2013, 08:26 PM


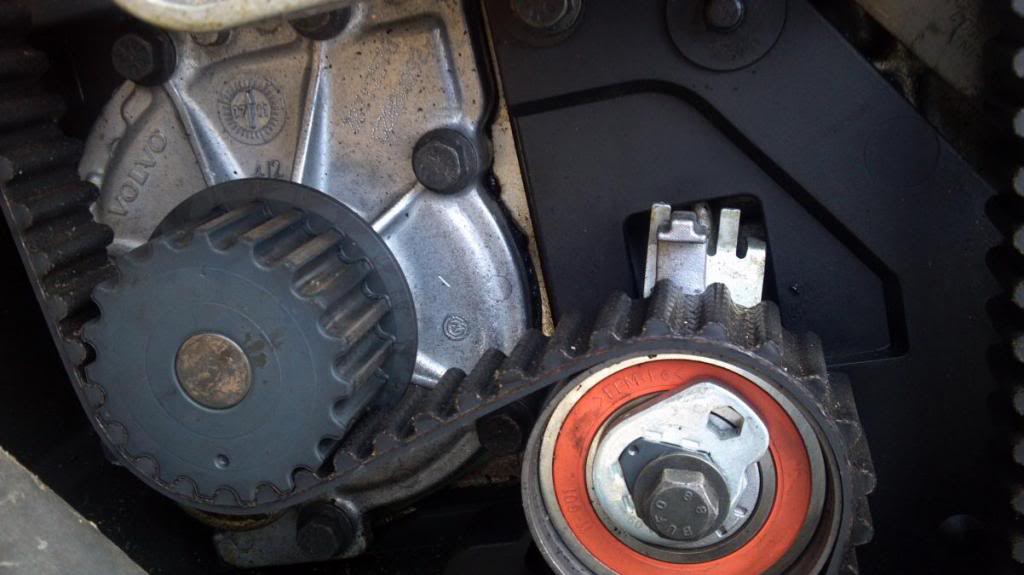
The proper belt tension adjustment is to slightly loosen the tensioner bolt, then use an allen wrench to move the metal bar in between the two metal tabs, then re-tighten the bolt. This is easy with the engine out of the car but the viewing angle with the engine in the car is off center. As you tighten the center bolt carefully watch the adjuster to make sure it does not move. After several tries I had to leave the metal bar a bit short of the tabs then as I tightened the bolt it moved into the correct position.
#22
04-01-2013, 09:25 PM

Thanks Hudini, I went to the volvo dealer today to get parts. I was lucky enough to talk to a tech there. When I told him the mileage and the trouble code He shook his head and and told me I was wasting my money on a new vvt hub. The service writers also cringed evidently they've seen a lot of this.He said the leak is almost always from the seal ,and that the P0015 code is considered a permanent fault after 100 to 150 k. the problem is in the cam itself.
He said the ports in the cam wear over time causing a pressure change in turn tripping the code and the only way to fix it is to change the cam . Well that sucks. So after taking off the cam sensor cover I decided to opt for the pop the cam cover method to do the seals. What the hell its only 43 bolts.LOL But i think it will be easier than trying to get the vvt hub in the right position again.I even had a tough time getting the lower bolt off the sensor cover. Getting behind the intake tube the pvc tube the vacuum lines the wire harness the fuel line was a real pain in the ***. I hope to fix the leak and change the belt and call it done. I read some ware that if you reset the ecu or the pcm or whatever you want to call it the code will go away. maybe I'll get lucky. He also said that the sound I'm hearing is an exhaust leak and it does go away after the engine warms up.?????? Ill keep you posted maybe even some pics. I'm starting to hate the volvo s40. Maybe this is why the stopped making them. But its my son's first car and it didn't cost him anything . So there's that......
He said the ports in the cam wear over time causing a pressure change in turn tripping the code and the only way to fix it is to change the cam . Well that sucks. So after taking off the cam sensor cover I decided to opt for the pop the cam cover method to do the seals. What the hell its only 43 bolts.LOL But i think it will be easier than trying to get the vvt hub in the right position again.I even had a tough time getting the lower bolt off the sensor cover. Getting behind the intake tube the pvc tube the vacuum lines the wire harness the fuel line was a real pain in the ***. I hope to fix the leak and change the belt and call it done. I read some ware that if you reset the ecu or the pcm or whatever you want to call it the code will go away. maybe I'll get lucky. He also said that the sound I'm hearing is an exhaust leak and it does go away after the engine warms up.?????? Ill keep you posted maybe even some pics. I'm starting to hate the volvo s40. Maybe this is why the stopped making them. But its my son's first car and it didn't cost him anything . So there's that......
#24
04-02-2013, 08:30 AM

I'm spewing oil when running(flies off the exhaust gear) and figure I would try to change out the o ring on the plunger. Should of changed the PCV system when I noticed the rear seal leaking on the exhaust cam. Anyways, I've replaced the PCV system and want to sell the car. I can't imagine the cam seal alone is the culprit given the amount. I've got my timing belt all lined up and about to pop it off so I can remove the gear, not the vvt, and pull out the plunger. Problem is the plunger is not accessible and I would need to rotate the cam. Any problem rotating the cam once the belt is off since this is an interference engine? I imagine that would only apply when running but need to know. Otherwise I need to double mark the gears and remove when the plunger is at 12 oclock.
#26
04-02-2013, 01:17 PM
Crank timing mark:
I'm not sure I'd trust the advise you were given. I'm running the original cam sensor and CVVT solenoid. I did replace the CVVT hub before I learned there was an easier and cheaper way to fix the plunger leak. My 2001 has over 175k miles and no codes. My 17 year old daughter drives it everyday. I even scanned it with the DiCE tool while driving to check things like boost level and such.
For the exhaust leak mine sounded like a sewing machine until warmed up. I found a nut backed off the exhaust stud right above the turbo. It kept backing off over time so I used a lock nut to make it stay. If you go this route don't use the Nylock nuts as the nylon will melt. Use the older stop nuts which are regular nuts that have been bent slightly to make them have more tension on the threads. Found them in Ace Hardware.
Last edited by Hudini; 04-02-2013 at 01:28 PM.
#27
04-02-2013, 01:31 PM
I'm spewing oil when running(flies off the exhaust gear) and figure I would try to change out the o ring on the plunger. Should of changed the PCV system when I noticed the rear seal leaking on the exhaust cam. Anyways, I've replaced the PCV system and want to sell the car. I can't imagine the cam seal alone is the culprit given the amount. I've got my timing belt all lined up and about to pop it off so I can remove the gear, not the vvt, and pull out the plunger. Problem is the plunger is not accessible and I would need to rotate the cam. Any problem rotating the cam once the belt is off since this is an interference engine? I imagine that would only apply when running but need to know. Otherwise I need to double mark the gears and remove when the plunger is at 12 oclock.
#28
04-02-2013, 06:15 PM
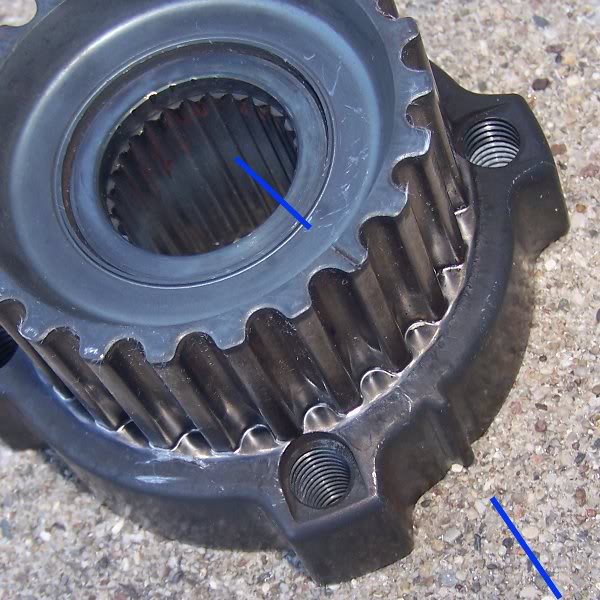
Got the car apart. Had to use vice grips to remove two special looking bolts that were preventing the cover from being removed from the cam. (shown in pic below)
Here is a pic of the rings on the CVVT cam that the volvo tech said wear:
Also, thanks for the timing marks I was going crazy trying to find them
Here is a pic of the rings on the CVVT cam that the volvo tech said wear:
Also, thanks for the timing marks I was going crazy trying to find them
Last edited by corby4; 04-02-2013 at 06:19 PM.
#31
04-03-2013, 06:42 PM

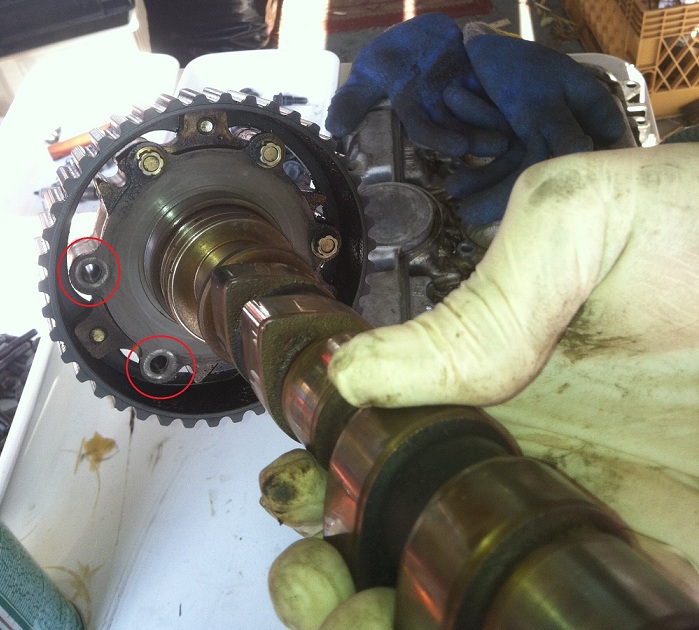
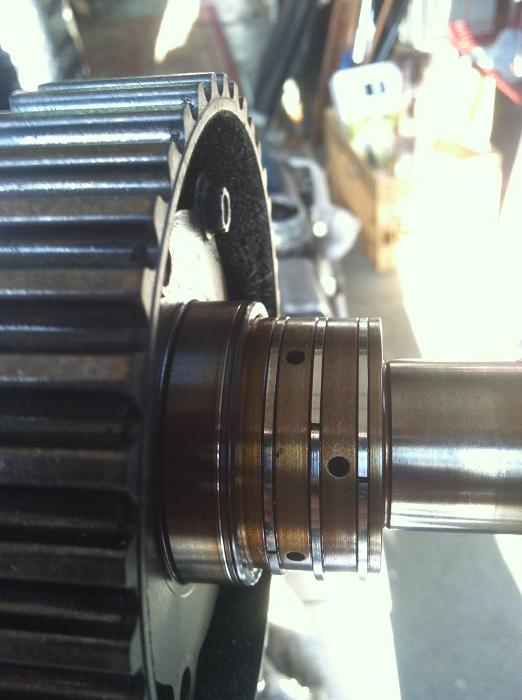
I would like to thank Hudini and Tr-car-nut and Corby4 for their excellent pictures. Corby4 it nice to see how the oil gets in and out of VVT pulley.
To Speedo, line up the cams and belt to timing reference on valve cover.
1.Mark the position of crank pulley to reference to something down there. Advise pulling front wheel and splash cover to see the crank pulley to mark its position. And you can turn engine by hand 2 revolutions when done.
2. Mark the belt to boths cam pulleys.
3 Mark the VVT hub or mechanism to its gear for belt.
Ease belt off both cams a little at a time. The cams will pop to there most relaxed position from the valve springs force. You have to fight this when slippling the belt back on. Do not move the belt going down to the crank.
You should be able to rotate the cam some to get at the plunger and replace the brittle square rubber ring. Do not lose the spring that can fall out from the plunger bore. Put the plunger back after finding an extremely tight fitting oring. This does not have to ever move. so it needs to be sealed good. Put gear back on and ease belt back over both pulleys. Best to have two people to help hold things and make sure nothing slips on you. After turning the engine over two revolutions with no interference, fire it up and check for leaks. reinstall all items removed. You will have about a dollar in it and the labor of love.
Ours is still dry and runs good.
cidftwayne
#32
04-03-2013, 07:52 PM
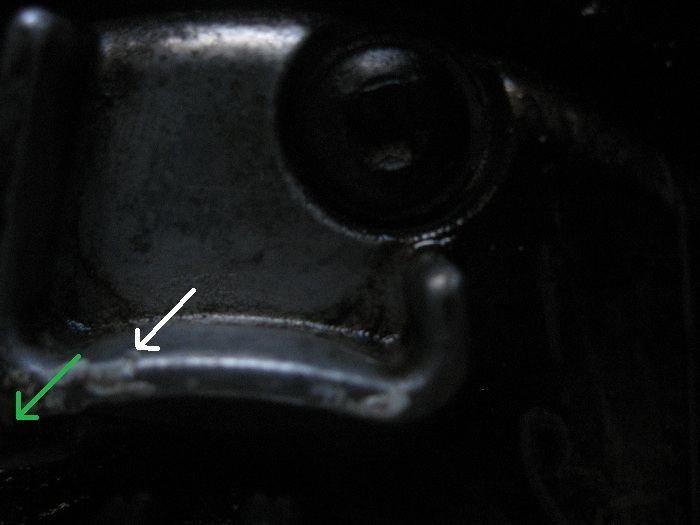
Here is a thought, from the faint timing mark on the block that I could see, whoever did this job before me may have installed the belt 1 tooth off. Maybe that's the reason for the P0015 code? But would the car run as great as it did if it was 1 tooth off? The mark that I found is not visible in the picture attached.It looks to be a little to the left . Keep in mind everything was covered in black grime and I have a lot more cleaning to do. I don't have the right puller to remove the sprocket ,nor do I want to.
Correction: That mark was definitely not the mark I thought it was. There's a small scratch where the white arrow is pointing and there is a protrusion below (not shown in picture) where the green arrow is pointing that looks similar to the mark on the sprocket. The difference is exactly one tooth. I'll try to get a better picture when I get the chance.
Correction: That mark was definitely not the mark I thought it was. There's a small scratch where the white arrow is pointing and there is a protrusion below (not shown in picture) where the green arrow is pointing that looks similar to the mark on the sprocket. The difference is exactly one tooth. I'll try to get a better picture when I get the chance.
Last edited by corby4; 04-04-2013 at 07:43 PM.
#33
04-04-2013, 11:55 AM
Thanks cidftwayne,
I pulled the plunger this morning and had to cut off the old o-ring, which to me is a good sign. It broke apart in multiple pieces. I measured the actual diameter of the plunger and came up with .462. The O-ring was .091 wide and .0625 thick in its hardened state. Given that the o-ring was flush with the outside diameter of the plunger that makes the diameter of the plunger where the ring seats at .337. I figure an o-ring that is AS58-011 which is 0.070 thick and has an inside diameter of 0.301 should work. Will see what's out there and post pics when done. Thanks again for all the advise.
I pulled the plunger this morning and had to cut off the old o-ring, which to me is a good sign. It broke apart in multiple pieces. I measured the actual diameter of the plunger and came up with .462. The O-ring was .091 wide and .0625 thick in its hardened state. Given that the o-ring was flush with the outside diameter of the plunger that makes the diameter of the plunger where the ring seats at .337. I figure an o-ring that is AS58-011 which is 0.070 thick and has an inside diameter of 0.301 should work. Will see what's out there and post pics when done. Thanks again for all the advise.
#34
04-05-2013, 08:11 PM
Hi Guys ,
Well got it all back together . Will start it tomorrow. What a BITCH.Thanks Hudini for your help and all for your help. I however would not reccomend doing it this way. The main problem is that you cant be sure the seals don't move when putting the cover back on.So we'll see tomorrow.
Well got it all back together . Will start it tomorrow. What a BITCH.Thanks Hudini for your help and all for your help. I however would not reccomend doing it this way. The main problem is that you cant be sure the seals don't move when putting the cover back on.So we'll see tomorrow.
#35
04-05-2013, 09:20 PM
Speedo,
I would recommend an inside diam. of .337" and a thickness of the full width of .091" for a total OD of .520". Thus it will have a good compressed fit of .058" approxiamately and will help to fill in the square shape of the original. You do not want this to leak when you are done. As some have tried and said it leaked again. I believe they did not get it sized right. I think the best way is to press it in with a small C-clamp while trying to work it into the bore with dull minny screw driver and silicone grease to make the rubber slippery is the way to go.
I am sorry I did not right the number of the oring down that we finnally used, but I did not decide to reply to this forum till after it worked. And I lost track of what we did use. I just know it was tight and I think it tried to cut the outter surface off but none was sticking out . So it was in tight. Do not press in further than what it has to, to clear putting the sprocket back on the VVT mechanism.
You might try to put just one of the three screws in with the belt on both cam sprockets(or a small drift punch through the bolt hole of sprocket and thread of the mechanism) and shoehorn it over the cam mechanism. May have to take the cover off the center bolt to use a socket with socket handle not a rachet to hold and rotate the cam to the aligned position inside the sprocket. I just said two different ways. Hope I gave some good methods.
Hopefully will never have to do this again as I do not have many friends with Volvos.
If this works easily for you, you will be the man. Hope you have great success!
Last edited by cidftwayne; 04-05-2013 at 09:24 PM.
#36
04-05-2013, 09:40 PM
Corby 4, 4-3-2013 7:52 reply,
I believe you found the problem for the P0015 error as you said. The timing has a tiny bit of tolerance and may run better if out slightly. As the marks are in the casting and the stack of the head gaskets may be slightly different from engine to engine. But they should be as close to the exact position as you can get. Since it was out on the crank it was a good thing you checked it out. It's just to bad they did not put an exposed timing mark on the crank pully to a reference somewhere down there. But then anybody could work on them. Sorry you had to take so much apart. That exhaust timing sensor bolts were a killer for us too. We dropped the bottom bolt and have not found it. It was a bear to reinstall also. Obviously an engineer never had to install one after it was built.
Good luck.
Good luck
Last edited by cidftwayne; 04-05-2013 at 09:43 PM.
#37
04-06-2013, 09:29 AM

After looking over everything my mechanic and I decided to go ahead and just get a new pulley... it was a pain in the *** to get that whole procedure through with, as there are no marks anywhere to indicate cam position when getting all that stuff off. Even with that Volvo Cam-locking tool, it took 12 tries to get the timing back to ridiculously close to perfect, it just wouldn't go perfectly as it seemed to before. But now everything runs fine, even though I believe the timing is still off just a hair. No leaks, no problems, no codes... I hope it's all done for good!
Thanks to Hudini and everyone else for your help in this!
Thanks to Hudini and everyone else for your help in this!
#38
04-06-2013, 07:11 PM
Thanks cidftwayne,
The o-ring I thought would work wasn't close. I tried a 5/16" inside diameter with a 3/32 thickness, but it was pretty tight and tended to want to roll out. I ended up using a 1/4" inside diameter with a 3/32" thickness. You really needed to stretch it to get it on, but I believe that helped reduce the 3/32" thickness, like stretching a rubber band. At first it sheared a little getting it in, so I pulled it out and it looked ok. It ended up going it snugly. Getting everything back on was a pain and in the end I must of jumped 2 teeth. So this time around I loosened the tensioner which made the process so much easier. I would recommend if I were to do it again I would lightly lock the belt to the intake gear using lock pliers , loosen the tensioner then work off the exhaust cam belt and gear to access the plunger. Fired it up this morning after triple checking alignment and no more spewing oil. I had a couple of drops but feel it was just residual. Going to pressure wash it tomorrow. Feel like I can sell it now that it's not leaking like a sieve. Appreciate all the write ups regarding the process.
The o-ring I thought would work wasn't close. I tried a 5/16" inside diameter with a 3/32 thickness, but it was pretty tight and tended to want to roll out. I ended up using a 1/4" inside diameter with a 3/32" thickness. You really needed to stretch it to get it on, but I believe that helped reduce the 3/32" thickness, like stretching a rubber band. At first it sheared a little getting it in, so I pulled it out and it looked ok. It ended up going it snugly. Getting everything back on was a pain and in the end I must of jumped 2 teeth. So this time around I loosened the tensioner which made the process so much easier. I would recommend if I were to do it again I would lightly lock the belt to the intake gear using lock pliers , loosen the tensioner then work off the exhaust cam belt and gear to access the plunger. Fired it up this morning after triple checking alignment and no more spewing oil. I had a couple of drops but feel it was just residual. Going to pressure wash it tomorrow. Feel like I can sell it now that it's not leaking like a sieve. Appreciate all the write ups regarding the process.
#39
04-06-2013, 09:57 PM
Well long story short, still leaking oil. Guess It was the hub after all.
I thought about doing the O ring when the shaft was out. But you know , I just wanted to finish. Big mistake. Now I'll be doing it on the car, If I can get those tamper proof bolts off. I went at one with a vice grip, but couldn't get it loose.Now it's a little torn up. Gave up for today. Maybe next week I'll get back on it. No codes yet though.
I thought about doing the O ring when the shaft was out. But you know , I just wanted to finish. Big mistake. Now I'll be doing it on the car, If I can get those tamper proof bolts off. I went at one with a vice grip, but couldn't get it loose.Now it's a little torn up. Gave up for today. Maybe next week I'll get back on it.
No codes yet though.

