P0015 Code on Volvo S40?
#41
 03-12-2015, 03:29 PM


Thanks for the info, but I am having a heck of a time finding that pot online.
I did find some 5kΩ Piher potentiometers, rated at 250mW:
PT15NV 5K A2020 PIHER - Potentiometer: mounting | TME - Electronic components
Do you know what the 439 in 5K439M means? Is 439 related to the mW? If not do you think this one would work?
Thanks for you help, I'm hoping I can get it fixed before the summer heat comes back
Send me pm with your phone ( I assume you are in US and I will send you couple.
#42
03-13-2015, 05:01 AM
I just took good look at you pot picture and yours has wrong shape of opening for shaft. Look at their specs page you need PK not PT shape of opening.
Mike
BTW just made 900 miles after last resetting of p0015 and no cel yet. Lots of this was highway but I am hoping Auto Rx will finaly cure my engine. I just do not see myself dropping the pan, cleaning pcv and changing cvvt gear on this Swedish marvel.
Mike
BTW just made 900 miles after last resetting of p0015 and no cel yet. Lots of this was highway but I am hoping Auto Rx will finaly cure my engine. I just do not see myself dropping the pan, cleaning pcv and changing cvvt gear on this Swedish marvel.
#43
03-13-2015, 11:52 AM

I just took good look at you pot picture and yours has wrong shape of opening for shaft. Look at their specs page you need PK not PT shape of opening.
Mike
BTW just made 900 miles after last resetting of p0015 and no cel yet. Lots of this was highway but I am hoping Auto Rx will finaly cure my engine. I just do not see myself dropping the pan, cleaning pcv and changing cvvt gear on this Swedish marvel.
Mike
BTW just made 900 miles after last resetting of p0015 and no cel yet. Lots of this was highway but I am hoping Auto Rx will finaly cure my engine. I just do not see myself dropping the pan, cleaning pcv and changing cvvt gear on this Swedish marvel.
I wish there was a way to bypass all of that fancy electronics crap and just have a good old fashioned (and reliable!) selector switch
#44
03-14-2015, 10:06 AM

Senior Member
Get it fixed- it will only get worse and sooner or later you will be stuck on the freeway in baking sun with no f'n fan. As an alternative you could take your CCM out, take the control panel out of it, get a hold of the right POTS and get a local old school tv repair guy to solder the new ones on. Pretty sure he would not charge more than say $40 to get that done. Very easy job. Of note: the three light bulbs in the CCM are very sensitive to movement and jarring. While you have the CCM out you may want to spring for some new bulbs and throw them in.
#45
03-14-2015, 03:49 PM
Get it fixed- it will only get worse and sooner or later you will be stuck on the freeway in baking sun with no f'n fan. As an alternative you could take your CCM out, take the control panel out of it, get a hold of the right POTS and get a local old school tv repair guy to solder the new ones on. Pretty sure he would not charge more than say $40 to get that done. Very easy job. Of note: the three light bulbs in the CCM are very sensitive to movement and jarring. While you have the CCM out you may want to spring for some new bulbs and throw them in.
Half of the little lights in the car are burnt out, slowly getting them all converted over to LED.
#46
03-17-2015, 06:05 AM
Update on Auto Rx treatment: after 2000mi of code-free running on highways it came back again. I am getting on changing filter as per their instructions. My next step is to chech oil pressure. Has anybody done it? I know the basics. Any caveats? What are the numbers? I am determined to get the code cleared or I am trashing the car . Btw the oil does not appear looking very dirty but more murky after treatment.
. Btw the oil does not appear looking very dirty but more murky after treatment.
#47
03-17-2015, 02:09 PM
Changed oil filter without draining the oil as per instructions and filter has plenty of black particules in pleats. This is after 3 Seafoam cycles and clean looking oil before Auto Rx application. I guess it has taken cleaning process to new level.
Still looking for write up or Vida guide for oil pressure check. Please help.
Mike
. Still looking for write up or Vida guide for oil pressure check. Please help.
Mike
#48
03-17-2015, 10:44 PM
Senior Member
Changed oil filter without draining the oil as per instructions and filter has plenty of black particules in pleats. This is after 3 Seafoam cycles and clean looking oil before Auto Rx application. I guess it has taken cleaning process to new level.
Still looking for write up or Vida guide for oil pressure check. Please help.
Mike
. Still looking for write up or Vida guide for oil pressure check. Please help.
Mike
#49
03-21-2015, 02:46 PM

I don't have access to VIDA but if you check your oil pressure you are looking for pressure cold (note that pressure) then let it warm up and it should drop as the oil heats up. The pressure will go down and stabilize at some point. Note that pressure. Then when you find the specs you can see if your engine is good. If it drops below 10psi I (personally) would shut off the engine to prevent damage. In addition, if your oil pressure is that low I would expect engine noise. That will arm you with information when you find the spec. Good luck.
#50
03-22-2015, 04:04 AM

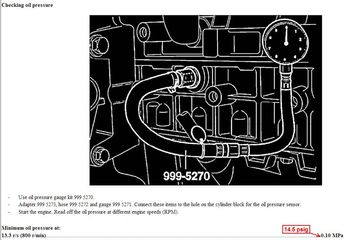
Minimum oil pressure at idle with oil at operating temperature: 14.5 psig
Minimum pressure @ 4000 RPM - oil at operating temperature: 51.8 psig
Maximum pressure @ 4000 RPM - oil at operating temperature: 101.5 psig
Reference:
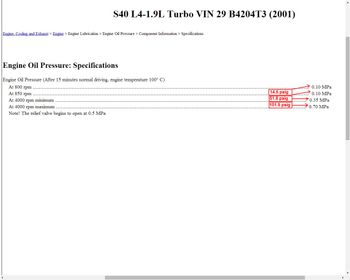
Note: The spec minimum pressure - while at idle and operating temperature (14.5 psig) - is also the set point for the low oil pressure alarm switch.
Reference:

#51
03-27-2015, 09:26 PM


#53
05-21-2015, 10:18 PM

That's a different CVVT hub than the one on your car, which has a different design.
The CVVT hub on your car is a vane type duty cycle unit. I've actually figured out how to fix it on the car and clear the P0015 code without removing the timing belt but I don't know if I want the liability of selling a kit. I'm west of Boston, if you want to drive up here I will (attempt to) fix your car at zero cost.
The CVVT hub on your car is a vane type duty cycle unit. I've actually figured out how to fix it on the car and clear the P0015 code without removing the timing belt but I don't know if I want the liability of selling a kit. I'm west of Boston, if you want to drive up here I will (attempt to) fix your car at zero cost.
Last edited by migbro; 05-21-2015 at 10:21 PM.
The following users liked this post:
s40_Ontario (04-09-2020)
#54
05-22-2015, 05:46 AM
That's a different CVVT hub than the one on your car, which has a different design.
The CVVT hub on your car is a vane type duty cycle unit. I've actually figured out how to fix it on the car and clear the P0015 code without removing the timing belt but I don't know if I want the liability of selling a kit. I'm west of Boston, if you want to drive up here I will (attempt to) fix your car at zero cost.
The CVVT hub on your car is a vane type duty cycle unit. I've actually figured out how to fix it on the car and clear the P0015 code without removing the timing belt but I don't know if I want the liability of selling a kit. I'm west of Boston, if you want to drive up here I will (attempt to) fix your car at zero cost.
Mike
#55
01-10-2017, 10:55 AM

Yes, the rectangle looking thing on top of the exhaust cam, passenger side. It allows hot oil under pressure to enter the big CVVT gear on the exhaust cam. I have not read a single thread where cleaning has fixed the issue though. I always assumed the solenoid part has failed and no amount of cleaning will fix it. The CVVT gear could also have failed internally. The cam sensor is on the driver's side of the exhaust cam. It's inserted into the reluctor wheel cover and held by a 10mm bolt.
Here is the cam reluctor wheel cover. You can see where the sensor is mounted to the cover.

Here is what's under the cover, the reluctor wheel.
Here is the cam reluctor wheel cover. You can see where the sensor is mounted to the cover.

Here is what's under the cover, the reluctor wheel.

#56
12-16-2017, 11:16 AM

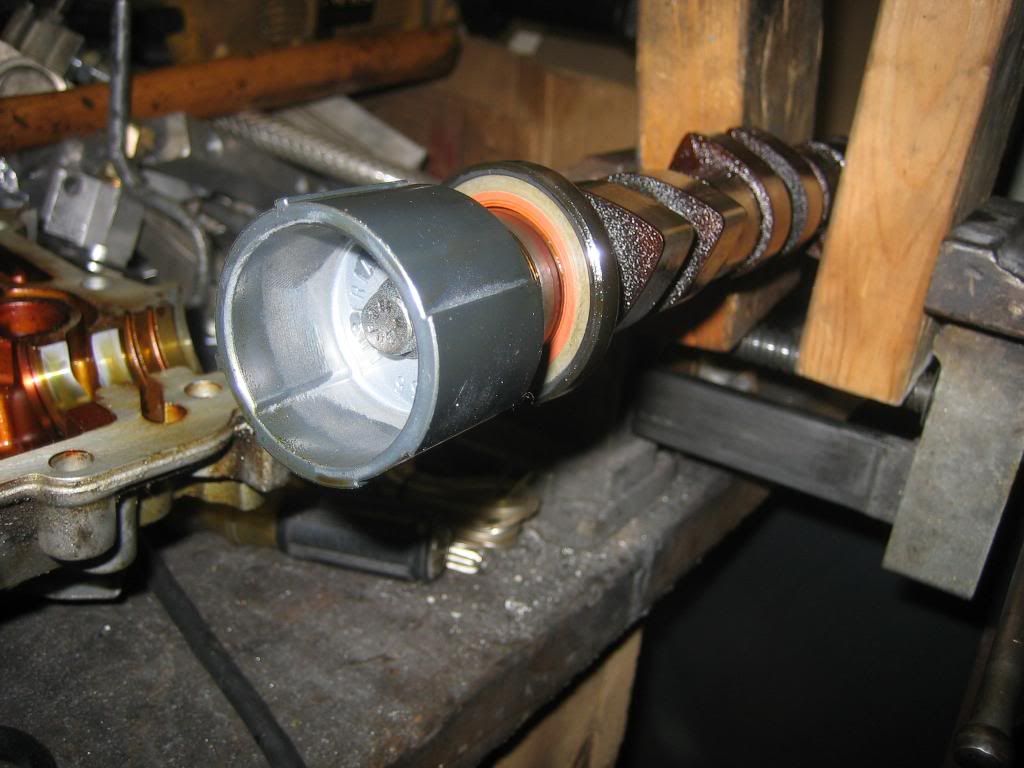
I hate to revive an old thread, but I have found a solution for code P0015 Camshaft Timing Over-retarded for a 2003 S40 1.9L Turbo. Usually I could just reset the code and it stayed off long enough for me to get it inspected. Recently it got so bad that I got P0015 pending after about 20 miles. Long story short, the exhaust camshaft VVT gear(non spring loaded type) had about half a tooth of rotational play in it; also the timing belt had hardly any tension on it. I’m assuming that both of these issues together caused the timing to lag.
I read a lot of forums where people claimed the issue was caused by sludge buildup in the VVT gear and the VVT solenoid valve; however that was not the case with me. When I took both parts off clean oil came out, with no evidence of sludge buildup anywhere. Also the VVT solenoid valve actuated just fine, and there was no debris in the gasket screen.
I bought my parts from RockAuto and PartsGeek. Here is what you will need:
- VVT Gear: $160 (USD)
- Timing Belt kit with tensioner and idler: $100
- Harmonic balancer (crankshaft) locking tool: Fairly easy to make, Haynes manual has a good description on how to make it. You can also purchase an expensive crankshaft/camshaft locking tool set.
- Camshaft locking tool: I HIGHLY recommend buying/borrowing the actually tool for this job. I made this tool per Haynes directions, and the tab that goes into the camshaft end slot bent when I tried to loosen the VVT sprocket bolt. If you use higher grade steel you might be fine, but if it bends even a little bit, your timing will be off when you re-assemble everything. This tool is essential to ensuring correct camshaft timing; and since camshaft timing was the original problem, I would not recommend cutting corners on this. I lucked out and a local mechanic in town actually loaned me his personal tool. I saw them on eBay ranging from $50-$100.
- I also changed some other parts unrelated to the problem while I was at it: water pump, camshaft seals, serpentine belt/tensioner, etc.
One little tip, when you initially install the VVT gear, only hand tighten the bolt so that the gear can still spin. Install the timing belt and set the correct tension. It is an automatic tensioner, but you need to manually preset the initial tension, just follow the directions. Now with the camshaft still locked, the VVT gear will rotate slightly until there is equal belt tension on either side of the gear. This will also ensure that the teeth on the gear perfectly line up with the teeth on the timing belt. Now you torque the VVT bolt. There is no timing mark on the new VVT gear because it can be installed in any position. Temporarily install the plastic cover with the timing marks. Make sure that the intake camshaft timing marks still line up, and use some whiteout and mark on the new exhaust VVT gear where it lines up with the timing mark on the plastic cover. Remove the camshaft locking tool and rotate the crankshaft through 2 rotations, then double check the timing and tension.
Disclaimer: I am not a certified auto mechanic. However, I am a certified aircraft mechanic through the FAA and the US military.
Hope this helps someone.
Zach
Last edited by ZPrice; 12-16-2017 at 11:44 AM.
The following users liked this post:
s40_Ontario (04-09-2020)

Thread
Thread Starter
Forum
Replies
Last Post