Automatic to manual transmission swap
#1
 08-04-2013, 02:56 AM


Join Date: Aug 2013
Posts: 4
Likes: 0
Received 0 Likes
on
0 Posts
I purchased car with a bad transmission for 1000 bucks as well as all components of the transmission swap for about 900 bucks. One option was replacing the transmission with another automatic but for the price, this ended up being way cheaper.
This is a guide on how to replace an automatic transmission, in this case a geartronic, with a manual m56.
First things first, I did this with minor experience. I have done oil changes, timing belts, cv axles, pretty much stuff my sister can do. I've also done a failed engine replacement in a 89 MR2 which was pretty much the sweetest car in the world until I got my collegy hands with no money in them on it. Anyways, this wasn't that hard to accomplish. It just seemed like it at first.
So I will go over the things that would be highly advisable to have. We will call this the prefunk with Dfunk.
-Car
-Some way to lower and raise the engine while the engine are on jackstands.
-Transmission (m56L or H)
-Manual flywheel and bolts
-Pressure plate and friction plate (two versions of the friction plate, a 23 toothed version and a 20 toothed version. i had to call Volvo to determine which version I had and that was after I spent 200 on the wrong one)
-New slave cylinder (most clutch kits come with a new one but if yours did not, I would advise purchasing one)
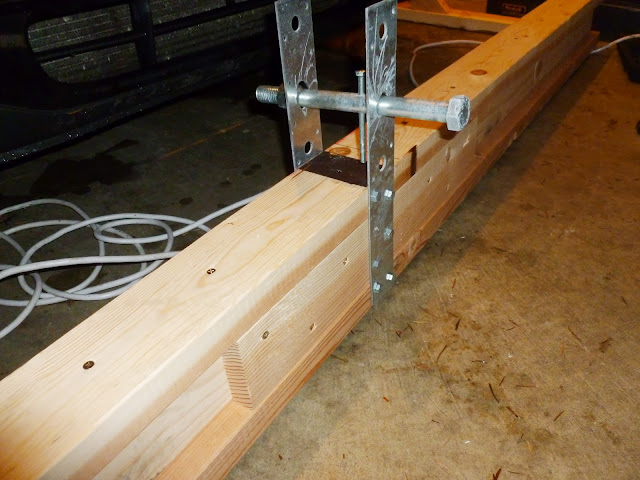
-Manual transmission mount bracket to subframe (very important, different than automatic bracket) In this picture, the bracket is the shinny silver crossmembered plate thing on the left of the transmission)

-pedals from manual car, cables that go from gearshifter to transmission, gear shifter itself with housing, all aplicable bolts that came with the housing, coverplate that goes over the gearshifter housing.
-hydraulic line that goes from master clutch cylinder to transmission slave cylinder.
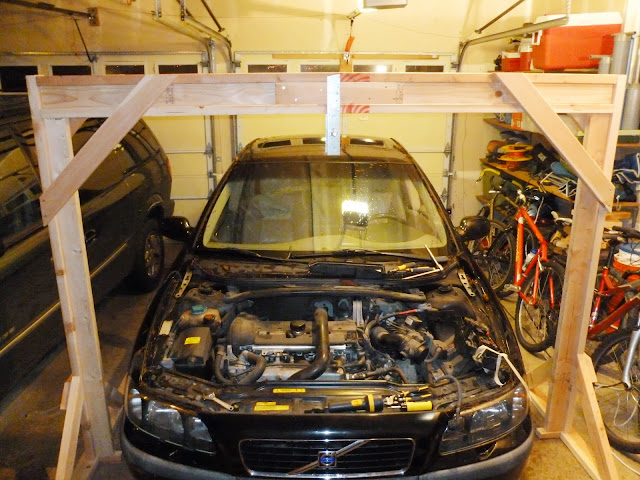
Since I did not believe a regular engine hoist would work for this project because the car is going to be in the air so far, I created this work of art. It is made out of 2x4's and metal bits plus some metal cable rated about 800 lbs. I used some chain to attach the cable where I want so I could raise the engine with the transmission lower than the rest. This setup was enough to lift the entire front end of the car into the air (although I would not recommend). The only thing I would change is to have some sort of ratchet system instead of a wire tied around a large bolt. This system cost me a whopping 50 bucks or so.

Take car and chalk rear wheels (important cause you will be working with the parking brake). Raise front of car on jack stands. This is actually quite difficult as the car will lean like a **** towards the front if you utilize any of the side jack places. I used a minivan jack and placed it on the subframe under the car in the front front and raised it. Place wood on side of car then under the jack and raise it again. It needs to be fairly high as the transmission will be coming out of the right wheel well (when looking at the car from the front). Care needs to be taken at this point when realizing how you will raise and lower the engine. I believe that the car will be too high in the air to use a standard engine hoist but I am not really sure as I did not go this route. Take wheels off of car and brake components. Brake components can be taped or tied to big springs. Unscrew two big bolts that attach the shock strut things to the wheel hub.
 Unscrew all bolts that are attached to the control arm/wheel hub and put this somewhere you will remember. The anti-roll bar needs to be unhooked from whatever it is hooked onto as well (not from the subframe, just from where it is connected in the wheel well). I would recommend an electric hammer drill (the one that goes pow pow pow while it unscrews things) as anything else will just make the ball joint spin in its housing.
 The axles or cv shafts will need to be taken off now. Unscrew bolts that hold it on anywhere and use screwdrivers or crowbar to leverage them out of the transmission.
 *note on my sisters black s60, the axles came out just fine using this strategy. On my green s60, I used a heavy duty crowbar and still have not been able to pull them off. Rumor has it that things called hammer pullers can pull stubborn ones off* Once you have the cv axles out, it is time to work on dropping the subframe.
Dropping the subframe is tricky because of all of the hoses and tubes and random stuff that is screwed onto it. You need to run your hand along the subframe to make sure you have gotten every random bolt and hose disconnected from the frame before you drop it. There are a number of things that are connected to the subframe.
-Anti-roll bar
-steering rack
-engine/transmission mounts
-random hoses and crap
The anti-roll bar I completely left on it when I dropped it. Didn’t touch it, it just was connected to the subframe and went wherever the subframe went.
The steering rack is connected to the subframe by 5 bolts/nuts. Two on each side and one near the middle. Make sure you get all 5 as you don’t want the steering rack to get pulled down by the subframe and possibly disconnected from the steering column.The steering rack is also connected to the engine by the bulbous type engine mounts. Remove the bulbous engine support.
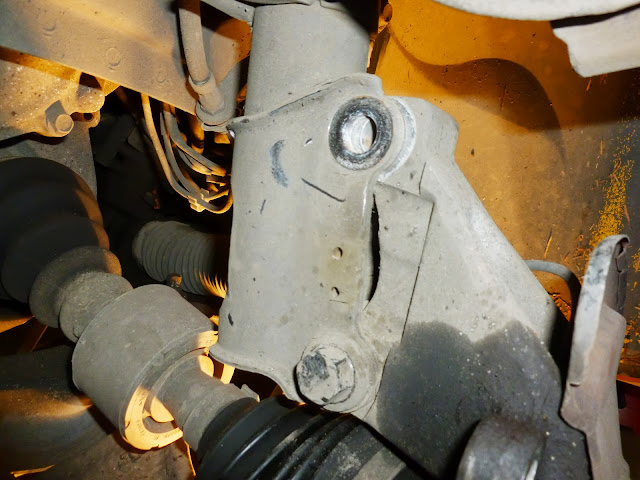
Engine transmission mounts. There are 2 big bulb (looks like large turnips) style engine mounts that need to be unscrewed from the subframe. One in the front and one in the back of the bay. remove at this time. There is an engine mount on the left side of the engine.
 This can be unbolted from the subframe without causing the engine to fall or anything. See the bolts that I took off? The transmission mount underneath the transmission that bolts to the front subframe area can be taken off completely.
Random hoses and crap. Disconnect from subframe.
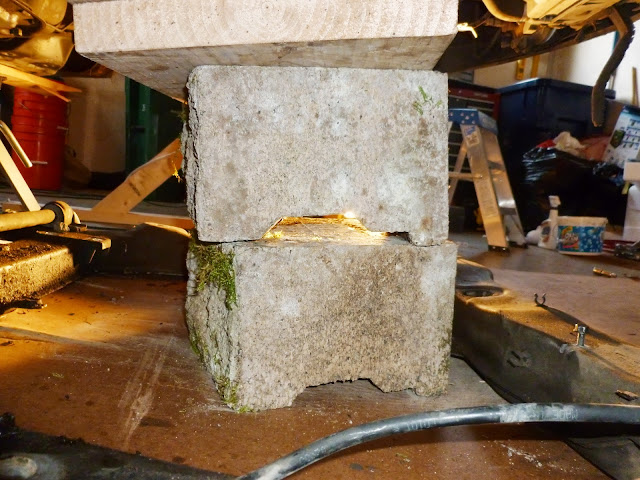
At this point, theoretically you should be able to lift the engine off of the subframe. This is exactly what I did. I raised it maybe an inch off of the subframe and bricked it up underneath. Notice that I was able to utilize bricks that were taller on one side than the other. It worked out perfectly because the oil pan/engine is at an angle. I was able to keep the natural angle of the engine throughout the whole procedure.

The subframe has 4 main bolts and pieces on the rear 2 bolts that need to be taken off before the main bolts.

Note the improper jack stand positioning that prevented me from taking the pieces off at first until I adjusted it.
After you have the subframe bolts off, you will notice that if you have done it properly, the frame will drop to the ground with nothing connected to it. Another person really helps out here cause that subframe is in an awkward place and really really heavy.
Now that you have the subframe off, you can start working on the transmission. Automatic transmissions have an oil cooler line attached to the radiator. I unscrewed it from the transmission and left it attached to the radiator. I really didn’t know how to take it off of the radiator. If you don’t plan on putting an auto back into the car, you can do whatever you want with this line, cut it, burn it, hack saw it, idk. I threw it over the subframe and my sister now drives it with a random hose there. There are a bunch of wires that go to the transmission. Disconnect these at the connectors. Seriously I am not sure what I did with the transmission. Basically, every wire that goes to the auto transmission will not be utilized so you need to disconnect everything from the transmission including the gear selector pieces.
Once you have all the wires and stuff disconnected from the transmission, it is time to lower the engine/transmission and get it in a good position to come off of the engine. But before you do that, you need to disconnect enough of the exhaust from the car so that when you lower the engine, it won’t bend the exhaust pipe and destroy it. I disconnected the exhaust from this part as well as the next part down the line. I think. This detail is hazy. Do what you gotta do. Now you can lower the engine. The transmission will need to squeeze out of the right wheel well area so basically lower enough till this is possible. The transmission is connected to the engine via a bunch of bolts around the bellhousing. Remove these bolts. I removed the starter as well because the torque converter needs its bolts removed on that side of the flywheel and this is one way to get those bolts out. I believe that there is another way on the bottom of the flywheel area so that you do not have to remove the starter. If you find this way, I would suggest using it as the starter is annoying to take off and put back on especially when you find out you really didn’t need to. Remove transmission and be careful not to bend or otherwise cause damage to the shaft that goes into the transmission. I hooked up my engine lifter system to the transmission at this point as I had the engine blocked off to where I needed it. I used the engine lifter to lift most of the weight of the transmission and yanked it off. Now the torque converter can be removed. There are 6 (or 8. Idk) bolts that hook the torque converter to the flywheel that can only be accessed from the engine side of the flywheel as I stated earlier. Remove these bolts. Remove torque converter. Use hammer drill again to remove flywheel bolts from the flywheel. I recommend spraying with something that will make the bolts not sheer off when you wrench them out. I had this happen and spent too long drilling that bolt out and finding replacement bolts. These bolts that you are now holding in your hand are a really weird size that Tacoma screw (a store dedicated to different bolts/screws and oddities) did not have. I had to purchase 3 from a Volvo dealer because I did not use the correct hex or star set. Do you know how much those three bolts cost me? My firstborn. Actually more like 20 bucks each. So pretty much my firstborn. USE THE CORRECT BIT. Lesson learned. A nice set of correct bits cost less than damaged bolts. Also, wherever you got your manual flywheel from, don’t forget to get the bolts for it too as these are different than the automatic flywheel bolts.
Now you have the transmission off and are ready to put on the manual components. Certain elements need to be performed before or at this time. The pressure plate that I received was a self adjusting pressure plate. This means that before you place it into the car, its adjusting value needs to be set at zero. This will prevent situations where you burn up your clutch in 5000 miles because the pressure plate is always pressing against the friction plate. You have two options. One is taking the engine and or flywheel to a Volvo dealership and having them mate the two things up properly for an absurd amount of money. The second option is to reset the value back to zero using a press and 3 points of contact. I had a mechanic do this with me while I backseat drove the crap out of him. But it cost me only 40 bucks (but I did 2 pressure plates and I had the mechanic come in to his shop on a Saturday just for me). Post a craigslist ad and say you will give them 20 bucks if you can use their large press for 15 minutes and problem solved.
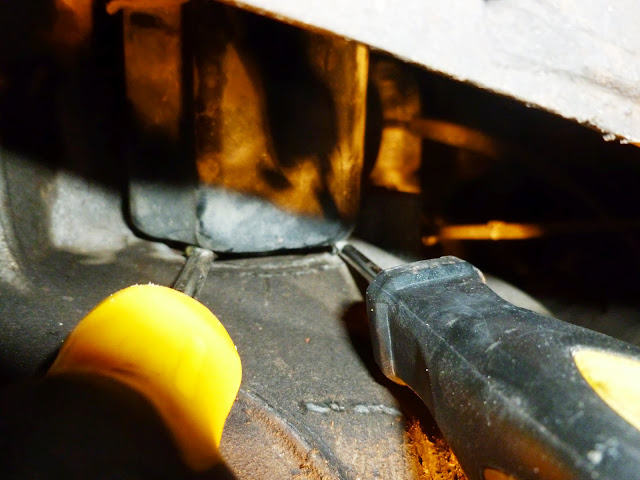
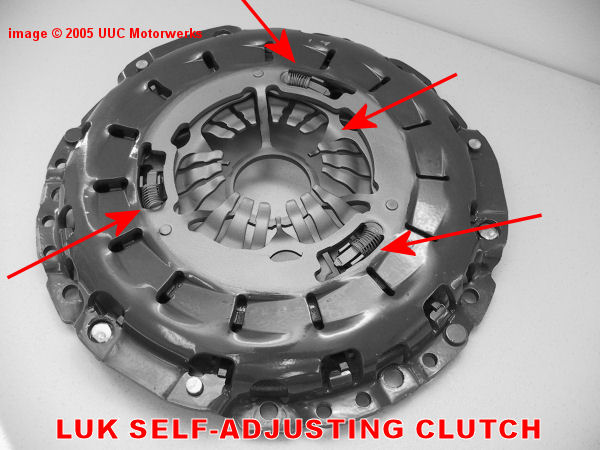 See those springs? this pressure plate is not set at zero yet. The wedge ring goes around the entire disc more outside of the springs but before the lip that goes down. Yeah.
Ok here is the process. The pressure plate uses an internal plastic ring that contains a wedge shape to it. It is spring loaded so that as the friction plate wears, the wedge ring shifts and makes the pressure plate contact the friction plate at the exact same place for its entire life. Pretty ingenious. What you need to do is support the pressure plate in such a way as the supports are not going to hamper the run of the tynes. I put three sockets on the outside metal piece and pressed down on the tynes using the press. While I was pressing, I was using a screw driver to press the wedge ring back into its 0 position. This meant the springs that you can see were all the way compacted. Voila. Done.
Now that you have a reset pressure plate, you can attach the manual flywheel to the engine. *Note: Manual flywheel is different than automatic flywheel* Then assemble the pressure plate and friction plate to the flywheel making sure the friction plate is aligned in such a way as the transmission shaft can go smoothly through the middle. Attach transmission to engine being careful to line up transmission spline shaft with friction plate hole. Attach bolts and basically reverse the process that you have done to put everything back together.
Next post will be about interior and electrical.
This is a guide on how to replace an automatic transmission, in this case a geartronic, with a manual m56.
First things first, I did this with minor experience. I have done oil changes, timing belts, cv axles, pretty much stuff my sister can do. I've also done a failed engine replacement in a 89 MR2 which was pretty much the sweetest car in the world until I got my collegy hands with no money in them on it. Anyways, this wasn't that hard to accomplish. It just seemed like it at first.
So I will go over the things that would be highly advisable to have. We will call this the prefunk with Dfunk.
-Car
-Some way to lower and raise the engine while the engine are on jackstands.
-Transmission (m56L or H)
-Manual flywheel and bolts
-Pressure plate and friction plate (two versions of the friction plate, a 23 toothed version and a 20 toothed version. i had to call Volvo to determine which version I had and that was after I spent 200 on the wrong one)
-New slave cylinder (most clutch kits come with a new one but if yours did not, I would advise purchasing one)
-Manual transmission mount bracket to subframe (very important, different than automatic bracket) In this picture, the bracket is the shinny silver crossmembered plate thing on the left of the transmission)
-pedals from manual car, cables that go from gearshifter to transmission, gear shifter itself with housing, all aplicable bolts that came with the housing, coverplate that goes over the gearshifter housing.
-hydraulic line that goes from master clutch cylinder to transmission slave cylinder.
Since I did not believe a regular engine hoist would work for this project because the car is going to be in the air so far, I created this work of art. It is made out of 2x4's and metal bits plus some metal cable rated about 800 lbs. I used some chain to attach the cable where I want so I could raise the engine with the transmission lower than the rest. This setup was enough to lift the entire front end of the car into the air (although I would not recommend). The only thing I would change is to have some sort of ratchet system instead of a wire tied around a large bolt. This system cost me a whopping 50 bucks or so.
Take car and chalk rear wheels (important cause you will be working with the parking brake). Raise front of car on jack stands. This is actually quite difficult as the car will lean like a **** towards the front if you utilize any of the side jack places. I used a minivan jack and placed it on the subframe under the car in the front front and raised it. Place wood on side of car then under the jack and raise it again. It needs to be fairly high as the transmission will be coming out of the right wheel well (when looking at the car from the front). Care needs to be taken at this point when realizing how you will raise and lower the engine. I believe that the car will be too high in the air to use a standard engine hoist but I am not really sure as I did not go this route. Take wheels off of car and brake components. Brake components can be taped or tied to big springs. Unscrew two big bolts that attach the shock strut things to the wheel hub.
Unscrew all bolts that are attached to the control arm/wheel hub and put this somewhere you will remember. The anti-roll bar needs to be unhooked from whatever it is hooked onto as well (not from the subframe, just from where it is connected in the wheel well). I would recommend an electric hammer drill (the one that goes pow pow pow while it unscrews things) as anything else will just make the ball joint spin in its housing. The axles or cv shafts will need to be taken off now. Unscrew bolts that hold it on anywhere and use screwdrivers or crowbar to leverage them out of the transmission. *note on my sisters black s60, the axles came out just fine using this strategy. On my green s60, I used a heavy duty crowbar and still have not been able to pull them off. Rumor has it that things called hammer pullers can pull stubborn ones off* Once you have the cv axles out, it is time to work on dropping the subframe. Dropping the subframe is tricky because of all of the hoses and tubes and random stuff that is screwed onto it. You need to run your hand along the subframe to make sure you have gotten every random bolt and hose disconnected from the frame before you drop it. There are a number of things that are connected to the subframe.
-Anti-roll bar
-steering rack
-engine/transmission mounts
-random hoses and crap
The anti-roll bar I completely left on it when I dropped it. Didn’t touch it, it just was connected to the subframe and went wherever the subframe went.
The steering rack is connected to the subframe by 5 bolts/nuts. Two on each side and one near the middle. Make sure you get all 5 as you don’t want the steering rack to get pulled down by the subframe and possibly disconnected from the steering column.The steering rack is also connected to the engine by the bulbous type engine mounts. Remove the bulbous engine support.
Engine transmission mounts. There are 2 big bulb (looks like large turnips) style engine mounts that need to be unscrewed from the subframe. One in the front and one in the back of the bay. remove at this time. There is an engine mount on the left side of the engine.
This can be unbolted from the subframe without causing the engine to fall or anything. See the bolts that I took off? The transmission mount underneath the transmission that bolts to the front subframe area can be taken off completely.Random hoses and crap. Disconnect from subframe.
At this point, theoretically you should be able to lift the engine off of the subframe. This is exactly what I did. I raised it maybe an inch off of the subframe and bricked it up underneath. Notice that I was able to utilize bricks that were taller on one side than the other. It worked out perfectly because the oil pan/engine is at an angle. I was able to keep the natural angle of the engine throughout the whole procedure.
The subframe has 4 main bolts and pieces on the rear 2 bolts that need to be taken off before the main bolts.
Note the improper jack stand positioning that prevented me from taking the pieces off at first until I adjusted it.
After you have the subframe bolts off, you will notice that if you have done it properly, the frame will drop to the ground with nothing connected to it. Another person really helps out here cause that subframe is in an awkward place and really really heavy.
Now that you have the subframe off, you can start working on the transmission. Automatic transmissions have an oil cooler line attached to the radiator. I unscrewed it from the transmission and left it attached to the radiator. I really didn’t know how to take it off of the radiator. If you don’t plan on putting an auto back into the car, you can do whatever you want with this line, cut it, burn it, hack saw it, idk. I threw it over the subframe and my sister now drives it with a random hose there. There are a bunch of wires that go to the transmission. Disconnect these at the connectors. Seriously I am not sure what I did with the transmission. Basically, every wire that goes to the auto transmission will not be utilized so you need to disconnect everything from the transmission including the gear selector pieces.
Once you have all the wires and stuff disconnected from the transmission, it is time to lower the engine/transmission and get it in a good position to come off of the engine. But before you do that, you need to disconnect enough of the exhaust from the car so that when you lower the engine, it won’t bend the exhaust pipe and destroy it. I disconnected the exhaust from this part
as well as the next part down the line. I think. This detail is hazy. Do what you gotta do. Now you can lower the engine. The transmission will need to squeeze out of the right wheel well area so basically lower enough till this is possible. The transmission is connected to the engine via a bunch of bolts around the bellhousing. Remove these bolts. I removed the starter as well because the torque converter needs its bolts removed on that side of the flywheel and this is one way to get those bolts out. I believe that there is another way on the bottom of the flywheel area so that you do not have to remove the starter. If you find this way, I would suggest using it as the starter is annoying to take off and put back on especially when you find out you really didn’t need to. Remove transmission and be careful not to bend or otherwise cause damage to the shaft that goes into the transmission. I hooked up my engine lifter system to the transmission at this point as I had the engine blocked off to where I needed it. I used the engine lifter to lift most of the weight of the transmission and yanked it off. Now the torque converter can be removed. There are 6 (or 8. Idk) bolts that hook the torque converter to the flywheel that can only be accessed from the engine side of the flywheel as I stated earlier. Remove these bolts. Remove torque converter. Use hammer drill again to remove flywheel bolts from the flywheel. I recommend spraying with something that will make the bolts not sheer off when you wrench them out. I had this happen and spent too long drilling that bolt out and finding replacement bolts. These bolts that you are now holding in your hand are a really weird size that Tacoma screw (a store dedicated to different bolts/screws and oddities) did not have. I had to purchase 3 from a Volvo dealer because I did not use the correct hex or star set. Do you know how much those three bolts cost me? My firstborn. Actually more like 20 bucks each. So pretty much my firstborn. USE THE CORRECT BIT. Lesson learned. A nice set of correct bits cost less than damaged bolts. Also, wherever you got your manual flywheel from, don’t forget to get the bolts for it too as these are different than the automatic flywheel bolts.Now you have the transmission off and are ready to put on the manual components. Certain elements need to be performed before or at this time. The pressure plate that I received was a self adjusting pressure plate. This means that before you place it into the car, its adjusting value needs to be set at zero. This will prevent situations where you burn up your clutch in 5000 miles because the pressure plate is always pressing against the friction plate. You have two options. One is taking the engine and or flywheel to a Volvo dealership and having them mate the two things up properly for an absurd amount of money. The second option is to reset the value back to zero using a press and 3 points of contact. I had a mechanic do this with me while I backseat drove the crap out of him. But it cost me only 40 bucks (but I did 2 pressure plates and I had the mechanic come in to his shop on a Saturday just for me). Post a craigslist ad and say you will give them 20 bucks if you can use their large press for 15 minutes and problem solved.
See those springs? this pressure plate is not set at zero yet. The wedge ring goes around the entire disc more outside of the springs but before the lip that goes down. Yeah. Ok here is the process. The pressure plate uses an internal plastic ring that contains a wedge shape to it. It is spring loaded so that as the friction plate wears, the wedge ring shifts and makes the pressure plate contact the friction plate at the exact same place for its entire life. Pretty ingenious. What you need to do is support the pressure plate in such a way as the supports are not going to hamper the run of the tynes. I put three sockets on the outside metal piece and pressed down on the tynes using the press. While I was pressing, I was using a screw driver to press the wedge ring back into its 0 position. This meant the springs that you can see were all the way compacted. Voila. Done.
Now that you have a reset pressure plate, you can attach the manual flywheel to the engine. *Note: Manual flywheel is different than automatic flywheel* Then assemble the pressure plate and friction plate to the flywheel making sure the friction plate is aligned in such a way as the transmission shaft can go smoothly through the middle. Attach transmission to engine being careful to line up transmission spline shaft with friction plate hole. Attach bolts and basically reverse the process that you have done to put everything back together.
Next post will be about interior and electrical.
Last edited by Dfunk; 08-05-2013 at 09:22 PM.
#2
08-04-2013, 02:57 AM
Join Date: Aug 2013
Posts: 4
Likes: 0
Received 0 Likes
on
0 Posts
#3
10-24-2014, 12:58 PM

I am not sure what happened to my Dfunk account but if you have any questions about this swap: funkdefunk(at sign)gmail(dot com)
I am about to start my own s60 swap for my car this trime (nonturbo manuals area bout 350 bucks! woot woot!) so I will be going through all of this again.
I am about to start my own s60 swap for my car this trime (nonturbo manuals area bout 350 bucks! woot woot!) so I will be going through all of this again.
Last edited by funkdefunk; 10-24-2014 at 02:03 PM.

Thread
Thread Starter
Forum
Replies
Last Post
02, 200, auto, automatic, bend, companies, conversion, guide, manual, oregon, s60, swap, transmission, transmition, volvo

