A/C Repair
#1
 06-03-2007, 10:45 PM


Thread Starter
After going through the job of replacing the a/c compressor on my 1999 Volvo V70 TurboI thought it might be helpful to others to post some pictures and tips of my experience.
First of all, the orifice tube was a bit of a headache for me because I read everywhere that it should be replaced with the compressor but I couldn't find anything that specifically said where it was. Everything kept saying it was on the high side up near the firewall at the evaporator connections. Here are some specific photos to show where the "hidden" line was that contained the orifice tube.
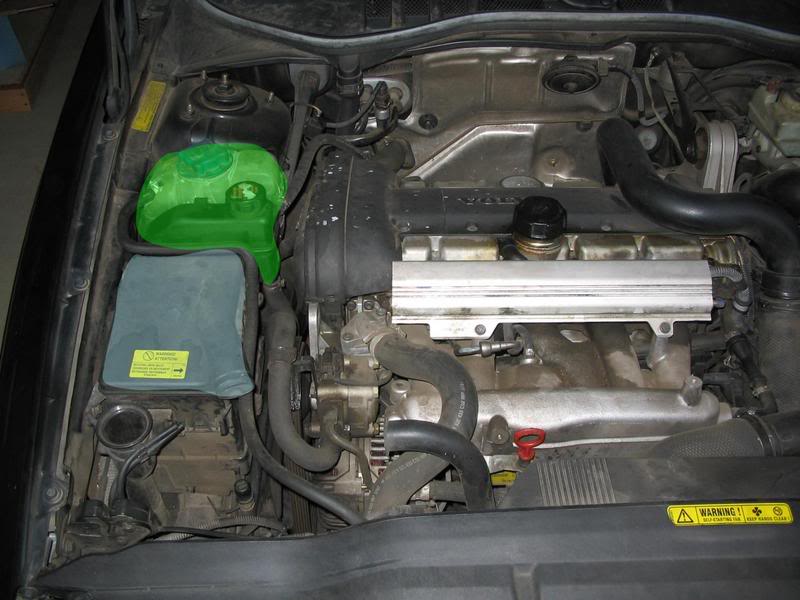
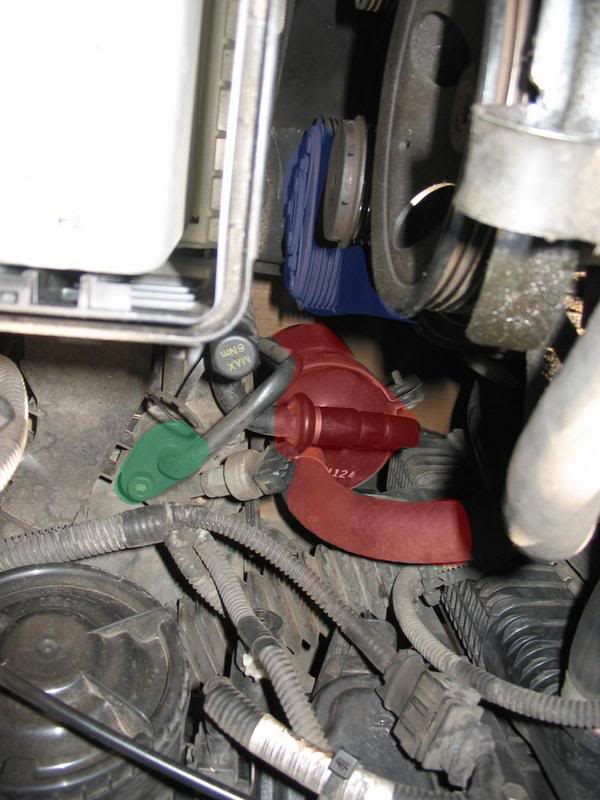
First photo - pull up and set to the side the coolant and power steering fluid tanks (in green). The hoses can bend up over the timing belt cover and rest on top of the engine. Also, the top to the ECU (in blue) can be removed to get a little more room (there are two clips on the left and right when standing in front of the car).
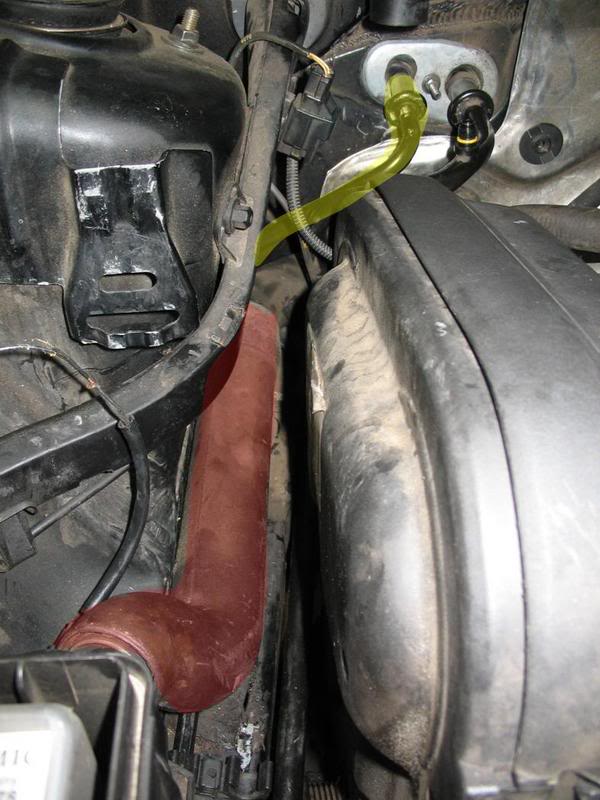
Next: after removing those, you can pull off the short piece of (air) hose that leaves the ECU (highlighted in red). The piping highlighted in yellow is the high side going into the evaporator. Following this as it disappears behind other piping can be a bit tricky.
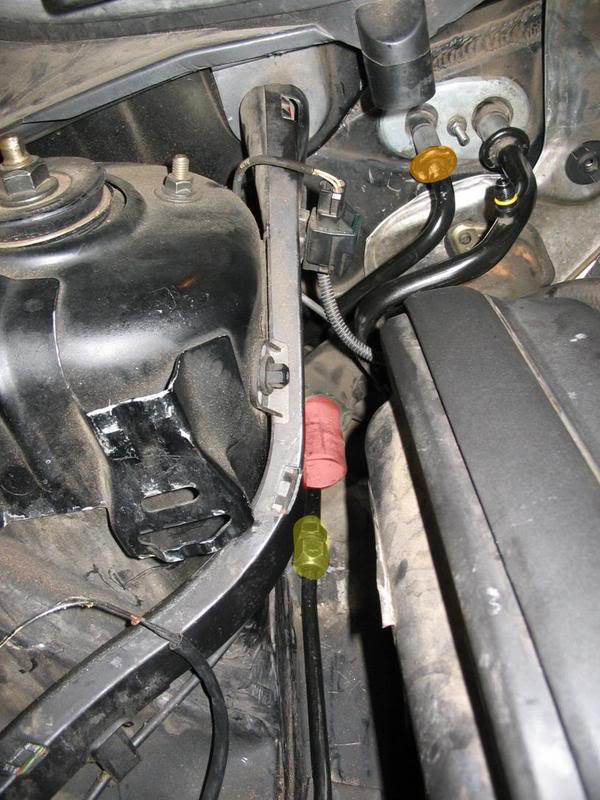
After removing the air hose, you can now see where the orifice tube is "conveniently" hidden (highlighted in yellow). I ended up taking the whole line of piping out in order to more easily disconnect the joint and it made it easier for flushing out.I highlighted the hose that was disconnected in red for reference. On another note, the joint highlighted in gold is the most frustrating type of joint I've encountered in any repair job that I've come across. It's been talked about in other places on this forum as being a spring-coupler connection and requires a special tool. All I can say is push the special tool so that the ridge goes in and spreads the spring open (you should hear a click) and then pull, wiggle, scream or do whatever comes to mind until the pipe pops off. There is a similar connection on the accumulator - in both cases, I spent more time than I'd like to admit pulling on them before giving up and going to bed only to have them come off within 5 minutes first thing in the morning.
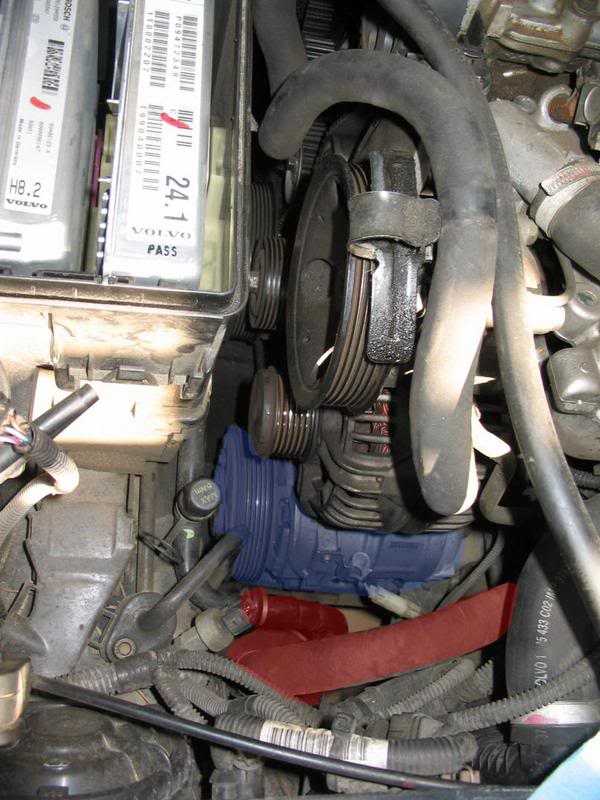
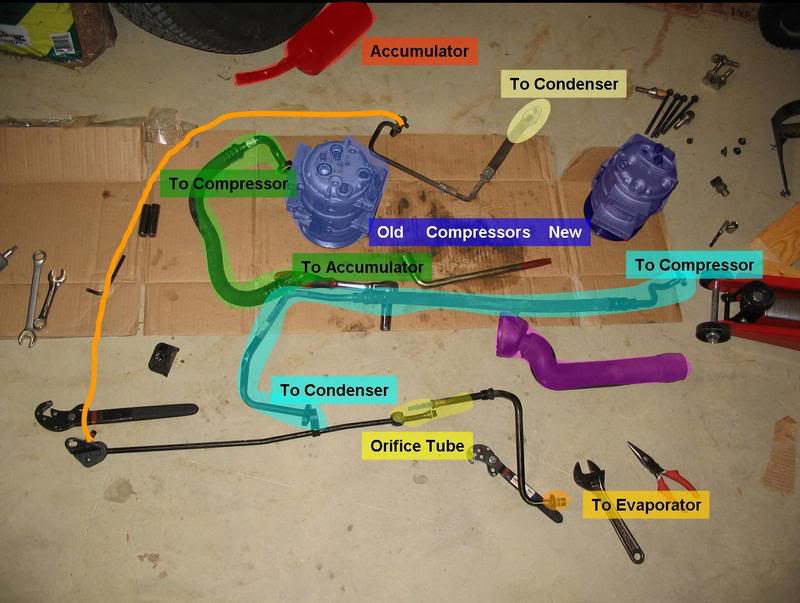
Just for reference I thought I'd include some pictures of the compressor (blue)and accumulator (red), both of which I replaced as well. Also, like an idiot I forot to put the O-ring in on the joint highlighted in green in the second photo and created a pretty good leak point for myself. The O-ring is now and the a/c is up and running! By the way, the green connection is the other end of the line that contains the orifice tube.
Another "in case you are interested" photo showing the parts that I (and my friend Ben) took off the car. Dark blue (on the right) is the new compressor; light blue is the old compressor; red is the old accumulator; purple is the annoying air hose that hid the orifice tube; yellow is the orifice tube; the orange circle on the bottom goes to the evaporator; the orange line indicates the connection between the orifice tube-containing pipe to another pipe which connects to the condenser where marked in beige; the teal pipe connects the condenser to the compressor (compressor connection on the right); and finally completing the chain, the green pipe goes from the compressor to the accumulator. The only piping I didn't remove was from the evaporator to the other end of the accumulator.
First of all, the orifice tube was a bit of a headache for me because I read everywhere that it should be replaced with the compressor but I couldn't find anything that specifically said where it was. Everything kept saying it was on the high side up near the firewall at the evaporator connections. Here are some specific photos to show where the "hidden" line was that contained the orifice tube.
First photo - pull up and set to the side the coolant and power steering fluid tanks (in green). The hoses can bend up over the timing belt cover and rest on top of the engine. Also, the top to the ECU (in blue) can be removed to get a little more room (there are two clips on the left and right when standing in front of the car).
Next: after removing those, you can pull off the short piece of (air) hose that leaves the ECU (highlighted in red). The piping highlighted in yellow is the high side going into the evaporator. Following this as it disappears behind other piping can be a bit tricky.
After removing the air hose, you can now see where the orifice tube is "conveniently" hidden (highlighted in yellow). I ended up taking the whole line of piping out in order to more easily disconnect the joint and it made it easier for flushing out.I highlighted the hose that was disconnected in red for reference. On another note, the joint highlighted in gold is the most frustrating type of joint I've encountered in any repair job that I've come across. It's been talked about in other places on this forum as being a spring-coupler connection and requires a special tool. All I can say is push the special tool so that the ridge goes in and spreads the spring open (you should hear a click) and then pull, wiggle, scream or do whatever comes to mind until the pipe pops off. There is a similar connection on the accumulator - in both cases, I spent more time than I'd like to admit pulling on them before giving up and going to bed only to have them come off within 5 minutes first thing in the morning.
Just for reference I thought I'd include some pictures of the compressor (blue)and accumulator (red), both of which I replaced as well. Also, like an idiot I forot to put the O-ring in on the joint highlighted in green in the second photo and created a pretty good leak point for myself. The O-ring is now and the a/c is up and running! By the way, the green connection is the other end of the line that contains the orifice tube.
Another "in case you are interested" photo showing the parts that I (and my friend Ben) took off the car. Dark blue (on the right) is the new compressor; light blue is the old compressor; red is the old accumulator; purple is the annoying air hose that hid the orifice tube; yellow is the orifice tube; the orange circle on the bottom goes to the evaporator; the orange line indicates the connection between the orifice tube-containing pipe to another pipe which connects to the condenser where marked in beige; the teal pipe connects the condenser to the compressor (compressor connection on the right); and finally completing the chain, the green pipe goes from the compressor to the accumulator. The only piping I didn't remove was from the evaporator to the other end of the accumulator.
The following 2 users liked this post by 99VolvoV70:
Dahlk (06-23-2020),
Philippa Mayall (08-02-2021)

#3
06-04-2007, 11:27 PM
Thread Starter
The following users liked this post:
Philippa Mayall (08-02-2021)
#5
06-05-2007, 09:00 PM
Thread Starter
To go along with this post I thought it might be useful to post the parts/supplies that I bought or used to do this job. I've collected my receipts, so here goes...
Local Mechanic
Diagnosis and oil change: $132.59(rip-off, by any chance? I should have just searched these forums to diagnosis it myself.)
Estimate to change compressor: $1300
Different Local Mechanic
Recover refrigerant: $20 (above mechanic quoted "no more than $120"!!!!!!!! and another said $45 - I'd definitely shop around for this)
From Discount AC Parts
1) A/C Compressor (New): $415 (Rebuilt was $315 but I went with new because I had only a limited opportunity to do the work and didn't want to have to do any returns.As it turns out, I ordered the wrong "mount" type and had to do an exchange anyway. I called and was told that the rebuilt ones are returned very infrequently. Also, I should point out that they had very helpful and knowledgable staff answering the phones and made the exchange very easy.)
2) Accumulator: $55 (Also called Receiver/Dryer)
3) Orifice Tube: $5
Discount code for ordering all three: ACKIT3 - $20 off and free shipping
Total: $455
From eEuroparts
1) A/C Pressure Switch: $76.49 (I don't know for sure if I needed this, but the only example I was working off of was on the DIY Network site for a Corvette and in that case this switch caused the compressor to fail. Probably a waste of money, but Dean at eEuroparts was great to work with so I was glad to support the business.)
2) Serpentine belt: $24.90 (Not directly related but the belt was cracked pretty bad and since I had it off already...)
Total: $101.39 with free shipping
From Parts America (Advance Auto Parts) - By far the worst customer service of any of the above.
1) PAG Oil Dye: $9.79
2) Syringe oil injector: $8.99 (I didn't really need this in the end.)
Total: $18.78 (shipping was a convoluted mess that I think I got fully refunded in the end)
From local Advance Auto Parts
1) Drain Pan: $2.44 (For catching flush)
2) Artic Freeze - 2 cans of R134A with Reusable Gauge: $29.88
3) Flush Solvent (spray can): $14.98
Not essential
4) 2 Extra cans of R134A after spraying first two cans through a leak: $20.04
5) 12pc Stubby Wrench Set (for tight places): $9.88 (This was a good chance to get some tools that I wanted and justify it for this job.)
6) GoJo Hand Cleaner Cream: $0.98
7) Blue Nitrile Gloves: $7.88
Total essential items: $47.30
With extra tools: $78.20
From local Harbor Freight
1) Air vacuum: $11.99 (for pulling a vacuum after assembling everything - works with an air compressor)
2) Floor jack: $19.99 (not necessary, but another tool I wanted that I could justify on this job)
3) 2pc Talon Wrench Set: $15.99 (cheaper online, this really helped with some of the connections)
Total essential: $11.99 + tax ($0.96 in AL)
With floor jack and wrench set: $47.97 + tax ($3.84 - 8% in AL)
From local O'Reilly Auto Parts
1) PAG Oil: $6.99
2) Hose Kit (to connect vacuum to low pressure port): $11.99
Total: $18.98 + tax ($1.52 in AL)
From local Home Depot
1) O-Ring Asst (after misplacing one and causing a leak): $2.91
Total: $2.91 + tax ($0.23 in AL)
Pizza and soda for friend to help: ~$25
Grand total essential items: $654.16
With "extras": $906.41
Total savings from $1300 estimate: $526.18 (not including initial diagnosis charge of $132.59 and with extra tools and a serpentine belt thrown in)
Another thought: based on my dealings with that mechanic, I'd expect the $1300 quote to rise as other "necessary" work is added on.
The following users liked this post:
Dahlk (06-23-2020)
#6
06-20-2007, 12:20 AM
Thread Starter
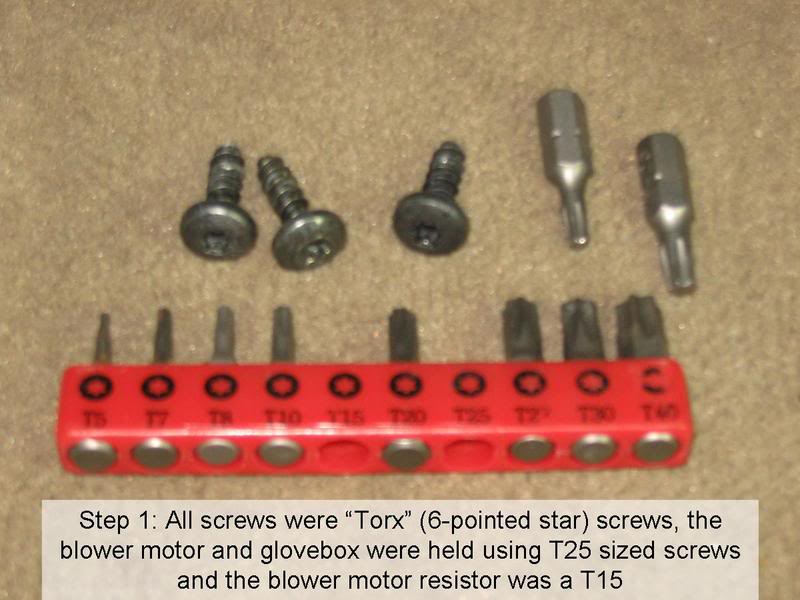
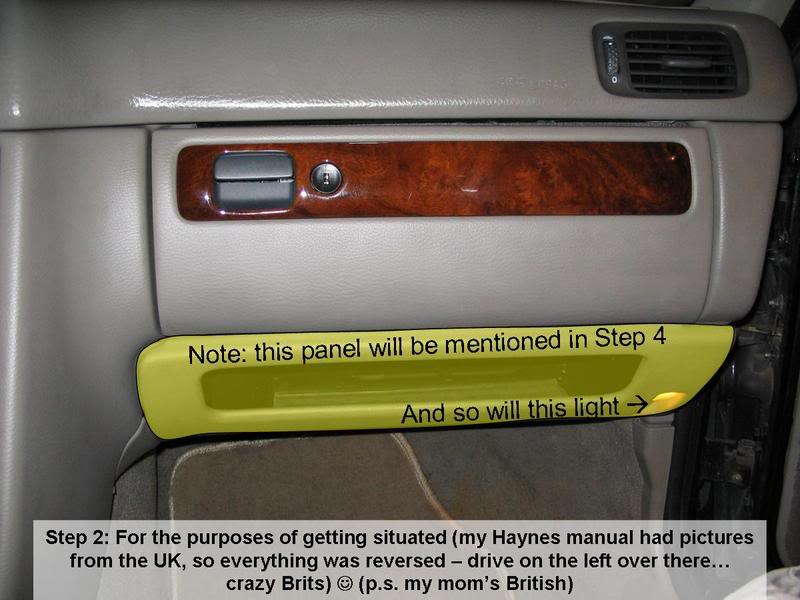
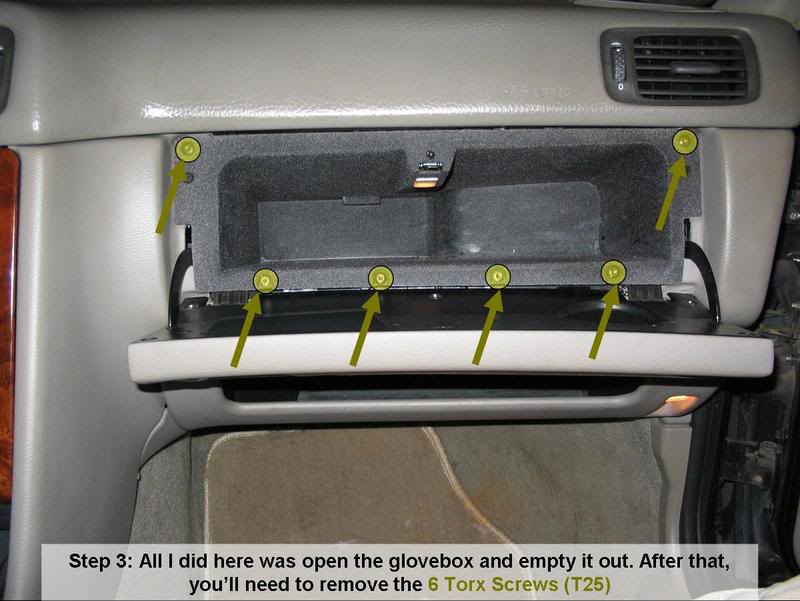
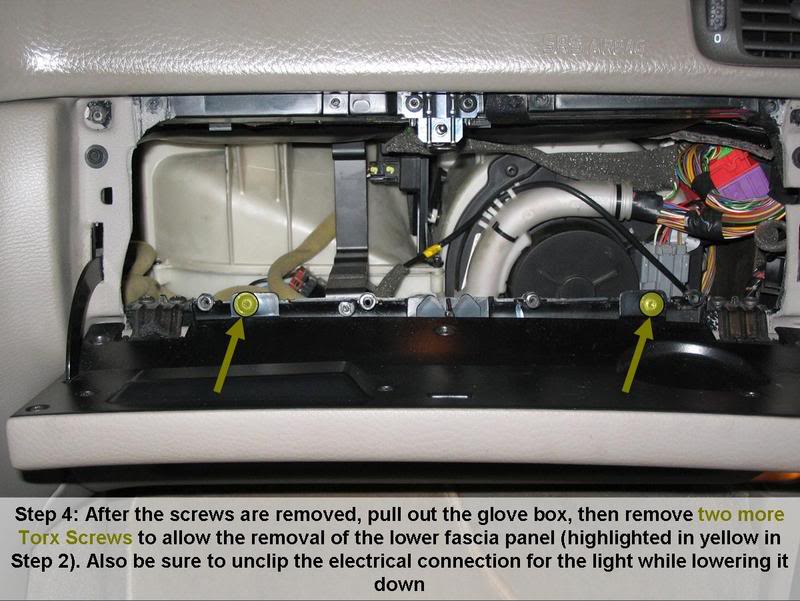
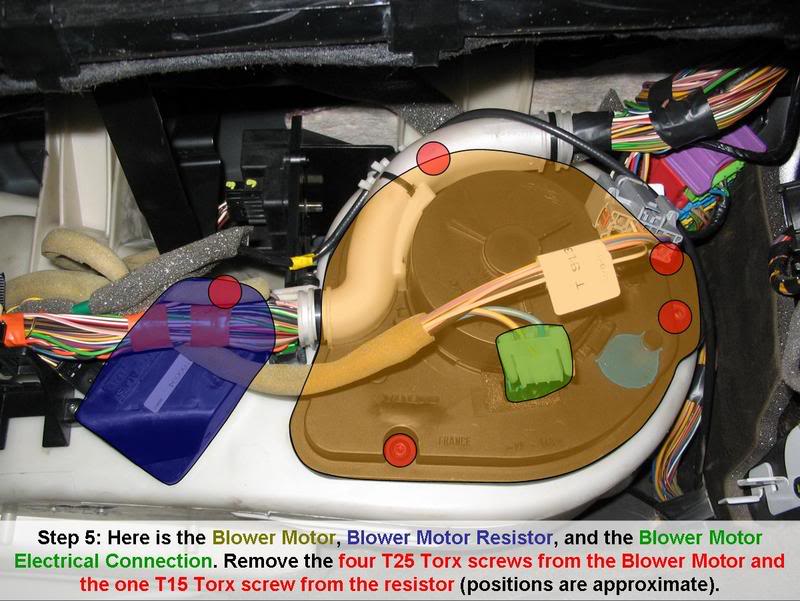
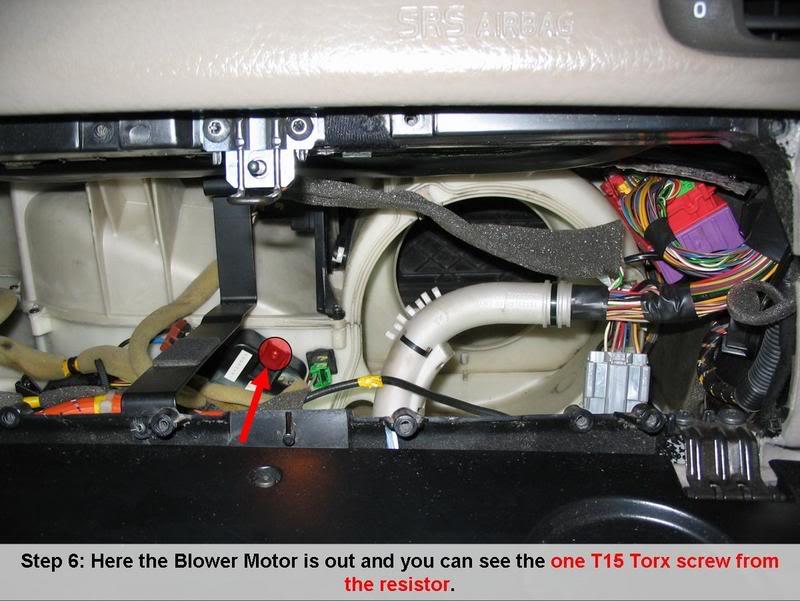
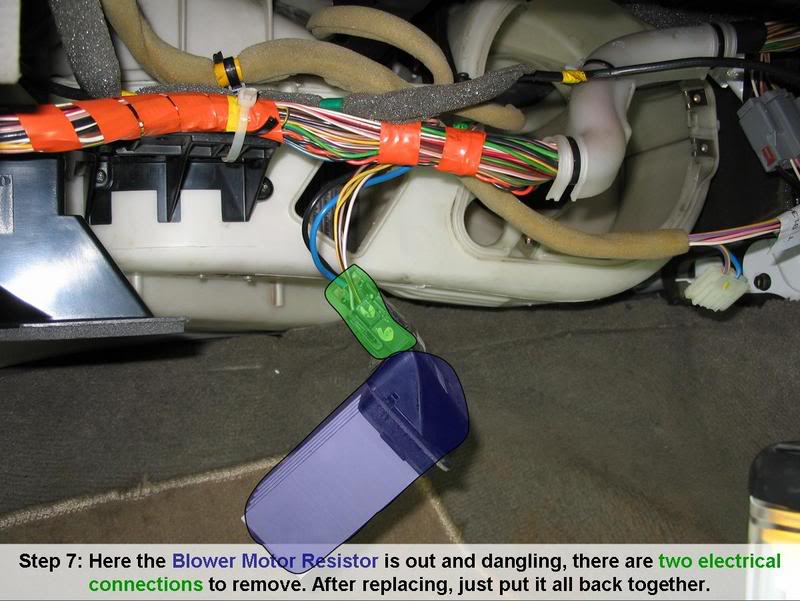
In the spirit of continuing to try and be helpful and post pictures for anything I do (since Tech said pictures aren't allowed in his shop), here are some pictures that go through excessive detail on what it takes to replace your Blower Motor and/or Blower Motor Resistor. I did both in my 1999 Volvo V70 Turbo. Hopefully this is helpful to you.
NOTES: I got the replacement parts forjust under $300from www.eEuroparts.com (always a pleasure to work with) and the job took me just under a half hour (even with stopping to take a bunch of pictures), so this was a pretty simple job. I'd rank it around the same difficulty as changing a light bulb.
Here are the pictures... Enjoy. Feel free to contact me or reply if you have any questions.

#8
07-13-2007, 03:37 PM
Thread Starter

#9
07-17-2007, 02:02 PM
#10
07-17-2007, 03:10 PM
Thread Starter
Hey bashley,
In this thread, I posted two pictures that show where the two (high and low) pressure switches were located on mine. I replaced the high pressure one, but not the low pressure one (I thought there was only one when I was ordering). They are simple to replace by the way, just disconnect the electrical connection and then unscrew it.
https://volvoforums.com/m_65018/tm.htm
Have fun taking it on... The thing that annoyed me was that the Haynes manual said not to perform any major A/C work due to the danger of working with refrigerant. It only cost $20 to recover (purge) the refrigerant and then it's just like working on anything else.
The most frustrating part for me was dealing with the spring-coupler connections. I had to disconnect two of them and they were a royal pain. Other than that, it was pretty simple.
Let me know if you have any other questions - I'll try to answer what I can (the rest I'll leave to someone more knowledgable).
#11
07-17-2007, 10:08 PM
Oh man. Do you have any idea how fantastic it is to have you guys for a resource? I mean, I can pull apart an old 302 blindfolded, but I have shied away from these newer engines with their computers and the way they stuff so much in such a small space. I used to be able to sit in the engine compartment of my old LTD and work on thatsmall block V8for hours with nary a bruised knuckle, but no more.
I do have one more question if you can put up with my lack of knowledge about A/C (never had that in my LTD). Do I need to purge the system to replace the low pressure switch? It's on a pipe of course, but truth to tell, I have no idea if there is refrigerant in the pipe or if removing the switch would allow it to escape if there is.
Thanks much,
Brian
#12
07-18-2007, 12:22 AM
Thread Starter
Nope, you'll be fine replacing the switch without purging it. (It resembles the tire stem where you pump up your tires.) There's a rod in the center that is pushed down as the switch screws on to open the valve. It's a very simple replacement.
Anyway, I'm glad to help. Luckily I know about this because I just did this job recently. I like tinkering with cars, but it would be nice to get a little more sometimes. My other car is a Mitsubishi Eclipse, so there is no room at all! When I changed my timing belt, I had to choose between completely removing the engine or drilling a hole in the wheel well to get one of the bolts out... I drilled the hole because I don't have anything to mount the engine on. I had already removed two of the three engine mounts to raise and lower it as far as possible, but it just was too long. So the Volvo feels a bit more roomy to me.
Have fun!

#15
04-05-2008, 11:24 PM

ORIGINAL: casualfc
Many thanks <99VolvoV70>!
I need to do the same thing with my '03 s40. How do I remove the glovebox? I noticed mine is different from your 99.
Many thanks <99VolvoV70>!
I need to do the same thing with my '03 s40. How do I remove the glovebox? I noticed mine is different from your 99.
#16
04-28-2008, 07:52 PM

#18
04-28-2008, 09:18 PM
#20
04-28-2008, 10:14 PM