Quad HID headlights in my 89 740
#1
 04-19-2013, 08:24 PM


I have a huge write up, but I just find that I never have time to format it the way that I want it and put it up here.
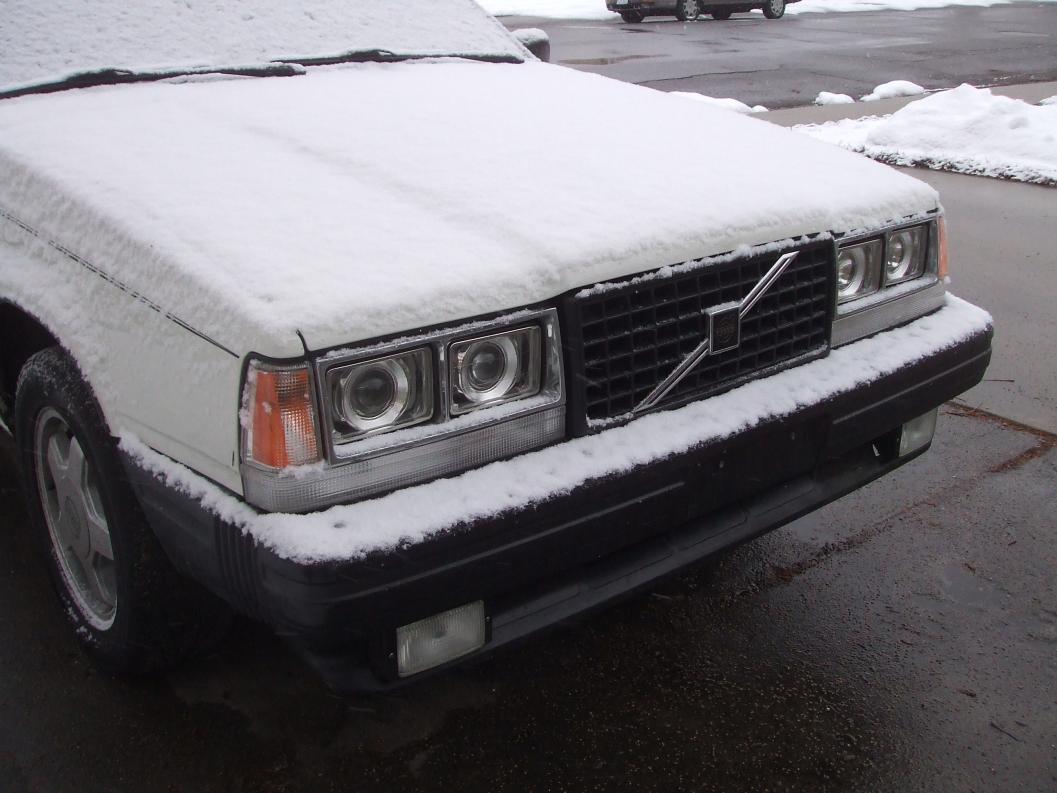
So my sealed beam halogens weren't cutting it. Now my head lights make it completely impossible to tell if my fog lights are on or not. I have 4 "bi-xenon" HID projectors lighting up the night. All four are high beam and low beam. This was an all custom project as there are no kits to put real HID's into 4X6 headlight buckets (there are lots of fake kits out there). The Retrofit Source was my supplier for the projectors and support hardware. I've never seen anybody do this before. Enjoy the pics!


So my sealed beam halogens weren't cutting it. Now my head lights make it completely impossible to tell if my fog lights are on or not. I have 4 "bi-xenon" HID projectors lighting up the night. All four are high beam and low beam. This was an all custom project as there are no kits to put real HID's into 4X6 headlight buckets (there are lots of fake kits out there). The Retrofit Source was my supplier for the projectors and support hardware. I've never seen anybody do this before. Enjoy the pics!
Last edited by Titan Joe; 07-13-2013 at 01:38 AM.

#3
07-13-2013, 01:12 AM
A bit late. But i have some time to post things.
With this mod there were a few things to overcome. First, information on HID can be confusing. Secondly, what do I need to get them into my car. So I'll first start with some general HID information.
HID's:
It stands for High Intensity Discharge. The light in an HID is generated by an arc passing though a pressurized gas chamber between two electrodes. It's an arc lamp. The color can be controlled and the amount of light generated is huge. That's how you can get pure white light to purple looking ones. I'm not too interested in blues and purples, but good white light would be nice. In conditions with poor visibility HID's are better because of their light beams. Essentially the beams are focused through a projector lens. The light is very evenly spread over the coverage area. Then the cut-off is sharp. While it seems like that would be bad, it's actually very good. You get light very evenly in the low beam zone and very little in above it. When aimed properly, they are less blinding than standard bulbs. In conditions like fog, heavy rain and snow less light is going above the low beam cut-off and is not getting reflected back into your eyes. Visibility is improved greatly. My fog lights don't seem to help at all anymore.
You'll see a lot of headlights bulbs for sale that say HID and that they will just drop into a standard headlight socket. They are not HID's. Some may be good headlights, but they are filament bulb maybe with xenon gas and stuff. They may be bright, but they are not HID's. HID's do not go in a standard reflector housing. They are used with projectors. They control the large amounts of light much better. The focus is very important, otherwise you'll blind everyone else on the road and not get the focused beams that you want. Real HID bulbs don't fit into filament type sockets.
Another thing about HID's is they are a single intensity bulb. What I mean is the bulb has no hi beam or low beam function. It's on or off. The projector is what makes the headlight pattern. They do this by focusing the light through a lens. Before the light gets to the lens, there is a wall that gives you your low beam cut-off. It's upside down to the pattern that you get because of the lens. They have projectors that are capable of hi and low beam functions as well. The wall on these units is on a solenoid and when high beams are needed, they move out of the way to let out a high beam pattern of light. I refer to it most of the time as a shutter, since it moves and blocks light. One nice thing is the bulb stays light the whole time. It never needs to heat back up to reach full performance. For some reason they call these bi-xenon projectors. I'm not really sure why they call them that. It makes me think of them as having two light sources, but they only have one. I would call them SCP (for shutter controlled pattern), SDP (for shutter dipping pattern), shutter projectors or something along those lines.
A few last things about HID's: They run on less power than normal headlights. A 35watt HID bulb is more powerful than a 55watt halogen bulb. They do require more power on startup, but that's brief. It's probably under a 10th of a second. Overall, the stress on the electrical system is much less. To run them requires a special ballast for each bulb. Mine are microprocessor controlled. So when doing a retrofit, it is important to consider space requirements for the projectors in the headlight area, the ballasts and the wiring harness. Function for the high and low beam setup is a little different, so you need to adapt the existing headlight controls to run the new system. What I'm hinting at is dual filament systems use a single ground, and two filaments powered separately for a toggling switch. A bi-xenon project keeps the bulb lit the whole time and toggles a shutter. If you are using HID as just low beams, this is not so much a problem. My kit came with a relay set that made taking care of this really simple.
So that covers most of what I learned about HID technology. Fitting them to my car was a whole new challenge.
My car is a 1989 740 Turbo. It was the final year for any Volvo car to have a quad headlight set up. The car was made for the US market so it used sealed beam lighting in this configuration. The outer two are dual filaments (hi and low operation), while the inner two are only used for hi beam operation.
I checked around online for some drop in projectors. I found nothing for real HID's in place of a 4 X 6 sealed beam. There were upgrades to xenon halogen replaceable bulb types. They have clear glass in the front and a reflector to focus the light. While it would be an improvement over my sealed beam halogens, it's not what I wanted.
I happened upon a website that sold almost everything I needed: The Retrofit Source. The Retrofit Source online: headlight upgrades for all applications It's the first place that sells real projectors and has a wealth of information on them. They even have dimensions so you can actually plan before you buy. TO sum their story up, a guy wanted HID's in his car. He found some in junk yards. Then started getting more and selling them. Then he found manufacturers and it has grown from there. Poof! A business is born. They have a selection of projectors, shrouds, ballasts, bulbs and kits to pick from. They do emphasize that there is no simple snap in solution. This is a custom retrofit job to mount in your car. You have to modify the existing headlight bucket to accommodate the projector. They sell a lot to assist this process and give tips for doing it right. This also means that each retrofit is very custom to every owner.
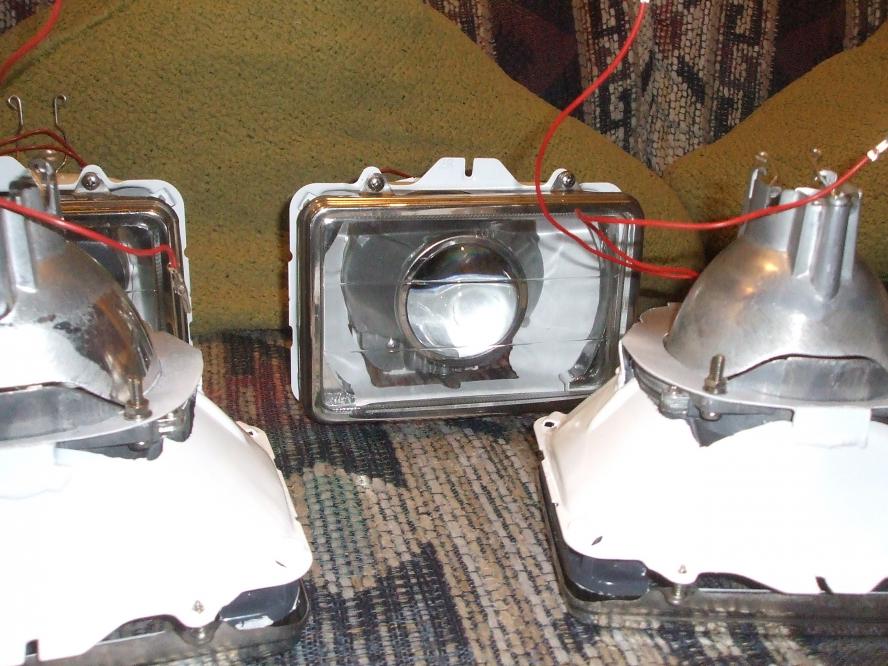
The size of the sealed beam units are about 4 inches by 6 inches. When you look at mounting something inside, with wall thickness you get maybe 3 inches from top to bottom. Projector lenses themselves are 2.5 - 3 inches. Then they regularly have a shroud to cover up the projector housing. They don't look very finished without a cover. A retrofit into 4 X 6 headlights is tight and I could not find any examples of it being done on their website. I figured that I would need to customize almost everything. I picked up some headlight buckets from a junk yard off an older 760 with plans to cut and modify. I purchased some clear lens 4 X 6 H4 sealed beam upgrade headlights from EBay with plans to cut the backs out of them. Below are the headlight buckets and the new headlights.

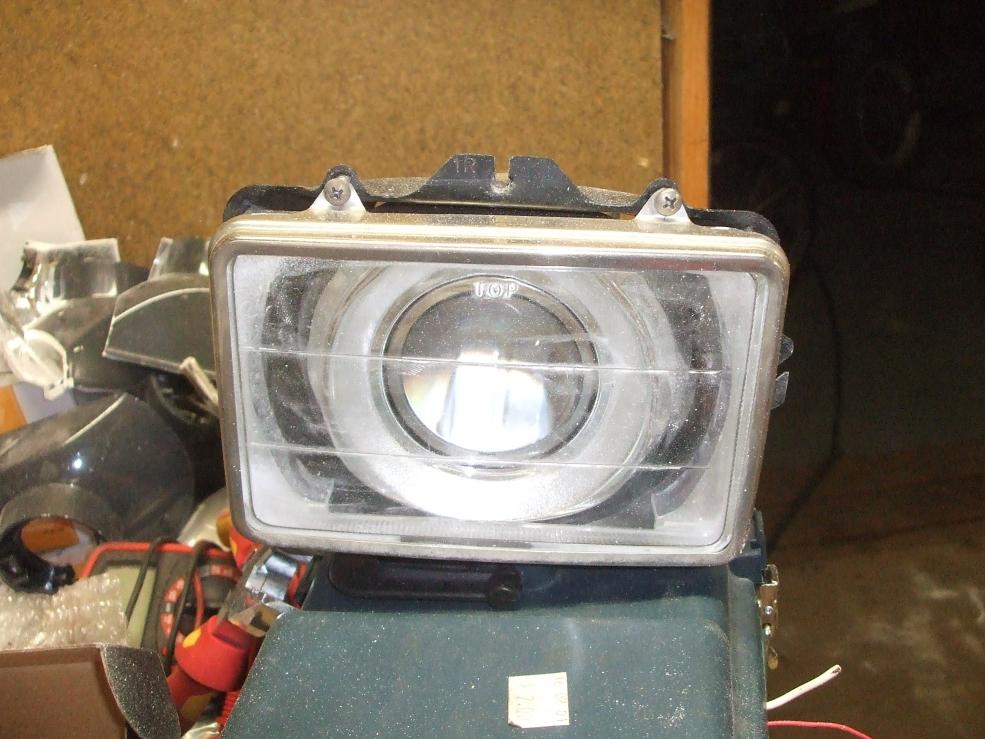
From The Retrofit Source I bought bi-xenon FX-R projectors (high and low beam capable), Morimoto 3Five ballasts (D2S bulb sockets), matching D2S Morimoto 3Five bulbs, premade wiring harnesses and relays and E55-R shrouds. I pick the E55-R shrouds because of their simple look and that they seemed to fit the space that I would have in the headlight bucket.

The projector housings. It includes the shutter mechanism.

The ballasts that actually drive the HID bulb.

Shroud rings around the lens.

This relay harness adapts H4 Hi/Low functions into the shutter mechanism.

These are the actual bulbs.
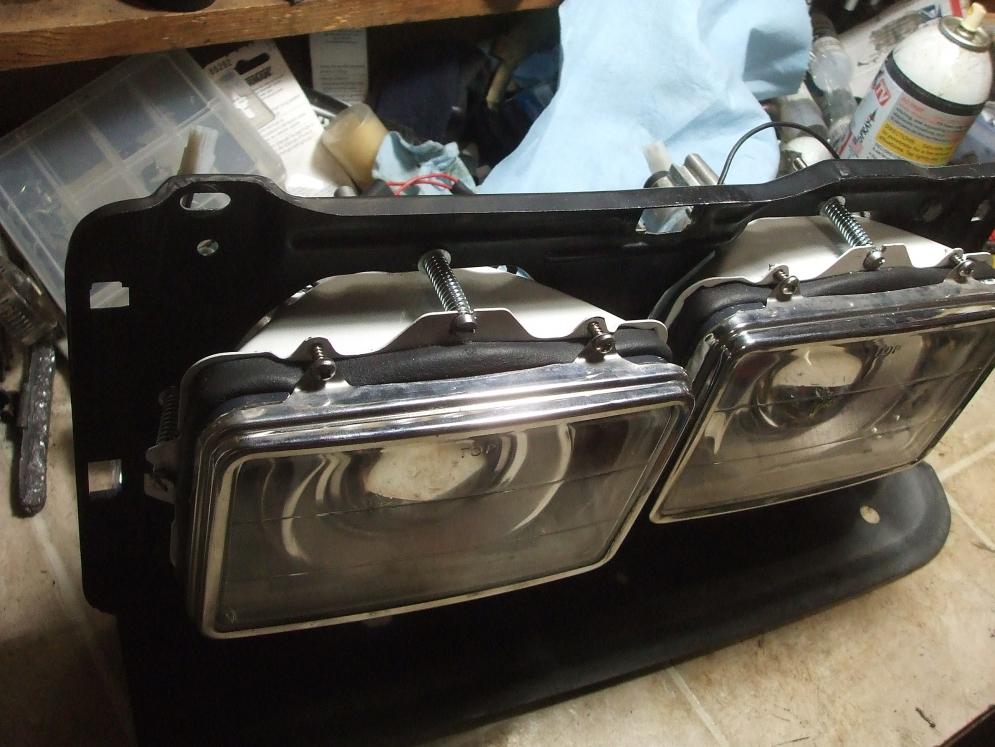
Now to make it all fit I had to cut open the headlight buckets and weld a bracket in its place. Not only was getting the projector to fit a concern, but alignment so my headlights are not all crooked was very important. I cut most of the reflector out of the new headlamp housings, but left the rounded sides of the reflector.
Cutting the reflector:

Fitting the projector:

Modified headlight buckets:

A test fit minus the shrouds:
With this mod there were a few things to overcome. First, information on HID can be confusing. Secondly, what do I need to get them into my car. So I'll first start with some general HID information.
HID's:
It stands for High Intensity Discharge. The light in an HID is generated by an arc passing though a pressurized gas chamber between two electrodes. It's an arc lamp. The color can be controlled and the amount of light generated is huge. That's how you can get pure white light to purple looking ones. I'm not too interested in blues and purples, but good white light would be nice. In conditions with poor visibility HID's are better because of their light beams. Essentially the beams are focused through a projector lens. The light is very evenly spread over the coverage area. Then the cut-off is sharp. While it seems like that would be bad, it's actually very good. You get light very evenly in the low beam zone and very little in above it. When aimed properly, they are less blinding than standard bulbs. In conditions like fog, heavy rain and snow less light is going above the low beam cut-off and is not getting reflected back into your eyes. Visibility is improved greatly. My fog lights don't seem to help at all anymore.
You'll see a lot of headlights bulbs for sale that say HID and that they will just drop into a standard headlight socket. They are not HID's. Some may be good headlights, but they are filament bulb maybe with xenon gas and stuff. They may be bright, but they are not HID's. HID's do not go in a standard reflector housing. They are used with projectors. They control the large amounts of light much better. The focus is very important, otherwise you'll blind everyone else on the road and not get the focused beams that you want. Real HID bulbs don't fit into filament type sockets.
Another thing about HID's is they are a single intensity bulb. What I mean is the bulb has no hi beam or low beam function. It's on or off. The projector is what makes the headlight pattern. They do this by focusing the light through a lens. Before the light gets to the lens, there is a wall that gives you your low beam cut-off. It's upside down to the pattern that you get because of the lens. They have projectors that are capable of hi and low beam functions as well. The wall on these units is on a solenoid and when high beams are needed, they move out of the way to let out a high beam pattern of light. I refer to it most of the time as a shutter, since it moves and blocks light. One nice thing is the bulb stays light the whole time. It never needs to heat back up to reach full performance. For some reason they call these bi-xenon projectors. I'm not really sure why they call them that. It makes me think of them as having two light sources, but they only have one. I would call them SCP (for shutter controlled pattern), SDP (for shutter dipping pattern), shutter projectors or something along those lines.
A few last things about HID's: They run on less power than normal headlights. A 35watt HID bulb is more powerful than a 55watt halogen bulb. They do require more power on startup, but that's brief. It's probably under a 10th of a second. Overall, the stress on the electrical system is much less. To run them requires a special ballast for each bulb. Mine are microprocessor controlled. So when doing a retrofit, it is important to consider space requirements for the projectors in the headlight area, the ballasts and the wiring harness. Function for the high and low beam setup is a little different, so you need to adapt the existing headlight controls to run the new system. What I'm hinting at is dual filament systems use a single ground, and two filaments powered separately for a toggling switch. A bi-xenon project keeps the bulb lit the whole time and toggles a shutter. If you are using HID as just low beams, this is not so much a problem. My kit came with a relay set that made taking care of this really simple.
So that covers most of what I learned about HID technology. Fitting them to my car was a whole new challenge.
My car is a 1989 740 Turbo. It was the final year for any Volvo car to have a quad headlight set up. The car was made for the US market so it used sealed beam lighting in this configuration. The outer two are dual filaments (hi and low operation), while the inner two are only used for hi beam operation.
I checked around online for some drop in projectors. I found nothing for real HID's in place of a 4 X 6 sealed beam. There were upgrades to xenon halogen replaceable bulb types. They have clear glass in the front and a reflector to focus the light. While it would be an improvement over my sealed beam halogens, it's not what I wanted.
I happened upon a website that sold almost everything I needed: The Retrofit Source. The Retrofit Source online: headlight upgrades for all applications It's the first place that sells real projectors and has a wealth of information on them. They even have dimensions so you can actually plan before you buy. TO sum their story up, a guy wanted HID's in his car. He found some in junk yards. Then started getting more and selling them. Then he found manufacturers and it has grown from there. Poof! A business is born. They have a selection of projectors, shrouds, ballasts, bulbs and kits to pick from. They do emphasize that there is no simple snap in solution. This is a custom retrofit job to mount in your car. You have to modify the existing headlight bucket to accommodate the projector. They sell a lot to assist this process and give tips for doing it right. This also means that each retrofit is very custom to every owner.
The size of the sealed beam units are about 4 inches by 6 inches. When you look at mounting something inside, with wall thickness you get maybe 3 inches from top to bottom. Projector lenses themselves are 2.5 - 3 inches. Then they regularly have a shroud to cover up the projector housing. They don't look very finished without a cover. A retrofit into 4 X 6 headlights is tight and I could not find any examples of it being done on their website. I figured that I would need to customize almost everything. I picked up some headlight buckets from a junk yard off an older 760 with plans to cut and modify. I purchased some clear lens 4 X 6 H4 sealed beam upgrade headlights from EBay with plans to cut the backs out of them. Below are the headlight buckets and the new headlights.
From The Retrofit Source I bought bi-xenon FX-R projectors (high and low beam capable), Morimoto 3Five ballasts (D2S bulb sockets), matching D2S Morimoto 3Five bulbs, premade wiring harnesses and relays and E55-R shrouds. I pick the E55-R shrouds because of their simple look and that they seemed to fit the space that I would have in the headlight bucket.
The projector housings. It includes the shutter mechanism.
The ballasts that actually drive the HID bulb.
Shroud rings around the lens.
This relay harness adapts H4 Hi/Low functions into the shutter mechanism.
These are the actual bulbs.
Now to make it all fit I had to cut open the headlight buckets and weld a bracket in its place. Not only was getting the projector to fit a concern, but alignment so my headlights are not all crooked was very important. I cut most of the reflector out of the new headlamp housings, but left the rounded sides of the reflector.
Cutting the reflector:
Fitting the projector:
Modified headlight buckets:
A test fit minus the shrouds:
#4
07-13-2013, 01:16 AM
So the look I wanted to get was a subtle a possible, but I like Halos. I don't think that bright round halos would give me the look I want. You can get 4 X 6 H4 headlight conversions with a rectangular halos in bright colors. But that's not the look that I want either. I painted the headlight buckets white to reflect light. With the shrouds and the left over side sections of the reflector I can get a halo-like effect around the shroud. I mounted a 3-watt LED to the top inside of the bucket hear the front so the light reflects around behind the shroud and off the white bucket. I had to notch out a space in the top of the shroud for the LED, but the result I think turned out very nice:

Those pictures are actually from earlier before I welded and painted the buckets. These next two pictures are after I had installed the LED's and wired them up. I used JB Weld to hold the ballast resistor to the bracket for the LED:


Those pictures are actually from earlier before I welded and painted the buckets. These next two pictures are after I had installed the LED's and wired them up. I used JB Weld to hold the ballast resistor to the bracket for the LED:
#5
07-13-2013, 01:23 AM
With the assemblies put back together it was time to see them light up:


They still weren't ready. I added some rubber between the headlight buckets and the front lens. It keeps light from escaping around the edges and lighting the areas around the headlights. Another problem is the bottom of the projector housings collided with the mounting bracket that the headlight bucket mount in. This just stopped the headlights from being aimed high enough. So apart they came again and I shaved the lip so I have plenty of adjustability. The original adjustment screws were another problem. They use plastic nut like things that get get pretty brittle. They were dying and all but stripped. I replace them with new M5 X .8 60mm long Cheese head machine screws and 40mm long springs. The nuts I cut so they would lock into the bracket. The spring tension holds them in place once adjusted.
They still weren't ready. I added some rubber between the headlight buckets and the front lens. It keeps light from escaping around the edges and lighting the areas around the headlights. Another problem is the bottom of the projector housings collided with the mounting bracket that the headlight bucket mount in. This just stopped the headlights from being aimed high enough. So apart they came again and I shaved the lip so I have plenty of adjustability. The original adjustment screws were another problem. They use plastic nut like things that get get pretty brittle. They were dying and all but stripped. I replace them with new M5 X .8 60mm long Cheese head machine screws and 40mm long springs. The nuts I cut so they would lock into the bracket. The spring tension holds them in place once adjusted.
#6
07-13-2013, 01:33 AM
One other thing to over come was the wiring pattern on my sealed beams. While the same plug will plug into a sealed beam as into a H4 headlight, the pinouts are different. I switched the pins on the supplied wiring harness to match my car's sealed beam pinout. A small screwdriver released the tab holding the pins. I had to bend some of them out a bit to make sure that they locked good. Every wire had to be moved. Below is a chart I made to show the differences and a picture showing the piece that I altered:

Two things had to be changed on the car. The inner headlights could not be plugged in because the connector in the back of the headlight interfered with the sheet metal around the radiator. This had to be trimmed. The next thing to make was brackets for the four ballasts. I used some stainless steel sheet metal to and bolted it to existing holes in the car. The ballasts are easy to remove as a unit and it didn't require drilling new holes in the car. Below is a shot of the ballasts in front of the battery on the driver's side.

The results by day:
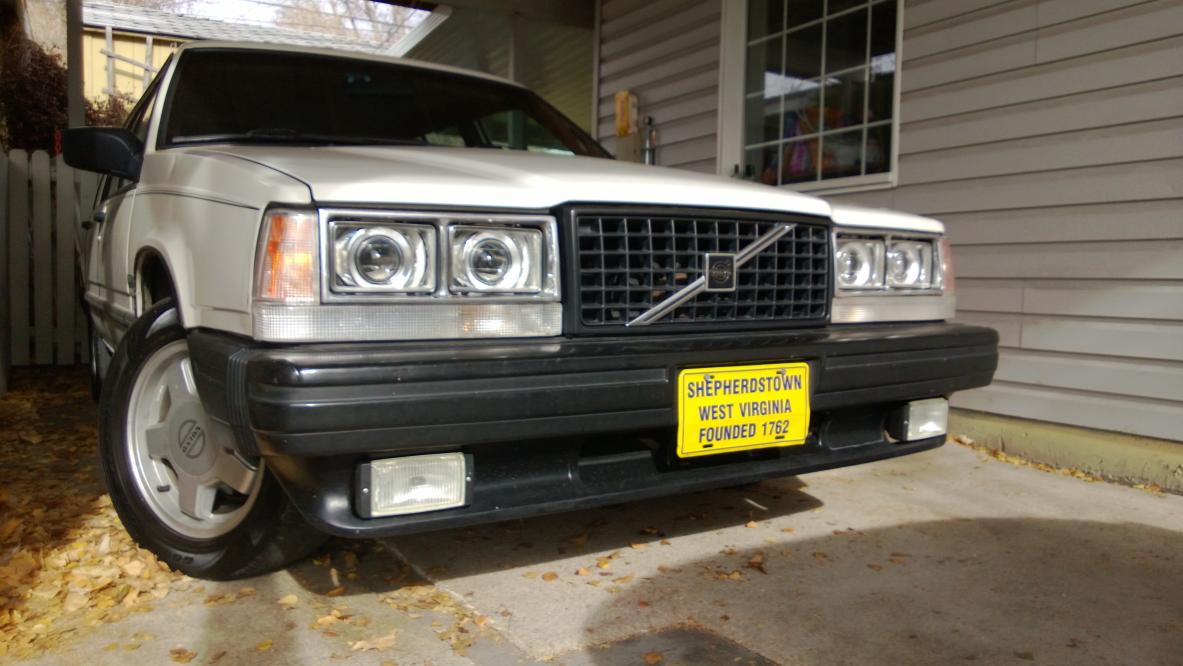
The pics in the first post are probably the best to show the lighting by night.
If you have questions or notice typos, or think something in here is unintelligible, feel free to tell me.
Two things had to be changed on the car. The inner headlights could not be plugged in because the connector in the back of the headlight interfered with the sheet metal around the radiator. This had to be trimmed. The next thing to make was brackets for the four ballasts. I used some stainless steel sheet metal to and bolted it to existing holes in the car. The ballasts are easy to remove as a unit and it didn't require drilling new holes in the car. Below is a shot of the ballasts in front of the battery on the driver's side.
The results by day:
The pics in the first post are probably the best to show the lighting by night.
If you have questions or notice typos, or think something in here is unintelligible, feel free to tell me.

#8
08-23-2013, 04:07 AM

awesome hack. I mean it, that effin nails it.
with the projector+halo combination hiding behind those, somehow the chrome surrounds look kinda cheesy. yes, I know chrome was original, and it looks very nice in that pic, but with the halos, how about blacked out surrounds ? they'd go with that eggcrate grill.
#9
08-23-2013, 04:09 AM
#10
03-23-2014, 01:25 AM

Thread
Thread Starter
Forum
Replies
Last Post
Schaeffy
Volvo 240, 740 & 940
4
07-06-2013 10:13 AM
Wekke
Private Wanted Classifieds - Archive
1
03-31-2010 04:59 PM