Another project done
#1
 05-23-2008, 06:34 PM


#3
05-24-2008, 12:24 AM

Senior Member
Join Date: Jun 2006
Location:
Posts: 275
Likes: 0
Received 0 Likes
on
0 Posts
Looks sweet, just like the day it rolled into it's first garage! How is the transmission doing? Any luck with the Lucas Oil? I think mine is starting to wear off. Driving short distances, <50 miles it is perfect, but I took it on a 360 mi roundtrip the other day and every time I got off the highway and came to a stop it seemed to slip into neutral, then jump into first gear when I hit the gas. I'm hoping a flush takes care of the problem, it will be done in the next month. It otherwise shifts incredibly smoothly. Crossing my fingers.
#4
05-24-2008, 01:09 AM

Senior Member
Hey Tech [sm=smiley20.gif],
What was the name of the paint product that you used?
What type of prep work did you do?
And how long did it take you from start to finish?
I ask as I'm doing my bumpers, trim and mud guards tomorrow morning as it's supposed to be a great daywith 11C in the morning and 20C in the afternoon.
Hoping it looks as well as yours. I'll take [sm=Flahssssss.gif].
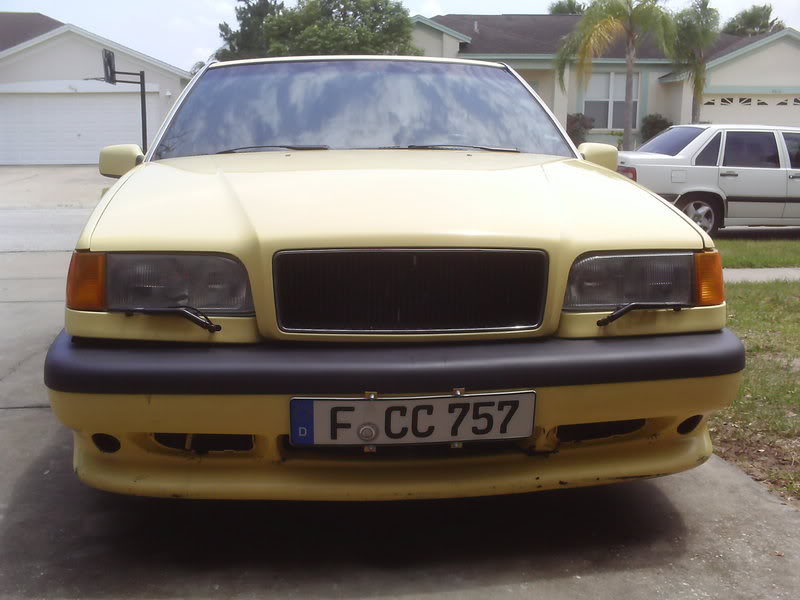
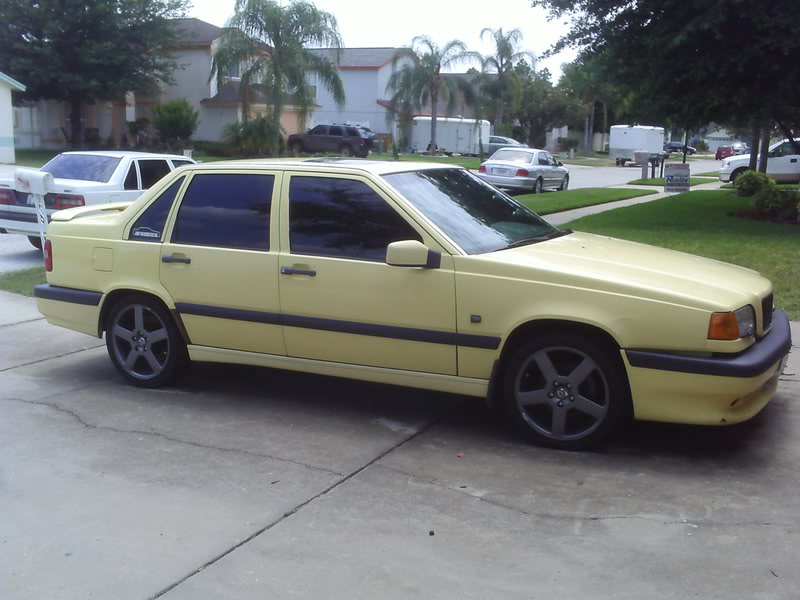
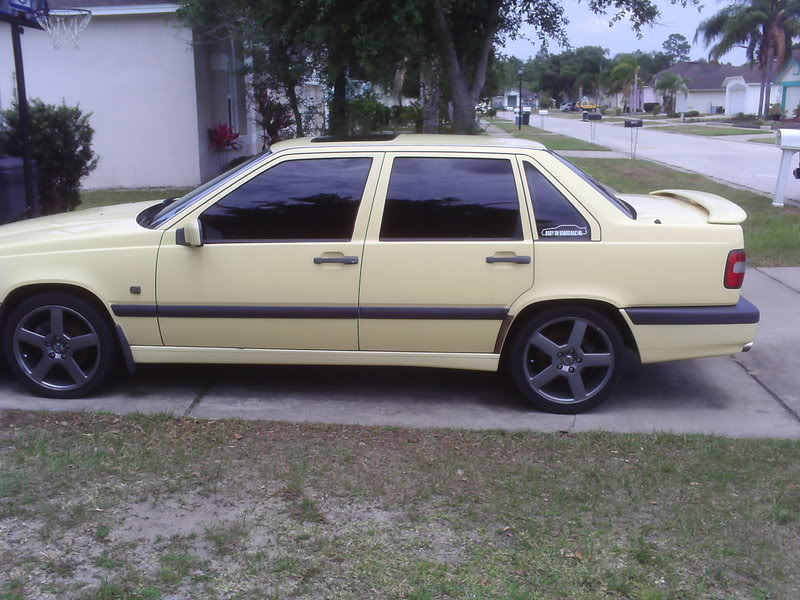
This is Before Paint.
http://s286.photobucket.com/albums/ll100/Quick-Brick/
[sm=icon_cheers.gif]
What was the name of the paint product that you used?
What type of prep work did you do?
And how long did it take you from start to finish?
I ask as I'm doing my bumpers, trim and mud guards tomorrow morning as it's supposed to be a great daywith 11C in the morning and 20C in the afternoon.
Hoping it looks as well as yours. I'll take [sm=Flahssssss.gif].
This is Before Paint.
http://s286.photobucket.com/albums/ll100/Quick-Brick/
[sm=icon_cheers.gif]

#6
05-24-2008, 06:33 AM
I used the Dupli.color Bumper coating. The paint code on the can is FB109 Dark Charcoal.
I washed all the moldings first.
Then wiped down with Alcohol.
The used the adhesive promoter that they sell as well and painted.
Also I took the moldings off the sides of the car.
I masked off the front and rear bumper and painted.
Let dry for a few hours and then rewashed the car and all is fine.
Wheelsup The tranny isn't doing all that well it worked good for about a month or so then back to the way it was.
I wish I could just find a manual tranny and everything cheap I would just convert to a 5 speed and be done with it.
#7
05-24-2008, 11:18 AM
Senior Member
Hey now Tech,
This is what I'm using for the job.
I'm figuring that it's going to take more time to prep the car than it will to actually do the painting[ ]. That's ok though as I'm looking forward to the job
  .
.
Oh, what do you think of the signature? I really like your montage and I'm still working on mine, but so far, I like the progression because it looks better than it did a few days ago. Yours is still the best I've seen though [sm=smiley20.gif].
Well, gotta get my paint'on [sm=smiley36.gif]. Camera emptied of old pic's and I'm heading out now so back in a bit with the results .
.
[sm=icon_cheers.gif]
[IMG]local://upfiles/14053/4E86E5C999044D2AABD2034822AF501B.jpg[/IMG]
[IMG]local://upfiles/14053/FBDE6D3D84DE478BBEEC0CA8DD1F3519.jpg[/IMG]
This is what I'm using for the job.
I'm figuring that it's going to take more time to prep the car than it will to actually do the painting[
]. That's ok though as I'm looking forward to the job .Oh, what do you think of the signature? I really like your montage and I'm still working on mine, but so far, I like the progression because it looks better than it did a few days ago. Yours is still the best I've seen though [sm=smiley20.gif].
Well, gotta get my paint'on [sm=smiley36.gif]. Camera emptied of old pic's and I'm heading out now so back in a bit with the results
.[sm=icon_cheers.gif]
[IMG]local://upfiles/14053/4E86E5C999044D2AABD2034822AF501B.jpg[/IMG]
[IMG]local://upfiles/14053/FBDE6D3D84DE478BBEEC0CA8DD1F3519.jpg[/IMG]
#8
05-24-2008, 11:27 AM

After waiting about 10 minutes for the pictures to open I fiannly hit the Stop button, but did get enough to see that it looks great. My yellow car has the trim all done in black, but my white car, which has the grey tip on the spoiler, is needing done. I never wanted to do it in black so I am going to look into doing whay you did. Your car is looking really good. Wish I had the time and money to speend on mine, but my cars have been somewhat neglected lately. I do keep the oil changed regularly, but that's about it.
#9
05-24-2008, 11:34 AM

#10
05-24-2008, 12:30 PM
On the back part of the door there is a rubber plug. Remove the plug and screw then slide the molding foward and remove it.
The fender ones are harder.
Look into the fender with the door open about half way. Use needle nose pliers to compress the clips and it will fall off.
The fender ones are harder.
Look into the fender with the door open about half way. Use needle nose pliers to compress the clips and it will fall off.
#11
05-24-2008, 01:28 PM
Senior Member
#12
05-24-2008, 01:47 PM
Senior Member
Hey now,
Try this again. messed up the pic's in the last one []
As an example.
1. Open the rear door and look for the gromet inside the door under the weather strip.
[IMG]local://upfiles/14053/DE4FA6CF6CCB4622A825C4BFEF837773.jpg[/IMG]
2. Pop off the gromet.
[IMG]local://upfiles/14053/19CABEC09B6544D0A6A6BC8B07EBD91D.jpg[/IMG]
3. Use T15 Torx wrench and be carefull not to drop the screw inside the door.
[IMG]local://upfiles/14053/08D857AB0A814126B1C2D1AD8E6532D8.jpg[/IMG]
4.With door open slide the the strip forward and remove.
[IMG]local://upfiles/14053/987110107F324262B8D7C1590002DB1D.jpg[/IMG]
I'm sure you can figure out how to out it back on.
Try this again. messed up the pic's in the last one [
]As an example.
1. Open the rear door and look for the gromet inside the door under the weather strip.
[IMG]local://upfiles/14053/DE4FA6CF6CCB4622A825C4BFEF837773.jpg[/IMG]
2. Pop off the gromet.
[IMG]local://upfiles/14053/19CABEC09B6544D0A6A6BC8B07EBD91D.jpg[/IMG]
3. Use T15 Torx wrench and be carefull not to drop the screw inside the door.
[IMG]local://upfiles/14053/08D857AB0A814126B1C2D1AD8E6532D8.jpg[/IMG]
4.With door open slide the the strip forward and remove.
[IMG]local://upfiles/14053/987110107F324262B8D7C1590002DB1D.jpg[/IMG]
I'm sure you can figure out how to out it back on.
#13
05-26-2008, 07:36 PM
Senior Member
Hey now Tech,
I'm currently working on the pic's in Photobucketthat I took of the trim/bumper project and I really like the end result [sm=smiley32.gif].First time I ever painted a car that wasn't going into a derby [sm=lol.gif].
Your's looked so damn good it made me jealous and wanting to do mine even more.
It isn't the flashiest of Brick's out there, but it is my Anvil and I'm keeping it for the next few years, at least, or until it fall totally apart. And being that 'it is a Volvo', I'm expecting at least another five years out if it as I'm "biting the bullit" and getting what needs to be fixed fixed.But doing my part when and where I can.
Well, while writing this post I was also editing the paint pic's at Photobucket and have just finished. [sm=icon_rock.gif]
Before.
http://s286.photobucket.com/albums/l...view=slideshow
Before, Prep and After.
http://s286.photobucket.com/albums/l...view=slideshow
I sorry the pic's of the torx are kind of fuzzy, but the designation is T15.[sm=smiley20.gif]There's a better pic in the post before this one.
And yes, I'll get the missing spot [:@]when I do the mud guards.
Hope this helps. It is the easiest thing to do so "get your can on" and do some spraying.
[sm=icon_cheers.gif]
I'm currently working on the pic's in Photobucketthat I took of the trim/bumper project and I really like the end result [sm=smiley32.gif].First time I ever painted a car that wasn't going into a derby [sm=lol.gif].
Your's looked so damn good it made me jealous and wanting to do mine even more.
It isn't the flashiest of Brick's out there, but it is my Anvil and I'm keeping it for the next few years, at least, or until it fall totally apart. And being that 'it is a Volvo', I'm expecting at least another five years out if it as I'm "biting the bullit" and getting what needs to be fixed fixed.
But doing my part when and where I can.Well, while writing this post I was also editing the paint pic's at Photobucket and have just finished. [sm=icon_rock.gif]
Before.
http://s286.photobucket.com/albums/l...view=slideshow
Before, Prep and After.
http://s286.photobucket.com/albums/l...view=slideshow
I sorry the pic's of the torx are kind of fuzzy, but the designation is T15.[sm=smiley20.gif]There's a better pic in the post before this one.
And yes, I'll get the missing spot [:@]when I do the mud guards.
Hope this helps. It is the easiest thing to do so "get your can on" and do some spraying.
[sm=icon_cheers.gif]
#14
05-26-2008, 07:48 PM

Senior Member
Join Date: Oct 2007
Location: ORLANDO ,FL where the hott panties are!
Posts: 451
Likes: 0
Received 0 Likes
on
0 Posts

Thread
Thread Starter
Forum
Replies
Last Post