Preparing for head gasket job question
#1
 06-06-2013, 11:03 AM


Hey all,
I spent days troubleshooting a hard start / engine cooling problem in our 2000 S40 and replaced all the usual suspects. I then had a look inside the plug holes and saw my culprit - cylinders 2,3,4 had coolant puddled on top of pistons. Strange thing is, I was barely blowing white smoke, just a very small amount at warmup. The car ran very well with virtually no smoke (or coolant in oil.) Things got much worse once I replaced the reservoir cap with a new one that held the pressure much better, however it still does not blow white smoke just bubbles and pressurizes the system real bad. Of course now its parked!
I will be pulling this apart in a couple days but was curious if anyone can say that that their experience was similar? When a HG goes is it common to fail out 3 cylinders? I'm just hoping I don't have a cracked head; if I did I'd imagine the symptoms would be much worse? Crossing my fingers ... !
Thanks a bunch,
Steve
#2
06-07-2013, 10:23 AM
I've been reviewing the VIDA instructions for removing the cylinder head on a B4204T2 engine (2000 S40) and am a little confused by something - wondering if anyone can please help?
In section 21, they make use of special tool 999-5454 (the one that threads into spark plug holes 1 and 4). I'm not really following the purpose of this tool since they never use it as a handle or anything. Are we to expect the cover might pop up suddenly upon releasing the screws?
Also, what exactly do they mean by "depressors" by using a suction cup? I don't see anything referred to as a depressor in the parts diagram?
I'm not following ... Thanks guys!
#3
06-07-2013, 12:08 PM

The tool holds the cam cover in place so you can slowly remove it to avoid cracking it. If you crack it, you need to replace the whole head. They are also used during reassembly to slowly and evenly install the cover.
The depressors are just the lifters. You can use a magnet to pull them out of the bore.
The depressors are just the lifters. You can use a magnet to pull them out of the bore.
#4
06-07-2013, 01:12 PM
#5
06-07-2013, 02:23 PM
#6
06-07-2013, 02:53 PM

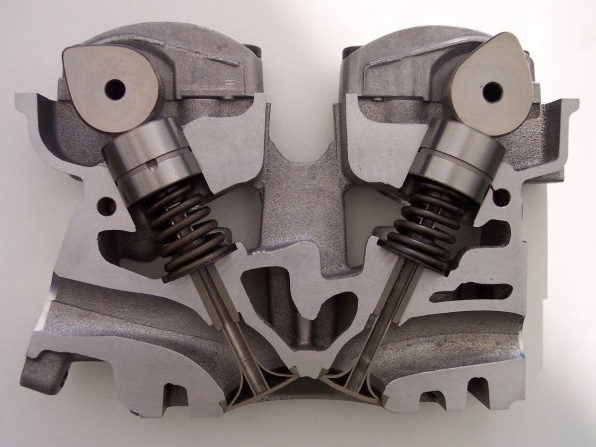
The cam cover is under pressure to lift from the valve springs through the "depressors" and cam lobes. You want the cover to release gently and evenly.
The depressors are cups that fit over the valve stem and spring to act as the adjustment for clearance with the cam lobe. Normally the engine will fail long before they wear enough to need replacement.
The depressors are cups that fit over the valve stem and spring to act as the adjustment for clearance with the cam lobe. Normally the engine will fail long before they wear enough to need replacement.

#7
06-07-2013, 06:52 PM
Thanks Hudini, that's an awesome cross-section pic! Now I get it. While the cams are under load and are turned to their marks for previous belt removal, are all the valves actually still closed though? As the cover and cover tool is removed and pressure is released, will the valves move at all (cam turn) , or will all the depressors just move together as a unit?
I'm re-reading the VIDA section on this because I'm really nervous about putting the cams and sprockets back on correctly for head re-assembly - I will mark them up with paint marks so I get it right. BTW, I will either be replacing the head with a cylinder-head.com reman unit, or have my local machine shop go over it, still undecided until I get quotes.
Thanks alot!!
#8
06-07-2013, 10:07 PM
When the timing marks are aligned the pistons are down in the bore but some valves are always open and under pressure. As the cover is loosened the cams will lift the cover and the valves will all close as the cam lobes are no longer holding them open. You want this to be a slow controlled process and not a sudden release of pressure. A plastic dead blow hammer or rubber mallet helps to break the cover loose without bending things.
Also, you can remove the cams without removing the cam gears. Replace the seals by slipping them off the other end. You do not want to remove the CVVT gear without some method for marking the correct position or without the cam holder tool because the CVVT gear can be installed in any position as it has no woodruff key or similar method for finding the correct position.
Good luck with the rebuild!
#9
06-07-2013, 10:52 PM

Junior Member
Join Date: Jan 2013
Location: Waco, Texas
Posts: 8
Likes: 0
Received 0 Likes
on
0 Posts
Hello Steve,
and Hudini,
The way Volvo made this head and valve train is cool, the top cover is also line bored for the top half of the cam bearings. Also it is the top half of the oil galley so you must be careful both removing and reinstalling, it has dowels on both sides that give a really tight fit. So the key to handling it is control, with the threaded tools it will allow you to do this. The information that I read says to bump with a hammer, this is difficult because of the close space. I used a slide hammer that is not to big with a flat hook, that consist of a bolt, jam nut, coupling nut, and a flat washer sandwiched to form the flat hook to put under the cast tabs for this. Be careful not to put any hickies on any of the mating surfaces. The tooling set I got was very well made by AST the set is the v500 which has two of these clamp tools and all of the cam holding tools and crank stop dowel for positive alignment of both cams and the crank. This makes it very easy to remove all drive gears and not to worry about marking, it also holds the cams with enough force to allow you to get the proper torque upon rebuild. I apologize for rambling, as a millwright I enjoy close tolerance work I have assisted setting a machine base within .032" in two axis, the trick was it weighed 116,000lb. yes we had it hanging on a crane and I was using a theodolite with a laser eyepiece by Wild Herrbrugg from 1969.
Take care,
MEL
#10
06-09-2013, 02:42 PM
#11
09-28-2013, 01:34 PM

Junior Member
Join Date: Sep 2013
Location: Alabama
Posts: 1
Likes: 0
Received 0 Likes
on
0 Posts
Cylinders 2,3,4 had coolant puddled on top of pistons....Yep same thing happened to me on the 2000 V40. I'm in the middle of the same project. Dead Blow Hammer popped the head right off. I'll be replacing the camshaft seals and bead blasting the camshaft box and the head for good measure. I'm also indicating the block first, to be sure there is no trouble there. This is not a process to race through, I'm taking it on in baby steps. Question: do youall think I should COPPERCOAT the head and block on reassembly? I've done my fair share of engine work like this but never on a VOLVO.

#14
10-21-2013, 11:10 AM

I'm about to do the reassembly of my cylinder head (2001 1.9T), and I have made the tool to align the cams, and found the head bolt torque, but can't find the spec for the head cover torque. I would assume they would be light since it's the journals for the cams, but can't find a number or the sequence to tighten them in.

#16
10-21-2013, 12:22 PM
Thanks, I'm sure they are close to the same, but I'd rather confirm on an S40, since there may be a good reason for them to be very different specs, and I don't enough to be sure. I'm nervous enough about this reassemble already I've done this on Jags, but this is my first Volvo - in fact, I only have the car because a Jag customer of mine sold it to me cheap when the head gasket blew. - Speaking of which...are there common causes for overheating? I boiled the thermostat, and it opens/closes just fine. The only thing I found wrong so far was someone forgot to retighten a small hose clamp on the heater pipe fitting (?) located behind the head on the driver's side, going towards turbo (I think). It got hot for some reason, so I'd rather find out now while things are apart...
I've done this on Jags, but this is my first Volvo - in fact, I only have the car because a Jag customer of mine sold it to me cheap when the head gasket blew. - Speaking of which...are there common causes for overheating? I boiled the thermostat, and it opens/closes just fine. The only thing I found wrong so far was someone forgot to retighten a small hose clamp on the heater pipe fitting (?) located behind the head on the driver's side, going towards turbo (I think). It got hot for some reason, so I'd rather find out now while things are apart...
#17
10-21-2013, 02:34 PM
#18
10-22-2013, 09:38 AM
#19
11-11-2013, 09:42 AM
Well, I got everything together, and it fired right up, but no oil pressure. Since it was together, I couldn't just spin up the oil pump with a drill, but I pumped oil into the oil pressure sensor hole, and began to get some pressure, but not enough, and now I'm back to showing no pressure, and there's lots of 'clicking' to correspond with a low oil pressure condition.
Any ideas? I can't just look in the oil filler to see if oil seems to be getting up top because of the screen in the filler, and I don't want to keep running it anyway, sounding as it does.
TIA for any advise....
Any ideas? I can't just look in the oil filler to see if oil seems to be getting up top because of the screen in the filler, and I don't want to keep running it anyway, sounding as it does.
TIA for any advise....
#20
11-12-2013, 10:05 AM
Did you install a new oil filter? It could be a clogged oil pickup tube at bottom of engine, severely leaking oil pickup - needs new o-rings, low oil level, or the oil pump is bad. I am sorry, but I do not know how to test fot this. No doubt someone here can assist. Please post the result. Greg

Thread
Thread Starter
Forum
Replies
Last Post
xDread92x
Volvo 240, 740 & 940
33
03-31-2013 02:18 PM
lmh
Volvo V70
2
09-26-2010 03:18 AM