
DIY: 1998 Volvo V70 Instrument Cluster Removal and Bulb Change
#1
 01-24-2010, 10:39 AM


Join Date: Jan 2010
Posts: 232
Likes: 0
Received 0 Likes
on
0 Posts
DIY: 1998 Volvo V70 Instrument Cluster Removal and Bulb Change
- The bulbs that illuminate the Fuel Gauge, Temp Gauge, Speedometer and Tachometer are Bulb “194”. But best is to use Volvo PN 942571 or Osram-Sylvania 194. Dealer usually charges 1-2h labor just to replace this stupid bulb.
It was Sunday and I was stuck, so I bought the Eiko Brand Bulb “194” from Oreilly (made in Taiwan), and it turned out Eiko brand is a bit brighter than the rest, a bit annoying. So the lesson is buy Volvo bulb to get the same wattage (3W or so).
Later I found out Menards Hardware sells the Osram-Sylvania 194 pair for $1.70!.
- To change the bulbs in the Instrument Cluster, the procedure calls for dash trim removal, which is a pain, however, once you have done it and familiar with it, a dash trim should not take more than 30 minutes.
- You might be able to remove some of the bulbs FROM BELOW by removing the knee trim under the steering wheel (one single Torx-25 Screw). It is a bit acrobatic but with some skills, you can replace some bulbs from BELOW. Some other bulbs are hidden and impossible to replace from BELOW. A Flashlight will help a lot when you lay on your back looking upward!
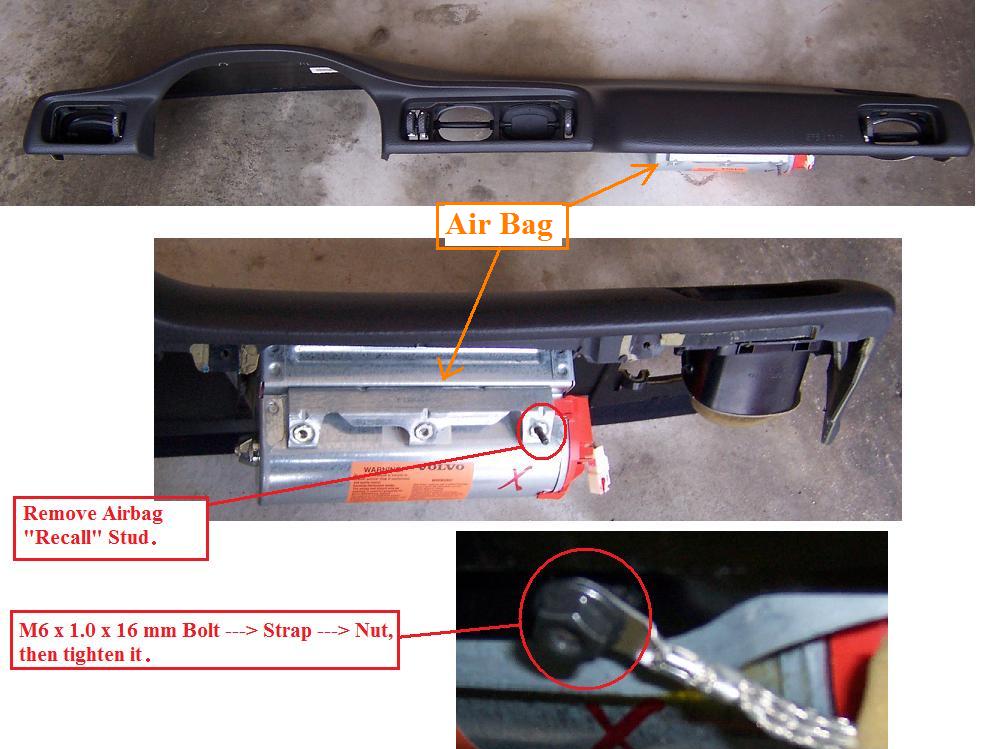
- For my 1998 V70, the Air Bag Ground Strap was recalled 1 year after I bought the car (bought car in 1998) because of “poor grounding”.
So the Volvo dealer used an M6 stud and sandwich the strap for better grounding. This stud made removal of the Dash Trim very difficult because it blocks the dash trim from coming out. So for future ease of removal of dash trim, get rid of the stud, and instead use M6 x 1.0 x 16 mm bolt and sandwich it with a nut as shown: basically bolt, then strap, then nut then tighten it.
Also if you have this “recall” stud, use a vice-grip to grab it and remove it, the dash will come out nicely.
- Read this nice Dash write-up:
http://www.vpcuk.org/forums/showthread.php?t=839
http://volvospeed.com/vs_forum/index...moval-writeup/
PROCEDURE
1. Copy FM radio channels, then disconnect Battery Ground Cable (10-mm socket). This is to prevent an SRS Code later.
- Driver seat all the way back.
- Steering Wheel DOWN and OUT all the way.
2. Use a flat blade screwdriver wrapped with a rag to prevent damage to trim work, pry the BOTTOM of the vents (see pic of the vents with clips) to remove them to expose the Torx-25 screws.
The dash speaker cover: pry the part close to you first.
3. Remove the 11 Torx-25 Screws as shown in Pic #1:

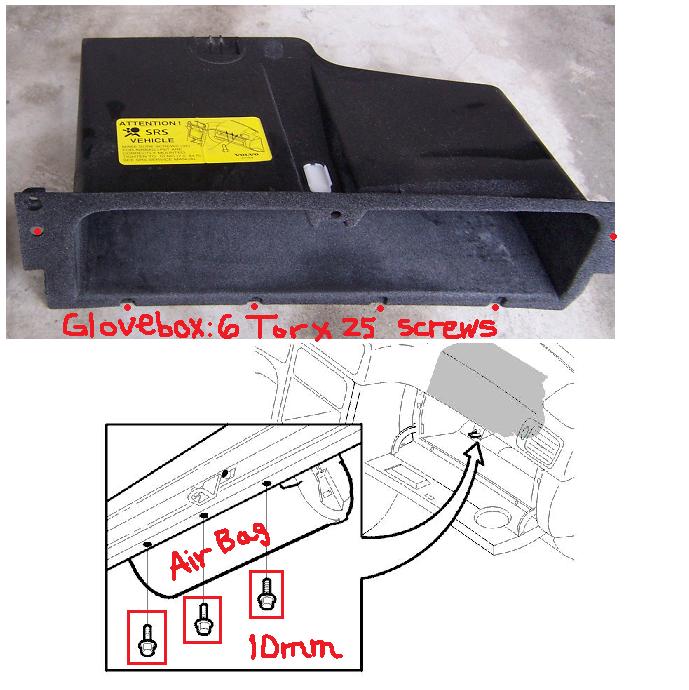
4. The Glove box is held by six (6) screws. Once the Glove box is removed, you will see the three (3) 10-mm bolts holding the Air Bag Unit (which is part of the dash trim).
- Disconnect Air Bag Electrical Connector: note how it fits in the groove for re-installation.
- Now the dash trim slides out nicely, set it in a safe place to prevent damage.
- If you have the “recall” stud as mentioned above, remove it.
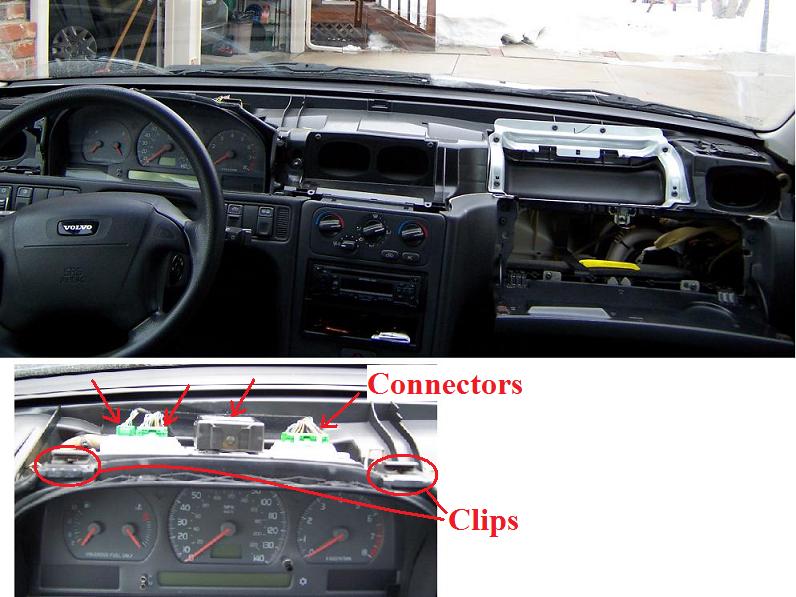
5. The Instrument Cluster is held by 2 clips (make a note how it fits together for ease of re-installation). Lift the REAR of the clip to remove it.
Now disconnect all connectors using a SMALL flat blade screwdriver.
6. Remove the Instrument Cluster by lifting it up a bit then slide it sideway.
7. In the REAR of the Instrument Cluster, there are essentially 2 types of bulbs:
- Volvo PN 942571 (Bulb 194; 3W); qty =4.
- Volvo 977709 (1.2W) Bulb is essentially similar to Volvo PN 966326 (1.2W) Bulb & socket (Trip Computer)
NOTE:
- To replace the 3W bulb, simple untwist it, then remove the bare bulb from the base, then insert a new bulb: straightforward.
- Volvo 977709 (1.2W) Bulb is one tiny unit (bulb + holder), so replace the whole thing, it is cheap.

RE-INSTALLATION:
1. During re-installation, do NOT forget to re-connect the Air Bag Electrical Connector!
2. To avoid trouble to having to take things apart again, once the NEW bulb has been replaced: install ONLY Dash Trim, Air Bag Ground Strap, Battery Ground, and Cluster Connections, then stop.
- Then using a cardboard or garbage bag to darken the Instrument Cluster and stick your head inside to test the light bulb to be sure it works fine and has the same intensity as the rest.
3. If the light bulb is OK, then re-install the rest of trim work. If not, re-inspect the bulb.
That is all, removing the dash trim may seem complicated but in reality, it is simple work, the level of difficulty is ONLY 2/10 if you read this DIY!
- The bulbs that illuminate the Fuel Gauge, Temp Gauge, Speedometer and Tachometer are Bulb “194”. But best is to use Volvo PN 942571 or Osram-Sylvania 194. Dealer usually charges 1-2h labor just to replace this stupid bulb.
It was Sunday and I was stuck, so I bought the Eiko Brand Bulb “194” from Oreilly (made in Taiwan), and it turned out Eiko brand is a bit brighter than the rest, a bit annoying. So the lesson is buy Volvo bulb to get the same wattage (3W or so).
Later I found out Menards Hardware sells the Osram-Sylvania 194 pair for $1.70!.
- To change the bulbs in the Instrument Cluster, the procedure calls for dash trim removal, which is a pain, however, once you have done it and familiar with it, a dash trim should not take more than 30 minutes.
- You might be able to remove some of the bulbs FROM BELOW by removing the knee trim under the steering wheel (one single Torx-25 Screw). It is a bit acrobatic but with some skills, you can replace some bulbs from BELOW. Some other bulbs are hidden and impossible to replace from BELOW. A Flashlight will help a lot when you lay on your back looking upward!
- For my 1998 V70, the Air Bag Ground Strap was recalled 1 year after I bought the car (bought car in 1998) because of “poor grounding”.
So the Volvo dealer used an M6 stud and sandwich the strap for better grounding. This stud made removal of the Dash Trim very difficult because it blocks the dash trim from coming out. So for future ease of removal of dash trim, get rid of the stud, and instead use M6 x 1.0 x 16 mm bolt and sandwich it with a nut as shown: basically bolt, then strap, then nut then tighten it.
Also if you have this “recall” stud, use a vice-grip to grab it and remove it, the dash will come out nicely.
- Read this nice Dash write-up:
http://www.vpcuk.org/forums/showthread.php?t=839
http://volvospeed.com/vs_forum/index...moval-writeup/
PROCEDURE
1. Copy FM radio channels, then disconnect Battery Ground Cable (10-mm socket). This is to prevent an SRS Code later.
- Driver seat all the way back.
- Steering Wheel DOWN and OUT all the way.
2. Use a flat blade screwdriver wrapped with a rag to prevent damage to trim work, pry the BOTTOM of the vents (see pic of the vents with clips) to remove them to expose the Torx-25 screws.
The dash speaker cover: pry the part close to you first.
3. Remove the 11 Torx-25 Screws as shown in Pic #1:
4. The Glove box is held by six (6) screws. Once the Glove box is removed, you will see the three (3) 10-mm bolts holding the Air Bag Unit (which is part of the dash trim).
- Disconnect Air Bag Electrical Connector: note how it fits in the groove for re-installation.
- Now the dash trim slides out nicely, set it in a safe place to prevent damage.
- If you have the “recall” stud as mentioned above, remove it.
5. The Instrument Cluster is held by 2 clips (make a note how it fits together for ease of re-installation). Lift the REAR of the clip to remove it.
Now disconnect all connectors using a SMALL flat blade screwdriver.
6. Remove the Instrument Cluster by lifting it up a bit then slide it sideway.
7. In the REAR of the Instrument Cluster, there are essentially 2 types of bulbs:
- Volvo PN 942571 (Bulb 194; 3W); qty =4.
- Volvo 977709 (1.2W) Bulb is essentially similar to Volvo PN 966326 (1.2W) Bulb & socket (Trip Computer)
NOTE:
- To replace the 3W bulb, simple untwist it, then remove the bare bulb from the base, then insert a new bulb: straightforward.
- Volvo 977709 (1.2W) Bulb is one tiny unit (bulb + holder), so replace the whole thing, it is cheap.
RE-INSTALLATION:
1. During re-installation, do NOT forget to re-connect the Air Bag Electrical Connector!
2. To avoid trouble to having to take things apart again, once the NEW bulb has been replaced: install ONLY Dash Trim, Air Bag Ground Strap, Battery Ground, and Cluster Connections, then stop.
- Then using a cardboard or garbage bag to darken the Instrument Cluster and stick your head inside to test the light bulb to be sure it works fine and has the same intensity as the rest.
3. If the light bulb is OK, then re-install the rest of trim work. If not, re-inspect the bulb.
That is all, removing the dash trim may seem complicated but in reality, it is simple work, the level of difficulty is ONLY 2/10 if you read this DIY!
Last edited by cn90; 02-03-2010 at 02:40 PM.
#2
01-24-2010, 01:01 PM
Join Date: Jan 2010
Posts: 232
Likes: 0
Received 0 Likes
on
0 Posts
EDIT:
- Just verified: a few bulbs (such as the "194" bulbs illuminating the Fuel Gauge and Temp Gauge) can be changed from BELOW.
The other bulbs are impossible to change from BELOW.
- Also the Sylvania-Osram "194" bulbs (bought at Menards) have perfect brightness. So I removed the Eiko bulb and replaced that with Sylvania-Osram "194" bulb, all from BELOW!
So all is good and very happy.
Thanks all for your help.
#3
01-28-2010, 01:01 PM

Great write up! I was searching for this info just a week ago and found a lot of partial information but nothing this complete and with good pictures.
The only part that was difficult on my car was getting the vents out without damaging the soft dash. But I came up with a safe method.
Instead of trying to pry the vents out I made a hook out of stiff steel wire, hooked it around the lower side of the innermost vertical vent vanes. Very quick and easy and zero risk of damaging the dash.
The only other thing I would add is that IPD sells a kit with all the lamps
http://www.ipdusa.com/Volvo-S70V70-1...p-128-371-550/
This post should be made 'sticky' as removing the dash to replace the cluster bulbs seems complicated and intimidating but with these directions (and my hook method for the vents) it is actually very easy and should be
Thanks,
Thomas
#4
01-28-2010, 03:30 PM
Join Date: Jan 2010
Posts: 232
Likes: 0
Received 0 Likes
on
0 Posts
Glad I could be of help.
1. Prying the vent with screwdriver wrapped with cloth will be fine. I have no visible damage whatsoever.
Pulling with stiff wire is fine but be careful not to rip the horizontal "louvers" in the vent.
Actually when prying, it comes out very easily.
2. The IPD kit is LED bulb, search around, some like it and some hate the Blue lighting effect.
So if you like your existing factory color, use the same.
Actually my local Menards hardware stores sell the Sylvania-Osram 2-bulb "194" style package for $1.70!
Last edited by cn90; 01-28-2010 at 06:32 PM.
#5
01-28-2010, 05:07 PM
#6
01-28-2010, 06:35 PM
Join Date: Jan 2010
Posts: 232
Likes: 0
Received 0 Likes
on
0 Posts
#7
02-03-2010, 08:15 AM

I have a 2000 S70. The dash layout looks identical to yours. Do you know if the process, and screw locations would be the same? The bulbs I need to replace is for the odometer, and the right side of the "informatin bar". Do you know if I can reach that from below, without removing dash?
#8
02-03-2010, 11:33 AM
Join Date: Jan 2010
Posts: 232
Likes: 0
Received 0 Likes
on
0 Posts
I have a 2000 S70. The dash layout looks identical to yours. Do you know if the process, and screw locations would be the same? The bulbs I need to replace is for the odometer, and the right side of the "informatin bar". Do you know if I can reach that from below, without removing dash?
- Bulb behind Fuel Gauge: very easy.
- Bulb behind Temp Gauge: quite a bit of acrobatic move and you need small hands to do it (or long forceps!).
- Bulb behind Odometer (mph): impossible from below (there is a plastic duct immediately behind it!).
- Bulb behind Tachometer (rpm): impossible from below (there is a plastic duct immediately behind it!).
Removing the dash is actually VERY EASY as long as you follow the above instructions. While you are there, you may as well replace all 4 "194" bulbs, using the same brand (like Sylvania) so you have the same brightness. With time/mileage, the factory bulb loses some brightness.
EDIT:
Volvo PN 942571 (Bulb 194; 3W), you can keep the Bulb HOLDER, just change the Bulb.
Volvo 977709: Bulb and Holder is ONE Unit, change the Entire Bulb Unit. It is cheap anyway.
Last edited by cn90; 02-03-2010 at 11:36 AM.
#9
02-06-2010, 10:22 PM
Thanks for the info. The weather is cold and snowing here. I don't have a garage to work in, so I am going to wait for better weather to attempt dash removal.
I do have another question though......I just bought this car, and all the bulbs were burned out in the switches on the dash. I replaced the bulbs in all of them that have replaceable bulbs. The two remaining switches are the trip computer, and the dashboard illumination dimmer. They don't appear to have replaceable bulbs. Do you know if they have internal bulbs, or are they not meant to be illuminated? I asked the local dealer, and they don't know the answer.
Thanks,
Jim
#10
02-06-2010, 10:53 PM
Join Date: Jan 2010
Posts: 232
Likes: 0
Received 0 Likes
on
0 Posts
#11
02-07-2010, 05:58 PM
I am not talking about the trip computer display. It is the selector **** I am referring to.
Like I said, there is not a replaceable bulb in the dimmer, or the trip computer ****. I guess the only way to repair them is to replace the entire switch.
Does anyone know if the trip computer **** is supposed to be illuminated?
Like I said, there is not a replaceable bulb in the dimmer, or the trip computer ****. I guess the only way to repair them is to replace the entire switch.
Does anyone know if the trip computer **** is supposed to be illuminated?
#12
02-07-2010, 07:23 PM
Join Date: Jan 2010
Posts: 232
Likes: 0
Received 0 Likes
on
0 Posts
#13
02-07-2010, 10:44 PM
#14
02-08-2010, 09:58 AM
Join Date: Jan 2010
Posts: 232
Likes: 0
Received 0 Likes
on
0 Posts
The trip computer **** (the **** you push to reset the trip to zero) is simply a plastic stick, no bulb.
#16
02-12-2010, 01:30 PM
Join Date: Jan 2010
Posts: 232
Likes: 0
Received 0 Likes
on
0 Posts
#18
02-13-2010, 01:01 AM
Join Date: Jan 2010
Posts: 232
Likes: 0
Received 0 Likes
on
0 Posts
Whenever there is a bulb in a Volvo switch, it is always replaceable.
Just check the backside of the switch, there should be some tabs. Use a SMALL flat screwdriver to gently pry it out and you should see the bulb.
These Volvo switches are designed so that the bulb can be replaced.
Just check the backside of the switch, there should be some tabs. Use a SMALL flat screwdriver to gently pry it out and you should see the bulb.
These Volvo switches are designed so that the bulb can be replaced.
#19
03-03-2010, 12:03 PM

#20
01-29-2011, 04:23 PM

Senior Member
Join Date: Feb 2009
Location: Glen Ellyn, IL
Posts: 564
Likes: 0
Received 0 Likes
on
0 Posts
It looks as if you "could" separate the circuit board from the white plastic frame, then you could get the bulb out, but I'm thinking it might be easier to just cut the plastic which is behind the bulb. Since the bulb is secured to the circuit board by twisting it, having it covered by the plastic does not seem to make sense. Plus, getting the circuit board and the plastic piece apart may crack the board - and who want to do that?!