
T5 Oil Trap repair (with pictures)


Thread Starter
|
Senior Member
Joined: Apr 2007
Posts: 431
Likes: 2
From: Ohio
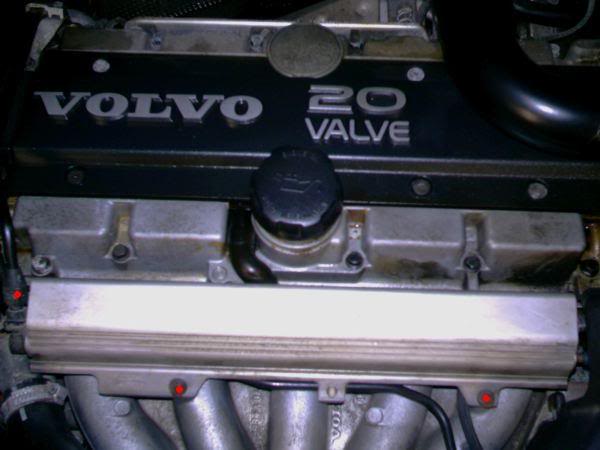
Well, I got around to working on my newly purchased Volvo V70 GLT with oil leaking everywhere. Oil was coming from the dipstick, the oil cap, and even engine seals. This is usually a problem with the vent system in these cars for the crankcase ventilation. I decided to document this repair in case anyone else needs to do this. So far this job was done with simple hand tools.
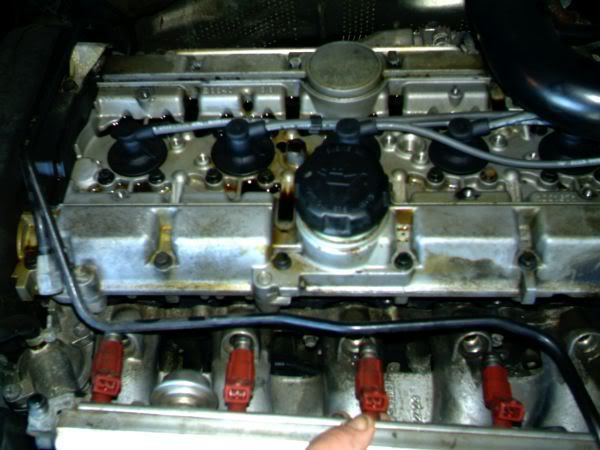
I removed the fuel rail and realized it did not have to come off, but it's nice to have some extra room. The fuel line was unhooked and then the cover and 2 bolts for the rail.
Grab the fuel rail and carefully and evenly pull it straight out........
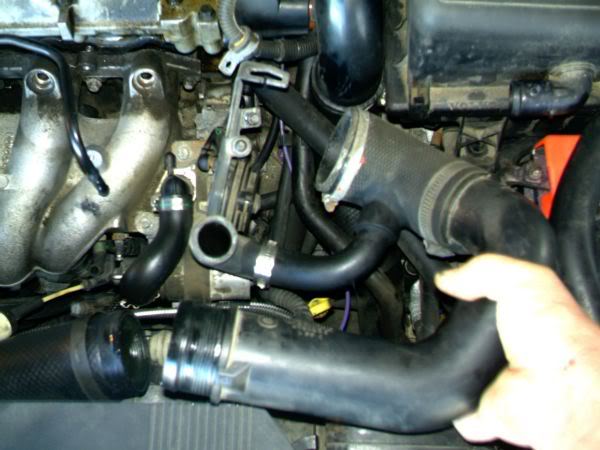
I then removed all the vacuum lines to the throttle body and intake and removed the throttle cable. After that, I removed the large hose from the throttle body......
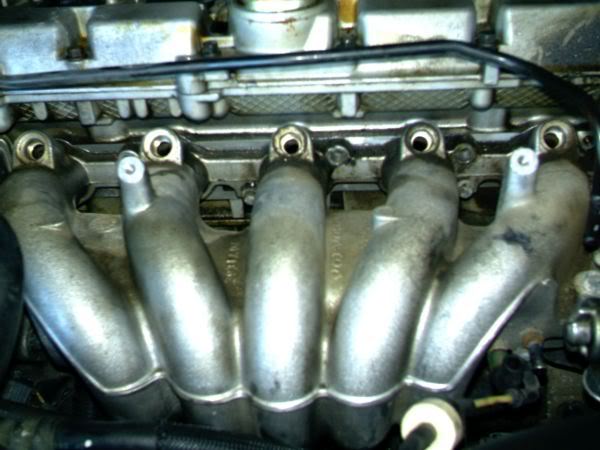
I then removed all the top bolts on the intake manifold and simply loosened the lower bolts. I had to use a 10MM 1/4" drive swivel socket for the lower bolts..........
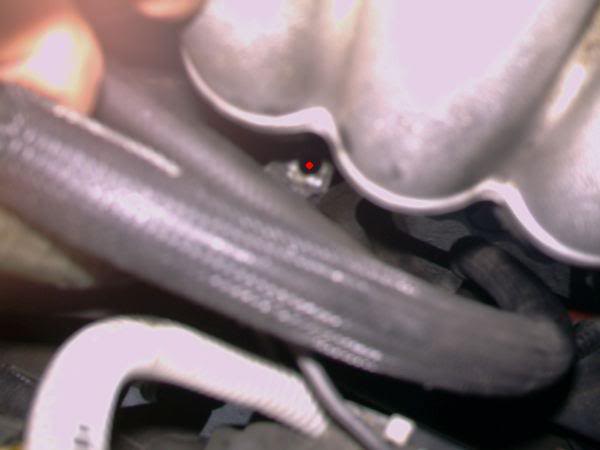
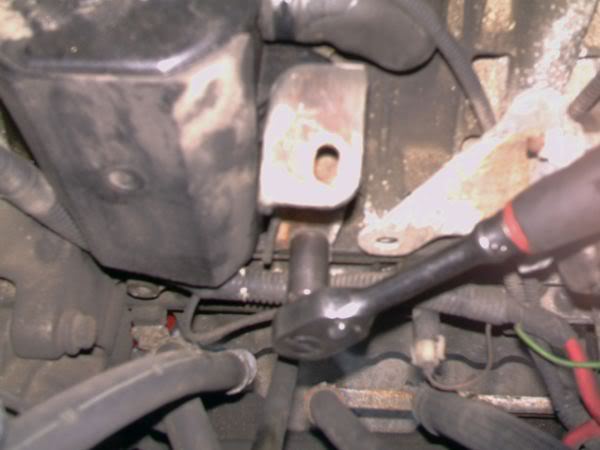
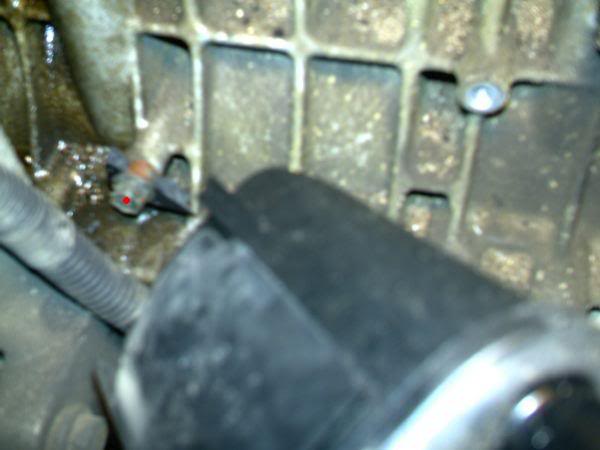
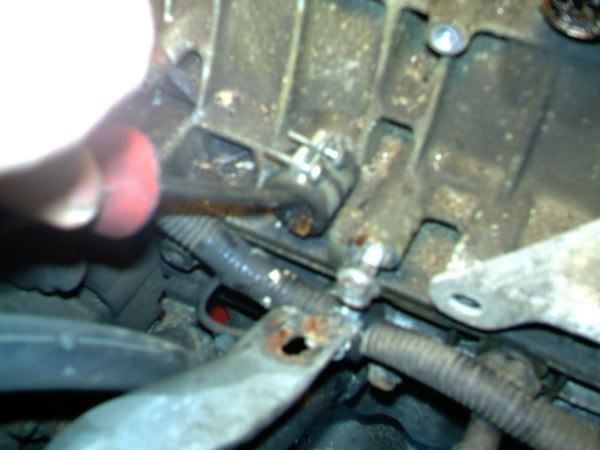
Under the intake are 2 more 12MM bolts. One is a brace from the bottom of the engine to the intake and the other is the dipstick tube (marked with red dot) and you basically cannot see these, but feel around and you will find them.........
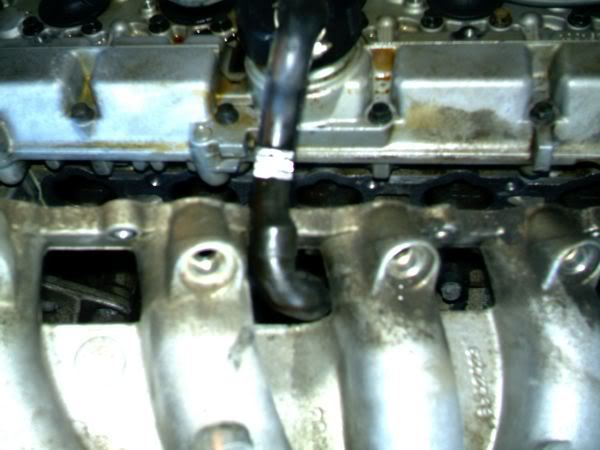
After that, carefully lift the intake and snake the hose through. If you feel anything catch, stop and check for vacuum lines you may have missed....
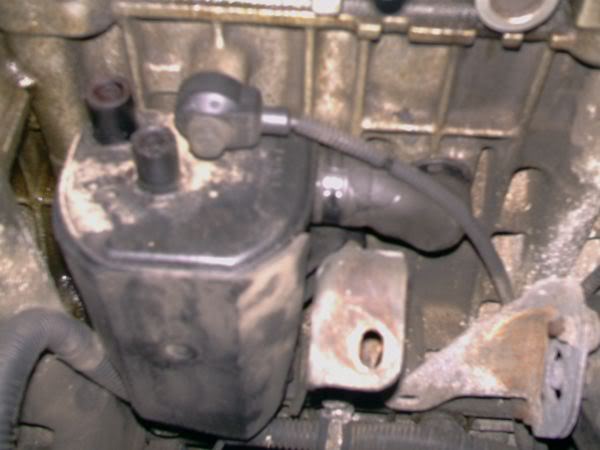
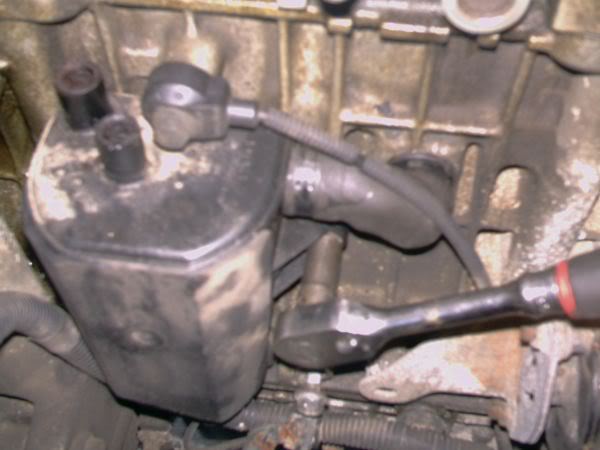
Now we get to the good part. Here is a nice shot of the oil trap after the intake is out of the way. Please note the bracket where it bolts to the bottom of the intake......
All the hose to the box have clamps that need cut off to remove. A good pair of diagonal pliers works well. You will need to replace them with worm clamps.........
Remove the intake brace.............
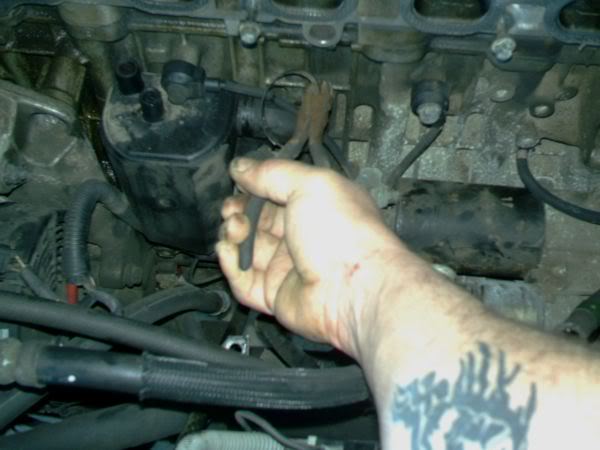
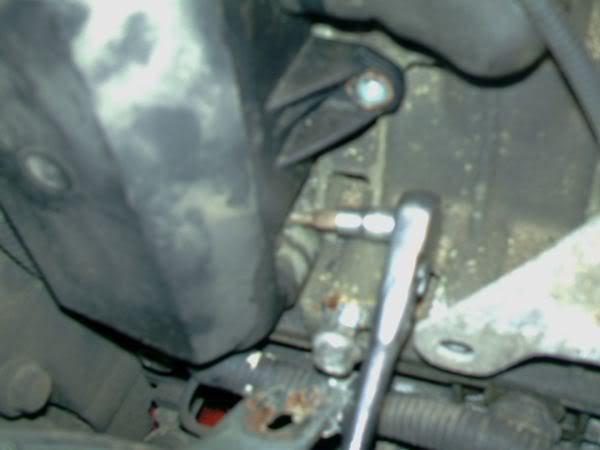
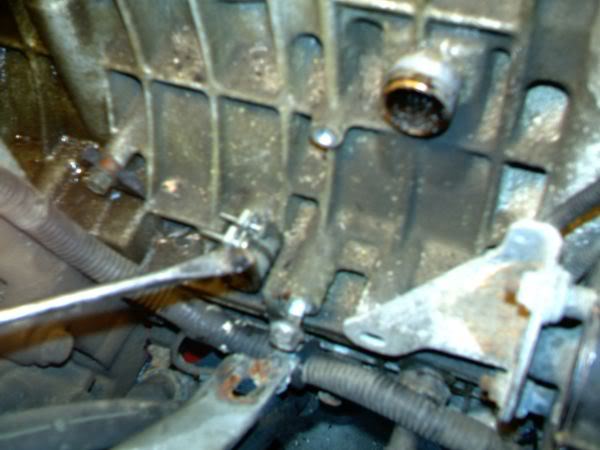
Remove the 2 bolts holding the box. One is hidden on the left side and you will see later........
Loosen the small clamps attaching the small hose. They are small Torx bolt clamps.....
Oh! Here is that hidden bolt! I found it after breaking it........
Since it was getting late, I had enough time to scrape some of the carbon and gunk from the ports with a screwdriver. Tomorrow, I will do more cleaning and update. I do see a lot of carbon and gunk in the hoses attached to the oil trap and the trap is nasty also, but have not found a blockage yet. Hopefully I find it tomorrow.
I removed the fuel rail and realized it did not have to come off, but it's nice to have some extra room. The fuel line was unhooked and then the cover and 2 bolts for the rail.
Grab the fuel rail and carefully and evenly pull it straight out........
I then removed all the vacuum lines to the throttle body and intake and removed the throttle cable. After that, I removed the large hose from the throttle body......
I then removed all the top bolts on the intake manifold and simply loosened the lower bolts. I had to use a 10MM 1/4" drive swivel socket for the lower bolts..........
Under the intake are 2 more 12MM bolts. One is a brace from the bottom of the engine to the intake and the other is the dipstick tube (marked with red dot) and you basically cannot see these, but feel around and you will find them.........
After that, carefully lift the intake and snake the hose through. If you feel anything catch, stop and check for vacuum lines you may have missed....
Now we get to the good part. Here is a nice shot of the oil trap after the intake is out of the way. Please note the bracket where it bolts to the bottom of the intake......
All the hose to the box have clamps that need cut off to remove. A good pair of diagonal pliers works well. You will need to replace them with worm clamps.........
Remove the intake brace.............
Remove the 2 bolts holding the box. One is hidden on the left side and you will see later........
Loosen the small clamps attaching the small hose. They are small Torx bolt clamps.....
Oh! Here is that hidden bolt! I found it after breaking it........
Since it was getting late, I had enough time to scrape some of the carbon and gunk from the ports with a screwdriver. Tomorrow, I will do more cleaning and update. I do see a lot of carbon and gunk in the hoses attached to the oil trap and the trap is nasty also, but have not found a blockage yet. Hopefully I find it tomorrow.
Last edited by Johnny Mullet; Mar 15, 2009 at 08:37 PM.


Junior Member
Joined: Oct 2009
Posts: 4
Likes: 0
If I was a woman, I would be your free strip dancer. 300 dollar vehicle problem solved. 1998 Volvo v70, just purchased on the 10th, 2 days ago.
Since I am a guy, all I can say is thanks and since I am close in location right now, if you ever, EVER need some help , let me know.
Thanks Big Time. and may your woman always make sure you are satisfied before leaving the bed.
Since I am a guy, all I can say is thanks and since I am close in location right now, if you ever, EVER need some help , let me know.
Thanks Big Time. and may your woman always make sure you are satisfied before leaving the bed.
Thread Starter
|
Senior Member
Joined: Apr 2007
Posts: 431
Likes: 2
From: Ohio
I'm glad my guide was useful for you. I have a lot of pics from other repairs I have done to this car, but I sold the car since I was basically tired of fixing it all the time. I got the car dirt cheap, but spent well over $1500.00 in parts on it. The previous owner did not maintain the car and it was riddled with problems. If I had to pay a mechanic to do all the repairs I have done, it would have cost me as much as the car is worth in value and that does not include my parts discounts!
I sold the Volvo and got another Geo Metro.................

I bought and rebuilt this car and fixed it up for less than $1000.00.............
http://geometroforum.com/topic/2175380/
I have not had to work on either one of my vehicles since then. More time to spend with the family I guess.
I sold the Volvo and got another Geo Metro.................
I bought and rebuilt this car and fixed it up for less than $1000.00.............
http://geometroforum.com/topic/2175380/
I have not had to work on either one of my vehicles since then. More time to spend with the family I guess.

Member
Joined: Aug 2007
Posts: 35
Likes: 0
wow,,tnx for this document..very important for me..i noticed that you have a very good car..add a rancho shocks to it and it would be perfect..
Last edited by kurtdaniel; Jan 25, 2010 at 07:38 PM.

Junior Member
Joined: Jan 2010
Posts: 8
Likes: 0
Sorry mullet. I know you love your geos but I have to share this with you.
http://www.youtube.com/watch?v=u617P7g3O7I
If you've seen it already, I apologize but I do appreciate the help on the oil trap.
http://www.youtube.com/watch?v=u617P7g3O7I
If you've seen it already, I apologize but I do appreciate the help on the oil trap.


Junior Member
Joined: May 2010
Posts: 27
Likes: 0
Just bought a 2000 V70 XC for the wife, it was well maintained as far as I can see, but being new to these animals, I just want to say thanks for a great posting. It taught me a bunch, if it were a 57 chevy I'd have no problem at all I'm an old school mechanic, I love to wrench on just about anything ( not Scared to get into it ) I just replaced the fuel pump, punched a small hole in the tin right over the pump...it was pretty nasty, elbows from pump were riddled with pin holes.....Do you have any idea why the engine rpm's rise to around 1100 rpm then back down to 900 rpm....it was doing this before the pump replacement?????? I just bought the Vida disks and am waiting for an XP Pro edition to run it. But need the car for work. Any ideas you may have would be greatly appreciated, just like your post.
Pete
Pete

Junior Member
Joined: Jun 2010
Posts: 21
Likes: 0
Cool, Thanks Tech!
I just bought a 98 V70xc w/177k miles and wanted to do all maintenance possible now that I have the head off to repair a blown headgasket! Got it for what I felt was dirt cheap $1400.
Spent $600 on ipdusa.com so far and $300 on labor for the blown gasket. I Want this baby to last a while.

Junior Member
Joined: Nov 2010
Posts: 3
Likes: 0
I'm just curious, I'm trying to do this on a 1999 v70 XC and when I try to pull out the manifold it feels like it's connected to something on the bottom, but I can't for the life of me figure out what. Any suggestions? Thanks!