
Members Write ups


Member
Joined: Feb 2005
Posts: 40
Likes: 0
From: Amherst, MA
After bending the valves on my 1998 V70XC engine due to an incorrect timing belt installation, I decided to tackle the job of rebuilding the head on my engine. Being a carpenter, I decided to make some of the tools required for removal/assembly out of wood with what I had lying around my shop. Overall it was a good experience and I learned a lot about my car. None of it was very difficult, but I'm glad I'm a patient guy.

After disconnecting the necessary items in the engine compartment I removed the head assembly out of the car along with the turbo and exhaust manifold attached. My small Kubota backhoe was perfect for lifting it out of the engine compartment and putting it back in. Anything I took off I put in baggies and labeled them.

With the head off I could see the damage the intake valves did to the pistons. There were some very slight indentations on the exhaust side of some of the pistons but I replaced only the intake valves. Exhaust valves weren't damaged.

Not a very pretty picture.

A moment when I was trying to find the humor in all of this...

This was my valve spring compressor tool. I made this out of an old birch spindle I had. The taper of the spindle allowed me to fit it into the valve recess perfectly. I cut the fork on one end to compress the valve springs with a 12" C-clamp and remove the valve retainers with a small magnet. The recess in the other end of the dowel was perfect for seating the valve guides with the tap of a hammer

Valve guides installed

I took the head and intake manifold to a shop and had them clean everything. I installed the lower end of the head with the turbo attached. Whenever I could I replaced anything that was going to be hard to get to later (ie vacum lines, o-rings, thermostat) and also took apart the turbo to clean it.

Don't forget the turbo oil seal!

I made the camshaft holders out of plywood and glued slotted dowels onto the plywood after the cams were aligned correctly on the upper part of the head. The next day I drilled locations for screws to hold the camshafts in place.

Spreading the volvo gasket

Installing the head by gently clamping with wood clamps to compress the valve springs. Now I could start putting everything back together. I took a lot of pictures along the way so I wouldn't forget the order of certain items. The only thing I forgot to do was to tighten one of the banjo fittings running off the turbo into the block. I ended up with a puddle of oil under the car but I consider that not too bad.
I made sure that when I put the timing belt on the this time I turned the engine over by hand a few times, check the timing marks, turn over a few more times, then crank it over. You should have seen the smile on my face when it started.
If anyone needs any help on something I didn't cover in enough detail feel free to post or email me. Good luck and have fun!
After disconnecting the necessary items in the engine compartment I removed the head assembly out of the car along with the turbo and exhaust manifold attached. My small Kubota backhoe was perfect for lifting it out of the engine compartment and putting it back in. Anything I took off I put in baggies and labeled them.
With the head off I could see the damage the intake valves did to the pistons. There were some very slight indentations on the exhaust side of some of the pistons but I replaced only the intake valves. Exhaust valves weren't damaged.
Not a very pretty picture.
A moment when I was trying to find the humor in all of this...
This was my valve spring compressor tool. I made this out of an old birch spindle I had. The taper of the spindle allowed me to fit it into the valve recess perfectly. I cut the fork on one end to compress the valve springs with a 12" C-clamp and remove the valve retainers with a small magnet. The recess in the other end of the dowel was perfect for seating the valve guides with the tap of a hammer
Valve guides installed
I took the head and intake manifold to a shop and had them clean everything. I installed the lower end of the head with the turbo attached. Whenever I could I replaced anything that was going to be hard to get to later (ie vacum lines, o-rings, thermostat) and also took apart the turbo to clean it.
Don't forget the turbo oil seal!
I made the camshaft holders out of plywood and glued slotted dowels onto the plywood after the cams were aligned correctly on the upper part of the head. The next day I drilled locations for screws to hold the camshafts in place.
Spreading the volvo gasket
Installing the head by gently clamping with wood clamps to compress the valve springs. Now I could start putting everything back together. I took a lot of pictures along the way so I wouldn't forget the order of certain items. The only thing I forgot to do was to tighten one of the banjo fittings running off the turbo into the block. I ended up with a puddle of oil under the car but I consider that not too bad.
I made sure that when I put the timing belt on the this time I turned the engine over by hand a few times, check the timing marks, turn over a few more times, then crank it over. You should have seen the smile on my face when it started.
If anyone needs any help on something I didn't cover in enough detail feel free to post or email me. Good luck and have fun!

Member
Joined: Feb 2005
Posts: 40
Likes: 0
From: Amherst, MA
Thanks, Tech. It's nice to hear that after all of those hours. It was hard for me to keep track of the hours as I did this in my spare time. I bought another 98 V70XC to replace this one while I fixed it. I would guess total time was about 40 hrs. Next time will be quicker (as if I'm going to do that again!). I really love this model and year Volvo. Today I'm picking up a 97 850 for $2500 w/ 117,000 mi for my daughter to replace her 86 240 and it looks like it's in great shape. I've found all my Volvos on EBay. Great marketplace if you know what you're looking for.
I do have a question for you. When I do a search on this forum for 'timing belt repair bent valves' my write-up doesn't appear. Do you know why that is? Should I post it to the V70XC forum?
Thanks for being here.
I do have a question for you. When I do a search on this forum for 'timing belt repair bent valves' my write-up doesn't appear. Do you know why that is? Should I post it to the V70XC forum?
Thanks for being here.

Senior Member
Joined: Sep 2006
Posts: 5,340
Likes: 14
From: IPS, MA
Great job, well done! And a great sense of humor to place the bent valves on the head!
As to this post, I wonder if you could copy & paste the contents, post it in the V70 forum so that one of us (moderator) could pin it to the top.
JPN
As to this post, I wonder if you could copy & paste the contents, post it in the V70 forum so that one of us (moderator) could pin it to the top.
JPN


Joined: May 2008
Posts: 2
Likes: 0
From:
I have a S60 2.5T. I purchasedthe BSR system. The BSR people claim HP @ 252 and torque @ 302. My brother-in-law is a mechanic. He thinks BSR's claims are wrong. He believes the gains are greater than they claim. If you own an S60 2.5T and buy the BSR system, you won't know your car once it has been reprogrammed. The torque is phenominal. Tires Chirp in first at 70 MPH. The WRX won't beat you with this!

Joined: Jun 2008
Posts: 2
Likes: 0
I have 05 xc90 5 cylinder turbo about 71,000 miles...i have ongoing problem with ac..on accleration ac stops working and then blow hot air...not good when its 105 degrees outside..this is the 4th time to dealer..compressor replaced,condenser replaced..other work was done..any help would be great

Got Boost?
Joined: May 2008
Posts: 3,473
Likes: 4
Making Polyurethane Bushings
Well my swaybar endlink bushings where shot. The endlinks could rotate around the rubber bushing inserts, so instead of buying new ones...Me and my dad decided to make our own Poly bushings. We ordered: Poly 75-Series RTV liquid rubber (part A), Poly 75-80 RTV liquid rubber (part B), and Poly UV additive (to protect the bushing from UV rays). It is a two-part Poly, And is very easy to work with. Find the Poly products here.
Please note: you want to have some knowledge on the hardness of the poly you want to use or are thinking about using. To soft could ruin you nice tight/stock ride feel, and can also damage the suspension, and if you go too Hard, you will create what is called as suspension bind. Suspension bind is when you prevent the suspension components from moving correctly or freely, and that can cause serious problems like: really rough ride, damage to suspensions/frame parts or broken suspensions/frame parts. For this project...I used a poly with a durometer of 80 shore A, which is the lowest I would go for endlinks.
Sorry for the bad Pictures.
Here are the products we used.

First thing was to take off the endlinks and gut out the rubber bushings (which wasn't that hard becuase the bushing would fall out), and we cut all the rubber off the metal.
Then we cleaned up the endlinks and metal inserts with some Acetone and the endlinks where ready for the new poly bushings.
Endlinks gutted/cleaned and ready for poly.

We used blue painters tape as a guide for the poly and to hold the metal inserts in the center of the endlink. Then we were ready for the Poly.
We first mixed in UV additive to the Poly 75-80 (The UV additive has to be .05% of the total weight of the final rubber weight), and then mixed in the 75-Series to the other mixture (The 75-Series has to be twice the amount of the 75-80). We mixed it together for ~five minutes, and that only left 35 minutes to work with it (The Poly has a 40min workable time limit).
Poly ready to be used.

Poly being injected into the endlinks.

After we injected the Poly into the bushing, we let them cure for 24 hours. The actual cure time for the poly is seven days so they are still off the car right now.

And here are the finished Endlinks, but are still fully curing.


We ended up putting a washer on each side of the endlink so we could put poly all the way to the end for a little bit tighter and more responsive swaybar.

I have to drive the car next week with out the front bar, and I already miss my front bar (Oh well...Now I can get the back end to swing out A LOT easier now
). I am expecting the new poly bushings to be even better, and will report back when I install them.I know that these can't compare with Spherical end links, but it will be a hell of a lot better than stock rubber bushings.
Over all the project is pretty simple to do. All you need is the Poly and additives, an accurate scale, and some time.
The only real problem you might have when doing this is that Polytek only sells certain amounts (because they are the manufacter), and the poly is kind of expensive.
Luckly my dad needs all of that poly to finish his other cars and we are making custom bushings for his other cars
. - UPDATE: -
It has been seven days and I just installed them and went for a test drive. All I can say is WOW! It is a huge improvement over the stock rubber bushings. The new custom poly with IPD's upper endlink bushings works realy well together. The car is a little flatter around the turns and they don't squeal. It just makes the car that much more enjoyable when driving. I can't wait to take the car to a track
.Here is the new Endlinks installed:

Close up of them. You can see the poly goes to all the way to where we put the washers:

Here is the new IPD upper bushings:

This upgrade was definitly worth it, and even if you don't make your own...you should still get some either from IPD or Kaplhenke Racing.
Happy Modding
.
Last edited by TIPSP; Jun 24, 2009 at 08:19 PM.

Senior Member
Joined: Oct 2005
Posts: 180
Likes: 1
From:
i was visiting a friend, and as we were talking, he was peeling of little pieces of the black trim that runs along side the windshield, and down the roof. after a few minutes, he finally asked why i dont do something about it.
so i did!
this is how it looked along most of the trim, on both sides

started by using a standard flat tip screwdriver, and slowly lifting until the retaining tab popped out of the back of the trim

worked my way toward the front of the car, slowly and carefully prying the trim up just far enough for the tabs to release. with any force, you risk bending the trim and/or scratching the paint


as i got near the curve by the windshield, i heard a screech as the back of the trim started sliding against my roof, so put something down to protect your paint (i turn old bathroom towels into rags, which worked great for the length of the trim)

pic with trim removed

this is where you could do your own thing, i chose to repaint for $9, instead of changing it out
after removing the rest of whatever trim was left on the rails, i used 220 sandpaper to prepare it, and a damp paper towel to remove the dust.

i went to wal-mart to get the primer and black paint, and i seen the yellow sitting there- which in the store, looked like a very close match to the car. thought i would try it out! after all, if it looked terrible, i can always resand/paint them. Since i have a yellow '95 T5-R, this is what i got. the indoor/outdoor is important, and matching the brands together is important. as long as you have primer before the paint, you can use whatever brand / color you like

painted trim pieces (dont forget the end caps!)


the rest is pictures of the trim reinstalled. its really simple to reinstall, just again dont use too much force, just enough to get the trim back into the tabs (i heard a click/snap on each one)


its not an exact match on color, but pretty close. i doubt most people will even notice it. will have to see in the morning daylight.
i started this at about 11pm, and finished around 2:15am. this is counting the trip to wal-mart, and 1 hour dry time (follow directions on the paint for best results). most of the time was taken up by waiting around between coats and the final dry time. altogether, just over 3 hours. tips to do that i didnt: try to stand them up as they would be on the car- elevated, but not vertical. this will help get in some rounder / folded areas. i almost had carpel tunnel by the end, from twisting my hand to get under the lip for even coverage. also, this brand is somewhat flexible, so i was not worried about painting the insulation attached to the trim. others might want to tape off or even remove that stuff before painting. i also used hot glue to reattach the end caps... that may come back to haunt me.
hope this helps somebody!
so i did!
this is how it looked along most of the trim, on both sides
started by using a standard flat tip screwdriver, and slowly lifting until the retaining tab popped out of the back of the trim
worked my way toward the front of the car, slowly and carefully prying the trim up just far enough for the tabs to release. with any force, you risk bending the trim and/or scratching the paint
as i got near the curve by the windshield, i heard a screech as the back of the trim started sliding against my roof, so put something down to protect your paint (i turn old bathroom towels into rags, which worked great for the length of the trim)
pic with trim removed
this is where you could do your own thing, i chose to repaint for $9, instead of changing it out
after removing the rest of whatever trim was left on the rails, i used 220 sandpaper to prepare it, and a damp paper towel to remove the dust.
i went to wal-mart to get the primer and black paint, and i seen the yellow sitting there- which in the store, looked like a very close match to the car. thought i would try it out! after all, if it looked terrible, i can always resand/paint them. Since i have a yellow '95 T5-R, this is what i got. the indoor/outdoor is important, and matching the brands together is important. as long as you have primer before the paint, you can use whatever brand / color you like
painted trim pieces (dont forget the end caps!)
the rest is pictures of the trim reinstalled. its really simple to reinstall, just again dont use too much force, just enough to get the trim back into the tabs (i heard a click/snap on each one)
its not an exact match on color, but pretty close. i doubt most people will even notice it. will have to see in the morning daylight.
i started this at about 11pm, and finished around 2:15am. this is counting the trip to wal-mart, and 1 hour dry time (follow directions on the paint for best results). most of the time was taken up by waiting around between coats and the final dry time. altogether, just over 3 hours. tips to do that i didnt: try to stand them up as they would be on the car- elevated, but not vertical. this will help get in some rounder / folded areas. i almost had carpel tunnel by the end, from twisting my hand to get under the lip for even coverage. also, this brand is somewhat flexible, so i was not worried about painting the insulation attached to the trim. others might want to tape off or even remove that stuff before painting. i also used hot glue to reattach the end caps... that may come back to haunt me.
hope this helps somebody!
Last edited by flamejet; Mar 23, 2009 at 03:28 AM.

Senior Member
Joined: May 2007
Posts: 712
Likes: 1
From: West Michigan
This is my first tutorial for the site. There seems to be a fair amount of demand for it, so here goes. This should help anyone with a 2001 or newer S60, XC70, or V70.
Removing the front door interior panels is a simple job. On a scale on 1 to 5, I rate this as a 1. Anyone with the smallest of tool sets can do this quickly at home.
Tools:
Time: Less than 10 minutes
Nitty Gritty:
(Optional) While working on the car with the door open, the overhead light will stay on. To turn it off press the button in the center of the overhead cluster.
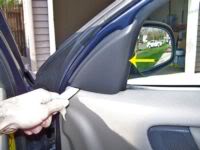
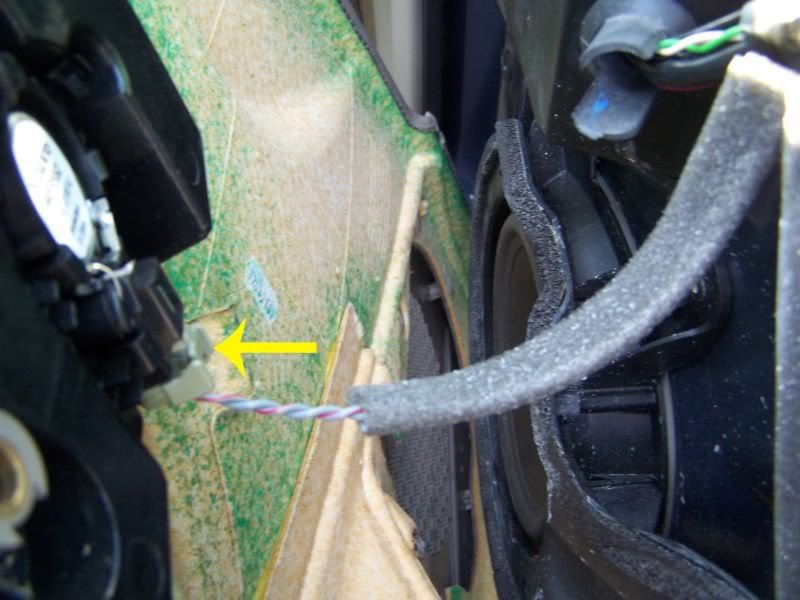
Using the bone tool, remove the side mirror cover plate. It is held in place by 3 pegs. It does not require a lot of force to remove so take it easy. After taking the picture, I found that starting along the window is easier. Place the bone tool where the arrow is shown and give it a slight twist. The cover should pop off.
Using a drift, depress the center of each round fastener along the perimeter of the panel. You will feel the center pin stop when it is in far enough.
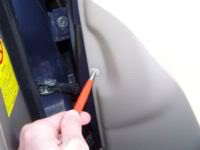
Using the bone tool, remove the front cover on the door pull. From below, you will see a small recess in the door pull as a perfect starting point. With a twisting motion, go along the edge of the cover until it releases.

Using the Torx bit and ratchet, remove the 2 screws on the door pull.

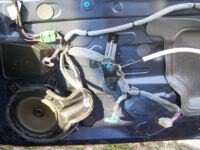
Starting from the bottom of the panel, gently pull the panel away from the door. The round fasteners will begin to come out. Gather them up and put them in a safe place. With all of them out of the panel, continue pulling the panel away from the door and lift it over the window sill. Don't drop it, yet.
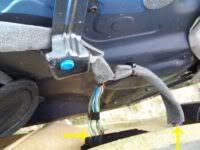
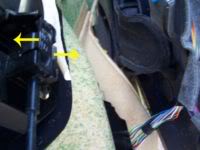
Detach all of the wire harnesses on the door panel. On this door there is one for the tweeter, two for the various door functions, and the door opener cable.

Throw the door panel in the garbage. It is not reusable. Just kidding. Set the door panel somewhere that it won't get damaged. Do whatever it was that you needed to do.
Putting the panel back on is a simple reverse procedure with the exception of the round fasteners. When you get to that step, remove the center pins from the fasteners, insert the fasteners to the panel, then install the pins flush to the fasteners.
Removing the front door interior panels is a simple job. On a scale on 1 to 5, I rate this as a 1. Anyone with the smallest of tool sets can do this quickly at home.
Tools:
- Weatherstripping tool, sometimes referred to as a bone tool. IPD sells them. Other tools will work, ie screwdriver, but can leave marks behind.
- Small drift. If you don't have one, improvise. A small screwdriver works.
- Torx bit. I forget which size. They usually come in sets anyway.
- Ratchet or driver, to use with the Torx bit.
Time: Less than 10 minutes
Nitty Gritty:
(Optional) While working on the car with the door open, the overhead light will stay on. To turn it off press the button in the center of the overhead cluster.
Using the bone tool, remove the side mirror cover plate. It is held in place by 3 pegs. It does not require a lot of force to remove so take it easy. After taking the picture, I found that starting along the window is easier. Place the bone tool where the arrow is shown and give it a slight twist. The cover should pop off.

Using a drift, depress the center of each round fastener along the perimeter of the panel. You will feel the center pin stop when it is in far enough.

Using the bone tool, remove the front cover on the door pull. From below, you will see a small recess in the door pull as a perfect starting point. With a twisting motion, go along the edge of the cover until it releases.

Using the Torx bit and ratchet, remove the 2 screws on the door pull.

Starting from the bottom of the panel, gently pull the panel away from the door. The round fasteners will begin to come out. Gather them up and put them in a safe place. With all of them out of the panel, continue pulling the panel away from the door and lift it over the window sill. Don't drop it, yet.
Detach all of the wire harnesses on the door panel. On this door there is one for the tweeter, two for the various door functions, and the door opener cable.


Throw the door panel in the garbage. It is not reusable. Just kidding. Set the door panel somewhere that it won't get damaged. Do whatever it was that you needed to do.

Putting the panel back on is a simple reverse procedure with the exception of the round fasteners. When you get to that step, remove the center pins from the fasteners, insert the fasteners to the panel, then install the pins flush to the fasteners.

Member
Joined: Nov 2008
Posts: 59
Likes: 0
My 96 Volvo 850 GLT had AC problem. When starting on a trip, AC worked fine; however, after stopping at a red light or similar and then taking off, the AC would quit blowing cold air.The problem was finally diagnosed by finding the magnet clutch wasn't engagiing the compressor at certain times. Found this by putting AC on while parked and with a broom stick pushed slightly on the front of the clutch. The clutch immediately engaged and AC put out cold air. Problem: Too much clearance between clutch and compressor pulley.
Big job to reshim clutch assembly per manual. Clutch assembly has to be removed and new shims installed. Heard thru grapevine, problem could be solved in 30 minutes with bread wrapper type shims. Got under car and looked. Cleaned the clutch area up with simple green and water hose. Dried area. Using thin pieces of formica(about 30/1000" thick) rather than bread clips, I took a long screw driver and applying gel super glue to each(1 at the time) I pried the clutch shims apart from the plate and slid a shim under each clutch pressure point. Checked the new clearance and found it to be in proper tolerance. Been over a year and have had no AC problems. Note: Be careful using the broom stick around moving parts, pulleys, belts. No problem if one is careful. Putting the shims in is simple when accessing the compressor from the bottom side. The shimming is easy from this position. Be sure to glue the tabs in place or they could come off when clutch isn't engaged.
Big job to reshim clutch assembly per manual. Clutch assembly has to be removed and new shims installed. Heard thru grapevine, problem could be solved in 30 minutes with bread wrapper type shims. Got under car and looked. Cleaned the clutch area up with simple green and water hose. Dried area. Using thin pieces of formica(about 30/1000" thick) rather than bread clips, I took a long screw driver and applying gel super glue to each(1 at the time) I pried the clutch shims apart from the plate and slid a shim under each clutch pressure point. Checked the new clearance and found it to be in proper tolerance. Been over a year and have had no AC problems. Note: Be careful using the broom stick around moving parts, pulleys, belts. No problem if one is careful. Putting the shims in is simple when accessing the compressor from the bottom side. The shimming is easy from this position. Be sure to glue the tabs in place or they could come off when clutch isn't engaged.

Junior Member
Joined: Sep 2009
Posts: 26
Likes: 1
From: Birmingham,UK
Your Volvo needs regular check-ups and maintenance. Regular oil changes at a reputable dealer or company will often ensure that not only do you have plenty of oil in your car, but many will check your other fluid levels as well. As the car ages, they will also alert you to any Volvo s70 or Volvo v70 parts you may need. These regular check-ups are recommended at every 3,000 miles. In order to maintain safe and reliable transportation, it is also vital that you have your tires rotated and balanced every 5,000 to 10,000 miles. With all the safety features that a Volvo has it can't do anything to protect you should you have a blow out. By rotating your tires on a regular basis you will be ensuring that there is equal wear on all of the tires.

Administrator
Joined: Mar 2009
Posts: 15,736
Likes: 36
From: Albuquerque, NM
Here is a good link to a lot of 850 write ups: https://volvoforums.com/forum/volvo-850-16/hot-topics-helpful-information-how-diy-repairs-26114/

Senior Member
Joined: Dec 2007
Posts: 906
Likes: 1
I did a steering wheel write up and put it in the Interior section. I didn't realise this section was here!
So, you have a ratty old wheel that just needs new leather? Wel, here is one method of re covering the wheel.
Most steering wheels made in the last 10-15 years have the leather glued on. This is great for fast production but at the expense of longevity. Even Momo went to gluing leather on, but they did stitch in a few high wear areas. A few select companies such as Moto Lita still completely stitch their wheels.
The problems with gluing are that the glue breaks down in the steering wheel because steering wheels get REALLY hot, the glue allows the leather to move and leather shrinks as it ages, and the glue eventually pulls away from the polyurethane foam and the leather.
The correct, traditional way to cover a wheel is to stitch it, but it is a very slow, time consuming task.
So, you have an old wheel, your gnarly hands have worn through the leather in several places, stitching is gone, glue is gone. It looks like this perhaps:

The first step is to remove the leather covering. You can safely throw it away, it is useless for making a pattern from, it will be shrunk and torn to shreds and no pattern you ever make from it will ever fit!
Once you remove all the leather, give the wheel a sand with some 240 grit paper to remove all the old leather and some of the glue. Don't worry about removing it all, just get is smooth, the new leather will hide it all.

The next step is to mark the wheel out so you can start patterning the leather. You want to start with the small leather pieces that cover the end of the spokes. Mark a line where you want the leather to finish on the spokes, and make a few reference marks on the foam. As you pattern and shape the leather, these marks will help you realign teh leather in the same spot as you mark, trim mark etc.

Cut a piece of leather oversize and start trimming. It is best to start on the good face of the wheel. You will end up with some weird shapes, but that is fine. Make sure you leave a generous amount of leather at the outside of the spokes so there is plenty of overlap when you cover the rim of the wheel.


Then glue your steering wheel and your leather generously with contact adhesive. Spend teh money and buy the proper stuff in a can that you apply with a brush. You want the glue to be absorbed by the leather and foam.
Remember how I said glue fails on steering wheels? This is the one area it is fine, the leather pieces are so small no real shrinkage happens, so they tend to stay put.
Don't worry if you have a bit of a coarse edge at the rim, a sharp blade will sort this out. Concentrate on getting the visible finished edge on the spoke and the seam behind the spoke nice.

Wrap the spokes with some cable ties or string to hold them whilst the glue sets. Once it is set, remove the ties and run super glue along the seam edge to hold it together permanently.
If you are using a fairly thin leather, you will want to sand the edges of the leather that will be underneath the rim covering, to make a nice smooth transition that won't be seen.I used 1.8mm pigskin because it is tough and durable, so it didn't matter.
Now the tricky bit! Measure your steering wheels circumference and grip circumference and cut a piece of leather that size or a little wider. Length is no problem, we will cut it down. Just make sure the long edges are STRAIGHT, it will help in marking up.
You want to try and stretch the leather around the wheel as much as you can to get a proper length to cut the leather at. You really do want it tight. Once you have that measurement, take 30mm (1- 1/4") off that and sew it up. Then try and stretch it over the wheel. It should curl around quite significantly, and be very hard to wrap around. You'll have to start at one point and slowly work it round. Seam should be at the top, mark your wheel to assist you getting the leather back in the same place.

Once you have achieved this, you want to mark up the long seam that will join the leather around the rim together. Roll the leather around and mark where the seam is in many spots. Most wheels are not a uniform grip diameter, so make plenty of marks. Roll the leather around with your hands.
Once you have all that marked up, move it to a bench, join the dots with a straight edge and trim it away. Take an extra millimetre or so off the width, to allow some stretch when you sew the cover on.

Once you are confident the cover is nice, refit it again, check it all over for good fit, trim again on the wheel if necessary and remove cover yet again.
Run a row of stitching around the edges of the leather around 2-2.5mm in from the edge. Keep the stitch long. Longer stitch means less hand sewing! You want a stitch length around 4mm. Use a large needle, it makes hand sewing easier.
Once you have that done, stretch the cover back on for the last time, pick a corner near a spoke and start hand sewing. A ball point needle is the best for this, as it will find the existing holes you made with the sewing machine. The only reason we ran a row of stitching along the leather is to make the holes for this.
The best way to hand sew is to start at one end, work about half way along, then go back and pull the stitching tight, then move forward from there. You want to avoid pulling any single particular stitch too tight, spread the load as you tighten the stitching up, or you may pull the thread through the leather.
I won't write about starting and finishing the stitching, there are many ways to do that, all available online. A baseball or herringbone stitch also works well, but I merely go across the wheel. It works just fine.
Once you get all this done. the wheel will be done!

A few points to note:
Buy quality leather. Soft leather is not well suited to this task, it will wear through in a hurry. You also want a decent thickness of leather, 1.2mm is the minimum I would use, imaging a good thick household furniture leather, that is what you want.
If you want a suede look, just sew the leather up with the tanned side in, furry side out. But be warned that with use, the suede look will smooth in high wear areas eventually.
Use only polyester thread for this job. Cotton rots, other synthetics fail. Use the thickest thread you can find. I used V207, V138 would do fine too. The heavier the thread, the stronger it is and the easier to handle when sewing.
Use a chinagraph pencil to mark everything up. White spirit removes it later.
Take your time marking everything up, it is the CRITICAL part of the job, it makes the job look great or crap. Don't rush the job, it takes about six hours or more, do a bit, leave it, come back later etc. The sewing is great to do in front of the TV.
Regards, Andrew.
So, you have a ratty old wheel that just needs new leather? Wel, here is one method of re covering the wheel.
Most steering wheels made in the last 10-15 years have the leather glued on. This is great for fast production but at the expense of longevity. Even Momo went to gluing leather on, but they did stitch in a few high wear areas. A few select companies such as Moto Lita still completely stitch their wheels.
The problems with gluing are that the glue breaks down in the steering wheel because steering wheels get REALLY hot, the glue allows the leather to move and leather shrinks as it ages, and the glue eventually pulls away from the polyurethane foam and the leather.
The correct, traditional way to cover a wheel is to stitch it, but it is a very slow, time consuming task.
So, you have an old wheel, your gnarly hands have worn through the leather in several places, stitching is gone, glue is gone. It looks like this perhaps:
The first step is to remove the leather covering. You can safely throw it away, it is useless for making a pattern from, it will be shrunk and torn to shreds and no pattern you ever make from it will ever fit!
Once you remove all the leather, give the wheel a sand with some 240 grit paper to remove all the old leather and some of the glue. Don't worry about removing it all, just get is smooth, the new leather will hide it all.
The next step is to mark the wheel out so you can start patterning the leather. You want to start with the small leather pieces that cover the end of the spokes. Mark a line where you want the leather to finish on the spokes, and make a few reference marks on the foam. As you pattern and shape the leather, these marks will help you realign teh leather in the same spot as you mark, trim mark etc.
Cut a piece of leather oversize and start trimming. It is best to start on the good face of the wheel. You will end up with some weird shapes, but that is fine. Make sure you leave a generous amount of leather at the outside of the spokes so there is plenty of overlap when you cover the rim of the wheel.
Then glue your steering wheel and your leather generously with contact adhesive. Spend teh money and buy the proper stuff in a can that you apply with a brush. You want the glue to be absorbed by the leather and foam.
Remember how I said glue fails on steering wheels? This is the one area it is fine, the leather pieces are so small no real shrinkage happens, so they tend to stay put.
Don't worry if you have a bit of a coarse edge at the rim, a sharp blade will sort this out. Concentrate on getting the visible finished edge on the spoke and the seam behind the spoke nice.
Wrap the spokes with some cable ties or string to hold them whilst the glue sets. Once it is set, remove the ties and run super glue along the seam edge to hold it together permanently.
If you are using a fairly thin leather, you will want to sand the edges of the leather that will be underneath the rim covering, to make a nice smooth transition that won't be seen.I used 1.8mm pigskin because it is tough and durable, so it didn't matter.
Now the tricky bit! Measure your steering wheels circumference and grip circumference and cut a piece of leather that size or a little wider. Length is no problem, we will cut it down. Just make sure the long edges are STRAIGHT, it will help in marking up.
You want to try and stretch the leather around the wheel as much as you can to get a proper length to cut the leather at. You really do want it tight. Once you have that measurement, take 30mm (1- 1/4") off that and sew it up. Then try and stretch it over the wheel. It should curl around quite significantly, and be very hard to wrap around. You'll have to start at one point and slowly work it round. Seam should be at the top, mark your wheel to assist you getting the leather back in the same place.
Once you have achieved this, you want to mark up the long seam that will join the leather around the rim together. Roll the leather around and mark where the seam is in many spots. Most wheels are not a uniform grip diameter, so make plenty of marks. Roll the leather around with your hands.
Once you have all that marked up, move it to a bench, join the dots with a straight edge and trim it away. Take an extra millimetre or so off the width, to allow some stretch when you sew the cover on.
Once you are confident the cover is nice, refit it again, check it all over for good fit, trim again on the wheel if necessary and remove cover yet again.
Run a row of stitching around the edges of the leather around 2-2.5mm in from the edge. Keep the stitch long. Longer stitch means less hand sewing! You want a stitch length around 4mm. Use a large needle, it makes hand sewing easier.
Once you have that done, stretch the cover back on for the last time, pick a corner near a spoke and start hand sewing. A ball point needle is the best for this, as it will find the existing holes you made with the sewing machine. The only reason we ran a row of stitching along the leather is to make the holes for this.
The best way to hand sew is to start at one end, work about half way along, then go back and pull the stitching tight, then move forward from there. You want to avoid pulling any single particular stitch too tight, spread the load as you tighten the stitching up, or you may pull the thread through the leather.
I won't write about starting and finishing the stitching, there are many ways to do that, all available online. A baseball or herringbone stitch also works well, but I merely go across the wheel. It works just fine.
Once you get all this done. the wheel will be done!
A few points to note:
Buy quality leather. Soft leather is not well suited to this task, it will wear through in a hurry. You also want a decent thickness of leather, 1.2mm is the minimum I would use, imaging a good thick household furniture leather, that is what you want.
If you want a suede look, just sew the leather up with the tanned side in, furry side out. But be warned that with use, the suede look will smooth in high wear areas eventually.
Use only polyester thread for this job. Cotton rots, other synthetics fail. Use the thickest thread you can find. I used V207, V138 would do fine too. The heavier the thread, the stronger it is and the easier to handle when sewing.
Use a chinagraph pencil to mark everything up. White spirit removes it later.
Take your time marking everything up, it is the CRITICAL part of the job, it makes the job look great or crap. Don't rush the job, it takes about six hours or more, do a bit, leave it, come back later etc. The sewing is great to do in front of the TV.
Regards, Andrew.
Last edited by Typhoon; Sep 13, 2010 at 03:06 AM.
