
Members Write ups


Junior Member
Joined: Dec 2010
Posts: 17
Likes: 0
If you plan buying a Volvo from a dealer in the US I first suggest you should read the US dealership reviews from www.volvo-dealers.com first. You have there all the information you need and reviews about Volvo dealers in the US.

Administrator
Joined: Mar 2009
Posts: 15,736
Likes: 36
From: Albuquerque, NM

Junior Member
Joined: Mar 2011
Posts: 1
Likes: 0
From: Little Rock, AR
Hi all, I'm new to the forum and to Volvos in general. I really like this little car, my wife and I went shopping for something economical and that we could purchase outright. We found this on Craigs list!
When I drove it, it drove fine. When I checked the oil, there were some water sludge in the dipstick tube... But none under the oil fill cap...
So I thought it was condensation and used it as a bargaining chip. I was outwitted.
I had the oil changed by a quickie place (I will never do that again) and drove it home. Car handles well and likes to run! I checked the oil after that 45 min drive and was happy not to find any more sluge on the dipstick, and coolant level was perfect.
After about two weeks the idle was noticeably rougher, more like whomping, and the lifters were clattering at idle. Checking the oil, the sludge was back, and the coolant tank was empty. If my wife finds out I've bought a car with a blown headgasket and I need to spend 900 or better to fix it I'm a goner!
So then I came across this stuff called Steel Seal. I'm not usually a fan of these types of products, but this was a perfect scenario for this type of fix: the car's retail and price to repair were approximately the same. So it makes sense to me to attempt a less costly repair IF the repair will do what you need it to do. In my case that meant getting a good year out of the repair.
So I researched the Steel Seal. I found that there were not a lot of positives to be found and in fact one guy had gone to the trouble of making a video about how it had not worked. However, while researching I came across two other products that looked very promising. One was Blue Devil and the other was Thermagasket. They look very similar in their directions, and in their testimonials. I spent a couple of days looking and thinking about it. I discovered that unlike ThermaGasket, Blue Devil is sold retail. Autozone carried it here, and so I went in and read all the product labels in that section. There are about 10 different products that all claim to do seal a block! I decided against Bar's on principles, and K&W cause I'd never heard of 'em. In the end the money back guarantee won out and I purchased the Blue Devil. I also purchase Prestone Radiator Flush, enough motor oil to change it, SeaFoam to clean the engine, and Lucas fuel system cleaner for the injectors. In short every mechanic-in-a-bottle I can find. Altogether I spend $120.
I put in the Lucas injector cleaner.
I start searching under the car for the drain, and I discover the air dam. 2 10MM bolts later and it's off. There's the drain **** and in such a nice place! Right out in front on the corner of the radiator.
So I was going to put in the flushing tee's but that turns out to be impossible, those are hard lines coming out of the firewall to the heater!
I follow the directions for the radiator flush: drain the coolant, fill with water and flush and run for 10 min after temp reached, drain, fill with water and run for 10 min again. I also disconnect top radiator hose and shoot water into engine and radiator. Water runs clear when I have finished these steps.
Now I change the oil and discover the quickie shop has tightened the oil drain plug so tight that the bolt head is rounded, I cant get a wrench on it. I tried every trick I knew: beating a socket on it, beating a wrench on it, etc. Even when I was successful the torque was incredible. Finally a 10" pipe wrench did the trick, and I used an angle grinder to make a new 5/8" bolt head out of the mess. I figure I will get a new oil pan bolt if I still have this car when it's time to change the oil again!
Ok so the oil is changed and the SeaFoam is in the oil. If you've never used Seafoam, it is an excellent product. I have never used it in the oil before, always in the fuel system. I didn't use it for the fuel this time because of the cost, frankly the fuel system cleaning was a bonus not a necessity and the Lucas product had a good reputation and about half the price.
Time to use the Blue Devil. Instructions are to remove the thermostat and fill the system with water minus the amount of the Blue Devil you are going to use. It says I could use half the bottle but I am not taking any chances. I start to remove the thermostat, and the back T40 Torx bolt is in a slightly awkward position. A socket torx bit will sit at an angle, and someone has found this out the hard way, the Torx patterned is a little boogered. Luckily I have an Allen Wrench looking set of Torx drivers and I use the long shaft to get on the bolt, and the handle to my jack as leverage on the short end. It took that amount of leverage for this to break free! I discovered that my thermostat is broken when I open it up! I was lucky it was still opening!
So now the thermostat is out and I fill the system with water using the seal from the thermostat to seal the housing. Then I drain the water level to the bottom of the reservoir.
Engine must be cold before starting this procedure. Damn that's gonna be at least 2 hours.
Ok, so it's been a couple hours, the engine is cool to the touch, let's do this! Starting the engine, it says to take at least a minute to pour the entire bottle out, pour slowly is written everywhere, I figure this is important. I bet it took 2-4 minutes the way I did it! Got it all in, the reservoir was perfect size for the Blue Devil bottle.
Turn heater to high. Check!
Let run for at least 50 min.
OK, so the rear speakers have quit working I'll fiddle with that. While I'm doing that. The lifters quieten all the way down to what sounds like a new engine! I am astounded at how well and fast the SeaFoam went to work. In addition the amount of water vapor in the exhaust has gone away, replaced by what smells like oil. Like all of a sudden the oil rings have failed in the engine. I'm talking a lot of blue smoke. However, the engine is absolutely purring. More on this later. This all occurs at less than 10 minutes in, and continues for the entire time the vehicle is running.
So at 51 minutes in it says to put in the thermostat and top off with antifreeze. The coolant level has not dropped enough to warrant this, and I need a new thermostat. So a test drive seems warranted, at least for the short trip to get the thermostat.
First, the oil smoke coming from the tail pipe is so bad that I actually thought the car might be on fire! Having read quite a lot about causes of water in your oil on this and other forums, I knew that the PCV system on this car is an animal of a different nature. So now I know that the SeaFoam has gone to work in there cleaning out those deposits! And its not playing!
But this engine is like a new engine! Now I know how this car was supposed to run! I am very impressed with the smooth acceleration, and the sport button is like a different car! The smoke stopped after about 10-15 minutes of regular driving, and I suspect that the cleaning process will continue for a little while longer. In addition the injector cleaner for the cylinder(s) that were being robbed due to the lifters not actuating should also continue to improve with time. But more importantly, I'm not losing any coolant to the oil. But it's only been a day so time will tell. I've got the receipt if this fails to work. But so far my results have been VERY impressive!
When I drove it, it drove fine. When I checked the oil, there were some water sludge in the dipstick tube...
But none under the oil fill cap...So I thought it was condensation and used it as a bargaining chip. I was outwitted.
I had the oil changed by a quickie place (I will never do that again) and drove it home. Car handles well and likes to run! I checked the oil after that 45 min drive and was happy not to find any more sluge on the dipstick, and coolant level was perfect.
After about two weeks the idle was noticeably rougher, more like whomping, and the lifters were clattering at idle. Checking the oil, the sludge was back, and the coolant tank was empty. If my wife finds out I've bought a car with a blown headgasket and I need to spend 900 or better to fix it I'm a goner!
So then I came across this stuff called Steel Seal. I'm not usually a fan of these types of products, but this was a perfect scenario for this type of fix: the car's retail and price to repair were approximately the same. So it makes sense to me to attempt a less costly repair IF the repair will do what you need it to do. In my case that meant getting a good year out of the repair.
So I researched the Steel Seal. I found that there were not a lot of positives to be found and in fact one guy had gone to the trouble of making a video about how it had not worked. However, while researching I came across two other products that looked very promising. One was Blue Devil and the other was Thermagasket. They look very similar in their directions, and in their testimonials. I spent a couple of days looking and thinking about it. I discovered that unlike ThermaGasket, Blue Devil is sold retail. Autozone carried it here, and so I went in and read all the product labels in that section. There are about 10 different products that all claim to do seal a block! I decided against Bar's on principles, and K&W cause I'd never heard of 'em. In the end the money back guarantee won out and I purchased the Blue Devil. I also purchase Prestone Radiator Flush, enough motor oil to change it, SeaFoam to clean the engine, and Lucas fuel system cleaner for the injectors. In short every mechanic-in-a-bottle I can find. Altogether I spend $120.
I put in the Lucas injector cleaner.
I start searching under the car for the drain, and I discover the air dam. 2 10MM bolts later and it's off. There's the drain **** and in such a nice place! Right out in front on the corner of the radiator.
So I was going to put in the flushing tee's but that turns out to be impossible, those are hard lines coming out of the firewall to the heater!
I follow the directions for the radiator flush: drain the coolant, fill with water and flush and run for 10 min after temp reached, drain, fill with water and run for 10 min again. I also disconnect top radiator hose and shoot water into engine and radiator. Water runs clear when I have finished these steps.
Now I change the oil and discover the quickie shop has tightened the oil drain plug so tight that the bolt head is rounded, I cant get a wrench on it. I tried every trick I knew: beating a socket on it, beating a wrench on it, etc. Even when I was successful the torque was incredible. Finally a 10" pipe wrench did the trick, and I used an angle grinder to make a new 5/8" bolt head out of the mess. I figure I will get a new oil pan bolt if I still have this car when it's time to change the oil again!
Ok so the oil is changed and the SeaFoam is in the oil. If you've never used Seafoam, it is an excellent product. I have never used it in the oil before, always in the fuel system. I didn't use it for the fuel this time because of the cost, frankly the fuel system cleaning was a bonus not a necessity and the Lucas product had a good reputation and about half the price.
Time to use the Blue Devil. Instructions are to remove the thermostat and fill the system with water minus the amount of the Blue Devil you are going to use. It says I could use half the bottle but I am not taking any chances. I start to remove the thermostat, and the back T40 Torx bolt is in a slightly awkward position. A socket torx bit will sit at an angle, and someone has found this out the hard way, the Torx patterned is a little boogered. Luckily I have an Allen Wrench looking set of Torx drivers and I use the long shaft to get on the bolt, and the handle to my jack as leverage on the short end. It took that amount of leverage for this to break free! I discovered that my thermostat is broken when I open it up! I was lucky it was still opening!
So now the thermostat is out and I fill the system with water using the seal from the thermostat to seal the housing. Then I drain the water level to the bottom of the reservoir.
Engine must be cold before starting this procedure. Damn that's gonna be at least 2 hours.
Ok, so it's been a couple hours, the engine is cool to the touch, let's do this! Starting the engine, it says to take at least a minute to pour the entire bottle out, pour slowly is written everywhere, I figure this is important. I bet it took 2-4 minutes the way I did it! Got it all in, the reservoir was perfect size for the Blue Devil bottle.
Turn heater to high. Check!
Let run for at least 50 min.
OK, so the rear speakers have quit working I'll fiddle with that. While I'm doing that. The lifters quieten all the way down to what sounds like a new engine! I am astounded at how well and fast the SeaFoam went to work. In addition the amount of water vapor in the exhaust has gone away, replaced by what smells like oil. Like all of a sudden the oil rings have failed in the engine. I'm talking a lot of blue smoke. However, the engine is absolutely purring. More on this later. This all occurs at less than 10 minutes in, and continues for the entire time the vehicle is running.
So at 51 minutes in it says to put in the thermostat and top off with antifreeze. The coolant level has not dropped enough to warrant this, and I need a new thermostat. So a test drive seems warranted, at least for the short trip to get the thermostat.
First, the oil smoke coming from the tail pipe is so bad that I actually thought the car might be on fire! Having read quite a lot about causes of water in your oil on this and other forums, I knew that the PCV system on this car is an animal of a different nature. So now I know that the SeaFoam has gone to work in there cleaning out those deposits! And its not playing!
But this engine is like a new engine! Now I know how this car was supposed to run! I am very impressed with the smooth acceleration, and the sport button is like a different car! The smoke stopped after about 10-15 minutes of regular driving, and I suspect that the cleaning process will continue for a little while longer. In addition the injector cleaner for the cylinder(s) that were being robbed due to the lifters not actuating should also continue to improve with time. But more importantly, I'm not losing any coolant to the oil. But it's only been a day so time will tell. I've got the receipt if this fails to work. But so far my results have been VERY impressive!
Last edited by kimble01; Mar 19, 2011 at 10:55 AM. Reason: Spelling!

Junior Member
Joined: Jul 2011
Posts: 7
Likes: 0
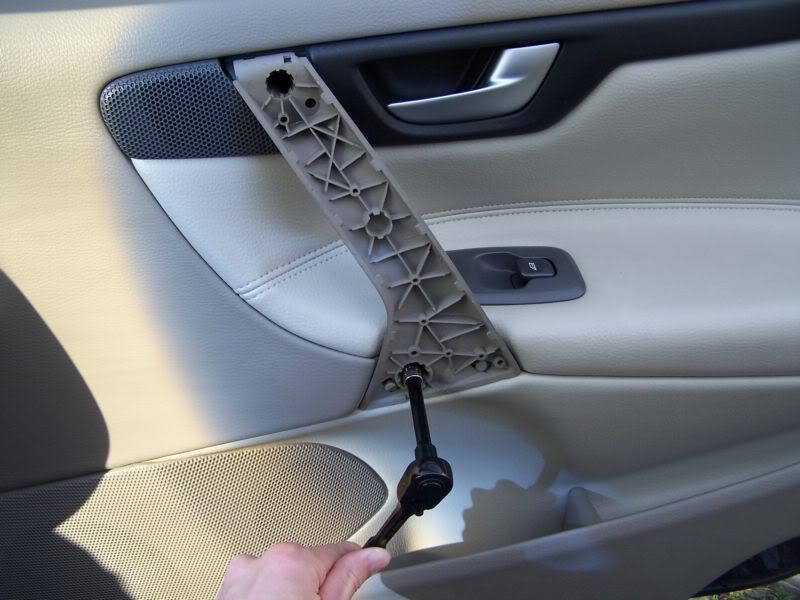
Using the bone tool, remove the front cover on the door pull. From below, you will see a small recess in the door pull as a perfect starting point. With a twisting motion, go along the edge of the cover until it releases.

Using the Torx bit and ratchet, remove the 2 screws on the door pull.
Thanks,
Tyler

Junior Member
Joined: Jul 2011
Posts: 1
Likes: 0
I have a 2001 S60 2.4 turbo and awhile back it started having a stuttering problem at certain RPM's. After trying to clean it with fuel injector cleaner thinking it might help, no bueno. I bought a top of the line diagnostic scanner and it read that the main issue was the cat and also had a bunch of readings for misfire. The car is definitely up there in mileage 175,000 and so when I took it to the mechanic sure it was the cat, all he did was change a hose and change some spark plugs. I know he was looking for the root of the misfires however, after leaving, my car was only better for maybe a week and then continued to get worse and worse. Recently, it started to stall out on me with a reading "Engine System Service Urgent." I took it to an exhaust specialist and had them replace the cat. Thinking that would help for the time being until I looked into the root of the problem it didn't seem to make the problem any better. When I come to complete stops it stutters a whole lot and sometimes dies. I tried to go over a small hill and it seemed to lose power with acceleration. I tried to check the MAF but it looks like that is fine. I need some suggestions?
Finicky switches? Checkout my write-up...
Tired of wasting hours of your precious time lifting your power windows by hand? Power windows working when THEY want to? Are you fed up? Then look no further and fix them yourself!
So, the problem I had with my power windows was on one switch only. The right rear window would not roll up using the driver�s master switch, but would roll up using it's own switch. Thinking this was weird and could only be electrical, I switched switches. All I did was switch problems and knew it was the switch. I was about to buy a new one when my friend said lets tear one apart and see if we can do anything. Since I had a few extra ones around, I though what the heck, even if we do break them...
Boy was I glad we did that. Now I searched a little for Volvo 240 window switch repair, but found a few sites which really didn't explain how to clean them, just how they worked. Now true, most of the cleaning is self explanatory, but I'm basically here to tell you, repairing your Volvo 240, and 740 and whatnot switches will work, at least they did for me.
What you will need: The switch, wire brush(pic below), some type of delicate bone tool, thin pry tool(small regular screw driver) rubbing alcohol, patience.
Step 1: Switch removal, the worst part of all.

As you can see, the right side of my retaining clip is already broken, so take your time removing these! I really think this is NOT the way to remove the switches, and if you have a better way, please share. Every one of my retaining clips is broken on one side, but not both sides. I may have to rig up a new retaining setup, but for now, I'm not messing with these switches again until I have to clean them.
http://i1137.photobucket.com/albums/...r/IMAG0088.jpg
Step 2: Popping the switch cover off.
Take your time in this step as well. Something a little more sturdy will be needed to wedge and remove the cover off. My friend was able to remove the cover with just one screw driver, but I needed two, one to start and hold the one side and the other to wedge off the retaining clips.
http://i1137.photobucket.com/albums/...r/IMAG0089.jpg
Like so, and wedge something on this side to keep the clips from going back into the holes.
http://i1137.photobucket.com/albums/...r/IMAG0091.jpg
Cover off yet? Maybe now I should mention little pieces may fall out.
http://i1137.photobucket.com/albums/...r/IMAG0077.jpg
Should have two ***** and two contact pins and they should be nearly black from carbon buildup. This is what the base should look like too...
http://i1137.photobucket.com/albums/...r/IMAG0076.jpg
This is why your switches work some of the time, or none.
Step 3: Cleaning
This is where you need the wire brush and rubbing alcohol.
http://i1137.photobucket.com/albums/...r/IMAG0084.jpg
Dip the brush in the alcohol that should be in a separate cup. (Don't put the brush in the alcohol bottle please, but whatever). Take the base and scrub away!
http://i1137.photobucket.com/albums/...r/IMAG0086.jpg
The two pictures below show what the other parts should look like before and after, so be sure to clean those too.
http://i1137.photobucket.com/albums/...r/IMAG0081.jpg
http://i1137.photobucket.com/albums/...r/IMAG0078.jpg
Everything clean!? Remember how to put it back together?
Step 4: Reassembly
Don't you love repair manuals instructions for installation... Installation is reverse of removal!!! Yeah... Well the best way to put it back together is to lay the switch with the connectors down, place the ***** and rockers in the proper position (see below pic) and snap the switch on straight down. NOTE: I have come across two types of switch base connections, where they snap in. Check yours, and see if the slots on both sides are the same size. If so you are good. If not, make sure you have the switch the right way, or it won't fit! Duh... The pictures explaining what I mean are below also.
http://i1137.photobucket.com/albums/...r/IMAG0092.jpg
http://i1137.photobucket.com/albums/...r/IMAG0083.jpg
http://i1137.photobucket.com/albums/...r/IMAG0082.jpg
Like said above, snap back on straight with switch in resting position.
http://i1137.photobucket.com/albums/...r/IMAG0093.jpg
That should do it. If not, then try new ones before you buy a window motor... Hope I saved you some $$$ like me!!!
Tired of wasting hours of your precious time lifting your power windows by hand? Power windows working when THEY want to? Are you fed up? Then look no further and fix them yourself!
So, the problem I had with my power windows was on one switch only. The right rear window would not roll up using the driver�s master switch, but would roll up using it's own switch. Thinking this was weird and could only be electrical, I switched switches. All I did was switch problems and knew it was the switch. I was about to buy a new one when my friend said lets tear one apart and see if we can do anything. Since I had a few extra ones around, I though what the heck, even if we do break them...
Boy was I glad we did that. Now I searched a little for Volvo 240 window switch repair, but found a few sites which really didn't explain how to clean them, just how they worked. Now true, most of the cleaning is self explanatory, but I'm basically here to tell you, repairing your Volvo 240, and 740 and whatnot switches will work, at least they did for me.
What you will need: The switch, wire brush(pic below), some type of delicate bone tool, thin pry tool(small regular screw driver) rubbing alcohol, patience
. Step 1: Switch removal, the worst part of all.
As you can see, the right side of my retaining clip is already broken, so take your time removing these! I really think this is NOT the way to remove the switches, and if you have a better way, please share. Every one of my retaining clips is broken on one side, but not both sides. I may have to rig up a new retaining setup, but for now, I'm not messing with these switches again until I have to clean them.
http://i1137.photobucket.com/albums/...r/IMAG0088.jpg
Step 2: Popping the switch cover off.
Take your time in this step as well. Something a little more sturdy will be needed to wedge and remove the cover off. My friend was able to remove the cover with just one screw driver, but I needed two, one to start and hold the one side and the other to wedge off the retaining clips.
http://i1137.photobucket.com/albums/...r/IMAG0089.jpg
Like so, and wedge something on this side to keep the clips from going back into the holes.
http://i1137.photobucket.com/albums/...r/IMAG0091.jpg
Cover off yet? Maybe now I should mention little pieces may fall out.
http://i1137.photobucket.com/albums/...r/IMAG0077.jpg
Should have two ***** and two contact pins and they should be nearly black from carbon buildup. This is what the base should look like too...
http://i1137.photobucket.com/albums/...r/IMAG0076.jpg
This is why your switches work some of the time, or none.
Step 3: Cleaning
This is where you need the wire brush and rubbing alcohol.
http://i1137.photobucket.com/albums/...r/IMAG0084.jpg
Dip the brush in the alcohol that should be in a separate cup. (Don't put the brush in the alcohol bottle please, but whatever). Take the base and scrub away!
http://i1137.photobucket.com/albums/...r/IMAG0086.jpg
The two pictures below show what the other parts should look like before and after, so be sure to clean those too.
http://i1137.photobucket.com/albums/...r/IMAG0081.jpg
http://i1137.photobucket.com/albums/...r/IMAG0078.jpg
Everything clean!? Remember how to put it back together?
Step 4: Reassembly
Don't you love repair manuals instructions for installation... Installation is reverse of removal!!! Yeah... Well the best way to put it back together is to lay the switch with the connectors down, place the ***** and rockers in the proper position (see below pic) and snap the switch on straight down. NOTE: I have come across two types of switch base connections, where they snap in. Check yours, and see if the slots on both sides are the same size. If so you are good. If not, make sure you have the switch the right way, or it won't fit! Duh... The pictures explaining what I mean are below also.
http://i1137.photobucket.com/albums/...r/IMAG0092.jpg
http://i1137.photobucket.com/albums/...r/IMAG0083.jpg
http://i1137.photobucket.com/albums/...r/IMAG0082.jpg
Like said above, snap back on straight with switch in resting position.
http://i1137.photobucket.com/albums/...r/IMAG0093.jpg
That should do it. If not, then try new ones before you buy a window motor... Hope I saved you some $$$ like me!!!
Last edited by Burn Stains; Sep 2, 2011 at 02:52 PM. Reason: Fix Links...

Junior Member
Joined: Sep 2009
Posts: 26
Likes: 1
From: Birmingham,UK
It's been two years since we have the Volvo XC60 and i suggest a time for re-paint. It was done last month and feels good to see a new Volvo on our garage. Very exciting to ride on it on a stunning bloody red paint.
Last edited by rspi; Feb 24, 2012 at 04:14 AM. Reason: typo


Member
Joined: Jan 2012
Posts: 50
Likes: 0
Flamejet,
I have saved this post for over a year....I just finished reattaching the trim. It looks so great! I followed your instructions except I bought trim paint from Autozone. (It is closer to my house than Wal mart) I used hot glue on the endcaps too. How has the hot glue held up on your car? Again, Thanks so much! Now I will try the antenna advice I saved from this forum too....
I have saved this post for over a year....I just finished reattaching the trim. It looks so great! I followed your instructions except I bought trim paint from Autozone. (It is closer to my house than Wal mart) I used hot glue on the endcaps too. How has the hot glue held up on your car? Again, Thanks so much! Now I will try the antenna advice I saved from this forum too....

Junior Member
Joined: Aug 2012
Posts: 4
Likes: 0
From: Champlain, NY
V50 S40 Oil Trap Change: https://volvoforums.com/forum/genera...ge-pics-64938/

Junior Member
Joined: Nov 2012
Posts: 6
Likes: 1
Just bought a 2002 S60 with 112K miles. The instrument cluster would work intermittently. All gauges, all lights, and displays, would work then suddenly shut down; go completely dark and gauges would pin out, then everything would come back on. On for 10 minutes +or-, off for 20 minutes+or-, an obvious short somewhere. I did notice at times I still had Temp and Fuel gauges, but most often everything was dark. Most posts pointed to possible cracked solder on the instrument cluster.
I removed and dissassembled the cluster. I studied both sides of the curcuit board, especially around the main wiring harness connecting pins, with a magnifying glass looking for cracked, or bad, solder joints. I found that someone had already made some solder repairs at the main pins. The job was sloppy with some solder splatters on the board. Some of the pins had a little corrosion. I cleaned flats areas with a cuetip and soldered pins with a small plackers dental brush, both dipped in isopropyl alcohol. I also checked the first foot of wiring harness in the car, that attaches to the cluster, for damaged wires. All wires appeared to be good. I reassembled and tested the cluster back in the vehicle. This did not fix the problem.
What I noticed when I reassembled was that if I pressed in on the exposed metal plate on the back left hand side of the cluster, all the lights and gauges would work. See pic of exposed plate.

This pic also shows my alteration to the back panel. You can see my "Fix" above the exposed metal plate. See next pic.


The fix was made by running a bolt through the metal bridge plate and circuit board and using a nut to apply tension to the metal plate. This tensioning by nut and bolt acheives the same effect as if you were pressing in on the exposed plate. The next pics show how this was done. Note in the pic above that I drilled a hole in the back cover to allow the nut to be exposed which also allows the back panel to properly seat. This also allows me to adjust the tension on the metal plate without removing the back cover. Proper tension seems to be key. Don't over-tension. You can break the board. Make sure you remove the cover from the circuit board before attempting to drill a hole. If you hit the circuit board with a drill bit, you could very well ruin the board.
Okay, so how did I know to put a bolt and nut here? Because, there is an existing hole in this metal plate and a correspondig hole in circuit board. I have no idea what this metal plate accuately does. I have a therory that the rapid expansion and contracting from the super heating and cooling that occurs within this metal bridge could be what is cracking the soldered connections. The metal plate bridges a large area of the board. Tensioning the plate and circuit board may be closing a crack I can't see. I inserted the bolt through the existing holes in the circuit board and the metal plate.The head of the bolt I installed sits against the circuit board. I only had a long bolt. I cut it to fit. You can use a shorter bolt.


I also drilled a hole in the front panel cover (white one only). See pic below. Again, remove the front cover from the circuit board. This requires you remove the gauges. Don't bend the hands on the gauges, and don't bend the spring pins when reinstalling the gauges. The gauges require the spring pins to be inserted properly in order for the gauges to work.
Drill here

Above is a pic of the hole in the front cover. Both holes in the front and back covers allow me to retension the bolt without disassembling the entire cluster. After you test the unit in the car, It is a good idea to dab a little silicone on the nut side of the bolt to keep the nut from vibrating loose.
Pic below shows the head of the bolt in circuit board. Note the blue tape to the right. At the same time I did the bolt I noted what looked like a cracked solder joint where a lead attaches to the bottom of a 1/4 inch black resister. I resoldered this connection. I used a 25 watt pencil wand, with 40/60 small diameter rosin core solder with flux in the solder.The blue tape is to protect the board from drips and splatter. I did not check this repair separately from the bolt work, So I can't say if resoldering the connection had any effect. (I have had to retension the nut and bolt
since the initial installation, so the soldering did not have any affect. I added some silicone to hold the nut.)
Okay, this worked for me and saved a $450 replacement. How long will it last? Don't know but its working now! Look on youtube for instructions on how to take out the cluster http://www.youtube.com/watch?v=FZjlzcfzjPs and also how to solder.
Update: 12-14-12 Still working.
I removed and dissassembled the cluster. I studied both sides of the curcuit board, especially around the main wiring harness connecting pins, with a magnifying glass looking for cracked, or bad, solder joints. I found that someone had already made some solder repairs at the main pins. The job was sloppy with some solder splatters on the board. Some of the pins had a little corrosion. I cleaned flats areas with a cuetip and soldered pins with a small plackers dental brush, both dipped in isopropyl alcohol. I also checked the first foot of wiring harness in the car, that attaches to the cluster, for damaged wires. All wires appeared to be good. I reassembled and tested the cluster back in the vehicle. This did not fix the problem.
What I noticed when I reassembled was that if I pressed in on the exposed metal plate on the back left hand side of the cluster, all the lights and gauges would work. See pic of exposed plate.
This pic also shows my alteration to the back panel. You can see my "Fix" above the exposed metal plate. See next pic.
The fix was made by running a bolt through the metal bridge plate and circuit board and using a nut to apply tension to the metal plate. This tensioning by nut and bolt acheives the same effect as if you were pressing in on the exposed plate. The next pics show how this was done. Note in the pic above that I drilled a hole in the back cover to allow the nut to be exposed which also allows the back panel to properly seat. This also allows me to adjust the tension on the metal plate without removing the back cover. Proper tension seems to be key. Don't over-tension. You can break the board. Make sure you remove the cover from the circuit board before attempting to drill a hole. If you hit the circuit board with a drill bit, you could very well ruin the board.
Okay, so how did I know to put a bolt and nut here? Because, there is an existing hole in this metal plate and a correspondig hole in circuit board. I have no idea what this metal plate accuately does. I have a therory that the rapid expansion and contracting from the super heating and cooling that occurs within this metal bridge could be what is cracking the soldered connections. The metal plate bridges a large area of the board. Tensioning the plate and circuit board may be closing a crack I can't see. I inserted the bolt through the existing holes in the circuit board and the metal plate.The head of the bolt I installed sits against the circuit board. I only had a long bolt. I cut it to fit. You can use a shorter bolt.
I also drilled a hole in the front panel cover (white one only). See pic below. Again, remove the front cover from the circuit board. This requires you remove the gauges. Don't bend the hands on the gauges, and don't bend the spring pins when reinstalling the gauges. The gauges require the spring pins to be inserted properly in order for the gauges to work.
Drill here
Above is a pic of the hole in the front cover. Both holes in the front and back covers allow me to retension the bolt without disassembling the entire cluster. After you test the unit in the car, It is a good idea to dab a little silicone on the nut side of the bolt to keep the nut from vibrating loose.
Pic below shows the head of the bolt in circuit board. Note the blue tape to the right. At the same time I did the bolt I noted what looked like a cracked solder joint where a lead attaches to the bottom of a 1/4 inch black resister. I resoldered this connection. I used a 25 watt pencil wand, with 40/60 small diameter rosin core solder with flux in the solder.The blue tape is to protect the board from drips and splatter. I did not check this repair separately from the bolt work, So I can't say if resoldering the connection had any effect. (I have had to retension the nut and bolt
since the initial installation, so the soldering did not have any affect. I added some silicone to hold the nut.)
Okay, this worked for me and saved a $450 replacement. How long will it last? Don't know but its working now!
Look on youtube for instructions on how to take out the cluster http://www.youtube.com/watch?v=FZjlzcfzjPs and also how to solder.Update: 12-14-12 Still working.
Last edited by shaddykac; Dec 17, 2012 at 12:58 PM. Reason: clarification on wording

Junior Member
Joined: Nov 2013
Posts: 10
Likes: 0
absolutely informative and thanx for sharing it here with us .. i will go through it and hopefully i will do right as well
Tevida Price
Tevida Side Effects
Tevida Price
Tevida Side Effects
Last edited by KandiceWestbrooks; Sep 29, 2018 at 01:39 AM.

Junior Member
Joined: Dec 2022
Posts: 14
Likes: 0

Thread
Thread Starter
Forum
Replies
Last Post