
Problems with the instrument cluster and power windows.
#1
 04-11-2011 | 01:42 PM

Thread Starter
|
Junior Member
Joined: Oct 2010
Posts: 15
Likes: 0
From: Wilke-Barre, PA
I have a 1986 740 GLE Volvo stationwagon.
The dashboard instrument cluster, hasn't been working fully. The gas gauge was working, then it stoped, but it will also go up and down. The speedmeter didn't work for years, now it is, but not keeping track with the miles. The clock doesn't work. But the the 2 meters on the right work...umm, I believe it is the rpms, and the other is the pressure? Haha, sorry...I don't know everything about cars, but I have fixed a bit on this one. 0_o I know if I sould or need to replace the whole instrument cluster, or maybe just take it out and clean the wiring???
And also with the power windows, they all go down, but none of them go up. With summer coming, the car is a tomb! (LOL). Again, I don't know if I should go to the junk yard and get new window motors, or maybe they just need some cleaning??? I just think that since they go down, then they aren't broken.
Thanks in advance for any help!!!

#3
08-08-2011 | 02:40 PM
Thread Starter
|
Junior Member
Joined: Oct 2010
Posts: 15
Likes: 0
From: Wilke-Barre, PA
Thank you for the reply. Some weeks ago I got 1 switch for the front passenger window. The window went down as it always did, but did not go up (Haha, just my luck! Putting the windows up manually is getting old.). Any way in the future to know that the switch I get from the junk yard is in working order?
Thanks a bunch!!!
Thanks a bunch!!!
#4
08-08-2011 | 08:31 PM
Finicky switches? Checkout my write-up...
Tired of wasting hours of your precious time lifting your power windows by hand? Power windows working when THEY want to? Are you fed up? Then look no further and fix them yourself!
So, the problem I had with my power windows was on one switch only. The right rear window would not roll up using the driver�s master switch, but would roll up using it's own switch. Thinking this was weird and could only be electrical, I switched switches. All I did was switch problems and knew it was the switch. I was about to buy a new one when my friend said lets tear one apart and see if we can do anything. Since I had a few extra ones around, I though what the heck, even if we do break them...
Boy was I glad we did that. Now I searched a little for Volvo 240 window switch repair, but found a few sites which really didn't explain how to clean them, just how they worked. Now true, most of the cleaning is self explanatory, but I'm basically here to tell you, repairing your Volvo 240, and 740 and whatnot switches will work, at least they did for me.
What you will need: The switch, wire brush(pic below), some type of delicate bone tool, thin pry tool(small regular screw driver) rubbing alcohol, patience .
.
Step 1: Switch removal, the worst part of all.
As you can see, the right side of my retaining clip is already broken, so take your time removing these! I really think this is NOT the way to remove the switches, and if you have a better way, please share. Every one of my retaining clips is broken on one side, but not both sides. I may have to rig up a new retaining setup, but for now, I'm not messing with these switches again until I have to clean them.
http://i1137.photobucket.com/albums/...r/IMAG0088.jpg
Step 2: Popping the switch cover off.
Take your time in this step as well. Something a little more sturdy will be needed to wedge and remove the cover off. My friend was able to remove the cover with just one screw driver, but I needed two, one to start and hold the one side and the other to wedge off the retaining clips.
http://i1137.photobucket.com/albums/...r/IMAG0089.jpg
Like so, and wedge something on this side to keep the clips from going back into the holes.
http://i1137.photobucket.com/albums/...r/IMAG0091.jpg
Cover off yet? Maybe now I should mention little pieces may fall out.
http://i1137.photobucket.com/albums/...r/IMAG0077.jpg
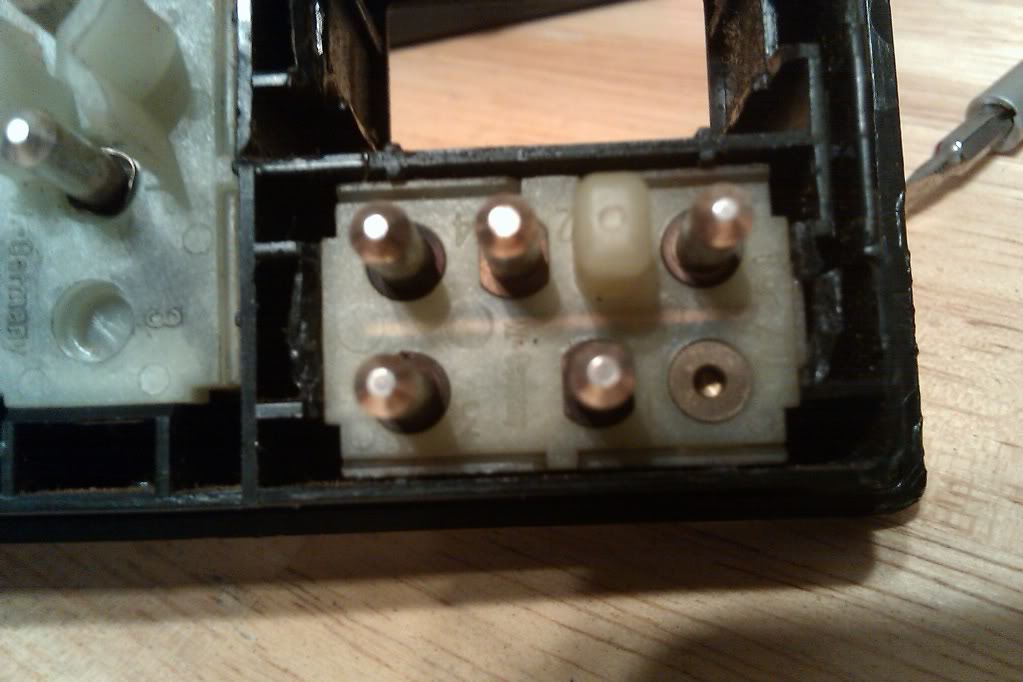
Should have two ***** and two contact pins and they should be nearly black from carbon buildup. This is what the base should look like too...
http://i1137.photobucket.com/albums/...r/IMAG0076.jpg
This is why your switches work some of the time, or none.
Step 3: Cleaning
This is where you need the wire brush and rubbing alcohol.
http://i1137.photobucket.com/albums/...r/IMAG0084.jpg
Dip the brush in the alcohol that should be in a separate cup. (Don't put the brush in the alcohol bottle please, but whatever). Take the base and scrub away!
http://i1137.photobucket.com/albums/...r/IMAG0086.jpg
The two pictures below show what the other parts should look like before and after, so be sure to clean those too.
http://i1137.photobucket.com/albums/...r/IMAG0081.jpg
http://i1137.photobucket.com/albums/...r/IMAG0078.jpg
Everything clean!? Remember how to put it back together?
Step 4: Reassembly
Don't you love repair manuals instructions for installation... Installation is reverse of removal!!! Yeah... Well the best way to put it back together is to lay the switch with the connectors down, place the ***** and rockers in the proper position (see below pic) and snap the switch on straight down. NOTE: I have come across two types of switch base connections, where they snap in. Check yours, and see if the slots on both sides are the same size. If so you are good. If not, make sure you have the switch the right way, or it won't fit! Duh... The pictures explaining what I mean are below also.
http://i1137.photobucket.com/albums/...r/IMAG0092.jpg
http://i1137.photobucket.com/albums/...r/IMAG0083.jpg
http://i1137.photobucket.com/albums/...r/IMAG0082.jpg
Like said above, snap back on straight with switch in resting position.
http://i1137.photobucket.com/albums/...r/IMAG0093.jpg
That should do it. If not, then try new ones before you buy a window motor... Hope I saved you some $$$ like me!!!
Tired of wasting hours of your precious time lifting your power windows by hand? Power windows working when THEY want to? Are you fed up? Then look no further and fix them yourself!
So, the problem I had with my power windows was on one switch only. The right rear window would not roll up using the driver�s master switch, but would roll up using it's own switch. Thinking this was weird and could only be electrical, I switched switches. All I did was switch problems and knew it was the switch. I was about to buy a new one when my friend said lets tear one apart and see if we can do anything. Since I had a few extra ones around, I though what the heck, even if we do break them...
Boy was I glad we did that. Now I searched a little for Volvo 240 window switch repair, but found a few sites which really didn't explain how to clean them, just how they worked. Now true, most of the cleaning is self explanatory, but I'm basically here to tell you, repairing your Volvo 240, and 740 and whatnot switches will work, at least they did for me.
What you will need: The switch, wire brush(pic below), some type of delicate bone tool, thin pry tool(small regular screw driver) rubbing alcohol, patience
. Step 1: Switch removal, the worst part of all.
As you can see, the right side of my retaining clip is already broken, so take your time removing these! I really think this is NOT the way to remove the switches, and if you have a better way, please share. Every one of my retaining clips is broken on one side, but not both sides. I may have to rig up a new retaining setup, but for now, I'm not messing with these switches again until I have to clean them.
http://i1137.photobucket.com/albums/...r/IMAG0088.jpg
Step 2: Popping the switch cover off.
Take your time in this step as well. Something a little more sturdy will be needed to wedge and remove the cover off. My friend was able to remove the cover with just one screw driver, but I needed two, one to start and hold the one side and the other to wedge off the retaining clips.
http://i1137.photobucket.com/albums/...r/IMAG0089.jpg
Like so, and wedge something on this side to keep the clips from going back into the holes.
http://i1137.photobucket.com/albums/...r/IMAG0091.jpg
Cover off yet? Maybe now I should mention little pieces may fall out.
http://i1137.photobucket.com/albums/...r/IMAG0077.jpg
Should have two ***** and two contact pins and they should be nearly black from carbon buildup. This is what the base should look like too...
http://i1137.photobucket.com/albums/...r/IMAG0076.jpg
This is why your switches work some of the time, or none.
Step 3: Cleaning
This is where you need the wire brush and rubbing alcohol.
http://i1137.photobucket.com/albums/...r/IMAG0084.jpg
Dip the brush in the alcohol that should be in a separate cup. (Don't put the brush in the alcohol bottle please, but whatever). Take the base and scrub away!
http://i1137.photobucket.com/albums/...r/IMAG0086.jpg
The two pictures below show what the other parts should look like before and after, so be sure to clean those too.
http://i1137.photobucket.com/albums/...r/IMAG0081.jpg
http://i1137.photobucket.com/albums/...r/IMAG0078.jpg
Everything clean!? Remember how to put it back together?
Step 4: Reassembly
Don't you love repair manuals instructions for installation... Installation is reverse of removal!!! Yeah... Well the best way to put it back together is to lay the switch with the connectors down, place the ***** and rockers in the proper position (see below pic) and snap the switch on straight down. NOTE: I have come across two types of switch base connections, where they snap in. Check yours, and see if the slots on both sides are the same size. If so you are good. If not, make sure you have the switch the right way, or it won't fit! Duh... The pictures explaining what I mean are below also.
http://i1137.photobucket.com/albums/...r/IMAG0092.jpg
http://i1137.photobucket.com/albums/...r/IMAG0083.jpg
http://i1137.photobucket.com/albums/...r/IMAG0082.jpg
Like said above, snap back on straight with switch in resting position.
http://i1137.photobucket.com/albums/...r/IMAG0093.jpg
That should do it. If not, then try new ones before you buy a window motor... Hope I saved you some $$$ like me!!!
Last edited by Burn Stains; 02-01-2012 at 01:21 PM. Reason: Fix links... Again...
#5
08-08-2011 | 08:47 PM

Super Moderator
Joined: Aug 2008
Posts: 2,580
Likes: 7
From: Dallas, TX
Wow...great write up! Let me just add for the o.p. Check to see if the windows will run up from the slave switches at each door. Generally, it is the master driver's switch that has gotten dirty from rain water, spilled sodas, cigerette ash, dandruff, stray cocaine, and all the other unmentionable stuff that happens in a second hand car before you bought it!!
You will not believe the concentrated grunge inside those switches.
Before I swapped clusters, I'd take a good look at the cluster ground wires. You may very well need a new cluster but always good to check the cheap stuff first.
You will not believe the concentrated grunge inside those switches.
Before I swapped clusters, I'd take a good look at the cluster ground wires. You may very well need a new cluster but always good to check the cheap stuff first.
Last edited by swiftjustice44; 08-08-2011 at 08:49 PM.
#6
08-19-2011 | 10:27 AM
Thread Starter
|
Junior Member
Joined: Oct 2010
Posts: 15
Likes: 0
From: Wilke-Barre, PA
Ha! Thank you, thank you, thank youuuuuuuuu. Right now I am in the middle of moving, so I don't have time to fix them now at all. *Sad face* But someone did tell me that the window motor might be corroded if while pressing the switch to go up while banging on the door panel where the motor is, and if it went up...0_o Still nothing. Read your whole write up, loved it!...Would like to marry it!!! But I wasn't able to view any of the pictures. And well, even books are nothing with out pictures...yes I am corny as well.
LMFAO, I dunno about the stray cocaine, but I'll be sure to look into that. ;P
Thank yous!!!
LMFAO, I dunno about the stray cocaine, but I'll be sure to look into that. ;P
Thank yous!!!
#7
08-20-2011 | 09:52 PM
Photobucket should ensure the link to my photos. Hopefully this time they stick around. Hope this fixes your problems when you get a chance.

#8
08-20-2011 | 10:28 PM
Aw crap. I just realized I put the photos in as links and not images, so the images don't show up on the post. You can still click them, but that can get annoying. Maybe it is better this way because you can read everything without have my huge pictures in the middle of the text. What does anyone think?
#9
08-21-2011 | 11:04 AM

Member
Joined: Jun 2010
Posts: 37
Likes: 0
From: Connecticut
The fuel guage is often the lock ring ground at the fuel tank. Remove the fuel lines, disconnect the wire connector and ground, remove the sending unit carefully--no sparks, and clean the surfaces. You might want to replace the locking ring. I find the O-rings are still useable. Often times just cleaning and reinstalling will get your gauge working again.
#10
08-22-2011 | 03:03 PM
Thread Starter
|
Junior Member
Joined: Oct 2010
Posts: 15
Likes: 0
From: Wilke-Barre, PA
Thank you again, sir! Loved the pics even more. I'm gonna try it in a few...someone put down the window, so eh, might as well try this before bringing the window up manually. 
And RE the fuel gauge. It works...but once the gas is a little past half empty (or full, haha) it drops all the way down to empty. 0_o A few months ago someone put new fuel pump, and I think new fuel filter and fuel lines...and, well...he really messed up and broke quite a bit on the car, so I'm sure he broke something while doing the repairs. 0_o
I have no lift, so I'll have to wait on that, but thank you very much!
#12
08-25-2011 | 11:01 AM
Thread Starter
|
Junior Member
Joined: Oct 2010
Posts: 15
Likes: 0
From: Wilke-Barre, PA
Hmmm, bad news. It didn't work. BUT, I think I figured out why the back left side window doesn't work. I was vacuuming the door, and saw how in that group of wires that leaves the door...a cluster of them were cut. I guess that is why some days it works fine and other days not at all. Depending if I open and close that door and the broken wires meet. I assume electrical tape won't fix that?
#16
09-12-2011 | 02:52 PM
Thread Starter
|
Junior Member
Joined: Oct 2010
Posts: 15
Likes: 0
From: Wilke-Barre, PA
Ummm, yeah, give me a few days and I'll take a pic. And, no...the door panel/trim doesn't have to be off to see the wires. It's,like, where...when you open the door all the way, and there's that bunch of wires between the two door hinges. It's about 3 or 4 of the wires are cut. 0_o Have no idea how that happened. (LOL) One of life's mysteries.
And, no...the door panel/trim doesn't have to be off to see the wires. It's,like, where...when you open the door all the way, and there's that bunch of wires between the two door hinges. It's about 3 or 4 of the wires are cut. 0_o Have no idea how that happened. (LOL) One of life's mysteries.
") . If something doesen't work, cut it at the source. Or as the commercials say, set it and forget it!
. If something doesen't work, cut it at the source. Or as the commercials say, set it and forget it!
#18
09-13-2011 | 01:59 PM
Thread Starter
|
Junior Member
Joined: Oct 2010
Posts: 15
Likes: 0
From: Wilke-Barre, PA
#19
12-20-2011 | 08:11 PM

Junior Member
Joined: Dec 2011
Posts: 23
Likes: 0
Just needed to thank this forum once again!
Originally read that write up here:
https://volvoforums.com/forum/volvo-...ll-down-54215/
Thanks Burn Stains and swiftjustice44! This is some seriously great info especially when parts in some areas are getting harder and harder to find.
When I bought my 1988 240 GL (It's actually a GL not a DL like I've posted before) only my left front window would work.
Well I had just reinstalled the switches on the driver's door after cleaning them and all my windows work now!
And it looked clean to begin with but I noticed some buildup around the bottom contacts. No wire brush was used in my case. Just soaked the metal parts in carburetor cleaner then cleaned it with a toothbrush. The plastic parts were soaked in soap and water then also cleaned with a tooth brush.
Sorry I can't find the source of the PDF at the moment and I can't upload the one I have because the file is too large but it's a rather easy switch to R&R.
Again THANK YOU guys! This forum is a huge help and my 600 dollar car is appreciating in value by the day!
But I think I'm keeping this car!
Sorry Barberella for bumping this thread but I hate to start a new thread on something already talked about. But I've been finding out how incredibly mechanic friendly these Volvo's really are. When you think you have a big problem the solution could be but a simple wire.
In my case just some cleaning fixed my problem.
Next job to tackle is my manual sunroof!
My car is so much fun man.
Last edited by John Gavina; 12-20-2011 at 08:15 PM.
#20
12-20-2011 | 08:25 PM
Junior Member
Joined: Dec 2011
Posts: 23
Likes: 0
And on your door jam wiring. A small screwdriver should remove your bonnets at the door and at the car body. Then you'll have room to repair the connections. A simple crimper tool with crimpers should fix it all up. Then electrical tape over the rubber boot.
Pic shows a typical crimper set.
You'll probably need blue crimps. The red ones may be too small.
Pic shows a typical crimper set.
You'll probably need blue crimps. The red ones may be too small.