
Oil pan o-ring installation instructions


Thread Starter
|
Administrator
Joined: Sep 2004
Posts: 36,349
Likes: 46
From: Orlando, Florida
These are Volvo instructions.
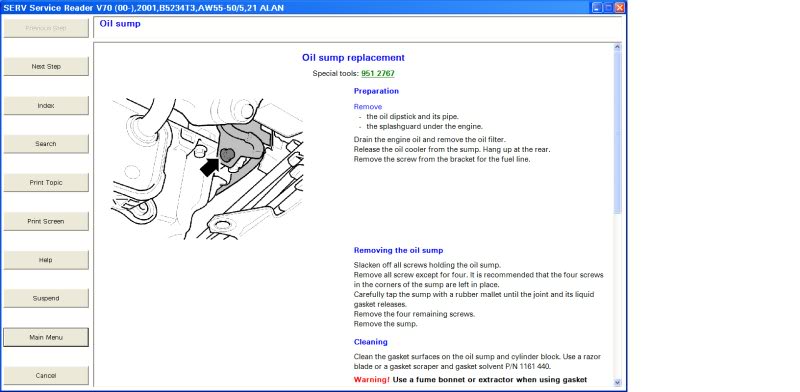
Remove
The oil dipstick and its pipe.
The splashguard under the engine.
Drain the oil and remove the oil filter.
Release the oil cooler from the sump.Hang up at the rear.
Remove the screw from the bracket for the fuel line.
Removing the oil sump(oil pan)
Slacken off all screwsholding the oil sump.
Remove all screws except fro four.
It is reccommended that four screws in the corners of the sump are left in place
Carefully tap the sump with a rubber mallet until the joint and its liquid gasket releases.
Remove the remaining screws.
Remove the sump.
Cleaning
Clean the gasket surfaces on the oil sump and cylinder block.
Use a razor blade or a gasket scraper and gasket solvent P/N 1161440
Warning Use a fume hood or extractor when using gasket solvent.(Fan if inside a garage)
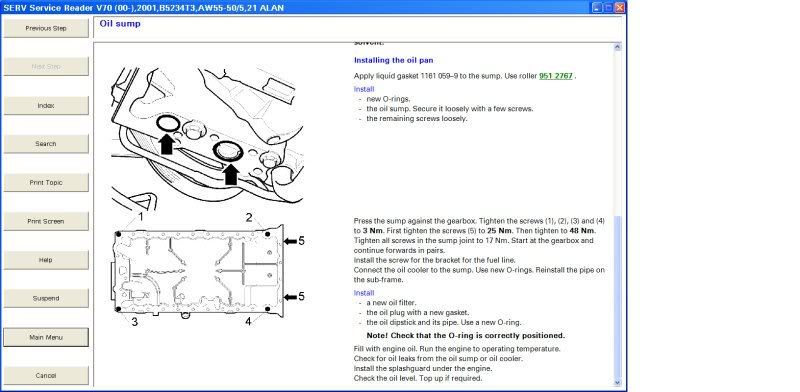
Installing the oil pan
Apply liquid gasket P/N 1161 059-9 to the sump use roller P/N 951 2767 (Or mini roller from hardware store)
Install new o-rings
The oil sump.
Secure it loosely with a few screws.
Then the remaining screws.
Press the pump against the transmission
Tighten the screws (1),(2),(3) and (4) to 3Nm.
First tighten the screws (5) to 25Nm.
Then tighten to 48 Nm.
Tighten all screws in the sump joint to 17 Nm.
Start at the transmisson and continue fowards in pairs.
Install the screw for the bracket for the fuel line.
Connect the oil cooler to the sump.
Use new o-rings.
Reinstall the pipe to the subframe.
Install
A new oil filter
The oil drain plug with a new o-ring
The dipstick and its pipe also use a new o-ring.
Note: check that all the o-rings are positions are correctly.
Fill the engine oil.
Run the engine to operating temp.
Check for oil leaks from the sump or the oil cooler.
Install the splash sheild under the engine.
Check the oil level.Top it off if needed.
Some more notes:
You may have to support the Right side of the engine and drop the subframe a little to get the pan out.
Have someone help you when installing the pan and watch the o-rings to make sure they do not fall while installing the pan.
Make sure when the pan is off you remove the pipe in the oil pan and replace those o-rings at the same time when you have it apart.
Also make sure you remove the oil pick up tube and replace that o-ring.
I think that is about all.
If there is anymore quiestions feel free to ask.
Edit not sure what happened to the original pics but this is all I have right now.
Remove
The oil dipstick and its pipe.
The splashguard under the engine.
Drain the oil and remove the oil filter.
Release the oil cooler from the sump.Hang up at the rear.
Remove the screw from the bracket for the fuel line.
Removing the oil sump(oil pan)
Slacken off all screwsholding the oil sump.
Remove all screws except fro four.
It is reccommended that four screws in the corners of the sump are left in place
Carefully tap the sump with a rubber mallet until the joint and its liquid gasket releases.
Remove the remaining screws.
Remove the sump.
Cleaning
Clean the gasket surfaces on the oil sump and cylinder block.
Use a razor blade or a gasket scraper and gasket solvent P/N 1161440
Warning Use a fume hood or extractor when using gasket solvent.(Fan if inside a garage)
Installing the oil pan
Apply liquid gasket P/N 1161 059-9 to the sump use roller P/N 951 2767 (Or mini roller from hardware store)
Install new o-rings
The oil sump.
Secure it loosely with a few screws.
Then the remaining screws.
Press the pump against the transmission
Tighten the screws (1),(2),(3) and (4) to 3Nm.
First tighten the screws (5) to 25Nm.
Then tighten to 48 Nm.
Tighten all screws in the sump joint to 17 Nm.
Start at the transmisson and continue fowards in pairs.
Install the screw for the bracket for the fuel line.
Connect the oil cooler to the sump.
Use new o-rings.
Reinstall the pipe to the subframe.
Install
A new oil filter
The oil drain plug with a new o-ring
The dipstick and its pipe also use a new o-ring.
Note: check that all the o-rings are positions are correctly.
Fill the engine oil.
Run the engine to operating temp.
Check for oil leaks from the sump or the oil cooler.
Install the splash sheild under the engine.
Check the oil level.Top it off if needed.
Some more notes:
You may have to support the Right side of the engine and drop the subframe a little to get the pan out.
Have someone help you when installing the pan and watch the o-rings to make sure they do not fall while installing the pan.
Make sure when the pan is off you remove the pipe in the oil pan and replace those o-rings at the same time when you have it apart.
Also make sure you remove the oil pick up tube and replace that o-ring.
I think that is about all.
If there is anymore quiestions feel free to ask.
Edit not sure what happened to the original pics but this is all I have right now.

Joined: May 2005
Posts: 1
Likes: 0
I recently purchased a 1995 850 GLT sedan. last week, while it was on its way to a body shop to have some deer induced body damage repaired, the low oil pressure light came on. The body repairman stopped the car and checked the oil, found it to the full mark on the dipstick, then drove about 10 miles with the low oil pressure light on. I suspect the oil pan o-rings are the cause of the low oil pressure but I am having a difficult time getting the oil pan off. My car seems to be a little different than your instructions. I did not find an oil cooler or fuel line in the vicinity of the oil pan, but did find that the power steering lines run under the left end (the transmission end) of the oil pan and are preventing me from getting the pan down from the engine. I have removed all the pan bolts and have it broken free from the engine block, but can only lower it till it hits the power steering lines. Do you have any suggestions on how to get the lines out of the way?
Any advice would be appreciated.
Thanks
Any advice would be appreciated.
Thanks
Thread Starter
|
Administrator
Joined: Sep 2004
Posts: 36,349
Likes: 46
From: Orlando, Florida
You will need to remove the front and rear trans line support brackets and you will be able to move the line out of the way.
Thread Starter
|
Administrator
Joined: Sep 2004
Posts: 36,349
Likes: 46
From: Orlando, Florida
Those are the oil pump o-rings not the o-rings for the pan.
The pan o-rings are 3 smaller o-rings like the small one in the picture.
The pan o-rings are 3 smaller o-rings like the small one in the picture.

Senior Member
Joined: Mar 2005
Posts: 189
Likes: 0
I have a 95 850 GLT. First of all, is there an oil cooler on it, and second, can I get it off, as well as the oil pan without taking the major braces of of the bottom of the car? I will post pictures as I'm doing this job to make it easier on me, as well as whomever will read this. Thanks Tech!!!
By the way, I hope your wife is okay.
By the way, I hope your wife is okay.
Thread Starter
|
Administrator
Joined: Sep 2004
Posts: 36,349
Likes: 46
From: Orlando, Florida
You will need to replace them when you have a constant tapping noise that won't go away.
Yes you can remove the oil pan without removing any braces.You might have an oil cooler but it is hard to say without seeing the car.
Yes everything is good here THANKS.
Yes you can remove the oil pan without removing any braces.You might have an oil cooler but it is hard to say without seeing the car.
Yes everything is good here THANKS.
Thread Starter
|
Administrator
Joined: Sep 2004
Posts: 36,349
Likes: 46
From: Orlando, Florida
The tapping noise comes from the lifters in the top of the engine.
But it is due to low oil pressure from the o-rings being bad.
But it is due to low oil pressure from the o-rings being bad.
Senior Member
Joined: Mar 2005
Posts: 189
Likes: 0
I do have this constant tapping. So, where is this oil pump? Is it inside the oil pan? How do I get started? I have a 1995 850 GLT with no oil cooler... I am almost positive about the oil cooler.
Thread Starter
|
Administrator
Joined: Sep 2004
Posts: 36,349
Likes: 46
From: Orlando, Florida
The oil pump on your car is located behind the Crank pulleys.The crank drives the oil pump.
How do you get what started?
How do you get what started?
Senior Member
Joined: Mar 2005
Posts: 189
Likes: 0
What I mean by how do I get started is; first of all, is it a heavy, and hard job... can I do it myself in a reasonable amount of time, or should I take it to a mechanic? FYI; I'm pretty good with cars, but not a 'mechanic'.

Joined: Aug 2006
Posts: 31
Likes: 0
From:
Senior Member
Joined: Mar 2005
Posts: 189
Likes: 0
Hey guys. I'm getting ready to start this project. I had a few questions;
Can I support the engine with a jack from underneath while taking the brace off, and working, or will I need an engine hoist? Also, where should I connect it?
Also, I have attached a photo of the seals that I got with a kit from Volvo. I think it's the right one, but not sure, and would like to know if the are, in fact the right seals. I know there are too many,but that's whatcame in the kit. I don't want to start the job without the right parts, as I only have one car, and I'm in the middle of knowhere. Anyway the kit is a number 8648358, and the sizes of the seals are as follows from left to right in the photo, and the sizes are approximate, but very close since I measured them as good as could be with a caliper;
1piece of 34.5m X 2.4mm X 2.4mm(with the cross-section of the ring having three flat edges-, but rounded on the very outer diameter)
1piece of 25.5mm X 4mm X 2.4mm ( cross-section is all square)
1 piece of 24.5mm X 2.4mm X 2.4mm (with the cross-section of the ring having three flat edges-, but rounded on the very outer diameter)
4 pieces of 19.5mm X 4mm X 2.4mm (cross-section is all square)
1 piece of 15.9mm X 4mm X2.4mm (cross-section is all square)
Are any combination of these the right pieces?
Thanks!!!!
[IMG]local://upfiles/1748/5E1A185EC2834D588F3828AD6BE0CA0C.jpg[/IMG]

Thread
Thread Starter
Forum
Replies
Last Post