Simple 850 upgrades that I really enjoy...
#21
 02-16-2012, 09:46 PM


I did puddle lights: Bought two pairs of weatherproof LED strips and 3M taped them to the bottom of the doors, Theres a grommet down there that i ran the wire through and then just wired them into the existing lights on the back end of the doors. Took me about an hour and a half and its a really nice luxury touch.

#23
02-18-2012, 08:21 AM
 Keep it looking real nice.
#24
02-19-2012, 12:51 AM

Junior Member
#25
02-19-2012, 09:39 AM
The trim pieces that go from the base of the windshield, to the top of the rear window simply pulls off. There are clips about every 8 inches that hold them to the car. Start at the base of the windshield when taking them off and try not to bend them. I usually use a puddy knife or wide wood chisel to get under them to pop them loose. Put a towel on the paint to avoid scratching the car.
The lip on the S70 trim pieces is almost 3/8 inches.
The lip on the S70 trim pieces is almost 3/8 inches.
#26
02-25-2012, 09:48 AM

Senior Member
Join Date: Jun 2009
Location: USA Rhode Island
Posts: 106
Likes: 0
Received 0 Likes
on
0 Posts
#27
02-26-2012, 12:54 AM
Here is a thread that I found:
How to do the Sc801 Aux Input Hack - Volvo Owners Club Forum
Would your iPhone work like the music players? If so, you maybe able to get a real stereo adapter that will allow you to control the phone with your stereo. I have installed a few of those adapters for people to control their iPods with their car stereo.
Last edited by rspi; 02-26-2012 at 12:55 AM. Reason: edit
#28
02-28-2012, 10:08 PM
#29
02-29-2012, 07:43 PM

Administrator
The center console was the challenge. I used solid copper wire as the wire itself will hold the light in position. No two sided tape needed !!
The white light is wonderful if you need to find something on the floor or read anything. With the stock incandescent lights I couldn't read a thing.
#30
03-01-2012, 08:24 AM
#31
03-01-2012, 10:57 AM
Administrator
I just wanted better light I could actually read a map, directions or a repair manual from and ordered 10 festoon bulbs off ebay thinking I'd make them work. They were cheap enough.
Number one. I went cheap on this conversion but if or when they fail I will replace them with ones that have the proper base and remove the soldering. These bulbs were only around $1.50 each and coming from china (ebay) took about two weeks to arrive. When I get a chance this evening or tomorrow to take down the rear courtesy lights you can see how much cleaner that install is and no soldering. The light in the rear of a wagon uses a festoon style bulb so that was just a simple swap as it plugged right in. (Festoon bulb is the long cylindrical bulb with the pointy ends) Not sure what a sedan uses for it's trunk light.
To do the center console lights I just took each bulb to a battery and made sure it lit up. When it did I marked the end of the bulb with a permanent marker "+" so I knew which end was the positive. LED must be installed only one way. They are directional just like the battery under the hood and you must insure before you solder it in the positive is attached to the positive supply. Regular bulbs will work in both directions, LEDs will not. I found out later there was a plus and negative sign on them but it's way too small.
I gently pried out the two lenses to get access to the torx screws holding the console to the roof. Removed the screws and gently pulled the console down to get to the connector.
I happened to have solid copper wire and it worked out well as the wire itself can be bent to position and hold that light in position without having to try and tape it in.
I used plumbing flux which is acid core because it needs the bite and in this application you aren't getting near anything delicate or any circuit boards. For electronics you should never use acid core as it can damage components but it worked well here as I was soldering to the bulb and to the reflector. Normally for electrical work you should use rosin core solder and if you don't have any of the acid, rosin core might work just fine.
The red wire wasn't soldered, just jammed into the connection. The blue wire was soldered to the reflector.
For the interior lights over the back doors I used smaller 12 led flat panels with the proper adapter so they would plug into the B9 bulb socket. They are harder to fit as the spring retainer that keeps the light up against the ceiling is in the way.
Center photo, $1.50 bulbs I ordered first. Last photo 2 for $10 where I bought them with the correct socket adapter (no soldering).
Have to run to work. Will ad more pictures and polish this later.
Last edited by Kiss4aFrog; 03-01-2012 at 11:12 AM.
#33
03-02-2012, 05:47 AM
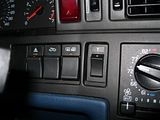
Oh yea, I liked the antenna switch for the sedan. Got the switch from a 960.
https://volvoforums.com/forum/volvo-...91/#post162809
https://volvoforums.com/forum/volvo-...91/#post162809
Last edited by rspi; 03-03-2012 at 05:19 AM. Reason: link
#34
03-03-2012, 01:21 AM
Junior Member
Or an antenna switch out of a 240 or 700 model that matches the early 850 switches well. I only use my antenna 10% of the time, so this helps keep down on wear; and the car looks sleeker without an aerial sticking up. I went to "test fit" the switch and then had it installed and working 20 minutes later (I solder my wiring...).

#35
03-03-2012, 05:20 AM