
Please help me find crank timing mark


Thread Starter
|
Junior Member
Joined: Jun 2013
Posts: 22
Likes: 1
Hi all - I'm working towards head removal and timing belt, water pump, etc. replacement on a 2000 S40 B4204T2 engine. I have my crank marks set in the "vicinity" of where they should be and my cam gear marks are spot on. The problem is that I was expecting to see a mark on the engine side of the crank to center between the two nicked crank teeth and nothing is there.
Please see my picture below; the red arrows indicate the nicked crank teeth, the blue line indicates one area I was looking at for another mark, and the yellow dot is another area I was looking at for a mark. Am I over-thinking this? VIDA says to line up crank marks with relevant marks on timing cover and oil pump housing? I just don't see it. I cleaned the area up and will try to clean it more.
In the position as shown, the cam gear marks are lined up with upper cover properly.
Please help, Thanks!
Oh and another quick question: what is the trick to remove the end cap of the intake cam cover? Just pry the sucker off through the key slot? turn it? etc.
Last edited by s40dad; Jun 11, 2013 at 06:58 AM.

Super Moderator
Joined: Oct 2010
Posts: 5,517
Likes: 73
Are you going to be using the special tool to correctly lock the crank and cams? If so, you can set up the timing after the head is off. The mark on the oil pump is the tab left of the yellow dot, not in the picture because the belt is still on. Line up the marks on the cams and the crank should also be aligned then.

To remove the plug on the intake cam you punch the middle with a flat head screwdriver and pry it out. Replace with new. My 2001 did not have any cam seal behind this plug either. You can easily fit one once you clean the baked oil out of the grooves if you want.
Are you going to remove the crank pulley for the serpentine belt? When removed it makes the crank marks very easy to line up.
Are you going to remove the crank pulley for the serpentine belt? When removed it makes the crank marks very easy to line up.
Thread Starter
|
Junior Member
Joined: Jun 2013
Posts: 22
Likes: 1
Thanks guys. I can partially see that tab but just thought of it as part of the housing and not an indicator/mark to speak off. I will be using two locking methods, a general purpose between the sprockets lock and a homemade tool at the other end of the cams.
Since this is my first time digging into one of these, I was expecting with those two tools in place, and the CVVT gears still attached, that when I relieve the cover pressure with another homemade tool, that I would be able to lift out the cover with the cams partially attached as one unit - of course with very careful support and then turn it over for cleaning etc.
Thanks to previous advice by Hudini, I will be leaving the cam sprockets intact on the cams and clean around them and fit the seals from the other side. Also, I was going to avoid taking the serpentine pulley off since I believe I can see down there OK.
Please review my cover/cam removal plan and advise further if you think it would help me so I know what to look out for. Also, what should I expect when removing the CVVT solenoid, will anything "pop out" ?
Thanks a bunch!!

When the cam cover is removed the cams will lift right out. The gear holder between cam gears will no longer hold as the cams can spread apart once free of the head.
Nothing to worry about on the CVVT solenoid. 4 bolts and a gasket with oil passages underneath. The gasket does have a screen glued to it. At least the replacement does. Not sure if the factory gasket has the screen.
Getting the cam seals over the cam lobes won't be the easiest. I was told by a very experienced Volvo mechanic to do it this way AFTER I removed my CVVT gear. My experience with this then is zero.

Thread Starter
|
Junior Member
Joined: Jun 2013
Posts: 22
Likes: 1
I thought I read somewhere that the cvvt gear was somehow attached to the cam cover? Did this mean then that it was held to the exhaust cam gear with special bolts instead?
If I carefully mark the locations of cam gears and the cvvt gear with paint or something on the cam spindle then I should be safe, right?
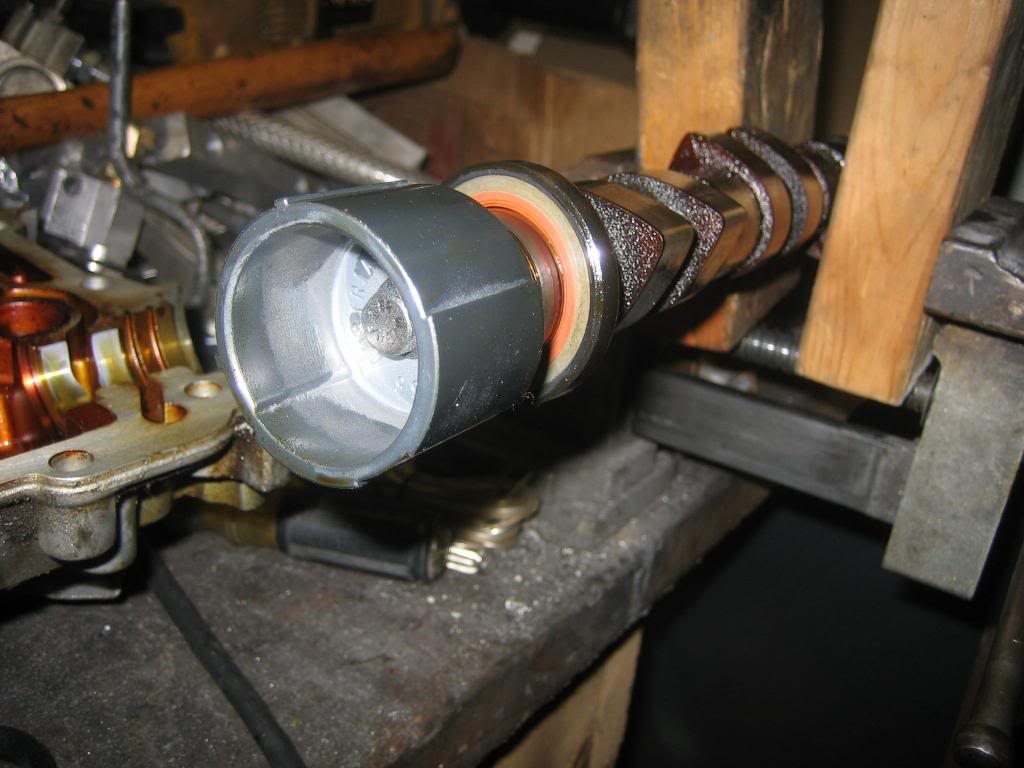
With the cams out like in your picture, can I properly torque the gears down in a vise without doing harm to the cam?
Thanks!
If I carefully mark the locations of cam gears and the cvvt gear with paint or something on the cam spindle then I should be safe, right?
With the cams out like in your picture, can I properly torque the gears down in a vise without doing harm to the cam?
Thanks!
The CVVT gear is bolted only to the exhaust cam by one big bolt and 80 lb/ft torque. The exhaust cam is sandwiched between the upper cam cover and the lower head. Pop the cover and the cams are free.
I do believe you could mark the CVVT gear in relation to the exhaust cam and successfully reinstall it. Every degree counts so make it good. Protect the cam from scratches and you should be good. Good luck.
I do believe you could mark the CVVT gear in relation to the exhaust cam and successfully reinstall it. Every degree counts so make it good.
Protect the cam from scratches and you should be good. Good luck.
Thread Starter
|
Junior Member
Joined: Jun 2013
Posts: 22
Likes: 1
Thanks Hudini !
I do believe that I should approach this the traditional way with cam gears/CVVT removed for reinstallation and cam seal installation - also following VIDA instructions. I will have the cams locked at both ends using proper tools (or at least very good DIY versions) when it comes to torqueing down. I'm going to mark very precisely with paint/etc, maybe even a slight scoring mark on gears.
BTW, would you know the T# of the torx center bolt on the exhaust cam? I believe it surpasses the max in my set so I'll have to buy one.
Thanks,
Steve
The large torx you see on the outside of the CVVT is a cover only. The real bolt is underneath although I can't remember if it's a proper bolt head or torx bolt. The cover has a gasket to keep oil from leaking.
Thread Starter
|
Junior Member
Joined: Jun 2013
Posts: 22
Likes: 1
Yea I made a mistake with that torx cover. I had cams all locked from both sides and lossened bolts while all locked up but never took them all the way off so i never knew that was a cover. BTW it is also a torx 55 underneath. I plan to leave it on for now and will deal with it before re-assembly. The big problem now is getting that cover to release from the back. I can see it has lifted about 1/16th" on exh side and about 1 centimeter on intk side but i cant get it to release and am afraid to do any prying. I'll keep lightly tapping it I guess. The CVVT being on the cam I hope isn't holding things up? all bolts are off and there is a little play in my cover tool.
I don't believe the CVVT would hold it from everything I've read. Of course I made the huge mistake of removing the CVVT with nothing marked and no cam holder tool around. You might not want to listen to my advice....
Thread Starter
|
Junior Member
Joined: Jun 2013
Posts: 22
Likes: 1
I'm actually finding if I try to lift the cover straight up and over with the cam that the bottom of the CVVT gear interferes with the cam seal part of the head underneath. And, if it try to lift the cover only, that the cover actually collides within 1/2-1 mm with the heads of two of those funky CVVT bolts. Its really frustrating. I may actually try and nip a smidge off two of those bolt head to get the cover to come out clean. Anyone deal with this before?

Thread
Thread Starter
Forum
Replies
Last Post
drew84
General Volvo Chat
4
Jun 11, 2014 07:32 PM
cdlahoward
Volvo 260, 760 & 960
3
Jun 12, 2011 05:03 PM