
Low Beam Headlight


Member
Joined: Nov 2007
Posts: 39
Likes: 0
From:
ORIGINAL: tech
Check for power at the headlight bulb then in the main plug to the headlight assembly.
Check for power at the headlight bulb then in the main plug to the headlight assembly.

Administrator
Joined: Sep 2004
Posts: 36,349
Likes: 46
From: Orlando, Florida
I forget exactly 100% but is should be right in the back of the headlight housing.
If no power there then you might have a bad headlight shunt assembly.
Check here for the location and check the connections for it. The link is for a HID repair to stop the beam failure message after installing HID's.
http://www.xenonvalot.com/xenonfixvolvo.html
If no power there then you might have a bad headlight shunt assembly.
Check here for the location and check the connections for it. The link is for a HID repair to stop the beam failure message after installing HID's.
http://www.xenonvalot.com/xenonfixvolvo.html
Member
Joined: Nov 2007
Posts: 39
Likes: 0
From:
I did some more reading and one suggestion was the relay. I can feel the relay clicking so I know which one it is. Question: Is there a separate relay for each side for low beams. Put another way, the left side low beam works fine. The right side does not. I do not have voltage to the right side but I do show continuity on my VOM. If there is only one relay controlling both low beams, then maybe it is faulty or the shunt you reference is bad.
Can you shed any light (pun intended) on this? Many thanks...
Can you shed any light (pun intended) on this? Many thanks...
Administrator
Joined: Sep 2004
Posts: 36,349
Likes: 46
From: Orlando, Florida
I cannot get to my wiring diagram give me till the morning and I will see what I can find in it.
Please just remind me. Atleast reply to this post and I will leave it as new to remind me.
Please just remind me. Atleast reply to this post and I will leave it as new to remind me.
Member
Joined: Nov 2007
Posts: 39
Likes: 0
From:
ORIGINAL: tech
I cannot get to my wiring diagram give me till the morning and I will see what I can find in it.
Please just remind me. Atleast reply to this post and I will leave it as new to remind me.
I cannot get to my wiring diagram give me till the morning and I will see what I can find in it.
Please just remind me. Atleast reply to this post and I will leave it as new to remind me.
Administrator
Joined: Sep 2004
Posts: 36,349
Likes: 46
From: Orlando, Florida
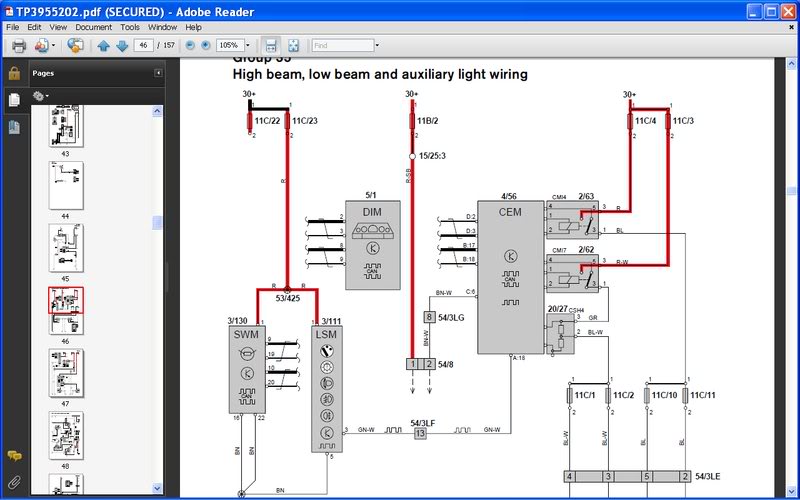
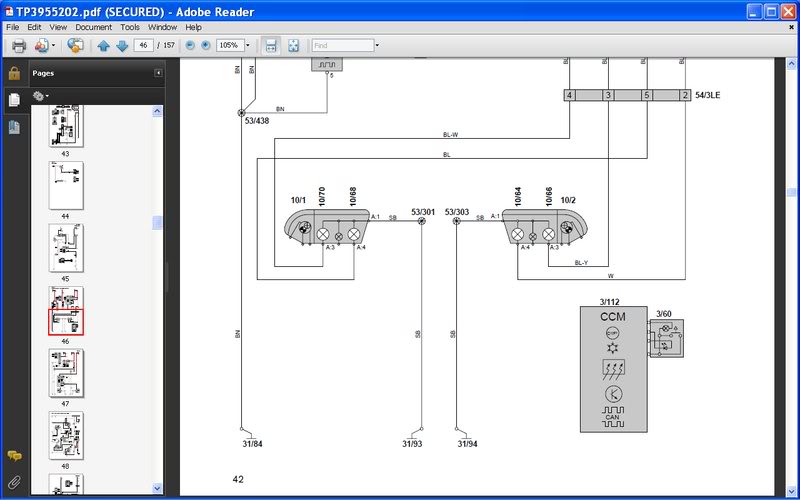
Ok I cannot find the legend so please bear with me here. Below is the wiring diagram. You can figure out which is the lowbeam by looking at yours ans seeing what color the wire is. Then back track on the diagram. I will try to help the best I can with the rest.
Member
Joined: Nov 2007
Posts: 39
Likes: 0
From:
In doing some more reading, it appears to be the shunt. I get 1.1 ohms at the bulb connector so I know there is continuity. The shunt follows the relay and I can feel the relay click. It appears there is one relay to control both lamps (makes sense) which then passes voltage to the shunt. I get no voltage at all at the bulb. I'm fairly confident the shunt is the issue.
I now need how to get it out. If you have the procedure so I don't ruin anything, I would be appreciative. I think it is a straight pull-out, no?
I now need how to get it out. If you have the procedure so I don't ruin anything, I would be appreciative. I think it is a straight pull-out, no?
Administrator
Joined: Sep 2004
Posts: 36,349
Likes: 46
From: Orlando, Florida
The shunt just pulls out.
Check the link I posted on page 1 for the fix for installing HID's and fixing the error message.
That explains how to get to it.
Also check the panel good they are known to have a bad connection and overheat melting the plastic.
Check the link I posted on page 1 for the fix for installing HID's and fixing the error message.
That explains how to get to it.
Also check the panel good they are known to have a bad connection and overheat melting the plastic.
Member
Joined: Nov 2007
Posts: 39
Likes: 0
From:
I found the procedure to get the CEM out, reemove the shunt and to repair the problem. I have copied that procedure here in case someone else needs it. I'm going to do this on Monday when I can get a new shunt. I'll post my results. I'll also measure the resistance with the new shunt and post that as well.
Symptoms: Headlights not on, system display reads "BULB FAILURE DIPPED BEAM"
Problem: Shunt is overheating, carbon has deposited on shunt connection. Need to replace shunt, clean carbon off CEM connector. You will need: patience, no-residue electrical connection cleaner, T25 torx bit, flashlight, 400 grit sandpaper, volvo part# 9442190 costs $9 (same part# for S60) Entire procedure is same as S60.
First, disconnect the negative lead from the battery. Then use the t25 torx to remove 2 screws that lie near the footwell/pedal light. You'll need to pull this panel down(with strong force) on the left side, then the right. Then, to disconnect it from the center consol, this "sound barrier" must be pushed up and toward the front of the car. You'll get it, just be careful.
Now with the plastic out of the way, you'll need to locate the CEM. Its directly in front of the obd port. To remove the CEM from it's clips, you'll need a screwdriver(I pried the clips with my bare hands). You will be upside-down and backwards, so you are looking towards the sky in the footwell. The clip that holds the CEM in place is behind it on the port side, the side closest to the door. It must be pulled directly away from the CEM. At the same time, pull the cem not down but back towards the obd port. It will take a few tries, as it will try to clip back into place. You can now maneuver the CEM down into a more workable location. http://i245.photobucket.com/albums/gg50 ... CT2320.jpg
http://i245.photobucket.com/albums/gg50 ... CT2318.jpg
You will see the burnt part of the cem even with the shunt still in. It is obvious, yellowy/black burned plastic. Pull the shunt out like you would a fuse.
Take a break...
Before going back to work on the car, take 400 grit(or something close to 400) and cut about a 8cm by 1cm rectangle. You need it to slip into the connector(just the burned one where the old shunt sat. Sand the inside of that connection real good. Your sandpaper will become dicolored, proving that you are cleaning. Sand it until you feel it's clean enough. I gave it a good 20-30 strokes. Clean with electrical cleaner. Let cleaner dry(30min to be sure). You are ready to replace the shunt(with the new one), replace the CEM, and put everything back together.
http://i245.photobucket.com/albums/gg50 ... CT2310.jpg
http://i245.photobucket.com/albums/gg50 ... CT2337.jpg
Member
Joined: Nov 2007
Posts: 39
Likes: 0
From:
ORIGINAL: tech
The shunt just pulls out.
Check the link I posted on page 1 for the fix for installing HID's and fixing the error message.
That explains how to get to it.
Also check the panel good they are known to have a bad connection and overheat melting the plastic.
The shunt just pulls out.
Check the link I posted on page 1 for the fix for installing HID's and fixing the error message.
That explains how to get to it.
Also check the panel good they are known to have a bad connection and overheat melting the plastic.
Yes, it all falls into place now with the resistor readings from that post as well. Outstanding...