
DIY: 1998 Volvo V70 Rear Shock Absorber (Bilstein TC) & Shock Mount


Thread Starter
|
Senior Member
Joined: Jan 2010
Posts: 232
Likes: 0
DIY: 1998 Volvo V70 Rear Shock Absorber (Bilstein TC) & Shock Mount
Here is a quick DIY for 1998 Volvo V70 Rear Shock Absorber + Mount.
NOTE:
1. The trickiest part of this job is in the bolt holding the Shock Mount. These bolts were rusted through and I broke one of them (it took 3 hours to get the stud out!). Learned my lesson, and the rest is easy.
The Nut is welded to the chassis.
- Once the car is safely on jackstand. From underneath apply some grease on the Bolt part below the nut. This way when the bolt is removed, the grease is sucked into the nut.
- Spray the top of these bolts with WD-40 or PB Blaster. Let it sit for 30 minutes. Do something else. Then loosen these bolts about 2 full turns. Once you feel the resistance, this is when the rust is drawn into the nut. Stop here. Again, Spray WD-40 or PB Blaster generously around the bolt so it flows downward into the nut. Let it sit for one hour.
- When removing the bolt, back it out 2 turns, tighten it 1 turn. Repeat the process to get the bolt out slowly. Back and forth and back and forth to work the rust out. If you feel too much resistance, stop, apply WD-40 or PB Blaster and wait. This is similar to tapping a new thread (same idea).
2. The shock mount bolt is M8 x 1.25 x 30. Get a four (4) bolts at hardware store (or Volvo dealer) beforehand. Get four (4) M8 nuts in case the factory nut is stripped.
3. I use Bilstein TC Shock Absorber ($58/each) and Volvo Shock Mount (Corteco, $24/each). Got all my parts at www.rmeuropean.com. FYI, Bilstein Struts/Shocks are L.T. warranteed.
4. Torque values:
- Shock Absorber Top Nut: 40 Nm
- Shock Mount Bolt: 25 Nm
- Shock Absorber Bottom Nut: 80 Nm
5. You need an offset wrench (17-mm) for the Shock Absorber Nut. Sears carries this offset wrench! Another choice is Air Tool but be careful not to apply too much force, the shaft can spin and damage the absorber seal.
PROCEDURE:
1. Car in Park, Apply Hand Brake. Chock Front wheels!
2. Jack the Rear and place Jackstand under the subframe (where the delta control arms is attached to). Yes Jackstand under the subframe, and not under the control arms.
3. Open the trunk, remove flooring material. The Cover is held by four (4) 10-mm bolts, 2 on each side. Once this is removed the Shock Mount is in plain sight:

4. This is the setup: the bolt goes down. The nut is welded to the chassis:

5. If you replace both Shock Absorber and Shock Mount, no need to remove the single Shock Absorber Nut. Just loosen the 12-mm Bolts holding the shock mount, again read my tip above (Spray WD-40 or PB Blaster and work very slowly, back and forth many times to loosen the rust!!!).
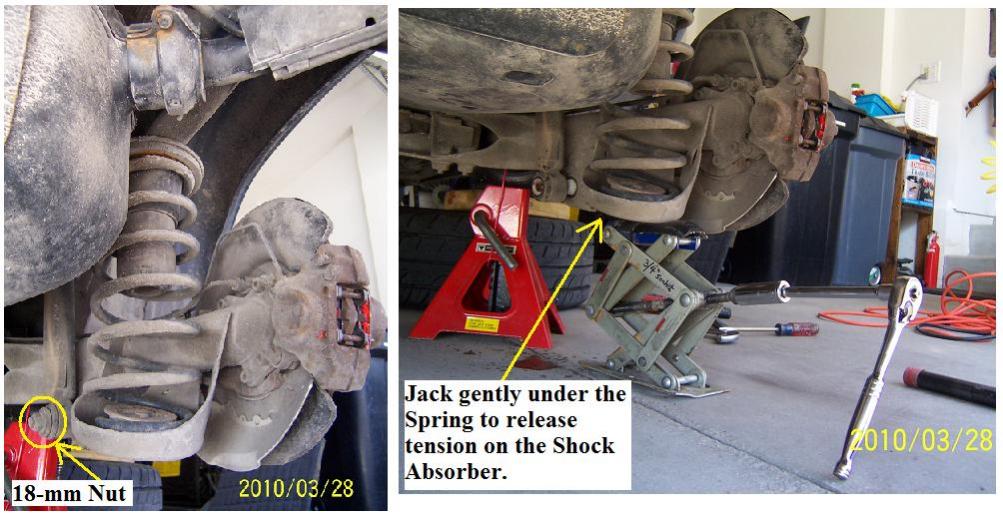
6. The lower part of the Shock Absorber is held by an 18-mm nut.
7. To remove the Shock Absorber, jack gently under the Rear Spring to release tension on the Shock Absorber.
8. During Shock Absorber and Shock Mount assembly, note this sequence. From Top to Bottom:
- Nut
- Large Washer
- Shock Mount
- Protective Sleeve
- Small washer (Bilstein provides this small washer)
9. Assemble the new Shock Absorber and Shock Mount outside of the car. It is much easier this way. Use the offset wrench and an adjustable wrench to hold the Shock Bolt. Tighten to 40 Nm.

10. Insert the new assembly into the car, install the 2 bolts loosely. Get under the car and attach the Lower part of the Shock Absorber using the 18-mm nut, do not tighten this 18-mm nut yet. Go back above and tighten the 12-mm mount nuts to 25 Nm. Then tighten the Lower 18-mm Nut to 80 Nm.
If you follow this DIY, it will be straightforward. Avoid breaking the bolt/nut at all cost!!! I spent 3h extracting the broken bolt!!! Anyway good luck and have fun, you will like the new ride from Bilstein TC!!!
-----------
AFTER THOUGHTS:
I search the different forums before doing this and I knew the nut/bolt on the mount is tricky and even so I broke one bolt off!!!
Having done this, my best advices for people are:
1. Get extra bolts and M8 nuts on hand.
2. Spray the bolts with WD-40 or PB Blaster 24-48h before doing this job.
This allows the lubricant to drip down into the nut's threads.
3. Then remove the bolt as mentioned above, 2 turns CCW and 1 turn CW.
Apply WD-40 or PB Blaster, wait 15 min.
Repeat the process as if you tap new threads using tap and die set.
Having said that, if you run into:
1. Broken bolt:
This was my nightmare, it took forever to extract the stud. Solutions:
a. Vice-grip to grab the stud and undo it.
b. Drill the stud out but you risk damaging the nut's thread.
If you stripped the nut's thread (but still welded in place):
- You can drill it larger for the bolt to pass through, then use another nut below it.
2. Broken Nut off the welding spot:
This is actually easier to handle than broken stud!
Working through the rear pass door, just place another nut below then install the bolt.
You may need another assistant to help you hold the nut while you tighten the bolt.
Here is a quick DIY for 1998 Volvo V70 Rear Shock Absorber + Mount.
NOTE:
1. The trickiest part of this job is in the bolt holding the Shock Mount. These bolts were rusted through and I broke one of them (it took 3 hours to get the stud out!). Learned my lesson, and the rest is easy.
The Nut is welded to the chassis.
- Once the car is safely on jackstand. From underneath apply some grease on the Bolt part below the nut. This way when the bolt is removed, the grease is sucked into the nut.
- Spray the top of these bolts with WD-40 or PB Blaster. Let it sit for 30 minutes. Do something else. Then loosen these bolts about 2 full turns. Once you feel the resistance, this is when the rust is drawn into the nut. Stop here. Again, Spray WD-40 or PB Blaster generously around the bolt so it flows downward into the nut. Let it sit for one hour.
- When removing the bolt, back it out 2 turns, tighten it 1 turn. Repeat the process to get the bolt out slowly. Back and forth and back and forth to work the rust out. If you feel too much resistance, stop, apply WD-40 or PB Blaster and wait. This is similar to tapping a new thread (same idea).
2. The shock mount bolt is M8 x 1.25 x 30. Get a four (4) bolts at hardware store (or Volvo dealer) beforehand. Get four (4) M8 nuts in case the factory nut is stripped.
3. I use Bilstein TC Shock Absorber ($58/each) and Volvo Shock Mount (Corteco, $24/each). Got all my parts at www.rmeuropean.com. FYI, Bilstein Struts/Shocks are L.T. warranteed.
4. Torque values:
- Shock Absorber Top Nut: 40 Nm
- Shock Mount Bolt: 25 Nm
- Shock Absorber Bottom Nut: 80 Nm
5. You need an offset wrench (17-mm) for the Shock Absorber Nut. Sears carries this offset wrench! Another choice is Air Tool but be careful not to apply too much force, the shaft can spin and damage the absorber seal.
PROCEDURE:
1. Car in Park, Apply Hand Brake. Chock Front wheels!
2. Jack the Rear and place Jackstand under the subframe (where the delta control arms is attached to). Yes Jackstand under the subframe, and not under the control arms.
3. Open the trunk, remove flooring material. The Cover is held by four (4) 10-mm bolts, 2 on each side. Once this is removed the Shock Mount is in plain sight:
4. This is the setup: the bolt goes down. The nut is welded to the chassis:
5. If you replace both Shock Absorber and Shock Mount, no need to remove the single Shock Absorber Nut. Just loosen the 12-mm Bolts holding the shock mount, again read my tip above (Spray WD-40 or PB Blaster and work very slowly, back and forth many times to loosen the rust!!!).
6. The lower part of the Shock Absorber is held by an 18-mm nut.
7. To remove the Shock Absorber, jack gently under the Rear Spring to release tension on the Shock Absorber.
8. During Shock Absorber and Shock Mount assembly, note this sequence. From Top to Bottom:
- Nut
- Large Washer
- Shock Mount
- Protective Sleeve
- Small washer (Bilstein provides this small washer)
9. Assemble the new Shock Absorber and Shock Mount outside of the car. It is much easier this way. Use the offset wrench and an adjustable wrench to hold the Shock Bolt. Tighten to 40 Nm.
10. Insert the new assembly into the car, install the 2 bolts loosely. Get under the car and attach the Lower part of the Shock Absorber using the 18-mm nut, do not tighten this 18-mm nut yet. Go back above and tighten the 12-mm mount nuts to 25 Nm. Then tighten the Lower 18-mm Nut to 80 Nm.
If you follow this DIY, it will be straightforward. Avoid breaking the bolt/nut at all cost!!! I spent 3h extracting the broken bolt!!! Anyway good luck and have fun, you will like the new ride from Bilstein TC!!!
-----------
AFTER THOUGHTS:
I search the different forums before doing this and I knew the nut/bolt on the mount is tricky and even so I broke one bolt off!!!
Having done this, my best advices for people are:
1. Get extra bolts and M8 nuts on hand.
2. Spray the bolts with WD-40 or PB Blaster 24-48h before doing this job.
This allows the lubricant to drip down into the nut's threads.
3. Then remove the bolt as mentioned above, 2 turns CCW and 1 turn CW.
Apply WD-40 or PB Blaster, wait 15 min.
Repeat the process as if you tap new threads using tap and die set.
Having said that, if you run into:
1. Broken bolt:
This was my nightmare, it took forever to extract the stud. Solutions:
a. Vice-grip to grab the stud and undo it.
b. Drill the stud out but you risk damaging the nut's thread.
If you stripped the nut's thread (but still welded in place):
- You can drill it larger for the bolt to pass through, then use another nut below it.
2. Broken Nut off the welding spot:
This is actually easier to handle than broken stud!
Working through the rear pass door, just place another nut below then install the bolt.
You may need another assistant to help you hold the nut while you tighten the bolt.
Last edited by cn90; Mar 29, 2010 at 10:40 AM.


Thread Starter
|
Senior Member
Joined: Jan 2010
Posts: 232
Likes: 0
DIY: 1998 Volvo V70 Front Bilstein TC Strut Tips/Tricks
http://www.matthewsvolvosite.com/for...hp?f=1&t=28455

Member
Joined: Sep 2009
Posts: 35
Likes: 0
Thanks for the link pal. I have just changed the front shock absorber and now I'm getting ready to do the rears and probably the mounts too.
Last edited by mikeross; Aug 30, 2010 at 09:22 PM.

Junior Member
Joined: Jul 2009
Posts: 13
Likes: 0
Thanks so much for writing this up and documenting it! I used your instructions to replace the rear shocks on my 99 V70 a few weeks ago. Very very well done and much appreciated.
Luckily I did not encounter any rusted bolts - even the lower ones - which I think has to do with the climate where I have lived. (Dry)
Because I didn't have a second jack to use CN90's method of jacking under the springs, I used a slightly different technique. I don't know if this was the correct method, but it worked. With the car on the ground and the parking brake engaged, front wheels blocked, inside the car loosen the 2 nuts on each of the shock mounts leaving them just barely attached. Break the wheel lugs loose on each of the rear wheels with the car on the ground. Jack up the car, place jack stands, and remove the rear wheels. Throw them under the car for an extra margin of safety. Crawl under the car - this won't work if you're huge - and using a long breaker bar gear wrench ratcheting set up with a DEEP socket take off the lower bolt nuts on both shocks. ( I had to run out and get a deep socket as the shallow one was a no go. Six point sockets as opposed to 12 point are nice too for more leverage and less chance of rounding off. I used socket set # GM0016 which I bought at O'Reilly/Schucks.) Stand up and reach into the back of the car and take the 2 upper shock mounting bolt nuts completely off each shock. Put the wheels back on the car and slowly lower the car back to the ground. Remove the parking brake - you'll hear some noise as the top of the shocks and the shock mounts will rise up into the rear hatch area about 3 inches or so. Now everything will be loose and can be removed easily. Pull the shocks off the spindles below and pull the whole unit (shock and mount) out through the top. I took cn90's suggestion and replaced the shock mounts ( Hutchinson) so I didn't bother breaking the old ones apart. (You will also absolutely need the deep offset wrench he mentions and I also bought the deep offset wrench set at Sears although I noticed later that Home Depot also sells a set. If you buy at Sears I found a better price by buying it online with in store pickup as opposed to just walking into the store and buying it - the set was $41.99 online with in store pickup versus $49.99 the other way). I then crawled under the car and connected up the new shock (Bilstein TC) and got into the rear hatch to attach the mount (just press down with one hand while tightening with the other initially and then use the offset wrench and a vice grip on the center spindle to tighten the center) and crawl under the car again to tighten up the lower nuts one last time. My shocks were the originals - yes, 11 years old - and they never leaked but they were blown with no rebound at all. I am a neophyte at Volvo repair and I thought this job was a piece of cake but YMMV.
Thread Starter
|
Senior Member
Joined: Jan 2010
Posts: 232
Likes: 0
No need for 2nd jack! For this job all you need is:
- one (1) jack
- two (2) jackstands. You can get away with only 1 jackstand if you do 1 side at a time.
1. Jack it up.
2. Place jackstand to support car, now remove the jack for the part that requires jacking up the Rear Spring.
That is all.

Thread
Thread Starter
Forum
Replies
Last Post
greenman86
For Sale / Trade - Archive
1
Apr 25, 2014 09:47 AM