
Just serviced PCV - a few tips


Thread Starter
|
Senior Member
Joined: Dec 2012
Posts: 107
Likes: 2
From: Fenton, MI
I don't think there's a need for a whole new tutorial. There are plenty out there that cover pretty much all the basics. This is just FYI concerning a few unexpected surprises while doing this DIY project.
Diagram used throughout
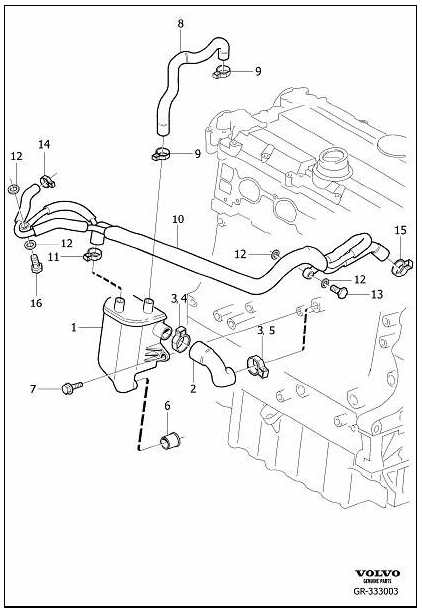
Vehicle
2005 XC90
2.5T
FWD
253k miles
I have no idea if this service has EVER been done on this vehicle. However the hose that goes from the flame trap to the valve cover (#8 above) has been broken for some time which was getting oil pretty much everywhere. I finally decided to tackle this issue. I also have had the tell tale smoke coming from the dipstick ever since I bought the car.
Parts
I ordered the kit from IPD located here.
That lower left manifold bolt
Removal: This wasn't as big of an issue as I expected. I followed another DIYer's advice and cut down a 10mm socket only leaving enough of the socket to get over the head of the bolt. This gives you just enough room to get to this bolt. I used a 1/4" socket, 9" extension, u-joint, and shorty 10mm. I stuck these between the left edge of the intake manifold and smaller hose coming out of the thermostat.
Reassembly: Tightening the bolt was easier. I was able to use the 1/4" socket, 9" extension and the shorty 10mm below the manifold and power steering hose but above the alternator. No need to remove this bolt. For one, the thermostat housing is in the way. Two, the manifold just sits on the bolt so once you loosen it pulling the manifold off is easy. Your new gasket will need to be slit so you can fit the gasket onto the bolt.
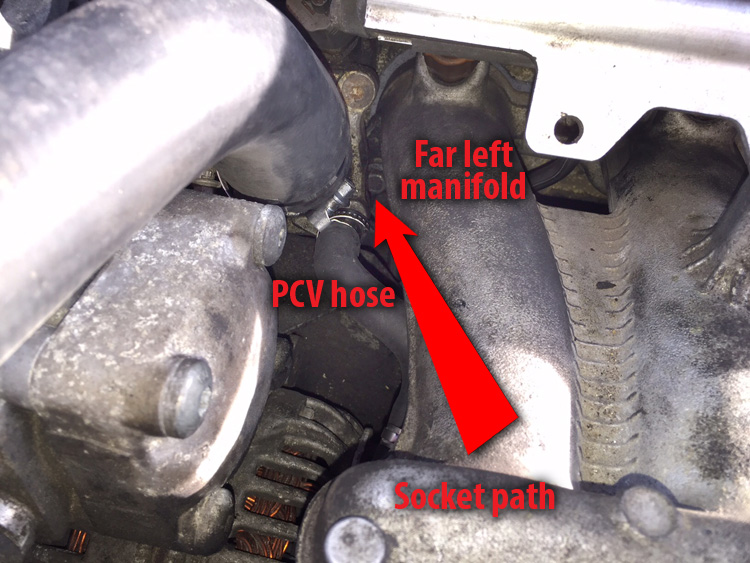
This is the path used to loosen the bolt. It took a 1/4" ratchet, extension, U-joint, and shorty 10mm socket. I found a better way to tighten it (see next pic).
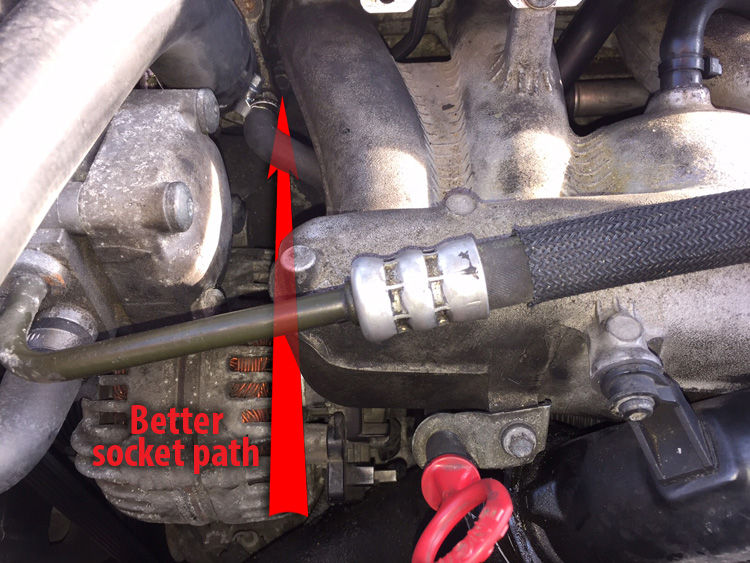
This path was better using a 1/4" ratchet, 9" extension and shorty 10mm socket.
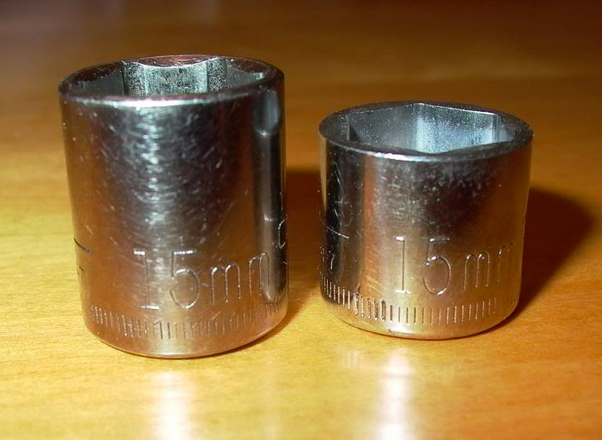
Wrong size socket, but you get the idea
The banjo bolt that attaches to the bottom of the intake (#16 above)
Removal: This critter is a pain. You can see it, but getting to it is another thing. After removing the throttle body it was pretty easy. You just have to reach in under the right side of the manifold to remove it.
Reassembly: Replacing that banjo is tougher. The idea of installing the throttle body upside down didn't excite me much. I thought it was better to wrestle with one banjo bolt instead of four throttle body bolts. The way I did this was to get the manifold close to in place and then finagle it so I could start the banjo bolt. Essentially I had the left-rear of the manifold lifted up. My arm was between the engine and manifold. One hand was working with the banjo bolt while the other was flexing the PCV hoses to get things lined up. Once started I was able to sneak a socket in there to tighten up the connection. I could then rotate the manifold into place.
Throttle body
For me it was easier to remove this before removing the intake. Mine was due for a cleaning so this made the most sense. Strangely enough the back two bolts were easier than the front two. One of those front bolts was removed from under the car with multiple extensions. It looked like a cartoon but worked. As mentioned before, the idea of trying to replace 4 bolts upside down while holding a gasket in place seemed crazy so I replaced the throttle body before putting the intake back on.
The banjo bolt that attaches to the right side of the engine (#13 above)
Removal: There's a reason why it's #13...I don't remember reading anything about this and THIS was by far the hardest part for me. The PCV hose that goes from the thermostat to the turbo (#10 above) is something some people don't mess with and I know why. For me, with as many miles as I have, figured it was worth replacing. The tube attaches to the thermostat, intake manifold, flame trap; then wraps around to the back of the engine hooking onto the turbo and engine block. When I first looked at it I thought, "there's no way this is coming out". Rest assured it does, but it's not pretty. Removal is pretty easy, loosen the connections and pull.
Reassembly: First off, getting the hose back to the turbo is a pain. Ever hear the expression "pushing a rope"? Well this is like that. The real issue though is the banjo bolt. Because you need a washer on both sides of that connector (#12 above) expect to lose a few. In fact another DIYer suggested ordering extra and I know why. There's still one somewhere in the back of my engine...who knows. I have big hands and it was all I could do to shove my hand in there to turn the bolt and use my other fingertips to place the washer hoping not to drop it.
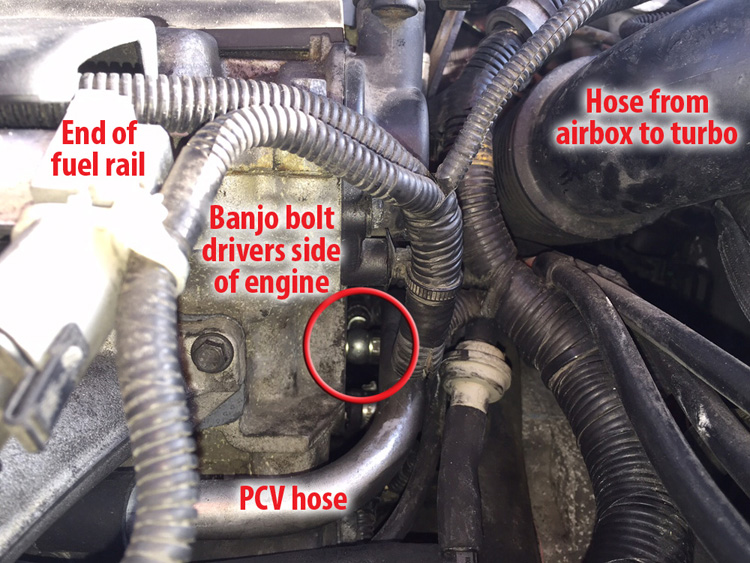
This one sucked. As you can see there's little to no clearance between the engine and vacuum hose/electrical rat's nest. Especially when you're trying to stick a washer on the end of the bolt before threading. Not fun.
Turbo connection
I found it easier to remove the cross brace that attaches at the strut towers. I also removed the cross brace bracket that attaches to the top of the engine. This opened up some space to get to the turbo and deal with the connections that needed to happen back there.
Flame trap bolts
NOTE: only one shown above but there are TWO
This was also not as bad as expected. The bolt on the right is no problem (#7 above). The bottom left bolt is slightly visible and I only had to use a long extension with a 1/4" ratchet to remove the bolt. Granted I had to reach way down to get that to work but it was pretty easy. I heard of others using flexible extensions and multiple u-joints but I didn't need any of this.
Thermostat - to remove or not remove
I didn't remove mine. Why there is a coolant hose mixed in with the PCV hose is beyond me (answered by ES6T below - thanks!). But when you remove it you're going to lose some antifreeze. I just let it drain and caught it the best I could. Eventually it stops after a few quarts lost. Just refill your expansion tank when done.
Odds and ends
This job is a pain in the butt, no doubt. It's not really hard, just tedious. There are a lot of hard to reach places and blind work you have to do. Take your time, double check your work and if you get frustrated, walk away, come back to it later. You only want to do this once, so you don't want to screw it up. The whole project took me 10+ hours over the course of a week. But that was a lot of scratching my head and trying to figure out where I put that tool I need (oh, there it is). I also wasted an hour+ looking for dropped tools and a really elusive manifold bolt.
Honestly...you might want to find out how much it would cost to have an indie shop do this. Having those 10 hours back would be nice and maybe worth the labor cost. Hope this helps. Good luck!
Diagram used throughout
Vehicle
2005 XC90
2.5T
FWD
253k miles
I have no idea if this service has EVER been done on this vehicle. However the hose that goes from the flame trap to the valve cover (#8 above) has been broken for some time which was getting oil pretty much everywhere. I finally decided to tackle this issue. I also have had the tell tale smoke coming from the dipstick ever since I bought the car.
Parts
I ordered the kit from IPD located here.
That lower left manifold bolt
Removal: This wasn't as big of an issue as I expected. I followed another DIYer's advice and cut down a 10mm socket only leaving enough of the socket to get over the head of the bolt. This gives you just enough room to get to this bolt. I used a 1/4" socket, 9" extension, u-joint, and shorty 10mm. I stuck these between the left edge of the intake manifold and smaller hose coming out of the thermostat.
Reassembly: Tightening the bolt was easier. I was able to use the 1/4" socket, 9" extension and the shorty 10mm below the manifold and power steering hose but above the alternator. No need to remove this bolt. For one, the thermostat housing is in the way. Two, the manifold just sits on the bolt so once you loosen it pulling the manifold off is easy. Your new gasket will need to be slit so you can fit the gasket onto the bolt.
This is the path used to loosen the bolt. It took a 1/4" ratchet, extension, U-joint, and shorty 10mm socket. I found a better way to tighten it (see next pic).
This path was better using a 1/4" ratchet, 9" extension and shorty 10mm socket.
Wrong size socket, but you get the idea
The banjo bolt that attaches to the bottom of the intake (#16 above)
Removal: This critter is a pain. You can see it, but getting to it is another thing. After removing the throttle body it was pretty easy. You just have to reach in under the right side of the manifold to remove it.
Reassembly: Replacing that banjo is tougher. The idea of installing the throttle body upside down didn't excite me much. I thought it was better to wrestle with one banjo bolt instead of four throttle body bolts. The way I did this was to get the manifold close to in place and then finagle it so I could start the banjo bolt. Essentially I had the left-rear of the manifold lifted up. My arm was between the engine and manifold. One hand was working with the banjo bolt while the other was flexing the PCV hoses to get things lined up. Once started I was able to sneak a socket in there to tighten up the connection. I could then rotate the manifold into place.
Throttle body
For me it was easier to remove this before removing the intake. Mine was due for a cleaning so this made the most sense. Strangely enough the back two bolts were easier than the front two. One of those front bolts was removed from under the car with multiple extensions. It looked like a cartoon but worked. As mentioned before, the idea of trying to replace 4 bolts upside down while holding a gasket in place seemed crazy so I replaced the throttle body before putting the intake back on.
The banjo bolt that attaches to the right side of the engine (#13 above)
Removal: There's a reason why it's #13...I don't remember reading anything about this and THIS was by far the hardest part for me. The PCV hose that goes from the thermostat to the turbo (#10 above) is something some people don't mess with and I know why. For me, with as many miles as I have, figured it was worth replacing. The tube attaches to the thermostat, intake manifold, flame trap; then wraps around to the back of the engine hooking onto the turbo and engine block. When I first looked at it I thought, "there's no way this is coming out". Rest assured it does, but it's not pretty. Removal is pretty easy, loosen the connections and pull.
Reassembly: First off, getting the hose back to the turbo is a pain. Ever hear the expression "pushing a rope"? Well this is like that. The real issue though is the banjo bolt. Because you need a washer on both sides of that connector (#12 above) expect to lose a few. In fact another DIYer suggested ordering extra and I know why. There's still one somewhere in the back of my engine...who knows. I have big hands and it was all I could do to shove my hand in there to turn the bolt and use my other fingertips to place the washer hoping not to drop it.
This one sucked. As you can see there's little to no clearance between the engine and vacuum hose/electrical rat's nest. Especially when you're trying to stick a washer on the end of the bolt before threading. Not fun.
Turbo connection
I found it easier to remove the cross brace that attaches at the strut towers. I also removed the cross brace bracket that attaches to the top of the engine. This opened up some space to get to the turbo and deal with the connections that needed to happen back there.
Flame trap bolts
NOTE: only one shown above but there are TWO
This was also not as bad as expected. The bolt on the right is no problem (#7 above). The bottom left bolt is slightly visible and I only had to use a long extension with a 1/4" ratchet to remove the bolt. Granted I had to reach way down to get that to work but it was pretty easy. I heard of others using flexible extensions and multiple u-joints but I didn't need any of this.
Thermostat - to remove or not remove
I didn't remove mine. Why there is a coolant hose mixed in with the PCV hose is beyond me (answered by ES6T below - thanks!). But when you remove it you're going to lose some antifreeze. I just let it drain and caught it the best I could. Eventually it stops after a few quarts lost. Just refill your expansion tank when done.
Odds and ends
This job is a pain in the butt, no doubt. It's not really hard, just tedious. There are a lot of hard to reach places and blind work you have to do. Take your time, double check your work and if you get frustrated, walk away, come back to it later. You only want to do this once, so you don't want to screw it up. The whole project took me 10+ hours over the course of a week. But that was a lot of scratching my head and trying to figure out where I put that tool I need (oh, there it is). I also wasted an hour+ looking for dropped tools and a really elusive manifold bolt.
Honestly...you might want to find out how much it would cost to have an indie shop do this. Having those 10 hours back would be nice and maybe worth the labor cost. Hope this helps. Good luck!
Last edited by ses_volvo; Oct 27, 2015 at 08:43 AM.

Super Moderator
Joined: Oct 2010
Posts: 5,517
Likes: 73
Good write up. The job isn't too bad once you've done a couple. Labor for the breather box is about 4 hours. A shop will probably charge a little more if replacing the hose assembly (#10) as well, but that is rarely needed. If the hard line going to the banjo bolt under the intake breaks, you can use a nipple from an XC90 T6 that comes with that hard line attached. The rest of that hose assembly doesn't usually go bad and it costs quite a bit.
As for the use of coolant, it is so that moisture that may be in the vapor at the banjo bolt doesn't freeze.
As for the use of coolant, it is so that moisture that may be in the vapor at the banjo bolt doesn't freeze.
Last edited by ES6T; Oct 26, 2015 at 07:52 PM.
Thread Starter
|
Senior Member
Joined: Dec 2012
Posts: 107
Likes: 2
From: Fenton, MI
Good write up. The job isn't too bad once you've done a couple. Labor for the breather box is about 4 hours. A shop will probably charge a little more if replacing the hose assembly (#10) as well, but that is rarely needed. If the hard line going to the banjo bolt under the intake breaks, you can use a nipple from an XC90 T6 that comes with that hard line attached. The rest of that hose assembly doesn't usually go bad and it costs quite a bit.
As for the use of coolant, it is so that moisture that may be in the vapor at the banjo bolt doesn't freeze.
As for the use of coolant, it is so that moisture that may be in the vapor at the banjo bolt doesn't freeze.
You're absolutely right. If not for replacing #10 I would've been done much sooner. Getting to the breather box wasn't bad at all. I figured with as many miles as I had, do it once and be done with it. I doubt I'll ever have the engine torn down to that level again any time soon. (fingers crossed, lol)
Like you said, #10 is the most expensive part of the kit. That hose alone runs $150-$200.
Regarding that intake banjo bolt the only way I was able to get it started the way I did was because the #10 hose was brand new and very pliable. I have a feeling an old hose wouldn't have taken that much bending. But it's good to know there's a work around if something does happen.
Thanks for the info about the coolant, that makes sense.

Senior Member
Joined: Jan 2010
Posts: 232
Likes: 0
I rebuild my hoses all the time: Auto Trans cooler hoses, Engine oil cooler hoses etc. using generic hose + Oetiker clamps.
Hose #10 can be rebuilt.
- Just keep the diagram of the setup
- Use angle grinder/dremel to remove the crimp (ferrule on the hydraulic hose).
- Once the ferrule is off, you will see the barb fittings, re-use those.
- Get new generic heater hose (Gates is the best), about $1/foot.
- Install new hose and Oetiker clamps (or you can use screw-type clamps too).
Generic heater hose is cheap. Oetiker clamps are on ebay for cheap.
You just saved $150-$200.
I took a generic photo and outline on YELLOW ink what can be replaced using generic hoses.
Last edited by cn90; Oct 27, 2015 at 06:16 PM.
Thread Starter
|
Senior Member
Joined: Dec 2012
Posts: 107
Likes: 2
From: Fenton, MI
I rebuild my hoses all the time: Auto Trans cooler hoses, Engine oil cooler hoses etc. using generic hose + Oetiker clamps.
Hose #10 can be rebuilt.
- Just keep the diagram of the setup
- Use angle grinder/dremel to remove the crimp (ferrule on the hydraulic hose).
- Once the ferrule is off, you will see the barb fittings, re-use those.
- Get new generic heater hose (Gates is the best), about $1/foot.
- Install new hose and Oetiker clamps (or you can use screw-type clamps too).
Generic heater hose is cheap. Oetiker clamps are on ebay for cheap.
You just saved $150-$200.
I took a generic photo and outline on YELLOW ink what can be replaced using generic hoses.

Junior Member
Joined: Jul 2021
Posts: 3
Likes: 0
Hey guys,
new here. I was searching everywhere on the net to find info on a coolant leak I have under the intake and found your diagram on google images.
I have repaired the leak on the coolant line under the intake (which all happens to be part of the PVC system - so strange), but it�s leaking again.
i want to run a bypass and skip the intake.
any hints as to where the other end of that coolant line goes at the back of the engine?
i know this is not PVC related, but it�s directly related to the parts in question in this thread and I haven�t found a damned thing on the internet except this thread and I�ve searched for days.
sorry for resurrecting an old thread
Thread Starter
|
Senior Member
Joined: Dec 2012
Posts: 107
Likes: 2
From: Fenton, MI
Hey guys,
new here. I was searching everywhere on the net to find info on a coolant leak I have under the intake and found your diagram on google images.
I have repaired the leak on the coolant line under the intake (which all happens to be part of the PVC system - so strange), but it�s leaking again.
i want to run a bypass and skip the intake.
any hints as to where the other end of that coolant line goes at the back of the engine?
i know this is not PVC related, but it�s directly related to the parts in question in this thread and I haven�t found a damned thing on the internet except this thread and I�ve searched for days.
sorry for resurrecting an old thread
new here. I was searching everywhere on the net to find info on a coolant leak I have under the intake and found your diagram on google images.
I have repaired the leak on the coolant line under the intake (which all happens to be part of the PVC system - so strange), but it�s leaking again.
i want to run a bypass and skip the intake.
any hints as to where the other end of that coolant line goes at the back of the engine?
i know this is not PVC related, but it�s directly related to the parts in question in this thread and I haven�t found a damned thing on the internet except this thread and I�ve searched for days.
sorry for resurrecting an old thread
Junior Member
Joined: Jul 2021
Posts: 3
Likes: 0
mines got 330k now and has been needing lots of love with the kms.
hopefully someone can chime in with some guidance.

Thread
Thread Starter
Forum
Replies
Last Post
Lifesgoodhere
General Volvo Chat
0
May 7, 2012 07:04 PM