
XC90 strut removal - wish I would've known...


Thread Starter
|
Senior Member
Joined: Dec 2012
Posts: 107
Likes: 2
From: Fenton, MI
I've been getting a horrific racket from my passenger side front. I thought initially it was my passenger motor mount going bad again. However after a quick search I realized it was likely my upper spring seat. To check I grabbed the top of my strut under the hood and was able to move it by hand...well that's not good.
It was time for brakes all around so the timing was good. The actual project was frustrating. However follow my advice and you'll save some of the headache.
Vehicle:
2005 XC90
FWD
2.5T
a gazillion miles (253K)
Diagram:
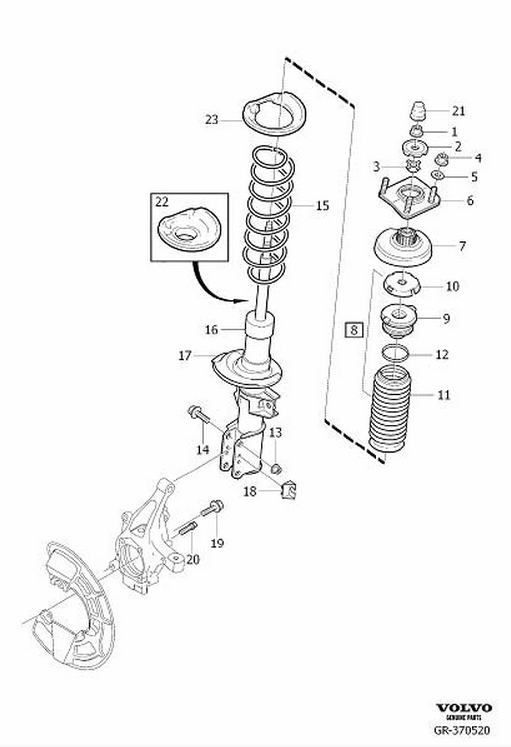
My struts were aftermarket replacements by the previous owner of my XC90. They were much simpler than the above diagram. In fact my struts were just the shock, spring, and numbers 1-7. All of number 8, 22, 23 were gone.
Removal:
This is pretty self explanatory. Remove the two bolts that hold the strut to the knuckle. The bolt is 18mm and the nut is 21mm (#13, 14 above). These suckers were nicely rusted on my XC90. Lots of penetrating oil, wire brushing, tapping, and eventually a 3 foot breaker bar got them to move. I removed my brake caliper and caliper mount to make it easier to reach the bottom bolt.
You also need to remove the sway bar link. This is also an 18mm (not shown above). Mine was, again, rusted on. Same process as above but instead of a breaker bar my impact wrench eventually got the nut off. The issue was the threaded end of the sway bar link was spinning. I tried to hold it without marring up the threads which eventually worked.
Then remove the 3-13mm bolts under the hood (#4 above) threaded onto the support plate (#6 above).
After that the strut should come out easily. For me this took way longer than I thought it should. Stubborn bolts suck, patience will be needed here.
Disassembly:
As I mentioned, my aftermarket struts were missing some of the parts that OEM ones have, so you may have more steps than I did.
You'll need some spring compressors. I love working with these. I feel like I'm working with a bomb because I'm sure they're going to let loose sending a spring through my garage door. Anywho...put these on the spring and compress is slightly. I have these ones, but any will do.
NOTE: IF YOU WANT LESS HEADACHE, NOW IS THE TIME TO PAY ATTENTION
The issue I had is once I removed the fitting (#3 above) the shock retracted. So the spring had the shock stretched out and after the tension was released it got shorter (think of George Costanza in the pool...shrinkage). Then I couldn't compress the spring enough to get everything back together.
The solution I came up with was to stretch the shock back out and then hold it there with some vice grips. I made sure to wrap the jaws in electrical tape so they didn't destroy the shock shaft. So BEFORE you take the fitting off (#3 above) get some vice grips on the shock shaft. You'll have to finagle them through the spring but that's fine, you don't need to take the spring off the shock.
If, for some reason you end up taking things apart and the shock does retract, not to worry. You can pull to extend the shock and get the vice grips on the shaft. It's just harder than doing it in the first place.

Vice grips here to avoid shrinking shock syndrome.
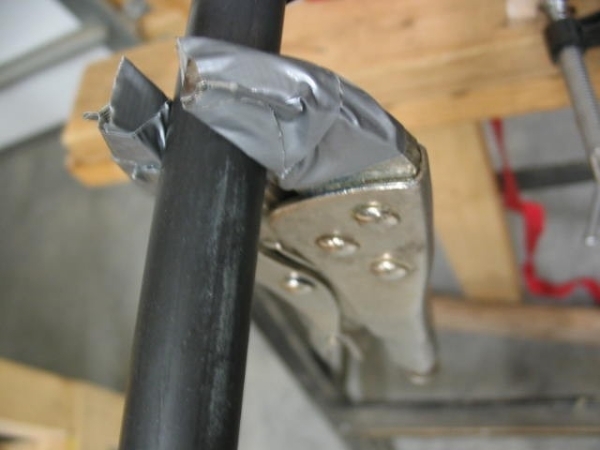
Not my pic, but you get the idea.
Now, back to disassembly...
Remove the 21mm nut at the top of the strut (#1 above). This is actually where I came up with the tape covered vice grips idea. The nut was rusted so they helped to hold the shaft while I removed the nut. It wasn't until later that it hit me to use them to hold the shock extended.
Next the washer (#2 above) and support plate (#6 above) will come off revealing the fitting (#3 above). Don't forget to hold the shock shaft with vice grips as mentioned above.
I removed the fitting (#3 above) first with a screwdriver and rubber mallet. Smack, reset, smack, reset, etc. What works better are some needle nose pliers used like a mini spanner wrench.
After that the spring seat (#7 above) will come off. Mine was destroyed as expected. If you have OEM struts you'll have to remove #8 above.

This is what I had to replace. Mine looked like someone punched a hole thru the center of it.
Reassembly:
No need to get fancy here, just reverse every thing you did.
Installation:
Just wrestle that sucker back into place. One thing I had to do was pry the sway bar down to get the sway bar link back onto the strut.
Odds and ends:
If not for the stubborn bolts and shock shrinkage this would've been easy. Those two issues were a bit maddening but the job is done. Hopefully you pick up a useful tidbit or two here. Good luck!
It was time for brakes all around so the timing was good. The actual project was frustrating. However follow my advice and you'll save some of the headache.
Vehicle:
2005 XC90
FWD
2.5T
a gazillion miles (253K)
Diagram:
My struts were aftermarket replacements by the previous owner of my XC90. They were much simpler than the above diagram. In fact my struts were just the shock, spring, and numbers 1-7. All of number 8, 22, 23 were gone.
Removal:
This is pretty self explanatory. Remove the two bolts that hold the strut to the knuckle. The bolt is 18mm and the nut is 21mm (#13, 14 above). These suckers were nicely rusted on my XC90. Lots of penetrating oil, wire brushing, tapping, and eventually a 3 foot breaker bar got them to move. I removed my brake caliper and caliper mount to make it easier to reach the bottom bolt.
You also need to remove the sway bar link. This is also an 18mm (not shown above). Mine was, again, rusted on. Same process as above but instead of a breaker bar my impact wrench eventually got the nut off. The issue was the threaded end of the sway bar link was spinning. I tried to hold it without marring up the threads which eventually worked.
Then remove the 3-13mm bolts under the hood (#4 above) threaded onto the support plate (#6 above).
After that the strut should come out easily. For me this took way longer than I thought it should. Stubborn bolts suck, patience will be needed here.
Disassembly:
As I mentioned, my aftermarket struts were missing some of the parts that OEM ones have, so you may have more steps than I did.
You'll need some spring compressors. I love working with these. I feel like I'm working with a bomb because I'm sure they're going to let loose sending a spring through my garage door. Anywho...put these on the spring and compress is slightly. I have these ones, but any will do.
NOTE: IF YOU WANT LESS HEADACHE, NOW IS THE TIME TO PAY ATTENTION
The issue I had is once I removed the fitting (#3 above) the shock retracted. So the spring had the shock stretched out and after the tension was released it got shorter (think of George Costanza in the pool...shrinkage). Then I couldn't compress the spring enough to get everything back together.
The solution I came up with was to stretch the shock back out and then hold it there with some vice grips. I made sure to wrap the jaws in electrical tape so they didn't destroy the shock shaft. So BEFORE you take the fitting off (#3 above) get some vice grips on the shock shaft. You'll have to finagle them through the spring but that's fine, you don't need to take the spring off the shock.
If, for some reason you end up taking things apart and the shock does retract, not to worry. You can pull to extend the shock and get the vice grips on the shaft. It's just harder than doing it in the first place.
Vice grips here to avoid shrinking shock syndrome.
Not my pic, but you get the idea.
Now, back to disassembly...
Remove the 21mm nut at the top of the strut (#1 above). This is actually where I came up with the tape covered vice grips idea. The nut was rusted so they helped to hold the shaft while I removed the nut. It wasn't until later that it hit me to use them to hold the shock extended.
Next the washer (#2 above) and support plate (#6 above) will come off revealing the fitting (#3 above). Don't forget to hold the shock shaft with vice grips as mentioned above.
I removed the fitting (#3 above) first with a screwdriver and rubber mallet. Smack, reset, smack, reset, etc. What works better are some needle nose pliers used like a mini spanner wrench.
After that the spring seat (#7 above) will come off. Mine was destroyed as expected. If you have OEM struts you'll have to remove #8 above.
This is what I had to replace. Mine looked like someone punched a hole thru the center of it.
Reassembly:
No need to get fancy here, just reverse every thing you did.
Installation:
Just wrestle that sucker back into place. One thing I had to do was pry the sway bar down to get the sway bar link back onto the strut.
Odds and ends:
If not for the stubborn bolts and shock shrinkage this would've been easy. Those two issues were a bit maddening but the job is done. Hopefully you pick up a useful tidbit or two here. Good luck!


Senior Member
Joined: Jul 2020
Posts: 5,113
Likes: 677
From: GA
If you replaced that part, what I call the strut cushion or spring seat in the past - perhaps you used the early version, that sold for much less than the later improved version that was used in the XC90's . The early 850 part number will fit - but is not as strong. The difference is there is more/thicker rubber on the underside of the cushion.

Junior Member
Joined: Jun 2023
Posts: 2
Likes: 1
You are probably missing the bump stop & stop washer. Stop washer spreads the force from the shock out further.

Super Moderator
Joined: Mar 2012
Posts: 9,608
Likes: 540
From: Burlington, VT
IPD sells a HD spring seat that is way beefier than OEM. as to the Volvo exclusive cross wing nut, I made my own tool out of a short length of iron pipe by cutting some slots then used a big vise grip. I should sell that design... LOL
Junior Member
Joined: Jun 2023
Posts: 2
Likes: 1
Yea, but even if you get the HD spring seat, it will fail eventually if you don't have the bump stop and stop washer installed, and is impossible to do so if you have them installed. (Parts #9 & 10 in the diagram posted above)

Thread
Thread Starter
Forum
Replies
Last Post