740 engine acting up. Warm start and idle problems.
#1
 11-22-2010, 07:58 AM


Join Date: Nov 2010
Posts: 14
Likes: 0
Received 0 Likes
on
0 Posts
I've got an '88 Volvo 740 Turbo Wagon: 5-speed, 225K miles, that's been acting up over the last year. She doesn't burn oil (qt in 1500 typical) and appears to still be tight. The Turbo works and bearings make no noise. The engine service light does NOT glow (but I admit I haven't checked the bulb). I do have a Haynes manual and have been using it to assist with some results (see replaced items), but I'm not trained on this car and this manual is woefully lacking in good diags for some obvious things.
Symptoms: She cold starts OK, but try to restart warmed at all and she usually has to sit at least an hour or no go. Outside temp seems to make little difference. There's a gassy smell while cranking warm and it's very much like a flooded carburetor engine. Often, the engine will finally catch with the pedal floored after a long crank. Also, after warming and driving a few minutes, the idle erratically will not return to normal, sitting up at 1800-2700 RPM for a bit before finally calming down. It was also running a little rough. There's a fair amount of carbon at the exhaust pipe and MPG is only ~20 and I'm a light foot. The idle RPM varies a bit much moving around between 600-1100 RPM warm.
What I've done this year: It had a broken thermostat (replaced), failing alternator (replaced), failed starter (replaced), recent oil change (has turned black after 800 miles). The bat cables were cleaned and terminals coated. Ohm tested the injectors OK (all exactly the same, on spec) and they all "click" in operation. I replaced a bad coil (low ohms by 20% for both primary and 2nd) and changed the carbon fouled plugs (which were also ill-gapped by some hamhand), both of which helped the roughness considerably. The plug wires all came up roses well under 10k ohms. The battery was a suspect for testing low so much when resting, but the alternator seems to have slowly fixed that (and problems come when system is charging OK). However, the main warm start and idle problem persists. :/
My next good guess: An obvious rich condition exists and, having eliminated quite a few other things, a sticking "Air Control Valve" seems the likely suspect. My specific observations of this device: after a warm no start, I pulled the ACV electrical lead and she fired right up and idled well at 16-1800 RPM. I plugged it back in and she chugged and nearly died before idling ~800 RPM. As it idled normally, I pulled the rubber hose from the upstream air connection to the ACV and she chugged and died within 5 seconds. I noted the vacuum was very strong. Putting the hose on, it wouldn't restart till I removed the electrical lead again. The ACV circuit has continuity at the device but I haven't ohm tested it yet. My best diag is the mechanical part of the ACV is gummed up or worn out. The Haynes manual was almost no help in arriving at this conclusion.
The best price I've seen for a replacement is $95 (most are $150 or up), 1 yr war. I'm on a very limited budget and the previous repairs have meant this fix may be the last I can deal with. Have I finally got it?
#2
11-22-2010, 07:01 PM


I would pull the idle air control valve and clean it thoroughly with carb cleaner. The Haynes manual does have some simple go/no go type of tests. I think you just apply voltage to a lead to see if it opens/closed. I would run these tests.
If you need a cheap replacement, try the junkyard. I believe the same valve was used for several years on 240s as well as 740s. I haven't had one fail on me yet and my cars all have around 200k miles.
If you need a cheap replacement, try the junkyard. I believe the same valve was used for several years on 240s as well as 740s. I haven't had one fail on me yet and my cars all have around 200k miles.

#4
11-25-2010, 05:12 PM
Join Date: Nov 2010
Posts: 14
Likes: 0
Received 0 Likes
on
0 Posts
Unfortunately, the local parts Volvos are well picked over. I did check 3 parts stores and the Air Control Valve of the 740 Turbo is not the same part number as the valve of the 240's (and it's $300 more! Yikes!!!). I'll see if the carb cleaner will clear it. Fuel pressure regulator check next. Note, this engine does not appear to have a cold start injector. It's not on diagrams and I've traced the fuel lines with no result.
I made a ref error: just discovered I have a CHILTON manual, not Haynes, though maybe I should.... (I have a Haynes for my Ford.) It's the 1970-89 Volvo (all models) #72300 printed in 1996. The Fuel System section doesn't describe the ACV in the L-Jetronic section. The B230F engine fuel components diagram does show the device in the correct spot on the engine. In CIS (Constant Idle Speed system here is not to be confused with Continuous Injection System), the valve, an idle air bypass valve, is still an ACV, but this book states CIS is used on B21, B23, B28 and B21 Turbo engines, no B230F is listed (must be an error). A diag for it is found in the CIS fuel system section. That paragraph states in full:
"Connect a jumper wire across terminals 1 and 4 [at computer], and another jumper across terminals 5 and 2 [ditto]. Start engine. A high idle speed of 1600-2400 rpm should be obtained - this indicates that the valve is working properly. If the engine does not develop that high idle speed, the (ACV) may be defective. If no fault is found with the (ACV), try a new ECU. Reconnect all connectors and check the overall operations of the CIS system."
So: Does everyone think this diag applies to the B230F engine ACV? Does unplugging the ACV, as I did, duplicate the effect of jumpers? These are things that someone should've questioned by now! Also, it appears the ECU needs to be added to the check list.
Last edited by jopower; 11-26-2010 at 03:14 AM.
#5
01-25-2013, 10:25 PM
Join Date: Nov 2010
Posts: 14
Likes: 0
Received 0 Likes
on
0 Posts
OK, I waited til the engine began acting funky and hit the CIS valve with a screwdriver handle. Instant return to proper idle! So it may be sticking.
Now have pulled and cleaned CIS valve with PB Blaster 3 times (with two 10 minute waits between soakings for it to work) but still intermittent function. I note the device can be partially disassembled by bending up the retainer tangs around the air valve end. I have ability to do this. Can I lube it if I get it apart? Any one done this?
There's also the possibility of bad wiring, so will get out my analog meter. I also note a mention that the CIS valve is NOT a 12 volt device. Maybe 3 volts, so will have to make a little battery pack to make it actuate safely.
As to the fuel injectors and regulator... would seem I need to get a "T" on the fuel rail fittings for a pressure meter to see what's going on. I think I can cobble a tester up. What's the fuel pressure spec I should see? Should this reading be held for some time after shut down?
Lastly, the older mech injection diag called for pulling the injectors out to see if they leak at rest. The Chilton rag doesn't say if this is the same for LJetronics. Please advise proper proceedure! Thanks to all.
Last edited by jopower; 01-25-2013 at 10:29 PM.
#6
01-26-2013, 04:38 AM

CIS valve? CIS is another name for the K-Jetronics injection used on late 70s, early early 80s volvos. your 1988 should be LH 2.2 which is an EIS system.
do you mean the cold start injector? or the idle air controller?
LH injection has a fuel rail pressure of 42-46 PSI above manifold vacuum. so if the manifold is -8 at idle, then it would be around 44-8 = 36 PSI
you can't really pull LH injectors out as the fuel rail is a hard pipe
do you mean the cold start injector? or the idle air controller?
LH injection has a fuel rail pressure of 42-46 PSI above manifold vacuum. so if the manifold is -8 at idle, then it would be around 44-8 = 36 PSI
you can't really pull LH injectors out as the fuel rail is a hard pipe
Last edited by pierce; 01-26-2013 at 04:41 AM.
#7
02-05-2013, 08:36 AM
Join Date: Nov 2010
Posts: 14
Likes: 0
Received 0 Likes
on
0 Posts
Have found that the 88 740 turbo has no cold start injector.
CIS in the Chilton Manual (and an official Volvo Service Manual found online) means 2 things: "Constant Idle Speed" (system) and "Constant Injection System". I did notice the differences in the devices and was a little confused by the seeming duplication. Idle Air Control valve is the common US desigation for the part I'm having trouble with.
CIS system (constant idle speed):
There are 4 components; 1) control box (ECU), 2) air valve, 3) throttle switch and 4) a signal from the coolant sensor.
Temporary fix: I have found that a small wad of clean rag in the intake side of the valve partly obstructs it at nearly the RPM range I want... no 2500 RPM zooms possible. The rag can't be sucked through due to valve parts in air stream.
But I do want to find a better fix. Found this valve cleaning and dis-assembly info (and much more) at: Engine Tune and Performance
Cold Start, Dies; Dirty or Faulty IAC. [Symptoms:] Cold Start: Car starts immediately with no throttle application, idles smoothly for about one second, then hesitates and dies.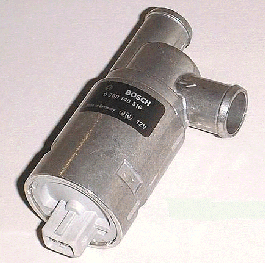 Ditto for my 1990 245DL. Starts up cold for one second, then dies. Sometimes, all cranking I wish to do will not restart it. If I sit and wait about 5 minutes, it will start and run l [Suggestions:] Check the IAC (idle air control- This provides for more air, or faster idle on start up. The fact that it starts readily when cold indicates the cold start injector is working properly. See hints below.
[Symptom:] Poor idle. [Diagnosis:] Clean the dirty Idle Air Control Valve (IAC). I should have remembered. The car did not start at ALL. So, I took out, removed the two hoses and cleaned it by spraying it with engine grease remover. It had a lot of dirt in it. The Idle Air Control Valve is located under the intake manifold; below the second cylinder. It is about 3 inches long and about 1.5 inches in diameter (I do not have one next to me so these dimensions are from my memory.) It has two rubber hoses connected to it through a T connection. It also has a snap-on electrical plug. This is most likely your problem. Here is how I clean it:
Fix 2: Rebuild Idle Air Control Valve: Save $150 by fixing IAC instead of replacing it.(Note: the IAC on newer LH 2.4 cannot be dissassembled but it can be cleaned Also note that Regina and Bosch IACs are NOT interchangeable if you are considering a replacement.
Solution: clean the slip ring inside the IAC The IAC is a metal can beneath the intake manifold, with two 1" hoses that feed extra intake air around the throttle body to control idle RPM, and reacts to loads like A/C or heavy electrical (alternator) loads. The valve has three pins, the center is a constant 12V supply, and the outside pins are pulsed by the ECM to ground, to either open or close a circular shutter -- looks something like a revolving door. (Except mind would only open, and close halfway.)
The first time I started the car after installing the cleaned IAC, the idle was still high. However, I removed the IAC again, wiggled the valve back and forth a few times, and reinstalled the IAC. I checked the resistances at the electrical connection pins and this checked out. Maybe the contact brushes hadn't quite seated themselves yet. The second start resulted in a nice idle control. In PARK, the car idled 600-700 RPM when warm as opposed to about 1600 RPM when the IAC didn't work. I've been driving with this cleaned IAC for several days now. The idle system is working fine. And I hope it stays that way! Was all this trouble worth it? Well for a tightwad, I'd have to say yes (since the IAC was successfully repaired).
CIS in the Chilton Manual (and an official Volvo Service Manual found online) means 2 things: "Constant Idle Speed" (system) and "Constant Injection System". I did notice the differences in the devices and was a little confused by the seeming duplication. Idle Air Control valve is the common US desigation for the part I'm having trouble with.
CIS system (constant idle speed):
There are 4 components; 1) control box (ECU), 2) air valve, 3) throttle switch and 4) a signal from the coolant sensor.
Temporary fix: I have found that a small wad of clean rag in the intake side of the valve partly obstructs it at nearly the RPM range I want... no 2500 RPM zooms possible. The rag can't be sucked through due to valve parts in air stream.
But I do want to find a better fix. Found this valve cleaning and dis-assembly info (and much more) at: Engine Tune and Performance
Cold Start, Dies; Dirty or Faulty IAC. [Symptoms:] Cold Start: Car starts immediately with no throttle application, idles smoothly for about one second, then hesitates and dies.
Ditto for my 1990 245DL. Starts up cold for one second, then dies. Sometimes, all cranking I wish to do will not restart it. If I sit and wait about 5 minutes, it will start and run l [Suggestions:] Check the IAC (idle air control- This provides for more air, or faster idle on start up. The fact that it starts readily when cold indicates the cold start injector is working properly. See hints below. [Symptom:] Poor idle. [Diagnosis:] Clean the dirty Idle Air Control Valve (IAC). I should have remembered. The car did not start at ALL. So, I took out, removed the two hoses and cleaned it by spraying it with engine grease remover. It had a lot of dirt in it. The Idle Air Control Valve is located under the intake manifold; below the second cylinder. It is about 3 inches long and about 1.5 inches in diameter (I do not have one next to me so these dimensions are from my memory.) It has two rubber hoses connected to it through a T connection. It also has a snap-on electrical plug. This is most likely your problem. Here is how I clean it:
- Remove all hoses and electrical connector, then remove the IAC
- Open the rotating valve to expose the innards. Spray some carburettor or fuel injector cleaner into the opening and shake it around. Make sure you plug the other end with your palm to trap the liquid inside the IAC.
- Open and close the flapper valve with a small screw driver to loosen any dirt, etc. contained inside. Don't scratch the valve
- Turn the IAC upside down to empty out the dirt and fluid.
- Repeat step 3 through 5 about 8 times.
- Test the IAC on the car without permanently installing it. You might have to repositioned some hosing to accomplish this task.
Fix 2: Rebuild Idle Air Control Valve: Save $150 by fixing IAC instead of replacing it.(Note: the IAC on newer LH 2.4 cannot be dissassembled but it can be cleaned Also note that Regina and Bosch IACs are NOT interchangeable if you are considering a replacement.
- No fast idle at start up.
- Grounding CIS (test point) does not have any effect on idle. (grounding the test point should disable air control valve (IAC)
- OR: The idle ('87 745ti) shoots up to about 2500 RPM. No amount of cooling off, throttle blipping, or general search for vacuum leaks would bring it down. I checked all the hoses, fuel pressure, mass air sensor, and coolant temp sensor. Everything was fine. And the car ran fine too, just a high idle.
Solution: clean the slip ring inside the IAC The IAC is a metal can beneath the intake manifold, with two 1" hoses that feed extra intake air around the throttle body to control idle RPM, and reacts to loads like A/C or heavy electrical (alternator) loads. The valve has three pins, the center is a constant 12V supply, and the outside pins are pulsed by the ECM to ground, to either open or close a circular shutter -- looks something like a revolving door. (Except mind would only open, and close halfway.)
- Electrical Diagnostics:
- Start the engine.
- Disconnect quick connector at air control valve.
- Test for battery voltage on the middle pin (it is pin number 2 GREEN wire if you slide the rubber off), you should detect 12V or so (with engine running).
- Turn off the engine.
- Test for ohms on IAC between middle pin and any side ones, you should have between 6 and 20 ohms in each case depending on the model. If you do have this resistance, then it means that the motor of the IAC is good. If not, don't give up yet.
- Disconnect the hoses from the manifold and the intake hose, disconnect the 3-pin electrical connector, loosen the top nut on the band clamp around the valve body, then remove the valve. Off the car, look down the bore of the valve, and then by supplying the center pin with 12V and shorting either of the outside pins to ground, the door should fully open or fully close.
- Disassembling and Cleaning the Valve
- Clean the slip ring (the one wherein the brushes are touching) inside the IAC by taking the IAC apart. [Editor's note: this is not possible on newer IACs with no housing clips.)
- Before you take it apart, mark the housing (a pen mark or screwdriver will do) so you can assemble it in the same position. IT IS IMPORTANT!
- With a small screwdriver pry up the clips or crimps which are holding the housing (there are four of them). Once they are up, pry on the housing a bit and the whole thing should come out. At this point, you will encounter a bit of resistance because of the strong magnet inside, but there is nothing to worry about, just keep going until everything comes out. Be careful not to lose the o-ring or the small cone piece -- which will probably fall off the armature shaft and be laying at the bottom of the barrel with the permanent magnets and the wiper contacts. You MUST NOT try to push it in once you started separating the housing (or you will destroy the brushes inside the valve). Once you open it, you will understand why.
- You will then see oil and crud all over the armature and the commutator. Clean it up with brake cleaner and carefully flush away all crud especially from gaps in commutator.
- Clean the contact points with very fine emery cloth or a Scotchbrite pad and polish them. Be careful; don't bend anything. Again, make sure you don't lose the little cone piece. You'll need to get it out of the barrel for re-assembly - it will come out easily but you have to use something non-metallic because of the strong magnets around the housing.
- When everything is spotless and oil free, put the cone on the end of the armature shaft, so that it tapers away from the armature. The cone is important, because it acts as a ramp when you replace the armature, gradually spreading the wipers so they land on the commutator without bending them out of contact. Also, a little silicone grease on the o-ring seal can't hurt. Once you take it out, slide it over the shaft and keep it in the upward position (so it won't fall off) while assembling it.
- To re-assemble, put the tee upside-down on the workbench, with the cone in place, and gradually feed the barrel down. It's a bit of a trick to keep it straight, because the permanent magnets have a habit of sucking the armature from side-to-side. It doesn't take much force. Once the armature is seated properly, re-align the marks on the barrel and tee by simply twisting the tee relative to the barrel. If you forget this step, the valve may likely not open or close fully. After doing so, then you are done. Push back the clips (if you have clips, and don't use a hammer
- Re-test the valve as above with test leads before the final crimping. Mine worked fine now, fully open, fully closed. I then squeezed the crimp tabs back into place with large channelock-type pliers, and double-checked the alignment marks. Replace the valve, making sure the flow arrow on the tee points in the proper direction. The arrow should point TO the intake, FROM the main throttle inlet hose. Tighten the hose clamps, and viola! New IAC valve. The entire procedure, including the pulling of the valve out and installing it back takes about 30--45 minutes. Test the side pins for ohms and re-install the IAC. You should now have a fast idle. Oh, make sure your PRM at idle is about 800 rpm. PS: I drilled and put in a small screw to prevent housing from rotating.
The first time I started the car after installing the cleaned IAC, the idle was still high. However, I removed the IAC again, wiggled the valve back and forth a few times, and reinstalled the IAC. I checked the resistances at the electrical connection pins and this checked out. Maybe the contact brushes hadn't quite seated themselves yet. The second start resulted in a nice idle control. In PARK, the car idled 600-700 RPM when warm as opposed to about 1600 RPM when the IAC didn't work. I've been driving with this cleaned IAC for several days now. The idle system is working fine. And I hope it stays that way! Was all this trouble worth it? Well for a tightwad, I'd have to say yes (since the IAC was successfully repaired).
#8
02-20-2013, 05:56 AM
Join Date: Nov 2010
Posts: 14
Likes: 0
Received 0 Likes
on
0 Posts
Since last post:
-New injectors (old were original)
-New fuel pressure regulator ('' ")
The engine still floods in some cases on a warm start. The spark plugs are all burning cleaner tips and mileage improved. Car still misses at sub 2500 RPM, though less than before. Records show the coil, wires, cap and rotor are all less than 10k miles old (though one of them may still be faulty). No obvious vacuum leak exists but I will try to trace one down.
Assuming good wires, this leaves the water temp, throttle position and O2 sensors and the ECU to test or replace (all are original items). The water temp signal controls the ECU cold start enrichment cycle and is the cheapest at $22, so it's first to go. I'll be back.
#9
02-20-2013, 01:17 PM
the water temp is also the easiest to test, just use an ohm meter. when cold, its relatively high resistance, and it drops to a few 100 ohms when very hot.
I much prefer to actually test stuff and determine whats wrong rather than keep throwing parts at a problem.
you might be suffering from wiring harness rot, which makes for some really frustrating trouble shooting. you go in there, stir stuff up while swapping various parts, and it seems like its fixed then it starts misbehaving again.
the idle system ONLY affects engine operation when the throttle is completely off at idle, its disabled the second you give it even a hair of gas pedal.
the 'engine service' light is just a mileage timer since the last time it was reset, I think it comes on in 5000 miles, and its a reminder its time for an oil change. the 'maintenance required' light, OTOH, indicates there is a fault in the system. ALL lights should come on when you turn the key to position II, then go out when the car is started.
#10
02-23-2013, 01:59 AM
Join Date: Nov 2010
Posts: 14
Likes: 0
Received 0 Likes
on
0 Posts
Somethings I don't have tools to test properly at hand, so have to use best options.
Engine service light isn't on.
I understand wire rot, but finding it is another story read best in warm weather or warm garage. I have neither available.
I'm pretty certain there are 2 problems. One is the erratic idle speeds most likely due to CIS system fault(s). The other concerns engine missing erratically below 2000 RPM, worse at idle (though it's much better than when I began... so something's going right). I've got an inline spark tester in my motor cycle tools somewhere and will apply it as soon as it reappears. Have tried a spare spark plug grounded on the valve cover but I'm alone and can't get there quickly enough to see it when she's running on 3 cyls. When I let off the gas it dies fast. Had the wires and cap-rotor not been changed so recently, would've done them 1st.
The new water temp sensor improved things a little, but wasn't the cure. Still, with 226k miles on it, I happy to see it in the spares box. There was a coolant seep sign there anyways.
I had used PB Blaster on the Air Control Valve earlier with only minor improvement. This time I pulled it and disassembled using info I found above. This went easily enough but it wasn't greatly dirty. Used electronics cleaner, a long dry time, then graphite in the bearings. See my attached photo. The long screwdriver was all that was needed for disassembly but a little careful hammer and chisel work was necessary for reassembly. Valve rotates easily by hand but results await a cold start to confirm success. It has continuity between all 3 terminals but not to case, so that's a good start.
Last edited by jopower; 02-23-2013 at 02:13 AM.
#11
02-23-2013, 02:11 AM

Thread
Thread Starter
Forum
Replies
Last Post
Squirt
General Volvo Chat
5
12-29-2020 02:53 PM
EricTheBlue87
Volvo S70
2
07-05-2011 05:39 PM