
Checking torque to yield head bolt tightness


Thread Starter
|
Member
Joined: Sep 2013
Posts: 62
Likes: 0
From: Glendale, WI
Wanted to get everyone's opinion on this:
As some may know, I've been doing a headgasket on my 850 bit by bit over the last few weeks. Today I got a few hours and, having cleaned the dickens out of everything previously, I put the head on. During the 130 degree tightening stage, I was having a friend help me by making sure the torque angle gauge retained its index properly and by calling out the degree values to me while I cranked on the breaker bar. On the #5 bolt, I glanced at the gauge and noticed that he had called out 130 but it was actually at 140. Uh oh. While 10 degrees over doesn't seem like an extreme problem, I'm a little worried that it might have happened without his noticing on some of the others.
So, would it be valid to take a torque wrench (beam style seems like it would be better than a clicker) and check a known good bolt, then see if any of the others don't match? I understand the nature of torque to yield bolts and that once plastic deformation occurs, the bolt won't return to its original length. However, I feel that they don't deform to the point of necking over the 130 degrees, and may have a little room for checking/adjustment to ensure the loading is even on the cylinder head. Any input would be appreciated, as this is all theory in my head based on courses I took a long time ago.
Thank you for your input!
As a corollary, if it turns out that I'm way off base and have to get new head bolts, am I correct in assuming that the headgasket would need to be replaced even if the head was never removed from on top of it?
Last edited by awfulwaffle; Nov 3, 2013 at 01:00 AM.

Super Moderator
Joined: Jan 2006
Posts: 2,564
Likes: 35
From: SW, WA
10 degrees will not make a noticeable difference. I just did my headgasket (twice, long story but look for the thread "850 down" if you are interested). Most of my head bolts were ate 130 degrees, but I'm pretty sure at least two are off by a few degrees. Car runs fine. The big thing to me is that they are torqued to at least 130 degrees and in the proper sequence.
Thread Starter
|
Member
Joined: Sep 2013
Posts: 62
Likes: 0
From: Glendale, WI
Thanks for the reply, psaboic. It's good to hear that 10 off isn't a huge difference. I'm still a bit worried that some of the other bolts may be off, and especially that some may be undet 130 by some unknown amount. Wondering if I should go and check em for tightness with a torque wrench and torque down any that may be under what the #1 bolt is (since I'm 100% sure that one was done correctly)...

Administrator
Joined: Mar 2009
Posts: 15,736
Likes: 36
From: Albuquerque, NM
If you are that worried about it, take them all loose in the proper sequence and re-torque them. If it were me, I would NOT worry about it.
I have been told by some mechanics that they should be torqued 15/45/180 degrees, Yikes! Other people 15/45/80 ft lbs. Yikes Yikes! All kinds of stuff go on.
I have also read where someone uses the OEM bolts twice. So, I would think that you could back them off and reuse the current new bolts seeing that they have not been in the head for a few days.
I don't think I would pull them for 10 degrees but I'm not the one that will have to sweat it out for the next 2 years. I'm not sure what when wrong with my daughters S70 but I know the head slowly began to leak after about a year of our ownership. A couple of years after that I was pulling it.
As for the gauge moving, why would that happen if you put a pin in the gauge to keep it steady?

Administrator
Joined: Mar 2010
Posts: 4,517
Likes: 12
From: Cape Coral, FL
You can have more than a 10 deg variance just on the bolts thread friction. If you were going to try and be dead on accurate you should also use the appropriate thread lube to achieve the required torque.
You can use engine oil, anti-seize .... but if you really want to be accurate you use this stuff with a torque wrench or angle gauge to hit the mark.
I would think you're good to go as is. You should be able to safely back them off in sequence and re-torque them too if you chose.
You can use engine oil, anti-seize .... but if you really want to be accurate you use this stuff with a torque wrench or angle gauge to hit the mark.
I would think you're good to go as is. You should be able to safely back them off in sequence and re-torque them too if you chose.
Thread Starter
|
Member
Joined: Sep 2013
Posts: 62
Likes: 0
From: Glendale, WI
Awesome guys, I wasn't sure whether or not the head might warp a tad if I were to pull the bolts loose and try again.
Rspi: Yikes indeed! I'm not really worried about significant overtorque in this case though, but about uneven torque.
As for the gauge, I wanted to make sure that it didn't wiggle a bit when I was resetting my breaker bar since I had the pin in the holes for the cam cover bolts, and those holes are larger than the pin diameter. Perhaps I'm being a little ****, but I'd rather be safe than sorry. Maybe that's why I put 6 hours into cleaning the block when some do it in 3.
Kiss4afrog:
I am trying to be as accurate as possible, and did use a liberal amount of antiseize on the threads and underside of the head of each bolt (though I'm not sure how it differs from the stuff that you posted). I've put way too much time that I didn't have into this car to have the headgasket fail just because I was unsure of some of the bolt torques. It's mostly a peace of mind thing: like rspi said, I'm the one that has to sweat about what might happen if I step on the gas a little to hard getting on the freeway and the gasket goes due to slightly uneven torque. I'll be loosening the bolts and retorquing, this time checking the angle every time I stop to reset my breaker bar.
Just so I'm sure: will I be OK to loosen the bolts all the way, or should I back them off with a bit of tension left and then do the 3 tightening stages from there?
Administrator
Joined: Mar 2009
Posts: 15,736
Likes: 36
From: Albuquerque, NM
If you are going to back them out, back them out until they are loose. Make sure you do it evenly as outlined in removal. Then go back and re-turque.
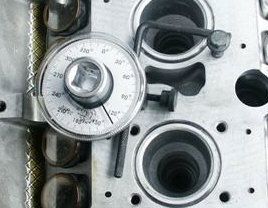
I also started to put the pin in those cover holes and realized that, that was NOT going to work. So I stuck a screw in the hole and used the lever / screw contact as a stop for the gauge as pictured. That worked a lot better for me, no slack. ALSO, Make sure you have your breaker bar in position so that you can make that 130 degree torque in one swing. Preferable one fluid motion. No stopping and resetting once you get started.
I also started to put the pin in those cover holes and realized that, that was NOT going to work. So I stuck a screw in the hole and used the lever / screw contact as a stop for the gauge as pictured. That worked a lot better for me, no slack. ALSO, Make sure you have your breaker bar in position so that you can make that 130 degree torque in one swing. Preferable one fluid motion. No stopping and resetting once you get started.
Administrator
Joined: Mar 2010
Posts: 4,517
Likes: 12
From: Cape Coral, FL
What he said 
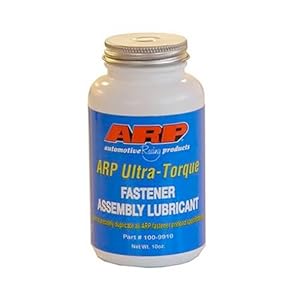
The difference is like so many things that work, some just work so much better. What you used works but the ARP stuff is used religiously by racers with expensive engines. It's been proven (tested) to assist in reducing drag in the threads so you accurately and repeatedly hit the same torque point no matter the bolt or the amount of torque required.
I also have a Ford Supercoupe and they are known for blowing head gaskets the way someone with a cold blows their nose.
You get premium gaskets, head studs and use the ARP lube. Then you're golden no matter how much boost you run.
Some of the ad hype:
ARP Ultra-Torque gets you within 5% of the required pre-load on the first pull and stays consistent with each subsequent cycle – race prep, machining, pre-assembly and final assembly!
ARP Ultra-Torque was developed to:
- Be more consistent with - Ultra-Torque
- Be more repeatable - Ultra-Torque
- Have no harmful contaminants
- Use ARP Ultra-Torque and achieve the target preload ON THE FIRST TORQUE CYCLE
ARP Ultra-Torque is Specifically designed as a fastener assembly lubricant for high performance engines
Last edited by Kiss4aFrog; Nov 5, 2013 at 04:53 PM.
Thread Starter
|
Member
Joined: Sep 2013
Posts: 62
Likes: 0
From: Glendale, WI
Well, it's done. I got most of em in one swing, but a few I had to reset for the last 10 degrees or so. Hopefully she holds! As always your guys' advice has been invaluable, both in terms of doing the job right and in terms of my peace of mind. I am very grateful to you all 

Thread
Thread Starter
Forum
Replies
Last Post