
How to add flasher to control LED turn signals


Thread Starter
|
Administrator
Joined: Mar 2010
Posts: 4,517
Likes: 12
From: Cape Coral, FL
I searched for a way to change or bypass the turn signal flasher and found some people think there is a separate flasher for the turn signals, there isn't. It's part of the emergency flasher switch.
I finally took my car apart and followed the wiring schematic to find out if and now how to bypass the emergency flasher unit to get my turn signals to work with LED bulbs.
I took the covers off my steering column and then removed the turn signal switch from the column. It's easier to remove the connector if you take the switch off the column.
With the connector loose I fed it power to insure the wiring diagram was correct. If you're going to test it first please make sure you have a fused power supply just in case you ........ goof I built a fused 18 foot alligator clamped power supply lead a long time ago just for the purpose of testing things at either end of a vehicle and it's been really helpful. The fuse has saved me many times.
I fed battery power to each circuit, left and right with with an electronic flasher PN 552 in line and it flashed properly. That PN 552 flasher is available at any auto parts store off the floor. You can NOT use a standard 552 flasher as you will have the fast flash. It needs to be an electronic flasher. It will work with a trailer also as I have a hitch and I wanted to make sure it would handle the load.
To supply power to the altered circuit I was constructing I "T'd" into the cigarette lighter power supply since it's switched with the ignition. That way it isn't hot all the time.
I have an aftermarket lighter socket with a lighted ring I hadn't connected in the last year or so and now was a good time to hot it all up. All I use my cigarette lighter for is cell phone charging so there is plenty of "juice" available in that circuit and it's already fused.
On my 95 the green with red tracer is the third pin over in the photo of the connector in my hand. It is the 12volt source coming from the emergency flasher unit and is the wire you need to cut to disconnect the four way flasher system from the turn signals.
Once you cut this wire your four way flashers will work properly so you don't have to worry you're losing any functionality of the system.
Second wire in the connector is solid green and that's the circuit for left (drivers) side turn signals.
The fourth wire, blue with a green tracer is the right (passenger) side turn signal circuit.
Once I manually confirmed it would work I cut that green with red tracer wire a little way up from the connector so I had some room should I decide to later return it to original condition. I then used a scotch block connector to "T" into the cigarette lighter power wire and ran a wire around and up the steering column to splice into the green with red tracer to supply power.
It's a little bit of work but I like the effect.
Note: I'm in Minnesota and I already know the down side of this conversion is that in winter the LED's run much cooler and do not defrost the lens. Down south you'd never notice but up north you need to make sure the lenses don't frost or freeze over. Then again it's why I carry a liquid de-icer for the windshield. Works great for mirrors also.
And yes LED's may be ricer to you but I like them.
I finally took my car apart and followed the wiring schematic to find out if and now how to bypass the emergency flasher unit to get my turn signals to work with LED bulbs.
I took the covers off my steering column and then removed the turn signal switch from the column. It's easier to remove the connector if you take the switch off the column.
With the connector loose I fed it power to insure the wiring diagram was correct. If you're going to test it first please make sure you have a fused power supply just in case you ........ goof
I built a fused 18 foot alligator clamped power supply lead a long time ago just for the purpose of testing things at either end of a vehicle and it's been really helpful. The fuse has saved me many times.I fed battery power to each circuit, left and right with with an electronic flasher PN 552 in line and it flashed properly. That PN 552 flasher is available at any auto parts store off the floor. You can NOT use a standard 552 flasher as you will have the fast flash. It needs to be an electronic flasher. It will work with a trailer also as I have a hitch and I wanted to make sure it would handle the load.
To supply power to the altered circuit I was constructing I "T'd" into the cigarette lighter power supply since it's switched with the ignition. That way it isn't hot all the time.
I have an aftermarket lighter socket with a lighted ring I hadn't connected in the last year or so and now was a good time to hot it all up. All I use my cigarette lighter for is cell phone charging so there is plenty of "juice" available in that circuit and it's already fused.
On my 95 the green with red tracer is the third pin over in the photo of the connector in my hand. It is the 12volt source coming from the emergency flasher unit and is the wire you need to cut to disconnect the four way flasher system from the turn signals.
Once you cut this wire your four way flashers will work properly so you don't have to worry you're losing any functionality of the system.
Second wire in the connector is solid green and that's the circuit for left (drivers) side turn signals.
The fourth wire, blue with a green tracer is the right (passenger) side turn signal circuit.
Once I manually confirmed it would work I cut that green with red tracer wire a little way up from the connector so I had some room should I decide to later return it to original condition. I then used a scotch block connector to "T" into the cigarette lighter power wire and ran a wire around and up the steering column to splice into the green with red tracer to supply power.
It's a little bit of work but I like the effect.
Note: I'm in Minnesota and I already know the down side of this conversion is that in winter the LED's run much cooler and do not defrost the lens. Down south you'd never notice but up north you need to make sure the lenses don't frost or freeze over. Then again it's why I carry a liquid de-icer for the windshield. Works great for mirrors also.
And yes LED's may be ricer to you but I like them.
Thread Starter
|
Administrator
Joined: Mar 2010
Posts: 4,517
Likes: 12
From: Cape Coral, FL
I just noticed when I viewed the pictures (taken at night) that the photo showing the scotch block for power from the lighter looks like I connected it to the wire leading to the light for the cigarette lighter. It's connected to the wire leading to the center of the cigarette lighter. All cigarette lighters have the center as the positive. The outside or the shell is always the ground or negative.

Senior Member
Joined: May 2010
Posts: 1,712
Likes: 1
A simpler way to avoid the "fast flash" you get from an LED turn signal is to install a 10w/10 ohm resistor from radio shack across the + and - wires right before they go into the turn signal. I wish you had asked here first - I'd have saved you a LOT of time...
 I tried to find a simpler way, where were you when I needed you
Senior Member
Joined: May 2010
Posts: 1,712
Likes: 1
Looks like this on a wiring diagram:
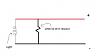
Red wire is positive and black is negative. Doesnt really matter which one you get though - resistors will work in either direction. You just solder or t-tap into the wires. Typically, I wrap the resistors in electrical tape, as they have a tendancy to get warm.
Basically how it works is that it mimics the resistance put out by a standard bulb. You use a 10 ohm because when you wire in the resistor in parallel with the LED, your overall resistance winds up being in the neighborhood of 5 ohms, which is pretty close to the resistance of a standard xx56 automotive bulb.
Radio Shack part number is 271-132.
10 Ohm 10W 5% Wirewound Resistor (2-Pack) : Resistors | RadioShack.com
Thread Starter
|
Administrator
Joined: Mar 2010
Posts: 4,517
Likes: 12
From: Cape Coral, FL
The resistor by it's nature uses more electricity. If you can add the resistor then you have working LED's but you're still burning more electricity then you need to, or the same as if you just had the regular incandescent bulbs.
My way may be more involved but it uses less electricity.
I'm shooting for putting the least load on my alternator as possible while being the best lit.
My way may be more involved but it uses less electricity.
I'm shooting for putting the least load on my alternator as possible while being the best lit.

Thread Starter
|
Administrator
Joined: Mar 2010
Posts: 4,517
Likes: 12
From: Cape Coral, FL
When using the resistor do you have the bulb warning light come on ?

Junior Member
Joined: May 2011
Posts: 29
Likes: 0
From: LaGrangeville, N.Y.
ibified, I've been searching for this info for months, thanks!! I assume the same resistor would work for the high output side of a 3157 bulb?
Would you know what size resistor to use for the low side of a 3157? I've switched both my Volvo and Mustang to LED and am having issues with both.
Would you know what size resistor to use for the low side of a 3157? I've switched both my Volvo and Mustang to LED and am having issues with both.

Junior Member
Joined: Aug 2019
Posts: 2
Likes: 0
From: Dallas, TX
Hi Kiss4aFrog,
I know this is an old post - but I recently acquired a 1998 Volvo s70 from my parents (they are now too old to drive) and put in LED turn signals and wanted to use your method to wire up a flasher so that there is no hyperflash. However, I am running into some trouble and was hoping I could get some more insight from you.
Here is what I have done:
Is there something I am missing or something I did incorrectly? I tried to follow your instructions as best as I could. Do I need to do anything with the solid green (drivers side turn signal) or blue with green tracer (passenger side turn signal) wires?
Thanks much!
Steven
I know this is an old post - but I recently acquired a 1998 Volvo s70 from my parents (they are now too old to drive) and put in LED turn signals and wanted to use your method to wire up a flasher so that there is no hyperflash. However, I am running into some trouble and was hoping I could get some more insight from you.
Here is what I have done:
- Connected wire between ACC power source and X prong of electronic 552 flasher.
- At steering wheel column, cut the green w/ red tracer wire from the turn signal stalk connector.
- Connected wire between L prong of electronic 552 flasher to the green w/ red tracer wire that feeds into the turn signal stalk connector. The lower half of the green w/ red tracer wire remains cut/disconnected.
Is there something I am missing or something I did incorrectly? I tried to follow your instructions as best as I could. Do I need to do anything with the solid green (drivers side turn signal) or blue with green tracer (passenger side turn signal) wires?
Thanks much!
Steven
Thread Starter
|
Administrator
Joined: Mar 2010
Posts: 4,517
Likes: 12
From: Cape Coral, FL
I'm not sure if the flasher itself is polarity sensitive but you should try reversing the "X" and "L" leads.
Did you check your wiring to see if it's the same as a '95 850 ?
Did you check your wiring to see if it's the same as a '95 850 ?
Junior Member
Joined: Aug 2019
Posts: 2
Likes: 0
From: Dallas, TX
I tried switching the connection between both the X and L prong on the 552 flasher for polarity, but either way I connect it, the flasher is not working. I also bought a 2nd flasher just to make sure I did not have a bad flasher.
I did not check if the 98 s70 has the same wiring, since it had the same green w/ red tracer wire - I assumed it was just the same. I was not able to find a wiring diagram on the web. I will revisit the wiring, maybe mine is different than yours.
How exactly did you test the wiring? Were you connecting the test power source to white turn signal connector or to the turn signal stalk (where the white connector plugs into)?

Thread
Thread Starter
Forum
Replies
Last Post

