
For those with snails


Thread Starter
|
Senior Member
Joined: Oct 2008
Posts: 536
Likes: 0
From: Bremen, IN
So I am looking at a few different turbo cars.
One of which is an 850T.
I want to do simple, cheap, mods.
Such as:
Aftermarket BOV (Ebay or local)
FMIC with piping (Ebay universal stuff)
And then I'll fab an intake up and get an exhaust.
Thats all I really want to do to my T if I get it.
How can I go about setting that stuff up?
Anyone have a tutorial for installing a BOV to a stock 850T?
I see 2.5" adapter pipes on Ebay for BOV's

Got Boost?
Joined: May 2008
Posts: 3,473
Likes: 4
here is one on FMIC
As far as the BOV...
Ebay is hit or miss, so be careful on the parts you order...
I hear good things about the cheap ebay intercooler kits.
You can try the adapter plate, but check return policy (if any) and check the quailty. The adapter plate just welds to the IC piping(unless it is already attached to a pipe then you will just clamp it to the othe IC pipes), attach the BOV to the adapter, and your done.
The 850hasa CBV stock, and if you do an intake, you will hear it... If you want to make the CBV sound like a BOV...Check out the MOPAR SRT-4 BOV plate.
The plate goes in betweenthe CBV and the turbo.
Good Luck.
ORIGINAL: S70driver
This was done by Auburn T5.
FMIC INSTALL
It took about 6 hours of sort of figuring stuff out as I went along but everything came together nicely and everything is running great.
Anyways, I ordered a precision turbo intercooler along with the following pieces of 2.25" piping
http://www.nolimitmotorsport.com/prod/AS1021
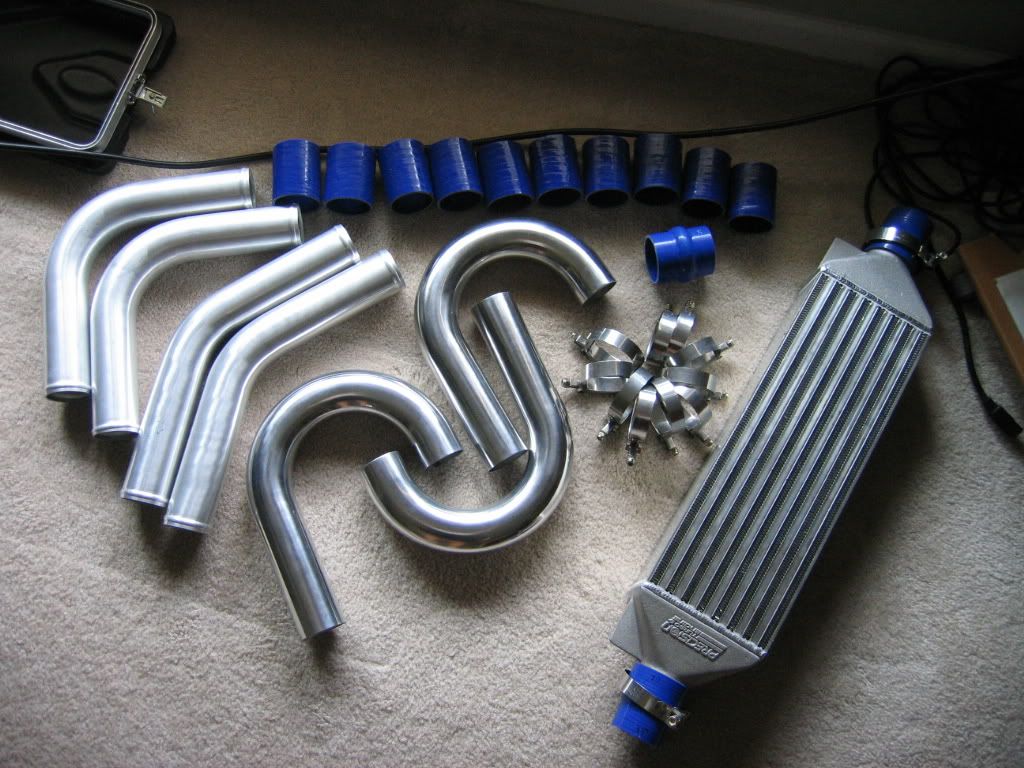
The only things not pictured that were needed were a few extra T bolt clamps and a 2.5" to 2.25" reducer for the throttle body. I thought it was 2.25" but it's a little bigger (<_< I'm using a 2" plumbing coupler at the moment I got from Homedepot until I can make it back out to the shop to get my reducer. It's working but not holding tight on the TB (more on that later) Also not pictured is one of those little aluminum nipples that would be welded to the piping right at the throttle body inlet for the air idle control hose to plug into. No one locally has them and I couldn't wait to have one shipped so I got a brass plumbing 1/2" to 3/8" as I wasn't sure what the inner diameter of the IAC hose was. Turns out it's 1/2" so what I did was took a drill and drilled out the inside of the piece to a single diameter as it get smaller at the 3/8" end. After that, I took a 1/2" drill bit and drilled a hole in the intercooler pipe right at the TB connector. The hole was a little too small to screw the brass fitting in so I used a dremel grinding stone to lightly grind a little bit more out. Just enough to screw the brass fitting in. It was extremely tight but not wanting to take any chances, I coated both the inside joint and outside where the brass fitting screws in with a couple of layers of JB weld. It doesn't look too pretty but it will do until I can get an aluminum nipple to have welded on in place of the brass fitting.
So when you're ordering your piping, try and get the aluminum nipple piece to weld onto the pipe to save yourself that headache. It wasn't hard just a lot of work.
Anyways, moving along...
The bumper removal was easy. Drilled out the 4 rivets holding the wheel well liner to the back of the bumper. (turn the wheels to get a good angle on the rivets.
Next I removed the splash guard. 2 screws hold it in and a small tab on the back of it releases it.
After that, I used a torx bit to remove all the screws holding a second plastic guard piece to the bumper.
After that, there will be 2 large bolts to remove. It uses I think a 15mm socket. They're the only ones that big so they're hard to miss. Mine put up a fight so I had to pop out the plastic pieces in the bumper that are next to the fog lights and use a breaker bar to break them loose. I was rewarded by tons of the most disgusting rusty muddy sludge water pouring out of the bolt hole as I loosened the bolt. I recommend sitting on teh ground in front of the bumper when doing this and having a towel below the bumper in case this happens to you.
So after those bolts were removed, (and the fog lights are unplugged) the bumper slides straight off. If it doesn't come off, you probably missed a couple of torx screws.
After this is done, remove all the factory intercooler piping along with the snorkel that connects the air box to the air inlet at the front of the air dam.
At this point, the battery needs to be removed. Following that, there are 2 large screws holding the battery tray to the frame and 2 smaller screws on the top of the battery tray holding the cruise control module. Remove these and the cruise control module under the battery tray can be removed. Unplug it's power connector and vacuum line and set it aside.
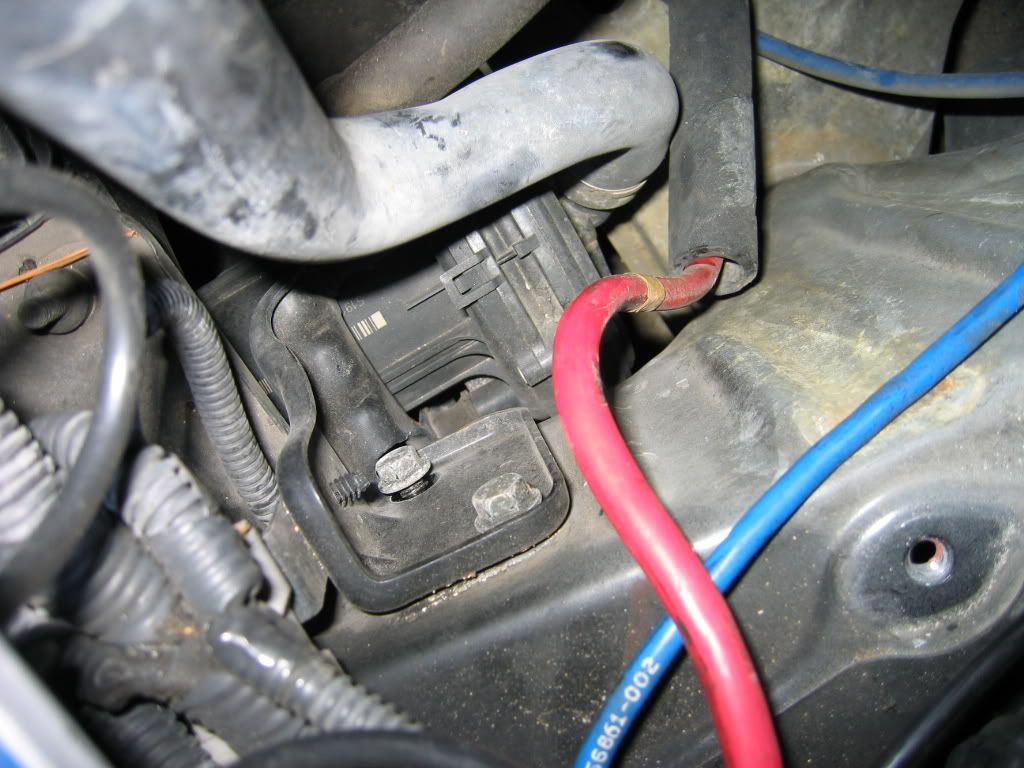
Now, for the air pump, it's no secret that it has to be removed from it's factory location in order for the cold side of the intercooler piping to get to the throttle body so before I decided whether or not to totally remove it or leave it, I unbolted it and moved it up to where the battery tray used to be.
In this pic, one of the bolts holding it to the frame is partially out and the bolt just above it is the 2nd one. Remove both of these to free the air pump.
The final obstacle is the tow hook. This had to be removed to get the hot side of the piping around the black AC canister and up to the turbo so we used a plasma cutter to eat through it. It can probably be done with a reciprocating saw (sawzall) or even a dremel but the metal in the hook is extremely strong and would take forever with a dremel. So if you know of any shops (most exhaust shops) that you cold drive the car to and have them cut the hook off, it will save you a lot of time.
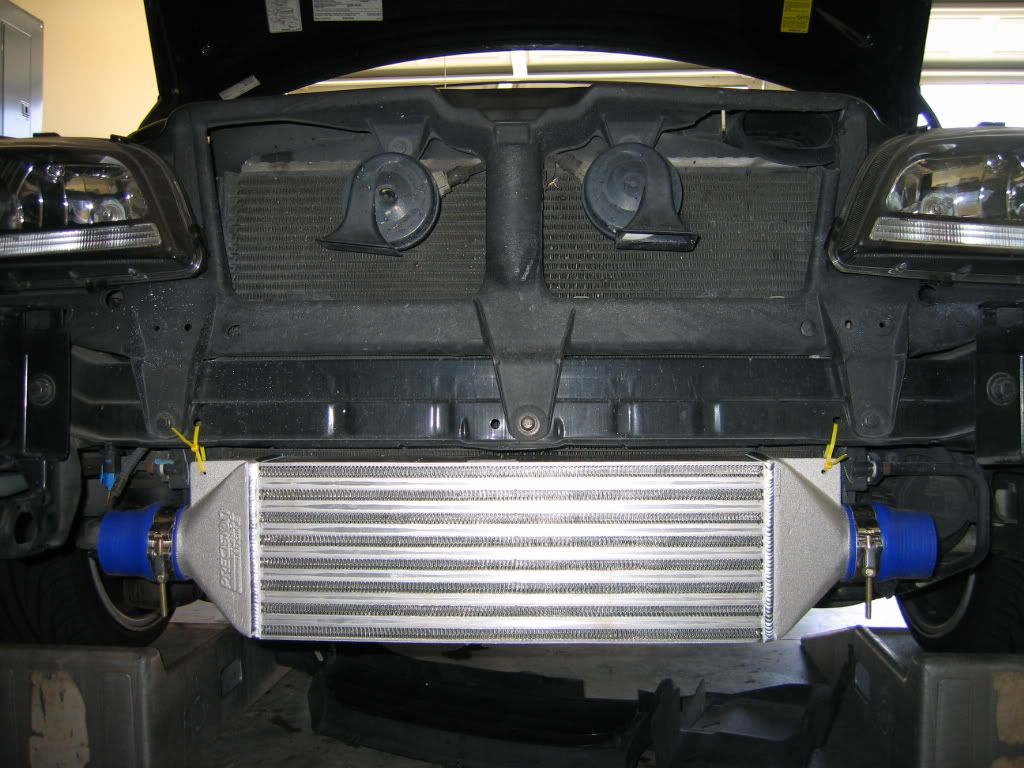
Once this was out of the way, it was time to mount the intercooler. I'm not sure if all the cars have them or not but there are 3 screw holes in the frame right where the intercooler is mounted that I was able to thread a couple of zip ties through (drilled a hole in each mounting bracket on the intercooler) and get an easy mock up location for the intercooler.
Now it was time to start playing with the intercooler piping to see what would need to be done.
At first, it may seem like there isn't enough piping but as Mark (BlackT5) said, the pipes can really only go one way and going that one route from turbo to throttle body, it WILL be enough piping unless you screw up so pay attention as I explain where the pipes were cut.
Starting at the turbo, a 90* bend comes over the engine (a la RIP kit) to a pair of 45* bend pipes.
The first pipe connecting to the turbo, I cut about 2 or 3 inches off the end so that it didn't sit so high over the engine. The hood wouldn't close all the way with it sitting that high so I had to remove enough to let the hood close but not so much so that it laid down on the engine.
The 45* piece coming after that had a little cut off from each end and the second 45* piece had a little cut off of the end that connects to the first 45* pipe. I made these cuts last becuase I started running the pipes from the intercooler.
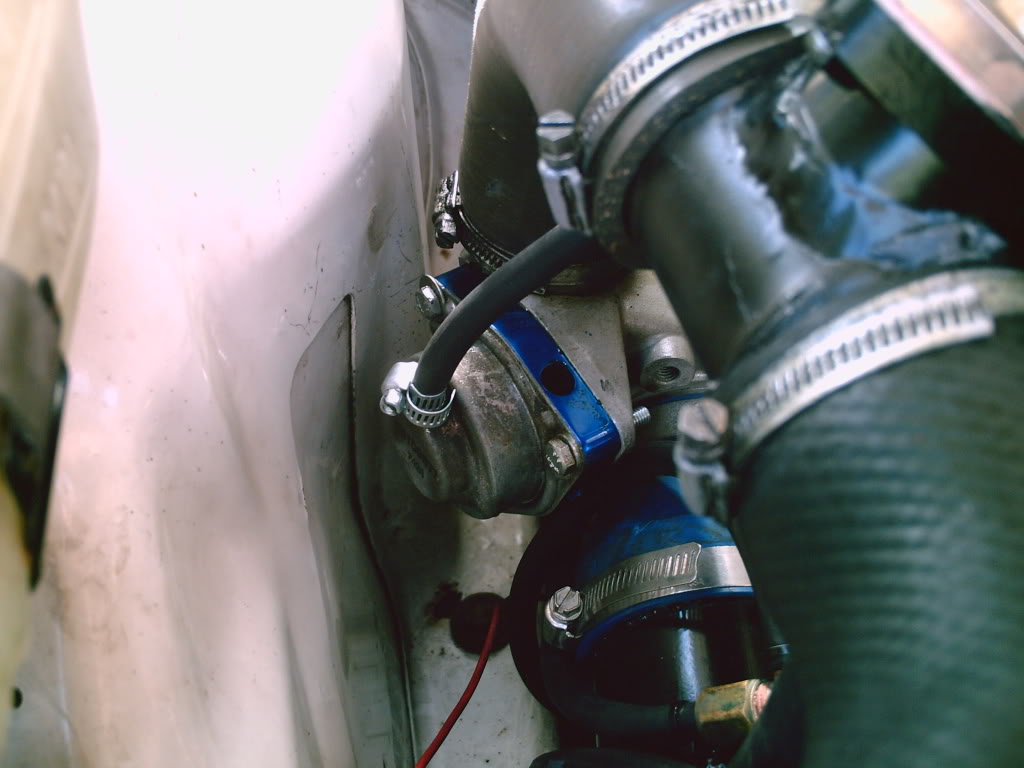
From the passenger (hot) side of the intercooler, I used a 180* J pipe. I cut it in half directly in the center of the bend becuase that U has to be extended out wider to wrap around the black AC canister (I have no idea what it's technically called but I'm sure someone will enlighten me). Seeing as to how Sam was busy getting his car ready for the SE turbo bricks meet that starts in about 6 hours, he didn't have time to weld up a piece of the extra pipe that was cut from the other pieces into that U to extend it out so I used a silicone coupler. It got the job done until we have a free weekend to weld a lot of these together.
The J pipe end that goes into the intercooler's coupler had a little bit cut off so that it didn't extend out so far past the black AC thing. I cut enough of it off so it gets closer but not too close. I don't have a picture of the hot side of my piping but I used Mark's picture below for a reference.

Ok. After that bend is made, I took another J pipe and cut it in half at the center of the bend. Here comes the hard part. Getting the piping up from that U bend up to the 45* piece going to the turbo requires some elbow grease, a little wire moving and lots of PATIENCE.
This was done by Auburn T5.
FMIC INSTALL
It took about 6 hours of sort of figuring stuff out as I went along but everything came together nicely and everything is running great.
Anyways, I ordered a precision turbo intercooler along with the following pieces of 2.25" piping
http://www.nolimitmotorsport.com/prod/AS1021
The only things not pictured that were needed were a few extra T bolt clamps and a 2.5" to 2.25" reducer for the throttle body. I thought it was 2.25" but it's a little bigger (<_<
I'm using a 2" plumbing coupler at the moment I got from Homedepot until I can make it back out to the shop to get my reducer. It's working but not holding tight on the TB (more on that later) Also not pictured is one of those little aluminum nipples that would be welded to the piping right at the throttle body inlet for the air idle control hose to plug into. No one locally has them and I couldn't wait to have one shipped so I got a brass plumbing 1/2" to 3/8" as I wasn't sure what the inner diameter of the IAC hose was. Turns out it's 1/2" so what I did was took a drill and drilled out the inside of the piece to a single diameter as it get smaller at the 3/8" end. After that, I took a 1/2" drill bit and drilled a hole in the intercooler pipe right at the TB connector. The hole was a little too small to screw the brass fitting in so I used a dremel grinding stone to lightly grind a little bit more out. Just enough to screw the brass fitting in. It was extremely tight but not wanting to take any chances, I coated both the inside joint and outside where the brass fitting screws in with a couple of layers of JB weld. It doesn't look too pretty but it will do until I can get an aluminum nipple to have welded on in place of the brass fitting.So when you're ordering your piping, try and get the aluminum nipple piece to weld onto the pipe to save yourself that headache. It wasn't hard just a lot of work.
Anyways, moving along...
The bumper removal was easy. Drilled out the 4 rivets holding the wheel well liner to the back of the bumper. (turn the wheels to get a good angle on the rivets.
Next I removed the splash guard. 2 screws hold it in and a small tab on the back of it releases it.
After that, I used a torx bit to remove all the screws holding a second plastic guard piece to the bumper.
After that, there will be 2 large bolts to remove. It uses I think a 15mm socket. They're the only ones that big so they're hard to miss. Mine put up a fight so I had to pop out the plastic pieces in the bumper that are next to the fog lights and use a breaker bar to break them loose. I was rewarded by tons of the most disgusting rusty muddy sludge water pouring out of the bolt hole as I loosened the bolt. I recommend sitting on teh ground in front of the bumper when doing this and having a towel below the bumper in case this happens to you.
So after those bolts were removed, (and the fog lights are unplugged) the bumper slides straight off. If it doesn't come off, you probably missed a couple of torx screws.
After this is done, remove all the factory intercooler piping along with the snorkel that connects the air box to the air inlet at the front of the air dam.
At this point, the battery needs to be removed. Following that, there are 2 large screws holding the battery tray to the frame and 2 smaller screws on the top of the battery tray holding the cruise control module. Remove these and the cruise control module under the battery tray can be removed. Unplug it's power connector and vacuum line and set it aside.
Now, for the air pump, it's no secret that it has to be removed from it's factory location in order for the cold side of the intercooler piping to get to the throttle body so before I decided whether or not to totally remove it or leave it, I unbolted it and moved it up to where the battery tray used to be.
In this pic, one of the bolts holding it to the frame is partially out and the bolt just above it is the 2nd one. Remove both of these to free the air pump.
The final obstacle is the tow hook. This had to be removed to get the hot side of the piping around the black AC canister and up to the turbo so we used a plasma cutter to eat through it. It can probably be done with a reciprocating saw (sawzall) or even a dremel but the metal in the hook is extremely strong and would take forever with a dremel. So if you know of any shops (most exhaust shops) that you cold drive the car to and have them cut the hook off, it will save you a lot of time.
Once this was out of the way, it was time to mount the intercooler. I'm not sure if all the cars have them or not but there are 3 screw holes in the frame right where the intercooler is mounted that I was able to thread a couple of zip ties through (drilled a hole in each mounting bracket on the intercooler) and get an easy mock up location for the intercooler.
Now it was time to start playing with the intercooler piping to see what would need to be done.
At first, it may seem like there isn't enough piping but as Mark (BlackT5) said, the pipes can really only go one way and going that one route from turbo to throttle body, it WILL be enough piping unless you screw up so pay attention as I explain where the pipes were cut.
Starting at the turbo, a 90* bend comes over the engine (a la RIP kit) to a pair of 45* bend pipes.
The first pipe connecting to the turbo, I cut about 2 or 3 inches off the end so that it didn't sit so high over the engine. The hood wouldn't close all the way with it sitting that high so I had to remove enough to let the hood close but not so much so that it laid down on the engine.
The 45* piece coming after that had a little cut off from each end and the second 45* piece had a little cut off of the end that connects to the first 45* pipe. I made these cuts last becuase I started running the pipes from the intercooler.
From the passenger (hot) side of the intercooler, I used a 180* J pipe. I cut it in half directly in the center of the bend becuase that U has to be extended out wider to wrap around the black AC canister (I have no idea what it's technically called but I'm sure someone will enlighten me). Seeing as to how Sam was busy getting his car ready for the SE turbo bricks meet that starts in about 6 hours, he didn't have time to weld up a piece of the extra pipe that was cut from the other pieces into that U to extend it out so I used a silicone coupler. It got the job done until we have a free weekend to weld a lot of these together.
The J pipe end that goes into the intercooler's coupler had a little bit cut off so that it didn't extend out so far past the black AC thing. I cut enough of it off so it gets closer but not too close. I don't have a picture of the hot side of my piping but I used Mark's picture below for a reference.
Ok. After that bend is made, I took another J pipe and cut it in half at the center of the bend. Here comes the hard part. Getting the piping up from that U bend up to the 45* piece going to the turbo requires some elbow grease, a little wire moving and lots of PATIENCE.
Ebay is hit or miss, so be careful on the parts you order...
I hear good things about the cheap ebay intercooler kits.
You can try the adapter plate, but check return policy (if any) and check the quailty. The adapter plate just welds to the IC piping(unless it is already attached to a pipe then you will just clamp it to the othe IC pipes), attach the BOV to the adapter, and your done.
The 850hasa CBV stock, and if you do an intake, you will hear it... If you want to make the CBV sound like a BOV...Check out the MOPAR SRT-4 BOV plate.
The plate goes in betweenthe CBV and the turbo.
Good Luck.
Thread Starter
|
Senior Member
Joined: Oct 2008
Posts: 536
Likes: 0
From: Bremen, IN
Also, if I buy a T model 850, I plan on getting the iPD three pod pillar.
What are three good gauges to get to fill that (other than a boost gauge) to be good for the car?
What are three good gauges to get to fill that (other than a boost gauge) to be good for the car?
Got Boost?
Joined: May 2008
Posts: 3,473
Likes: 4
I am not 100% sure on the plate, but I think it just goes between the CBV and the turbo and make the sound of a BOV.
I just put this option out there...personally, I would just do a regular BOV.
I don't remember the names of the ebay ICs, but I heard that the you can get a descent one for like $250-$300.
This is the link from the post above: http://www.nolimitmotorsport.com/prod/AS1021it has a descent IC for $250, but youwill have to also buy some pipes from them, or find the pipes else where. This kit looks nice...I might get this one for my car .
.
As far as gauges go...Like tech said:
Boost gauge that reads 20-30hg and like 20-30psi.
AIR/FUEL gauge is nice but I thought the only "real" A/F gauges were the wideband, and those cost like $350.
Oil/Water Temp Gauges are also nice to have.
EGT/pyrogauge is also good to have when you raise boost.
I just put this option out there...personally, I would just do a regular BOV.
I don't remember the names of the ebay ICs, but I heard that the you can get a descent one for like $250-$300.
This is the link from the post above: http://www.nolimitmotorsport.com/prod/AS1021it has a descent IC for $250, but youwill have to also buy some pipes from them, or find the pipes else where. This kit looks nice...I might get this one for my car
.As far as gauges go...Like tech said:
Boost gauge that reads 20-30hg and like 20-30psi.
AIR/FUEL gauge is nice but I thought the only "real" A/F gauges were the wideband, and those cost like $350.
Oil/Water Temp Gauges are also nice to have.
EGT/pyrogauge is also good to have when you raise boost.

Administrator
Joined: Sep 2004
Posts: 36,349
Likes: 46
From: Orlando, Florida
Yes you really need a wide band.
Alot of people also have the oil pressure or oil temp. Some people even have transmission oil temp.
For the guage pod I would buy from here and mold it myself.
http://www.gaugepods.com/volvo.html
For the guages I think I am going to buy new ones from here once I get back to work. You can buy most of them in electrical setups including the boost gauge so you don't have to run the hose.
http://prosportgauges.com/blue_performance_gauges.aspx

Thread
Thread Starter
Forum
Replies
Last Post
my850turbo
Volvo 850
4
Apr 12, 2006 11:21 AM