
Dash board removal for mounting tab repair


Thread Starter
|
Administrator
Joined: Sep 2004
Posts: 36,349
Likes: 45
From: Orlando, Florida
First thing you have to do is disconnect the battery.
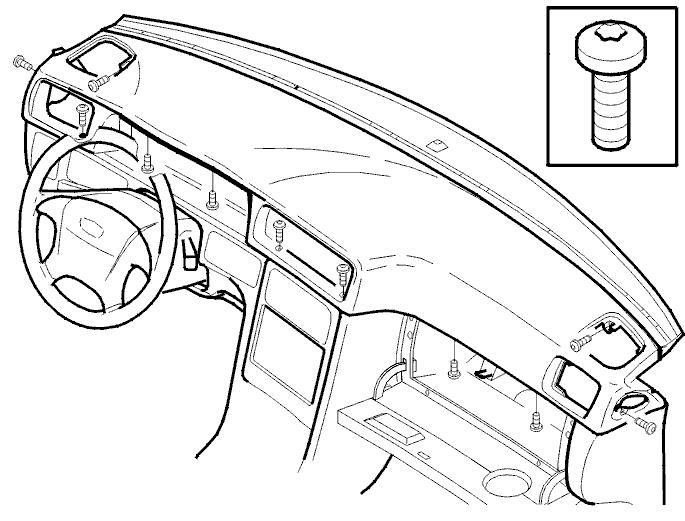
Next start off by removing the wiper arms.There is a 13mm nut per arm.You may need to remove a black cover to get to the nut.
Then remove the 4 Torxes 25 screws holding the plastic cover under the the wiper arms.You will have to also remove the 2 clamps holding the rubber hoses to the plastic cover.Lift up on the front of the cover then slide it towards the front of the car to remove it.
Then under there is Either 4 torxes 30 screws or 10mm screws that hold the dash to the body of the car.Be very careful removing and tightening the screws for the dash.The dash tabs could break and then will need to be repaired or the dash will need to be replaced.Also just pull up on the pollen filter case if it has one.If not just remove the ring that is there.
Going to the inside of the car you will need:T-25 socket or bit with a screwdriver,A long T-30 socket,18mm socket with extension and ratchet,wire cutters,T-15,T-20,10mm ,12mm,13mm,1/4 drive socket.
First start off by removing the center console.If it is a 850 remove the front cubby by reoving the 2 T-25 screws then under the cover is 2 T-15 screws remove them.Unplug the black and grey plugs in the hole by the 2 T-15 screws.Then lift up the armrest and remove the black cover and remove the 2 8mm or 10mm screws.The early 850's may have T-25 screws.
The S70 remove the shifter boot cover bye pulling it towards the drivers seat with the arm rest up.Then remove the cover in the cover under the arm rest.Remove the 2 screws in there.
Unplug the 2 plugs behind the cover for the E-brake.Lift the back of the center console up first and work it out.
Next remove the radio by pushing in the little tabs on the side of the radio then they will pop out and then pull them to release the tabs all the way.Remove and unplug the radio.
The next step will depend whether you have ECC (Electronic climate control)or MCC(manual climate control)
If you have ecc then you car reach through the hole for the radio and push the climate control module from the back.Be careful put a rag on your arm.Sometimes it is stubborn and when it releases it will cut your arm.
If you have MCC then remove all 3 of the control *****.Then under the 2 outer ***** is 2 T-25 screws.Remove them then push the outside cover out from the back and unplug the wiring.On the sides you will see one Phillips screw on each side remove them.You are done here for now.
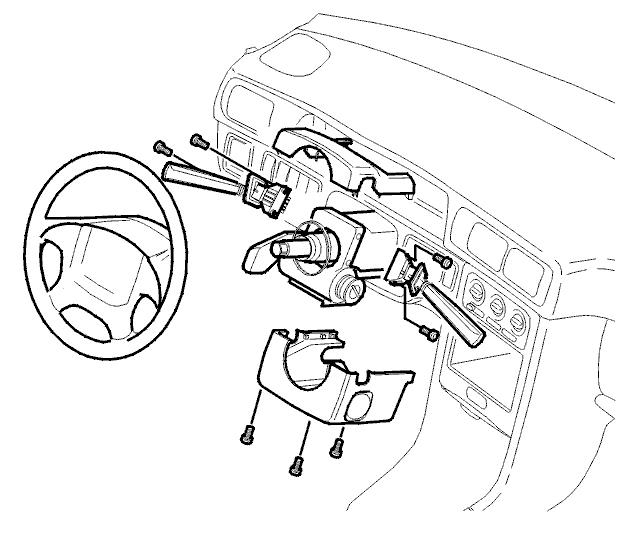
Next remove the air bag from the steering wheel.Turn the steering wheel so that the top is to one side.There is a hole in the back of the steering wheel.Insert a long T-30 and remove the screws for the airbag.Always remove and tighten the right side screw for the air bag first.If not then the horn might not work.Next take the little T-20 screw stored in the steering wheel.That will get screwed into the hole on top of where the bolt for the steering wheel is.It will hold the Contact reel from unrolling.
Note: Break the bolt for the steering wheel loose before installing the small screw.
Remove the bolt holding the steering wheel in.It is a 18mm head bolt.Then lift the steering wheel off.
Next remove the steering column covers.On the S70 pull up on the top one and remove it.Then loosen and remove the T-25 screws in the bottom cover.The screws go from the bottom going up.
The 850 you will have to remove 2 T-15 screws in the front part of the cover.You will need it to be long to reach the screws.That will remove the top cover.Note be careful removing the T-15 screws.Hold down on the top cover while removing then or the tabs might break off the top cover.Then remove the 2 T-25 screws and remove the lower cover.
Next remove the turn signal switch and the wiper switch.They are held on by 2 T-25 screws each.Next remove the SRS contact reel.Note:Be very careful the plastic is very brittle.
There is 3 screws total holding it in.Then unplug it and remove it all the way.
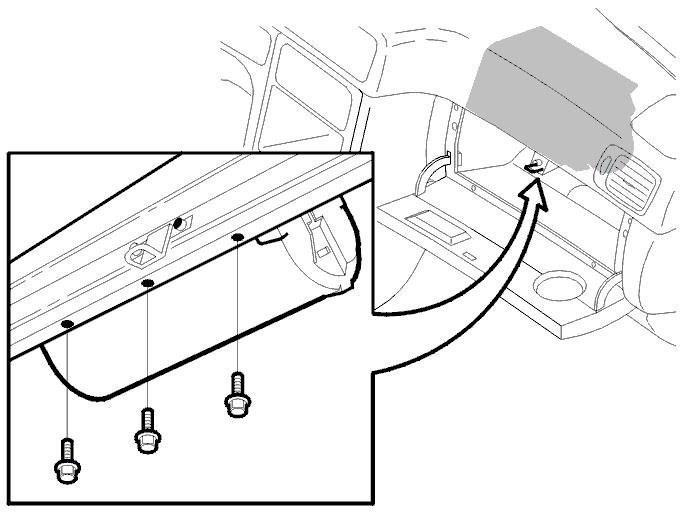
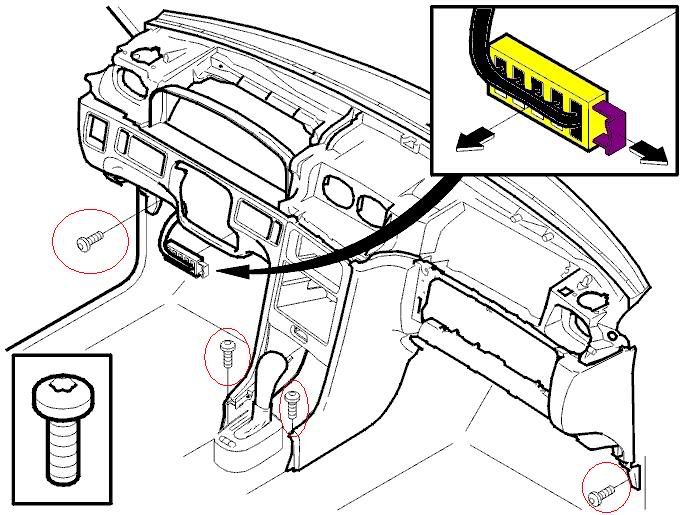
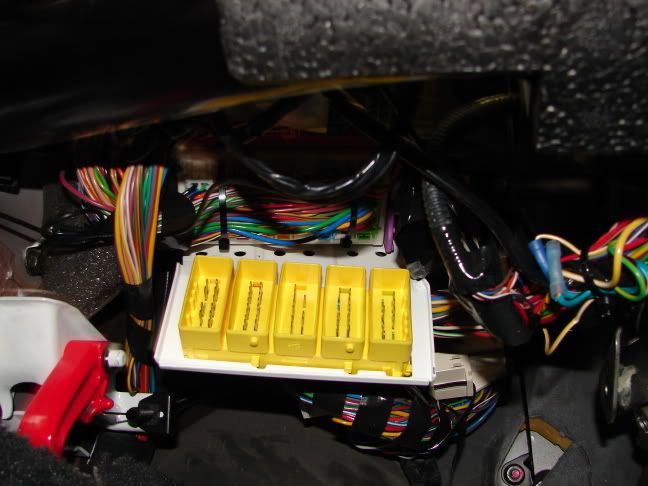
Next remove the lower dash panel on the left side of the car.Then look up under the dash and you should see a long red plug or a Yellow with a Purple pull tab to release. It should have a tab to pull to release it.Pull it and release it.That is the main plug for the dash.
Next on the 850 you will have to remove the metal knee bolsters.There is 13mm nuts holding it in.Note:Or you can wait till you remove the dash.It is easier to remove them once the dash is out.Pull back the cover at the bottom of the dash by the door.The sill cover that runs all the way back.Pull it off by the dash.You will see a screw holding the bottom of the dash.remove the 10mm screw.
Then go to the other side and remove the glove box assembly.Remove the T-25 screws folding it in.On the 850's unhook the glove box support arms by inserting a small screw driver in the hole.Then remove the insert.Next remove the lower dash cover on that side as well.
Also unplug the passenger side Air bag.You will see the plug.Look for an orange wrapped wire and follow to the plug.Then pull back on the sill cover again and remove the 10mm screw on that side as well.
The dash should be ready to come out.Make sure you have someone help you remove it.
You will need to leave the key out of the ignition.To get the car out of park.Look on the right side of the shifter.There is a soleniod you will need to push the soleniod back and push the button on the shifter and pull out of part.
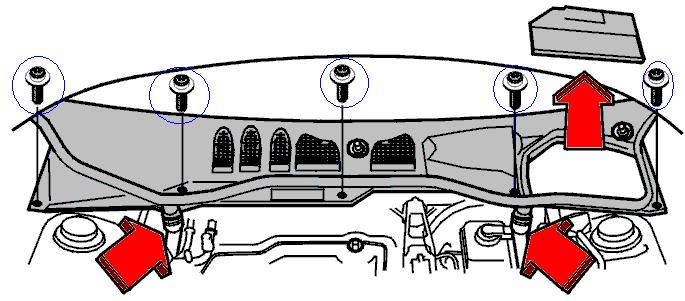
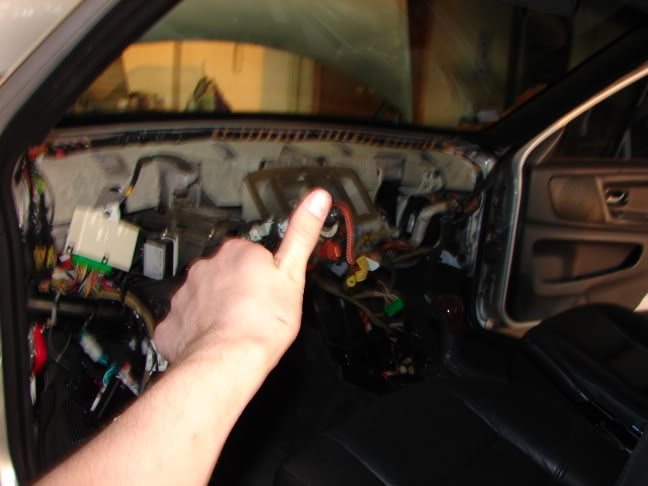
Remove the dash.If it is turbo you will also have to unplug the line for the boost guage if the car has one.Also be careful some cars have an extra plug you will have to unplug while removing the dash.Watch while removing.
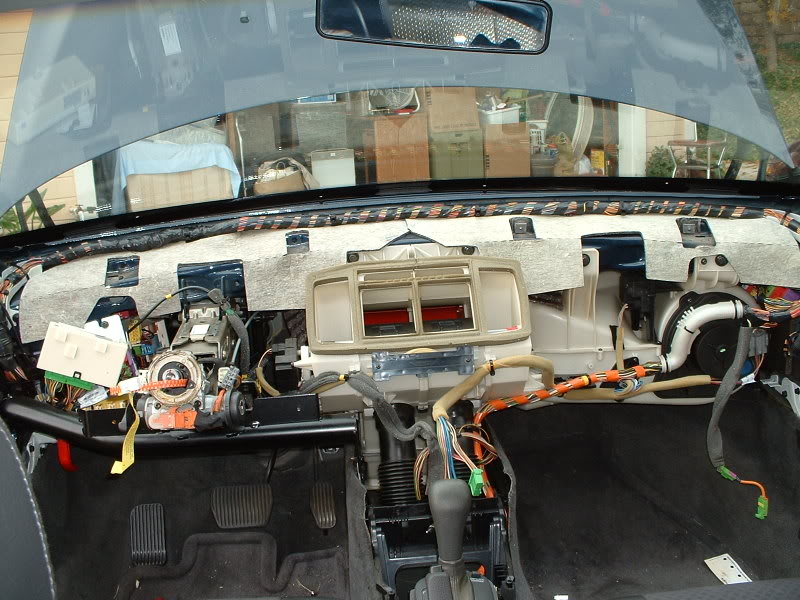
Set the dash off to the side in a safe place.
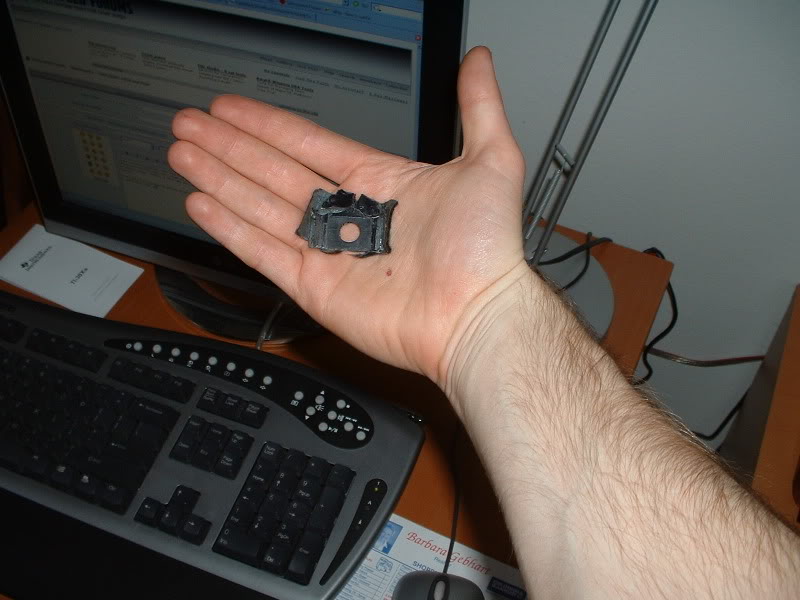
Then you will see the Dash Mounting Tabs on the back of the Dash.
This is what I would use to repair the Tabs. They call it Piping strap.I have a picture posted at the bottom of the post.
What you will do is cut a piece that will go up and over the tab that you can screw on each side. You will need to screw it over the clips that are there with the threads.Make sure you get it as tight as you can. Then when you got them all secured before installing make sure you install either a piece of Duct tape or Felt tape over the Tab and strap. This way you know it won't squeek or anything like that.
Then reinstall the dash.
[IMG]local://upfiles/853/508A35960BDE4D3EB2F3CD3CB3593107.jpg[/IMG]
Next start off by removing the wiper arms.There is a 13mm nut per arm.You may need to remove a black cover to get to the nut.
Then remove the 4 Torxes 25 screws holding the plastic cover under the the wiper arms.You will have to also remove the 2 clamps holding the rubber hoses to the plastic cover.Lift up on the front of the cover then slide it towards the front of the car to remove it.
Then under there is Either 4 torxes 30 screws or 10mm screws that hold the dash to the body of the car.Be very careful removing and tightening the screws for the dash.The dash tabs could break and then will need to be repaired or the dash will need to be replaced.Also just pull up on the pollen filter case if it has one.If not just remove the ring that is there.
Going to the inside of the car you will need:T-25 socket or bit with a screwdriver,A long T-30 socket,18mm socket with extension and ratchet,wire cutters,T-15,T-20,10mm ,12mm,13mm,1/4 drive socket.
First start off by removing the center console.If it is a 850 remove the front cubby by reoving the 2 T-25 screws then under the cover is 2 T-15 screws remove them.Unplug the black and grey plugs in the hole by the 2 T-15 screws.Then lift up the armrest and remove the black cover and remove the 2 8mm or 10mm screws.The early 850's may have T-25 screws.
The S70 remove the shifter boot cover bye pulling it towards the drivers seat with the arm rest up.Then remove the cover in the cover under the arm rest.Remove the 2 screws in there.
Unplug the 2 plugs behind the cover for the E-brake.Lift the back of the center console up first and work it out.
Next remove the radio by pushing in the little tabs on the side of the radio then they will pop out and then pull them to release the tabs all the way.Remove and unplug the radio.
The next step will depend whether you have ECC (Electronic climate control)or MCC(manual climate control)
If you have ecc then you car reach through the hole for the radio and push the climate control module from the back.Be careful put a rag on your arm.Sometimes it is stubborn and when it releases it will cut your arm.
If you have MCC then remove all 3 of the control *****.Then under the 2 outer ***** is 2 T-25 screws.Remove them then push the outside cover out from the back and unplug the wiring.On the sides you will see one Phillips screw on each side remove them.You are done here for now.
Next remove the air bag from the steering wheel.Turn the steering wheel so that the top is to one side.There is a hole in the back of the steering wheel.Insert a long T-30 and remove the screws for the airbag.Always remove and tighten the right side screw for the air bag first.If not then the horn might not work.Next take the little T-20 screw stored in the steering wheel.That will get screwed into the hole on top of where the bolt for the steering wheel is.It will hold the Contact reel from unrolling.
Note: Break the bolt for the steering wheel loose before installing the small screw.
Remove the bolt holding the steering wheel in.It is a 18mm head bolt.Then lift the steering wheel off.
Next remove the steering column covers.On the S70 pull up on the top one and remove it.Then loosen and remove the T-25 screws in the bottom cover.The screws go from the bottom going up.
The 850 you will have to remove 2 T-15 screws in the front part of the cover.You will need it to be long to reach the screws.That will remove the top cover.Note be careful removing the T-15 screws.Hold down on the top cover while removing then or the tabs might break off the top cover.Then remove the 2 T-25 screws and remove the lower cover.
Next remove the turn signal switch and the wiper switch.They are held on by 2 T-25 screws each.Next remove the SRS contact reel.Note:Be very careful the plastic is very brittle.
There is 3 screws total holding it in.Then unplug it and remove it all the way.
Next remove the lower dash panel on the left side of the car.Then look up under the dash and you should see a long red plug or a Yellow with a Purple pull tab to release. It should have a tab to pull to release it.Pull it and release it.That is the main plug for the dash.
Next on the 850 you will have to remove the metal knee bolsters.There is 13mm nuts holding it in.Note:Or you can wait till you remove the dash.It is easier to remove them once the dash is out.Pull back the cover at the bottom of the dash by the door.The sill cover that runs all the way back.Pull it off by the dash.You will see a screw holding the bottom of the dash.remove the 10mm screw.
Then go to the other side and remove the glove box assembly.Remove the T-25 screws folding it in.On the 850's unhook the glove box support arms by inserting a small screw driver in the hole.Then remove the insert.Next remove the lower dash cover on that side as well.
Also unplug the passenger side Air bag.You will see the plug.Look for an orange wrapped wire and follow to the plug.Then pull back on the sill cover again and remove the 10mm screw on that side as well.
The dash should be ready to come out.Make sure you have someone help you remove it.
You will need to leave the key out of the ignition.To get the car out of park.Look on the right side of the shifter.There is a soleniod you will need to push the soleniod back and push the button on the shifter and pull out of part.
Remove the dash.If it is turbo you will also have to unplug the line for the boost guage if the car has one.Also be careful some cars have an extra plug you will have to unplug while removing the dash.Watch while removing.
Set the dash off to the side in a safe place.
Then you will see the Dash Mounting Tabs on the back of the Dash.
This is what I would use to repair the Tabs. They call it Piping strap.I have a picture posted at the bottom of the post.
What you will do is cut a piece that will go up and over the tab that you can screw on each side. You will need to screw it over the clips that are there with the threads.Make sure you get it as tight as you can. Then when you got them all secured before installing make sure you install either a piece of Duct tape or Felt tape over the Tab and strap. This way you know it won't squeek or anything like that.
Then reinstall the dash.
[IMG]local://upfiles/853/508A35960BDE4D3EB2F3CD3CB3593107.jpg[/IMG]

Joined: Mar 2005
Posts: 54
Likes: 0
From:
Hi Tech! I finally decided to do the project, but I'm stuck on one item.
I'm having problem locating the red or yellow pull tab to release the main plug for the dash. I looked under the dash of the driver side but could not find it. I see bunch of wires, but no plug. Could you go more detail where about the plug might be? Start me with me lying on the floor board and looking up the steering column.
'98 S70, non-turbo
Thread Starter
|
Administrator
Joined: Sep 2004
Posts: 36,349
Likes: 45
From: Orlando, Florida
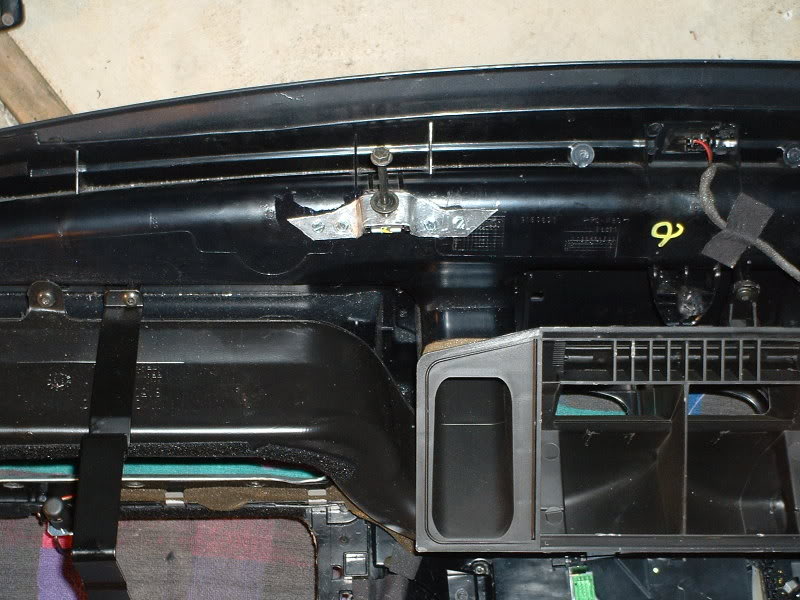
It is over to the right side. It will be a Yellow plug about 6 inches long or a little more and about 2 inches wide.
It will be about where the arrow in the Pic is.
[IMG]local://upfiles/853/8657D246AA6245F8B042231C512B796C.jpg[/IMG]
It will be about where the arrow in the Pic is.
[IMG]local://upfiles/853/8657D246AA6245F8B042231C512B796C.jpg[/IMG]
Joined: Mar 2005
Posts: 54
Likes: 0
From:
I got the dash out. Hoa!
My '98 S70 did not have the main plug for the dash although it had more screws that need to be removed, i.e. under the ash tray holder and both outer most bottom leg of the dash. I now see what the broken tabs looks like. I will post picture later.
Tech, thanks again for your post.
My '98 S70 did not have the main plug for the dash although it had more screws that need to be removed, i.e. under the ash tray holder and both outer most bottom leg of the dash. I now see what the broken tabs looks like. I will post picture later.
Tech, thanks again for your post.
Joined: Mar 2005
Posts: 54
Likes: 0
From:
No more squeaks!
Contact reel – shown with the screw lock installed. The plastic mounting eyelet was old and brittle. I was able to salvage it using a 2-tube epoxy to mend it.
Alignment dash plug – I believe this was the main squeaker. Make sure you replace the worn out felt wrap. This is located on the underside center of the dash.
Broken mount – here you see the plastic casing the square nut has disintegrated. I was able to use the 2-tube epoxy to mend others that are worse off.
Piping strap – I had to increase slightly the size of the piping strap hole directly above the square nut to make it easier for me to fish for the square nut during installation. I took the picture without the tape wrap so you can see how I installed it. I later wrap the strap with a cloth tape on both sides. You can use a duct tape as well as Tech mentioned.
[IMG]local://upfiles/1589/4CDA67D6700D47EE8D71D8FC365867C8.jpg[/IMG]
[IMG]local://upfiles/1589/7F66CBC9453642459DD30B71FDC20B0A.jpg[/IMG]
[IMG]local://upfiles/1589/852B9D8F844F47D6B76A711103483A33.jpg[/IMG]
[IMG]local://upfiles/1589/17E16BAF01D54D67AE3D2D721540075B.jpg[/IMG]
[IMG]local://upfiles/1589/661520964A8A42D8BF304E2748A685F1.jpg[/IMG]

Joined: Oct 2006
Posts: 3
Likes: 0
Quick question...
Pulling the dash seems like a pretty big ordeal. I believe the book calls for about 9 hours labor. Is there any quick fix or is pulling the dash the only reasonable way to go?
There is plenty of room to work around the wiper transmission (under the A/C intake). My friend and I are almost tempted to run some heavy duty lag screws throug the firewall to pull the dash tight against the wall.
I know this is a riggin' way to fix something, but we just aren't up to pulling the dash right now for the tab repair.
Any reason why this might not work?
Thread Starter
|
Administrator
Joined: Sep 2004
Posts: 36,349
Likes: 45
From: Orlando, Florida
You will only Trash the Dash more by doing that.
If you take your time and work carefully with 2 people you can have it out in about 1 hour or so.
With as many As I have done I can have it out in 20 minutes.
If you take your time and work carefully with 2 people you can have it out in about 1 hour or so.
With as many As I have done I can have it out in 20 minutes.
Joined: Oct 2006
Posts: 3
Likes: 0
I believe the problem is finding the time. What kind of time do you estimate it would take for a first timer?
Have you ever broken any of the "fake" woodgrain pieces in the process? If so...where do you purchase these replacement pieces? The dealer claims they can't guarantee a match in color and they are very expensive. I see some cheap kits on Ebay for around $125. Have you ever tried one of these kits?
Thanks for your help!
If you were nearby...I believe we would gladly pay for your 20 minutes of service!
Thread Starter
|
Administrator
Joined: Sep 2004
Posts: 36,349
Likes: 45
From: Orlando, Florida
Never broke any of the wood grain.
That is part of the dash and doesn't get touched.
To remove and repair and install I would look at about 1/2 a day with repairing and letting Glue or what ever you use setup.
That is part of the dash and doesn't get touched.
To remove and repair and install I would look at about 1/2 a day with repairing and letting Glue or what ever you use setup.


Joined: Aug 2007
Posts: 12
Likes: 0
From:
Hey All,
Tech gave some pretty good detailed instructions. I came across some instructions a while back for the same project. What a long, drawn out project. Make sure before you start, you have the entire day set aside. Preferably start Saturday Morning, just in case something goes wrong, you have Sunday to recover.
Well I couldn't find the original thread anymore so here is a carbon copy.
First of all, let me say that this was done on a 1999 S70 and will work for all trims. It could possibly be different for 1998 and will more than likely be different for 850's.
One of the main reasons your dash is squeaking/ratteling is because 4 studs that screw into the firewall have shattered. These are the tools and supplies you'll need:
-General tools and sockets
-Torx screwdrivers
-thin strips of aluminum or other maluable metal.
-wood screws
-new screw plates (only if you are missing any)
-Zip-Ties (optional)
Ok. Here are the steps at a glance:[/b]
**DISCONNECT THE NEGATIVE (-) LEAD TO THE BATTERY TO AVOID AN SRS CODE** (but make sure electric seats are all the way back first!!)
1.) Take off the top dash pad and remove other accessories.
2.) Remove the center console.
3.) Remove the windshield wiper cover.
4.) Remove steering wheel+turn signal and windshield wiper stalks.
5.) Remove lots of T25 screws and a yellow plug.
1.) Removing the dash pad and other accessories.[/b]
Open the glovebox door and start taking out all the T25 screws you see. Give the box a good jerk and pull it out. Again, pull out all the T25 screws you see and set them aside. The bottom row should release the bottom storage compartment.
Pry out all of the air vents and stereo mesh on the pad. Unscrew the seven T25 screws behind all of them. There are two screws above/in front of the instrument cluster. Remove these screws.
Now direct your attention to the glovebox. Along the top are three 10mm bolts holding in the dash pad.
Lift off the dash pad and notice the passenger airbag is still connected; pinch the ends of the connector on the end of the module and pull out, then slide out the clip on the bottom.
The dash pad can now be easily lifted out. Now remove your radio, thermostat controls, and hazard light switch.
2.) Remove the center console.[/b]
Open the armrest and pry out the cover at the bottom. Underneath are two 8mm screws that hold the entire console in. Unscrew them.
Release the parking break (if enabled) and pull the cover towards the drivers seat until it snaps out. Underneath, there are two white connectors. Seperate them. From here, put the car in neutral and lift up on the entire console and pull it out of the car.
The center console should now be out of the car.
3.) Removing the windshileld wiper cover.[/b]
Remove the caps on the windshield wiper stalks. Use a 13mm socket to remove the windshield wipers.
Remove these five screws:
Pry off the clamps holding the two rubber drain hoses on both sides off.
4.) Removing the steering wheel.[/b]
Remove the three screws on the bottom of the steering column cover and pull off the bottom half. The bottom half can be pried out like so:

Turn the key to Position | or || and turn the wheel sideways. Unscrew the two screws to pry out the airbag (you will need a long T25(possibly T30) screwdriver). It takes a little bit of persuading, but it'll come off.
Next, remove the white plug that fits in the back of the airbag. It pulls straight out. Next, unscrew the big screw in the middle of the wheel. You will now see some splines. Take a ultra-fine point sharpie or pencil and mark a straight line across the diameter. This will help make sure you put the wheel back on straight.
You can now pull off the wheel. Remove the wiper and turn signal stalks.
5.) Remove LOTS of T25 screws and yellow plug.[/b]
Now back to the interior. There is a black cover that pops out on the very far outside bottom of the dash. Pull straight towards the back of the car and it will pop out. Behind will be, you guessed it, another T25! Remove the one on both the drivers and passengers side.
Next, lay in the drivers foot well and look up towards the relays and you will see a yellow plug. Pull out the purple retainer and just lift out the yellow plug!
If you want pictures of the entire wiring harness just let me know and i'll post it up!
From here you should now be able to lift/contort the entire dash out!
Picture of Socals just a little more clearer:
Now to fix the problem![/b]Thanks Socal!
This is your problem
There are 4 plastic clips (which are molded into the defrost vent and the dash console itself) that go over 4 square nuts, which are what the 4 bolts in the firewall screw into.
When plastic breaks the square nuts are no longer being held in place and the dashboard is no longer attached to the firewall.
The crude but effective fix I came up with, was to make some rough metal strips which hold the nut against the dash, and which are screwed into the defrost vent. After padding it around the strap and reassembling, it totally eliminated the racket that my dash was making.
You can see the long bolts sticking out of the dash, I was checking to make sure they went through correctly.
I will have Seamus' method up soon as well whenever i find it.
Reinstall everything in reverse order!
Good Luck and Happy Wrenching!
[/align]
Tech gave some pretty good detailed instructions. I came across some instructions a while back for the same project. What a long, drawn out project. Make sure before you start, you have the entire day set aside. Preferably start Saturday Morning, just in case something goes wrong, you have Sunday to recover.
Well I couldn't find the original thread anymore so here is a carbon copy.
First of all, let me say that this was done on a 1999 S70 and will work for all trims. It could possibly be different for 1998 and will more than likely be different for 850's.
One of the main reasons your dash is squeaking/ratteling is because 4 studs that screw into the firewall have shattered. These are the tools and supplies you'll need:
-General tools and sockets
-Torx screwdrivers
-thin strips of aluminum or other maluable metal.
-wood screws
-new screw plates (only if you are missing any)
-Zip-Ties (optional)
Ok. Here are the steps at a glance:[/b]
**DISCONNECT THE NEGATIVE (-) LEAD TO THE BATTERY TO AVOID AN SRS CODE** (but make sure electric seats are all the way back first!!)
1.) Take off the top dash pad and remove other accessories.
2.) Remove the center console.
3.) Remove the windshield wiper cover.
4.) Remove steering wheel+turn signal and windshield wiper stalks.
5.) Remove lots of T25 screws and a yellow plug.
1.) Removing the dash pad and other accessories.[/b]
Open the glovebox door and start taking out all the T25 screws you see. Give the box a good jerk and pull it out. Again, pull out all the T25 screws you see and set them aside. The bottom row should release the bottom storage compartment.
Pry out all of the air vents and stereo mesh on the pad. Unscrew the seven T25 screws behind all of them. There are two screws above/in front of the instrument cluster. Remove these screws.
Now direct your attention to the glovebox. Along the top are three 10mm bolts holding in the dash pad.
Lift off the dash pad and notice the passenger airbag is still connected; pinch the ends of the connector on the end of the module and pull out, then slide out the clip on the bottom.
The dash pad can now be easily lifted out. Now remove your radio, thermostat controls, and hazard light switch.
2.) Remove the center console.[/b]
Open the armrest and pry out the cover at the bottom. Underneath are two 8mm screws that hold the entire console in. Unscrew them.
Release the parking break (if enabled) and pull the cover towards the drivers seat until it snaps out. Underneath, there are two white connectors. Seperate them. From here, put the car in neutral and lift up on the entire console and pull it out of the car.
The center console should now be out of the car.
3.) Removing the windshileld wiper cover.[/b]
Remove the caps on the windshield wiper stalks. Use a 13mm socket to remove the windshield wipers.
Remove these five screws:
Pry off the clamps holding the two rubber drain hoses on both sides off.
4.) Removing the steering wheel.[/b]
Remove the three screws on the bottom of the steering column cover and pull off the bottom half. The bottom half can be pried out like so:
Turn the key to Position | or || and turn the wheel sideways. Unscrew the two screws to pry out the airbag (you will need a long T25(possibly T30) screwdriver). It takes a little bit of persuading, but it'll come off.
Next, remove the white plug that fits in the back of the airbag. It pulls straight out. Next, unscrew the big screw in the middle of the wheel. You will now see some splines. Take a ultra-fine point sharpie or pencil and mark a straight line across the diameter. This will help make sure you put the wheel back on straight.
You can now pull off the wheel. Remove the wiper and turn signal stalks.
5.) Remove LOTS of T25 screws and yellow plug.[/b]
Now back to the interior. There is a black cover that pops out on the very far outside bottom of the dash. Pull straight towards the back of the car and it will pop out. Behind will be, you guessed it, another T25! Remove the one on both the drivers and passengers side.
Next, lay in the drivers foot well and look up towards the relays and you will see a yellow plug. Pull out the purple retainer and just lift out the yellow plug!
If you want pictures of the entire wiring harness just let me know and i'll post it up!
From here you should now be able to lift/contort the entire dash out!
Picture of Socals just a little more clearer:
Now to fix the problem![/b]Thanks Socal!
This is your problem
There are 4 plastic clips (which are molded into the defrost vent and the dash console itself) that go over 4 square nuts, which are what the 4 bolts in the firewall screw into.
When plastic breaks the square nuts are no longer being held in place and the dashboard is no longer attached to the firewall.
The crude but effective fix I came up with, was to make some rough metal strips which hold the nut against the dash, and which are screwed into the defrost vent. After padding it around the strap and reassembling, it totally eliminated the racket that my dash was making.
You can see the long bolts sticking out of the dash, I was checking to make sure they went through correctly.
I will have Seamus' method up soon as well whenever i find it.
Reinstall everything in reverse order!
Good Luck and Happy Wrenching!
[/align]


Junior Member
Joined: Feb 2009
Posts: 5
Likes: 0
From: beaumont, tx
glad this is sticky. MyS70Glt, that diagram is great. Thanks for providing it. I just bought an s70 with terrible dash noises. It seems to be exactly those tabs.
Also, I too am curious about those cheap trim kits on ebay. I've got a couple of cracked trim pieces that could use replacing, among other broken interior parts.
Also, I too am curious about those cheap trim kits on ebay. I've got a couple of cracked trim pieces that could use replacing, among other broken interior parts.

Junior Member
Joined: Mar 2009
Posts: 2
Likes: 0
These are great postings and instructions. My shop wanted $800. to just remove and install the dash. Repairs/ replacement parts would have been extra. Had a completely loose dash assembly in my 97' 850 T-5. Took it apart and now see that all the mounts are in a hundred pieces. I can't see a way to reconstruct the mounts (holding nuts). There is nothing to go by anymore. I think I'm left with ordering a replacement from the dealer. I saved $800. though and feel good about that. Thanks guys. Mike