
Dash board removal for mounting tab repair


Administrator
Joined: Mar 2009
Posts: 15,736
Likes: 36
From: Albuquerque, NM
This is just as bad as doing a AC evaporator in the 850. That would be a good time to do both. I'm thinking about putting some expansion glue in the mount hole. Are the main holes that broken the ones that have screw that come from the base of the windshield?

Senior Member
Joined: Nov 2011
Posts: 832
Likes: 2
Hey All,
Tech gave some pretty good detailed instructions. I came across some instructions a while back for the same project. What a long, drawn out project. Make sure before you start, you have the entire day set aside. Preferably start Saturday Morning, just in case something goes wrong, you have Sunday to recover.
Well I couldn't find the original thread anymore so here is a carbon copy.
First of all, let me say that this was done on a 1999 S70 and will work for all trims. It could possibly be different for 1998 and will more than likely be different for 850's.
One of the main reasons your dash is squeaking/ratteling is because 4 studs that screw into the firewall have shattered. These are the tools and supplies you'll need:
-General tools and sockets
-Torx screwdrivers
-thin strips of aluminum or other maluable metal.
-wood screws
-new screw plates (only if you are missing any)
-Zip-Ties (optional)
Ok. Here are the steps at a glance:[/b]
**DISCONNECT THE NEGATIVE (-) LEAD TO THE BATTERY TO AVOID AN SRS CODE** (but make sure electric seats are all the way back first!!)
1.) Take off the top dash pad and remove other accessories.
2.) Remove the center console.
3.) Remove the windshield wiper cover.
4.) Remove steering wheel+turn signal and windshield wiper stalks.
5.) Remove lots of T25 screws and a yellow plug.
1.) Removing the dash pad and other accessories.[/b]
Open the glovebox door and start taking out all the T25 screws you see. Give the box a good jerk and pull it out. Again, pull out all the T25 screws you see and set them aside. The bottom row should release the bottom storage compartment.
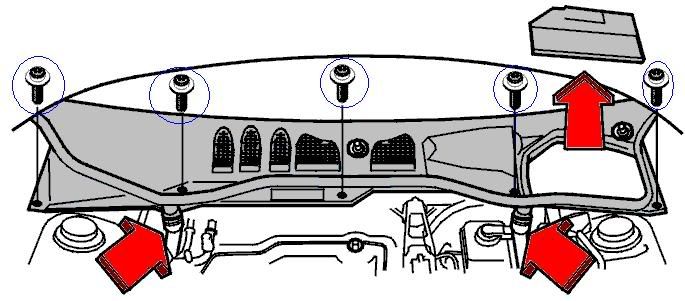
Pry out all of the air vents and stereo mesh on the pad. Unscrew the seven T25 screws behind all of them. There are two screws above/in front of the instrument cluster. Remove these screws.
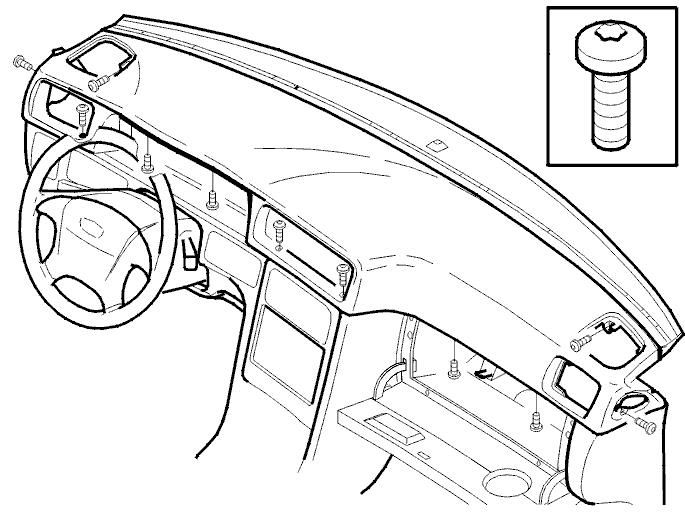
Now direct your attention to the glovebox. Along the top are three 10mm bolts holding in the dash pad.
Lift off the dash pad and notice the passenger airbag is still connected; pinch the ends of the connector on the end of the module and pull out, then slide out the clip on the bottom.
The dash pad can now be easily lifted out. Now remove your radio, thermostat controls, and hazard light switch.
2.) Remove the center console.[/b]
Open the armrest and pry out the cover at the bottom. Underneath are two 8mm screws that hold the entire console in. Unscrew them.
Release the parking break (if enabled) and pull the cover towards the drivers seat until it snaps out. Underneath, there are two white connectors. Seperate them. From here, put the car in neutral and lift up on the entire console and pull it out of the car.
The center console should now be out of the car.
3.) Removing the windshileld wiper cover.[/b]
Remove the caps on the windshield wiper stalks. Use a 13mm socket to remove the windshield wipers.
Remove these five screws:
Pry off the clamps holding the two rubber drain hoses on both sides off.
4.) Removing the steering wheel.[/b]
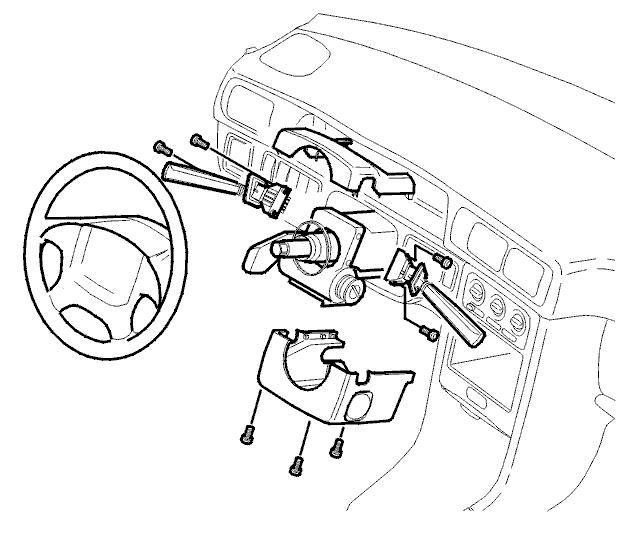
Remove the three screws on the bottom of the steering column cover and pull off the bottom half. The bottom half can be pried out like so:

Turn the key to Position | or || and turn the wheel sideways. Unscrew the two screws to pry out the airbag (you will need a long T25(possibly T30) screwdriver). It takes a little bit of persuading, but it'll come off.
Next, remove the white plug that fits in the back of the airbag. It pulls straight out. Next, unscrew the big screw in the middle of the wheel. You will now see some splines. Take a ultra-fine point sharpie or pencil and mark a straight line across the diameter. This will help make sure you put the wheel back on straight.
You can now pull off the wheel. Remove the wiper and turn signal stalks.
5.) Remove LOTS of T25 screws and yellow plug.[/b]
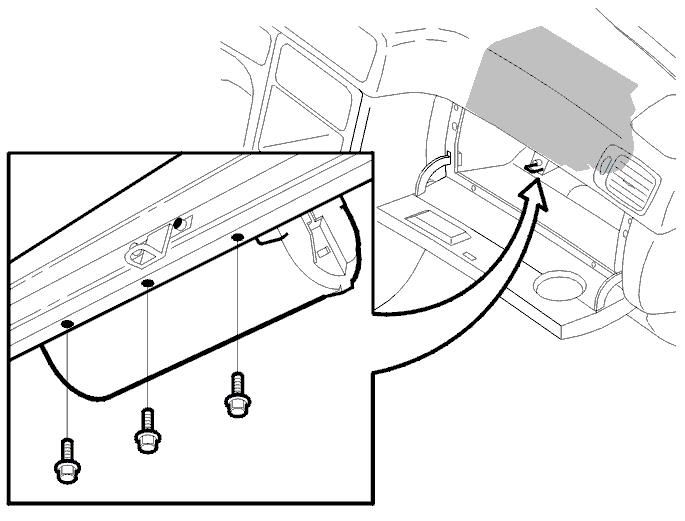
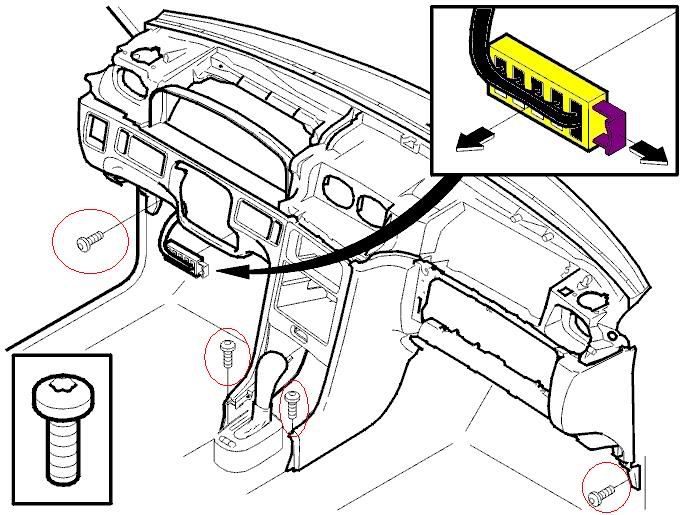
Now back to the interior. There is a black cover that pops out on the very far outside bottom of the dash. Pull straight towards the back of the car and it will pop out. Behind will be, you guessed it, another T25! Remove the one on both the drivers and passengers side.
Next, lay in the drivers foot well and look up towards the relays and you will see a yellow plug. Pull out the purple retainer and just lift out the yellow plug!
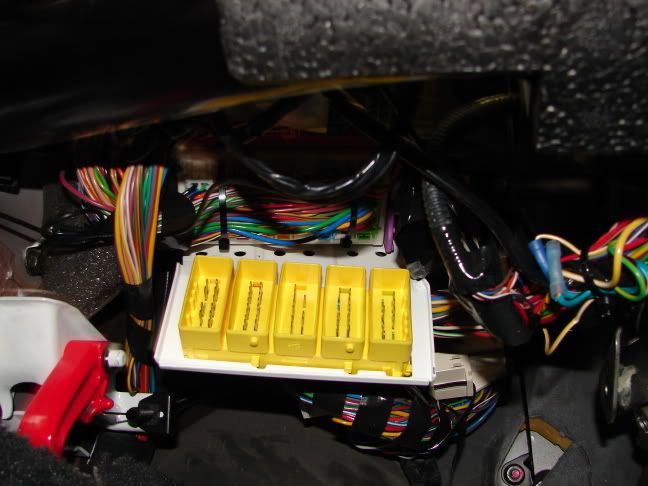
If you want pictures of the entire wiring harness just let me know and i'll post it up!
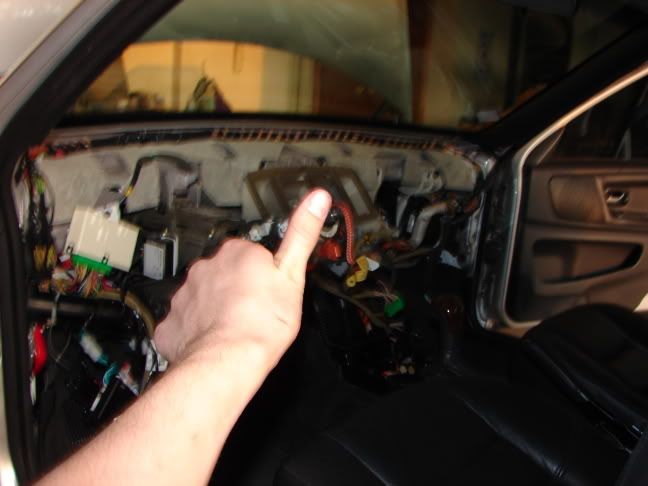
From here you should now be able to lift/contort the entire dash out!
Picture of Socals just a little more clearer:

Now to fix the problem![/b]Thanks Socal!
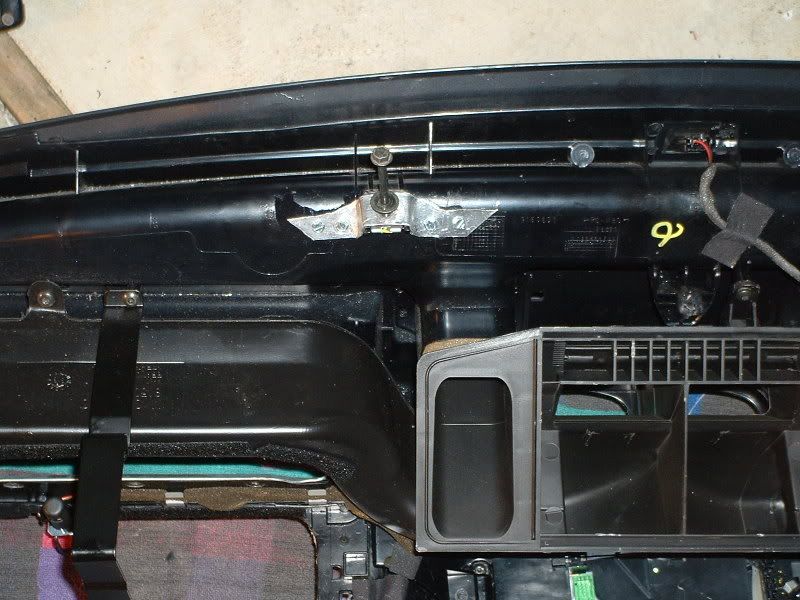
This is your problem
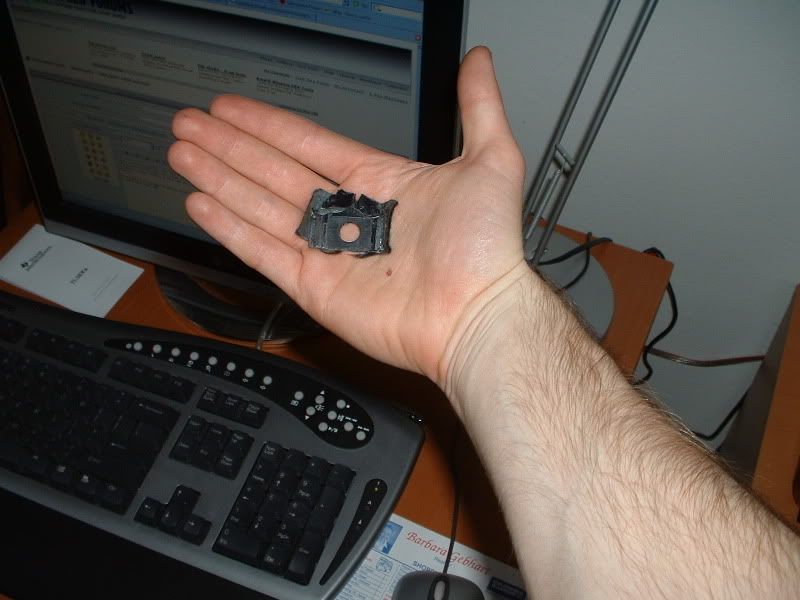
There are 4 plastic clips (which are molded into the defrost vent and the dash console itself) that go over 4 square nuts, which are what the 4 bolts in the firewall screw into.
When plastic breaks the square nuts are no longer being held in place and the dashboard is no longer attached to the firewall.
The crude but effective fix I came up with, was to make some rough metal strips which hold the nut against the dash, and which are screwed into the defrost vent. After padding it around the strap and reassembling, it totally eliminated the racket that my dash was making.
You can see the long bolts sticking out of the dash, I was checking to make sure they went through correctly.
I will have Seamus' method up soon as well whenever i find it.
Reinstall everything in reverse order!
Good Luck and Happy Wrenching!
[/align]
Tech gave some pretty good detailed instructions. I came across some instructions a while back for the same project. What a long, drawn out project. Make sure before you start, you have the entire day set aside. Preferably start Saturday Morning, just in case something goes wrong, you have Sunday to recover.
Well I couldn't find the original thread anymore so here is a carbon copy.
First of all, let me say that this was done on a 1999 S70 and will work for all trims. It could possibly be different for 1998 and will more than likely be different for 850's.
One of the main reasons your dash is squeaking/ratteling is because 4 studs that screw into the firewall have shattered. These are the tools and supplies you'll need:
-General tools and sockets
-Torx screwdrivers
-thin strips of aluminum or other maluable metal.
-wood screws
-new screw plates (only if you are missing any)
-Zip-Ties (optional)
Ok. Here are the steps at a glance:[/b]
**DISCONNECT THE NEGATIVE (-) LEAD TO THE BATTERY TO AVOID AN SRS CODE** (but make sure electric seats are all the way back first!!)
1.) Take off the top dash pad and remove other accessories.
2.) Remove the center console.
3.) Remove the windshield wiper cover.
4.) Remove steering wheel+turn signal and windshield wiper stalks.
5.) Remove lots of T25 screws and a yellow plug.
1.) Removing the dash pad and other accessories.[/b]
Open the glovebox door and start taking out all the T25 screws you see. Give the box a good jerk and pull it out. Again, pull out all the T25 screws you see and set them aside. The bottom row should release the bottom storage compartment.
Pry out all of the air vents and stereo mesh on the pad. Unscrew the seven T25 screws behind all of them. There are two screws above/in front of the instrument cluster. Remove these screws.
Now direct your attention to the glovebox. Along the top are three 10mm bolts holding in the dash pad.
Lift off the dash pad and notice the passenger airbag is still connected; pinch the ends of the connector on the end of the module and pull out, then slide out the clip on the bottom.
The dash pad can now be easily lifted out. Now remove your radio, thermostat controls, and hazard light switch.
2.) Remove the center console.[/b]
Open the armrest and pry out the cover at the bottom. Underneath are two 8mm screws that hold the entire console in. Unscrew them.
Release the parking break (if enabled) and pull the cover towards the drivers seat until it snaps out. Underneath, there are two white connectors. Seperate them. From here, put the car in neutral and lift up on the entire console and pull it out of the car.
The center console should now be out of the car.
3.) Removing the windshileld wiper cover.[/b]
Remove the caps on the windshield wiper stalks. Use a 13mm socket to remove the windshield wipers.
Remove these five screws:
Pry off the clamps holding the two rubber drain hoses on both sides off.
4.) Removing the steering wheel.[/b]
Remove the three screws on the bottom of the steering column cover and pull off the bottom half. The bottom half can be pried out like so:
Turn the key to Position | or || and turn the wheel sideways. Unscrew the two screws to pry out the airbag (you will need a long T25(possibly T30) screwdriver). It takes a little bit of persuading, but it'll come off.
Next, remove the white plug that fits in the back of the airbag. It pulls straight out. Next, unscrew the big screw in the middle of the wheel. You will now see some splines. Take a ultra-fine point sharpie or pencil and mark a straight line across the diameter. This will help make sure you put the wheel back on straight.
You can now pull off the wheel. Remove the wiper and turn signal stalks.
5.) Remove LOTS of T25 screws and yellow plug.[/b]
Now back to the interior. There is a black cover that pops out on the very far outside bottom of the dash. Pull straight towards the back of the car and it will pop out. Behind will be, you guessed it, another T25! Remove the one on both the drivers and passengers side.
Next, lay in the drivers foot well and look up towards the relays and you will see a yellow plug. Pull out the purple retainer and just lift out the yellow plug!
If you want pictures of the entire wiring harness just let me know and i'll post it up!
From here you should now be able to lift/contort the entire dash out!
Picture of Socals just a little more clearer:
Now to fix the problem![/b]Thanks Socal!
This is your problem
There are 4 plastic clips (which are molded into the defrost vent and the dash console itself) that go over 4 square nuts, which are what the 4 bolts in the firewall screw into.
When plastic breaks the square nuts are no longer being held in place and the dashboard is no longer attached to the firewall.
The crude but effective fix I came up with, was to make some rough metal strips which hold the nut against the dash, and which are screwed into the defrost vent. After padding it around the strap and reassembling, it totally eliminated the racket that my dash was making.
You can see the long bolts sticking out of the dash, I was checking to make sure they went through correctly.
I will have Seamus' method up soon as well whenever i find it.
Reinstall everything in reverse order!
Good Luck and Happy Wrenching!
[/align]


Junior Member
Joined: Jul 2012
Posts: 2
Likes: 0
I have no idea what to do now. Does anybody know how to remove the steering wheel Torx screws when the heads have been stripped out? Is it absolutely necessary to remove the steering wheel in order to remove the dash?

Junior Member
Joined: May 2007
Posts: 6
Likes: 0
Attempting to remove the squeaky rattling dash on my 1999 S70 to repair the mounting tabs. Made it to the step where you have to remove the steering wheel. Tried to loosen the two Torx screws on the back side of the steering wheel. The screws were super tight and wouldn't budge with a straight handle Torx driver. I switched to a T handle Torx driver to get more leverage. I just stripped the heads of the screws trying to loosen them.
I have no idea what to do now. Does anybody know how to remove the steering wheel Torx screws when the heads have been stripped out? Is it absolutely necessary to remove the steering wheel in order to remove the dash?
I have no idea what to do now. Does anybody know how to remove the steering wheel Torx screws when the heads have been stripped out? Is it absolutely necessary to remove the steering wheel in order to remove the dash?
By the way, not all of these cars used T-30 screws for the back of the steering wheel. My 1998 S70 has T-27's.
Junior Member
Joined: Jul 2012
Posts: 2
Likes: 0
I finally got the steering wheel screws out.
I first tried the T-30 Torx but it was too big. I was using a T-25 when I partially stripped out the heads.
Somebody else posted a reply message suggesting a T-27 might be the correct size. (Thanks for the suggestion! I didn't know there was such a thing as a T-27. My Torx set jumps from T-25 to T-30.) I bought a T handle T-27, but it was too long. The handle end hits the clear plastic dash panel.
I found a Craftsman folding Torx key set at Sears which includes seven Torx sizes (including a T-27). The individual Torx drivers fold out from the handle (kind of like a Swiss army knife). The Torx shaft (about 2 inches) is long enough to reach the recessed screw heads, but short enough that the handle doesn't hit the instrument panel. The perpendicular handle also gives you good leverage to loosen tight screws.
After I got the steering wheel off I pushed one of the screws completely out of the foam pad to double check the size. The T-30 size driver is definitely too big and will not fit. The T-27 size fits perfectly.

Junior Member
Joined: Jul 2012
Posts: 21
Likes: 0
From: Dallas, TX
Had to do the dash tab repair because the rattling was torturous. The dash was in pretty bad shape as a result of being driven to work daily and parked uncovered over a ten year period in the Texas heat. If I had to do this over I would pursue replacing the dash instead of repairing it as I did. Thank goodness for JB Weld.
Removal of the dash was fairly straight forward thanks to this thread. It was a bit of a Rubic's cube puzzle to get it past the steering column though. It required a specific sequence of turning the ignition in order to move the shifter and then the reverse in order to remove the key as the final step to getting the dash past the column. I strongly recommend removing one of the front seats which I didn't do during dash removal but did (passenger side) during install. Seat removal was very easy.
I haven't seen anyone post damage similar to what I found so here it is along with photos.
A RUNDOWN OF THE DAMAGE
- The tube that supplies air to the defroster vents, which is also the main support structure of the dash, was cracked almost completely around in two spots.
- The part of the top side of the dash that is closest to the windshield was badly cracked in two spots.
- Three of the four tabs were broken with two being shattered. The tab in the attached photo is fixed with JB Weld and was the worst of the three. Where there is JB Weld is where it was cracked. The only reason all four tabs weren't broken is because the bolt on one of them was very loose and not putting any strain on the tab.
- The part of the dash that runs down the door frame on the driver's side was shattered in a couple of spots. The passenger side of the same spot showed no such damage.
- The three clockspring mounting points were badly cracked with the top one having broken completely in two.
- All of the gray foam that wraps the wire bundles had disintegrated with the adhesive turning into an oily goo.
- The foam that seals the joints in the AC system had disintegrated in some spots. I replaced this foam in the two spots that were easily accessible.
Junior Member
Joined: Jul 2012
Posts: 21
Likes: 0
From: Dallas, TX
The cracked dash tube was repaired with JB Weld and a metal bracket at each of the two cracks since I didn't want to rely solely on the JB Weld due to the severity of the cracks. I fabricated the brackets from one of those steel strips that you usually find at hobby stores.
I dug out a groove along each crack to give the JB Weld more of a surface to adhere to. The brackets were placed at the points where the crack seemed widest and the stress on the tube was greatest.
I dug out a groove along each crack to give the JB Weld more of a surface to adhere to. The brackets were placed at the points where the crack seemed widest and the stress on the tube was greatest.
Junior Member
Joined: Jul 2012
Posts: 21
Likes: 0
From: Dallas, TX
Addressing the foam wrapping was by far the worst part of the whole dash repair job. It had to be done as the foam sprinkled itself every time it was touched or even moved. The oily goo which was the remains of the adhesive got on everything. I removed the remaining foam with a vacuum and by rubbing it off with paper towels. I then wiped off the wire bundles with alcohol which turned the goo into sticky globules. Further wiping removed most of that.
I initially wrapped the newly bare wire bundles with white soft rubber checkerboard shelf liner that is found at grocery stores and also at Walmart and Target stores. I wasn't pleased with this as I'm not sure of this material's longevity and resistance to heat or its white color. I then found some dark gray felt and wrapped it over the shelf liner. The combination of the two is great since the felt would slide all over the wire bundles without the liner and the felt outer cover has the look that closely matches the foam. It also provides a good padding for the wires. The liner and felt were secured using velcro tape. This was my biggest breakthrough in the whole job. It could be removed and adjusted at any time and it also stuck to the felt. I used a mild blue velcro tape to secure the liner and a heavy duty black velcro tape over the felt.
I have more photos but must get lunch first.
Junior Member
Joined: Jul 2012
Posts: 21
Likes: 0
From: Dallas, TX
Lunch was awesome.
The large vent foam gasket that is behind the dash was disintegrating to the touch especially at its top. I replaced it with weatherstripping and did the same to the smaller gasket that is on the front side of the dash. The large gasket peeled off mostly intact while the smaller one had to be scraped off.
The straight weatherstripping replacement pieces had to be cut at multiple angles in order to replicate the curved shape of the original gaskets. It was a little tedious but it worked.
The AC smells better now and in fact doesn't have much of a smell at all. It previously had a musty odor to it that would diminish after running it for a few minutes but would return every time after startup. The large foam gasket from behind the dash did have its own significant odor that was apparent when I removed it. The area underneath the cowling that covers the cabin air filter was washed paying particular attention to the air filter housing. There was a significant amount of dirt that had collected over the years which I'm certain added to the musty smell especially when it got wet. I also cleaned all of the air passages in the dash when it was out so I'm not sure how much of the improvement is due to just the gasket.
There is more foam at points where different sections join but it looked in fairly decent shape and I was losing my enthusiasm to try to replace it, so I didn't.
Very happy with the final outcome of the AC venting system.

Administrator
Joined: Mar 2009
Posts: 15,736
Likes: 36
From: Albuquerque, NM
I thought long and hard about trying that. One guy said he had done it successfully but I was afraid that it would push the dash further away from the fire wall and make more of a mess of things.