
Dig's debut: 2000 V70 XC


Thread Starter
|
Member
Joined: Nov 2011
Posts: 37
Likes: 0
From: The Land of Pleasant Living
Thanks, rspi. I had not seen that thread so now that there's a link to it in this thread, I'll be able to go back to it when I get motivated to tackle the dye job.
I like your green ToyYoda. How many miles do you have on it?
 ") The vanity plate on the car is cool too.
The vanity plate on the car is cool too.
BTW...ever wonder what kind of music they played on the Deathstar's elevators?
Richard Cheese - Darth Vaders Imperial March Theme (HQ) - YouTube
I like your green ToyYoda.
How many miles do you have on it? The vanity plate on the car is cool too.BTW...ever wonder what kind of music they played on the Deathstar's elevators?
Richard Cheese - Darth Vaders Imperial March Theme (HQ) - YouTube
Thread Starter
|
Member
Joined: Nov 2011
Posts: 37
Likes: 0
From: The Land of Pleasant Living
The other driver's insurance company called me yesterday to let me know that they had spoken with him and he acknowledged complete fault in the accident! I'll be dropping the car off Monday and picking up the rental car on their dime. What a load off of my mind.
I think I'll just park this handy link right here while I'm posting today.
Reset Service Light – Volvo
I think I'll just park this handy link right here while I'm posting today.
Reset Service Light – Volvo
Thread Starter
|
Member
Joined: Nov 2011
Posts: 37
Likes: 0
From: The Land of Pleasant Living
I got the XC back yesterday. The rear bumper cover will be replace but it's on back order from Volvo until the first week of March. They fixed/replaced the mechanicals underneath, slapped the old cover back on and gave it back to me to drive until then. I wish I could just get a check for the amount of the new cover and its installation. The old cover is barely damaged and the new one will not match the rest of the gray trim.
More to follow. Pics will come ASAP.
More to follow. Pics will come ASAP.

Senior Member
Joined: Jun 2008
Posts: 259
Likes: 0
From: PA
Then don't be so lazy, get out the masking tape, buy a couple of spray cans of bumper spray paint at any auto store, mask off your paint then paint your old trim to match your new bumper.
The stuff matches nearly 100%
The stuff matches nearly 100%

Administrator
Joined: Mar 2009
Posts: 15,736
Likes: 36
From: Albuquerque, NM
If you do take JRL's advise, make sure you have matching or near matching paint. Also, the side trip pieces come off with 1 screw, that's right, 1 screw. Just take them off and paint them on the ground.
Also, not sure why the insurance company didn't just give you a check to take care of that stuff yourself. That's how they always deal with me.
Also, not sure why the insurance company didn't just give you a check to take care of that stuff yourself. That's how they always deal with me.
Last edited by rspi; Feb 26, 2012 at 12:22 AM. Reason: add


Thread Starter
|
Member
Joined: Nov 2011
Posts: 37
Likes: 0
From: The Land of Pleasant Living
Not yet. I have read somewhere that a regimen of aggressive oil changes decreases the sludginess of the engine over time and the code gets thrown with less frequency. I'm going to give that a shot for a while. Fresh oil every 3k miles. What can it hurt?
Meanwhile, the shortcut offered by the ATF flush is still on the table.
Meanwhile, the shortcut offered by the ATF flush is still on the table.
I reset the light and stopped in to get a fresh supply of 7.1 quarts of Valvoline poured into the engine. Due to the recent onset of summer like temps, I made the choice, based on the manual's recommendations, to go back to a 10 weight instead of a 5 and I had to go with dino instead of synthetic but I figured I'd take a chance.
While under the hood, the tech noticed that there was a leak somewhere in the coolant overflow tank/hose/clamp. This news was consistent with the need for me to refill the system with about two cups of coolant every week when the dash light would come on. The next day, I popped the hood (still using the double pull method to fully release the latches) and was able to lift the tank out of its mounting slots to discover that I couldn't easily eyeball the source of the leak. The bottom of the tank was wet so I assumed the worst and made my plans based on that bit of intel. I used my phone's camera to take a couple of pictures of the whole system for reference and hit the road.
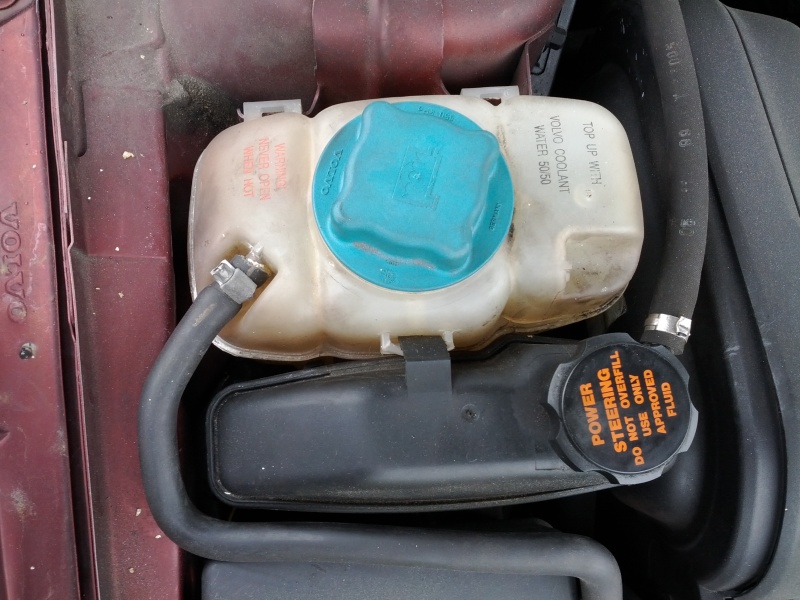
Photo taken from above while standing in front of the bumper.
White tank is coolant.
Black tank is Power Steering

View of the hose/clamp going to the metal line between the engine and the firewall. Pic is taken while standing beside the car leaning over the fender.
I went to my local pick and pull, paid my dollar entrance fee and found a couple of later model S60's with the same tank system still intact. I confirmed that the new tank was correct by comparing it to the pics on my phone and quickly removed the better looking one of the two available.
- 7mm socket released the clamp on the hose that mated to the metal line between the engine and the firewall.
- Pull the topmost overflow hose off the nipple without the need to remove the factory clamp. Bonus!
- Pop the tank straight up out of the fender slots, bringing the black power steering tank with it.
- Pop the P.S. tank out of the slots that mate it to the coolant tank and set aside.
- Cut the wires for the indicator light (in case the plug on mine was different from the new plug)
- Pay the man at the window $10 for the tank/cap/wiring/hose/clamps.
I got home and in a light drizzle, I repeated the steps above with the exception of the need to loosen the top clamp which had been replaced by a previous owner AND I unplugged my own wiring. The new plug popped right in so I didn't need to splice the new receptacle in line. More bonus!
I slipped the new hose over the line behind the engine and tightened the 7mm clamp. Then I popped all the plastic parts into their respective slots, refilled the system, started the car and ... fingers crossed ... it's been dry ever since.
Easy, easy fix. Again.
If only the non cooling AC can be so easy to solve. It's getting hot out there!
Someday, I'll get around to replacing the ignition lock but honestly, I've gotten used to the occasional bump to get the key to catch so I can start the car.
Thread Starter
|
Member
Joined: Nov 2011
Posts: 37
Likes: 0
From: The Land of Pleasant Living
The high mount third brake light at the top of the tailgate glass stopped working today. Do I really have to break the clips that hold the interior trim around the glass to replace a basic 1156 bulb?
Here's a link to one man's fix instead of buying replacement clips.
DIY: Rear Tailgate, how to Caulk with Silicone
Here's a link to one man's fix instead of buying replacement clips.
DIY: Rear Tailgate, how to Caulk with Silicone
Last edited by Digmenow; Apr 10, 2013 at 04:41 PM.

Thread
Thread Starter
Forum
Replies
Last Post
mamboo
All Other Volvo's
0
May 10, 2010 01:35 AM