
2005 Volvo XC90 Radiator Replacement DIY


Thread Starter
|
Member
Joined: Jan 2012
Posts: 31
Likes: 5
2005 Volvo XC90 Radiator Replacement DIY - Part 1
Hi,
The radiator on my 2005 XC90 developed a leak, and I could not find anything super useful, other than a 40min long youtube video where the guy seems to be stumbling through the process, and there isn't much detail on what he actually does... The video is here: https://www.youtube.com/watch?v=4OsEYpnJk1A). So, here are the steps I took, with some photos, hopefully this helps someone else. Time estimate - 2-4 hours, It took me 4ish due to stopping to take pics, and an additional almost hour dealing with a faulty captive nut in the new radiator (see note about that in the end)...
All images:
https://imgur.com/a/PWrMq
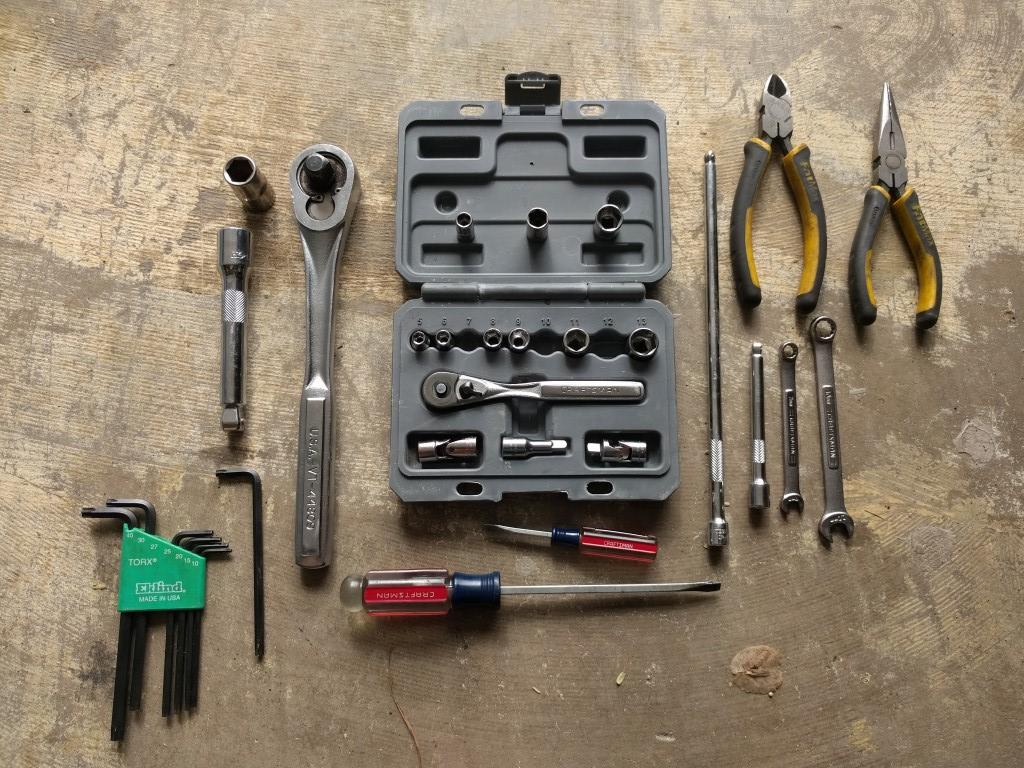
1. Tools I used - no specialty tools needed, and can all be done with a small socket set and few wrenches. The torx key needed is #27, most other bolts are 10mm or 12mm, with the 7mm used for the hose clamps.
You will also need:
- cable ties
- Coolant
- transmission fluid for top up (I lost about half a quart).
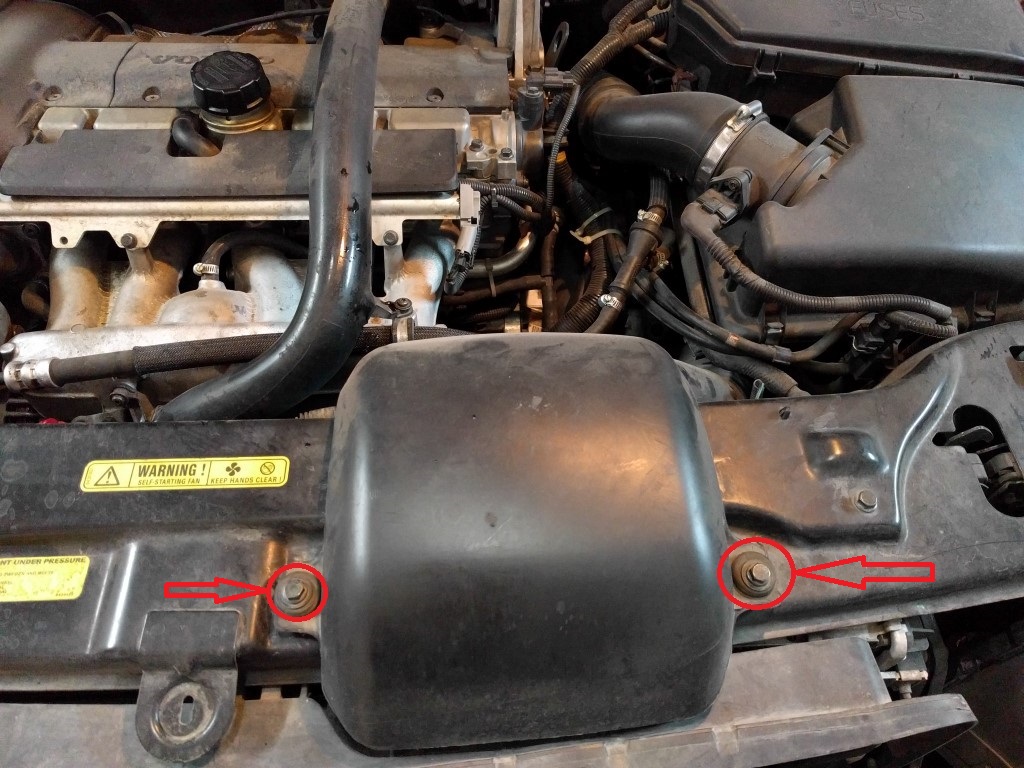
2. Take out the air intake pipe, 2 10mm bolts. Air intake pipe pulls out of the airbox:
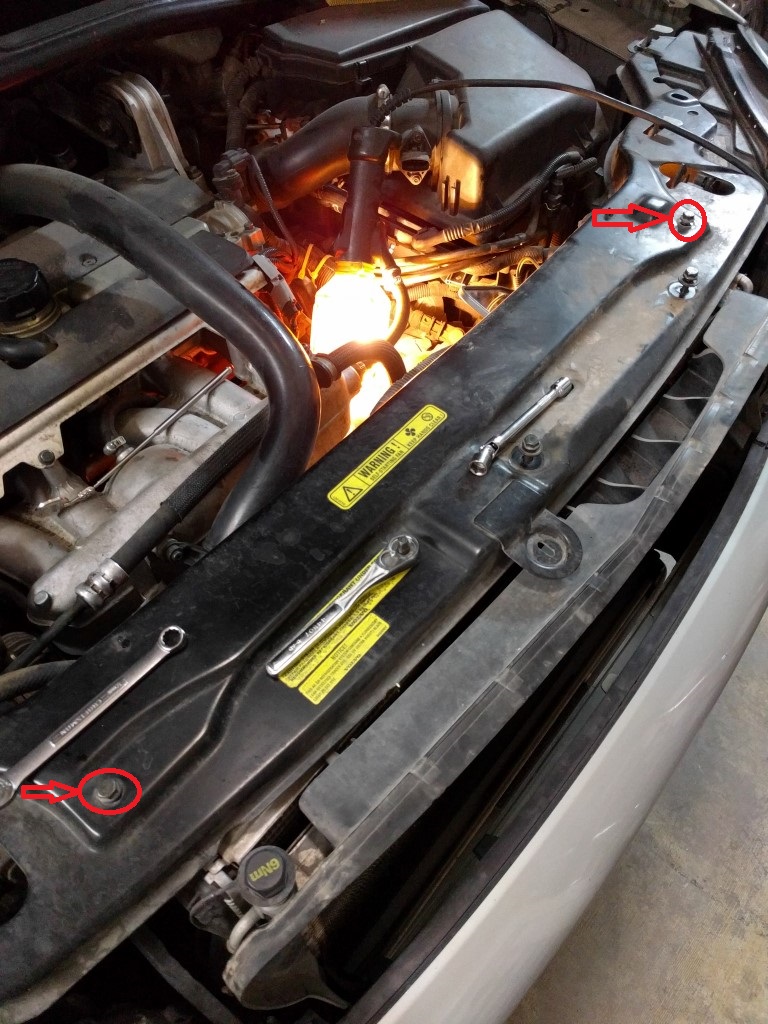
3. Take out the two top bolts that hold the fan shroud assembly to the top of the radiator. They are a little tricky to get to as they are up under the front cross-brace, but can be done with a flex joint, nimble fingers and a bit of patience. It might also help to undo the BOTTOM radiator bolts (see step #19 further below), which should allow the radiator to drop a little, and make this easier. I didn't have to do it, but I can see how it might help provide some extra clearance:
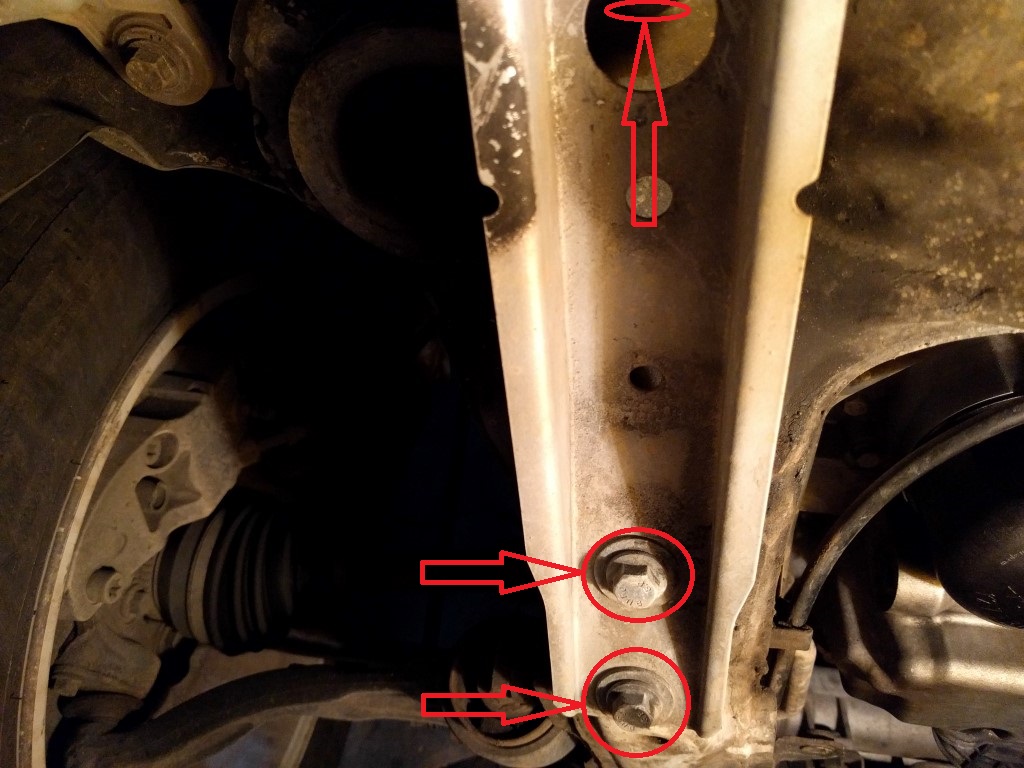
4. Remove bolts that stabilize the top of the radiator. 2 10mm bolts, come straight up. They fit inside rubber mounts at the top of the radiator:

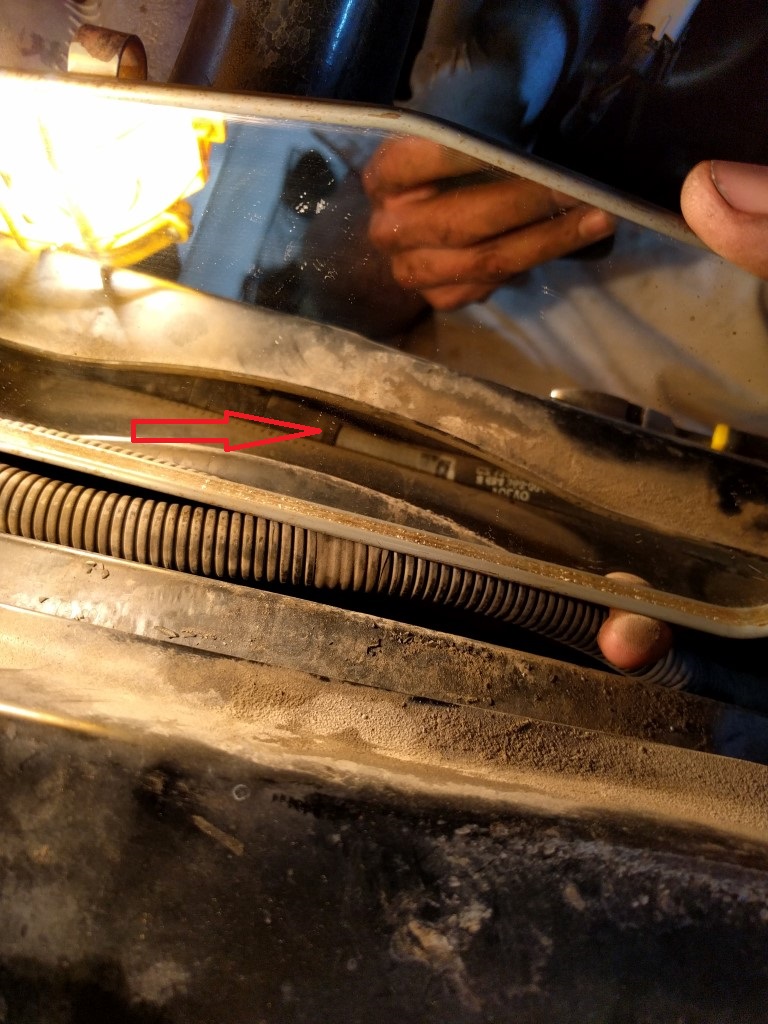
5. Undo electrical connector on the top of the fan shroud, driver side:

6. Undo (cut) cable ties that hold electrical wires to the top of the shroud, and move them out of the way (towards the engine). There are a few clips that go into the shroud, you can leave those in there, and just use new cable ties through them for the assembly:
7. Undo the fan electrical connector on the passenger side, and take the hose (power steering) out from its clip. Also take out the electrical wires from the brackets on the fan shroud and move them away:
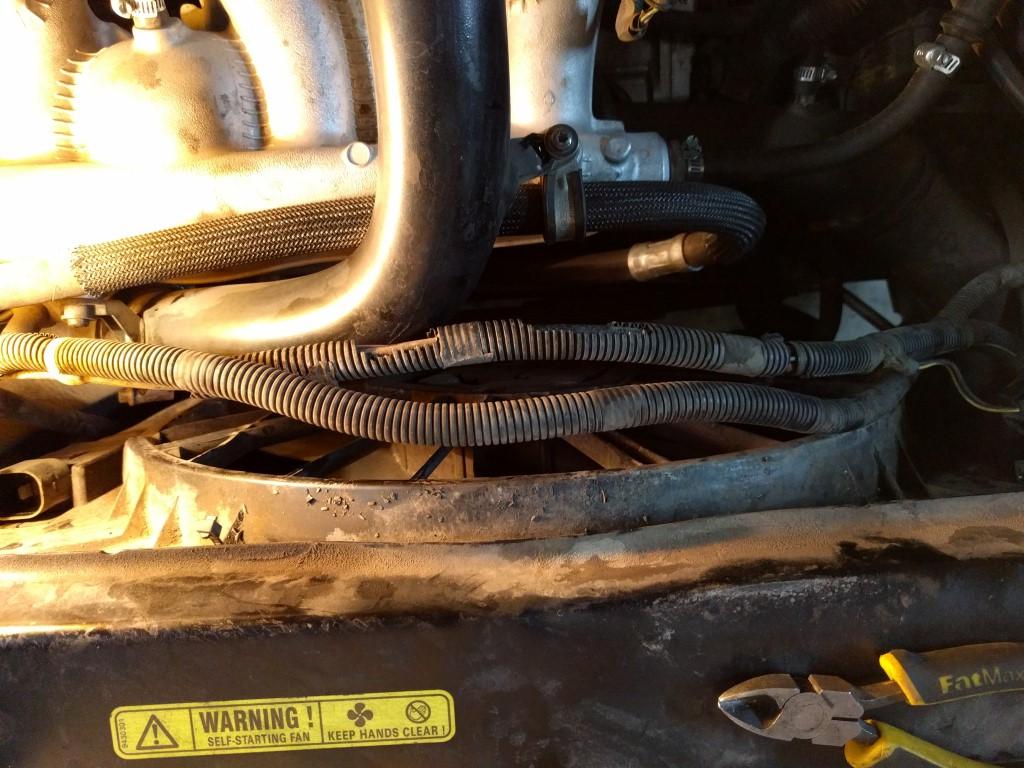
8. Under the top cross member, on top of the radiator, are the coolant overflow tank hose, and the cable for the hood latches. You could leave the coolant overflow hose for later, but I undid the hose from the little tabs that keep it in place. Tight in there, but can be done just with your fingers. No need to touch the cable for the hood latches:
9. Under the car, remove the bolts that hold the front lower valance (metal thing that forms the bottom middle of the bumper). 3 12mm bolts on each side. The assembly then can be wiggled out, you can bend the bumper a bit to make it clear:

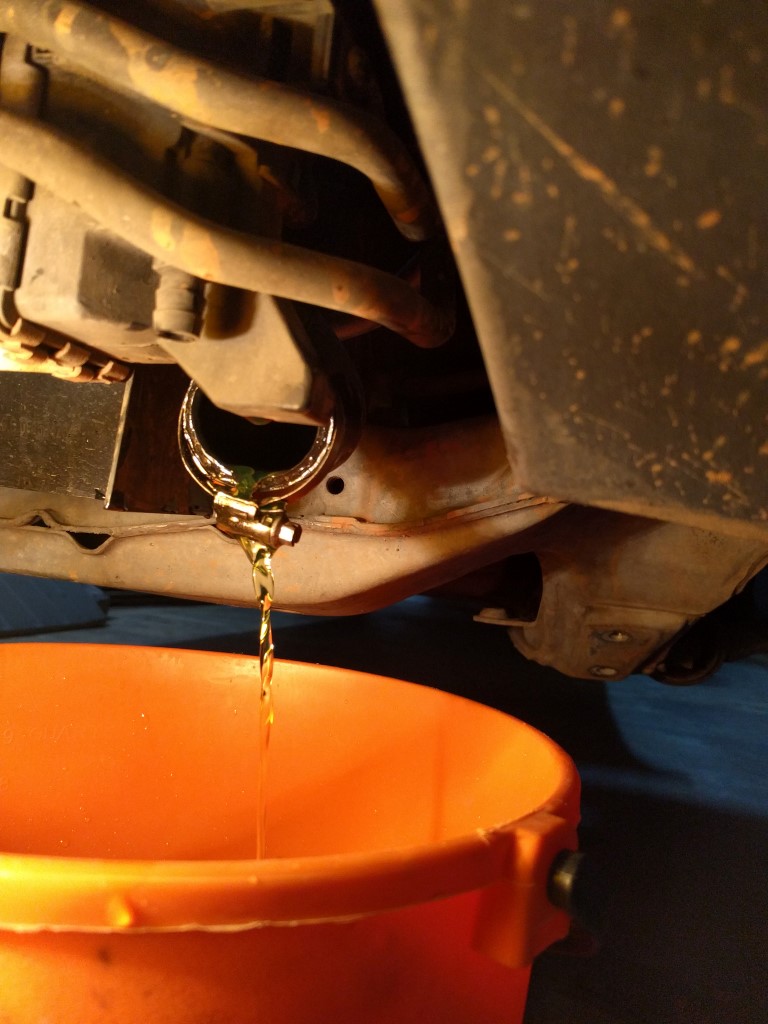
10. Time to drain the coolant, use the lower radiator hose, driver side:
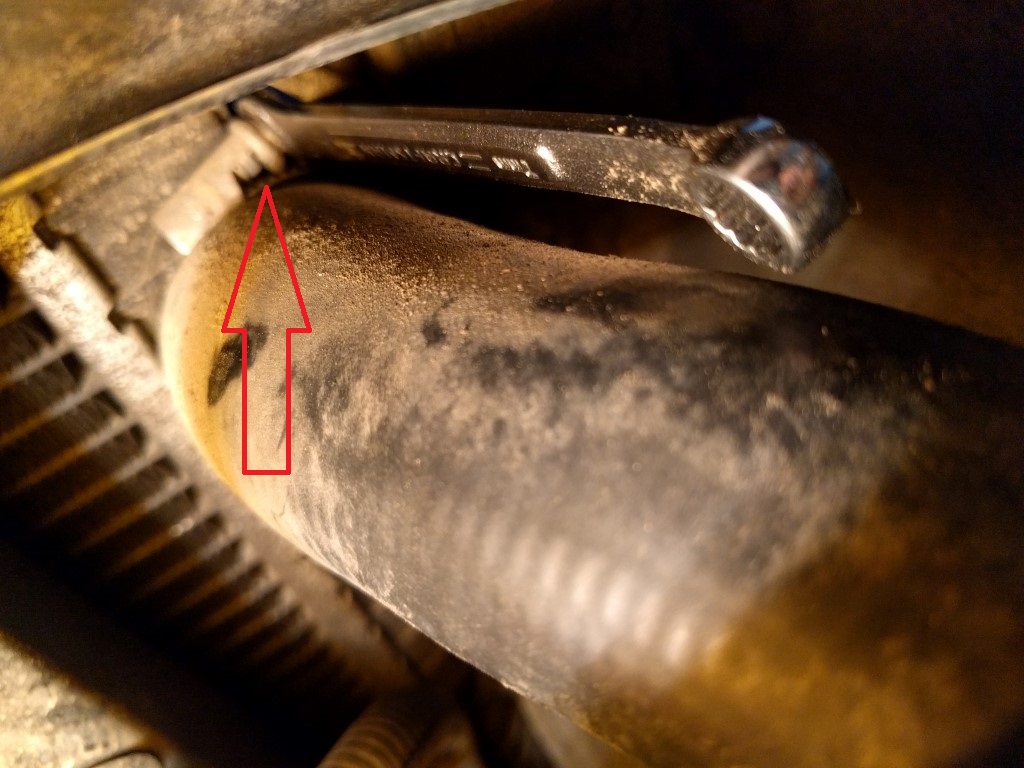
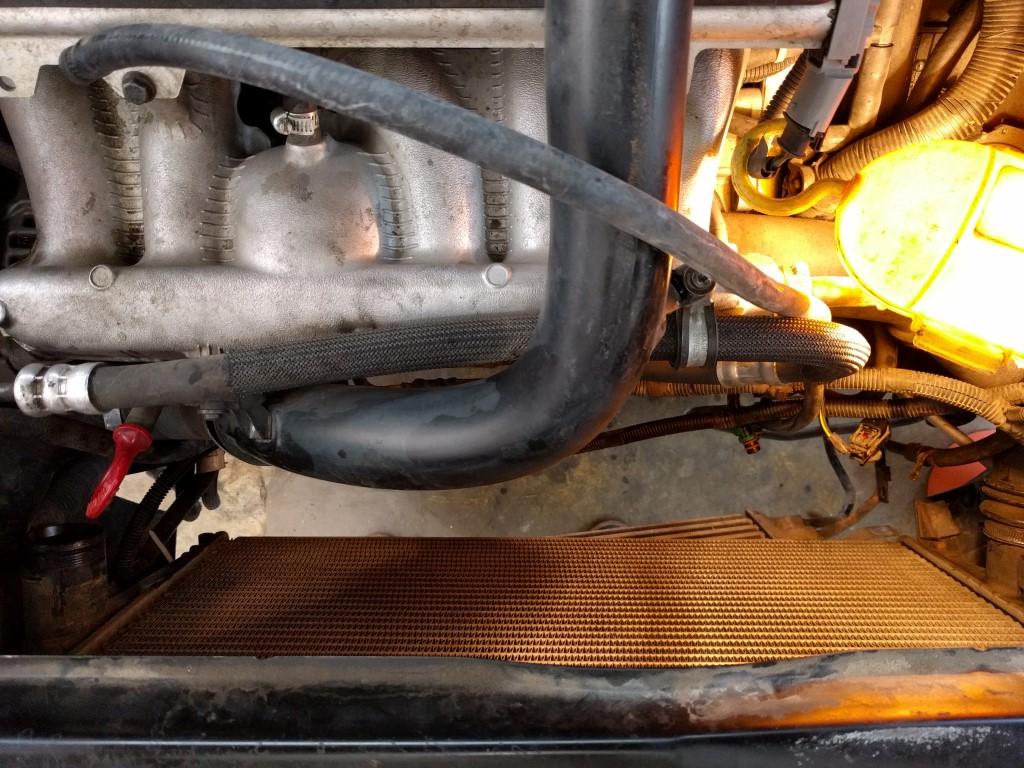
11. Undo the top radiator hose (passenger side). A 7mm wrench fits in there:
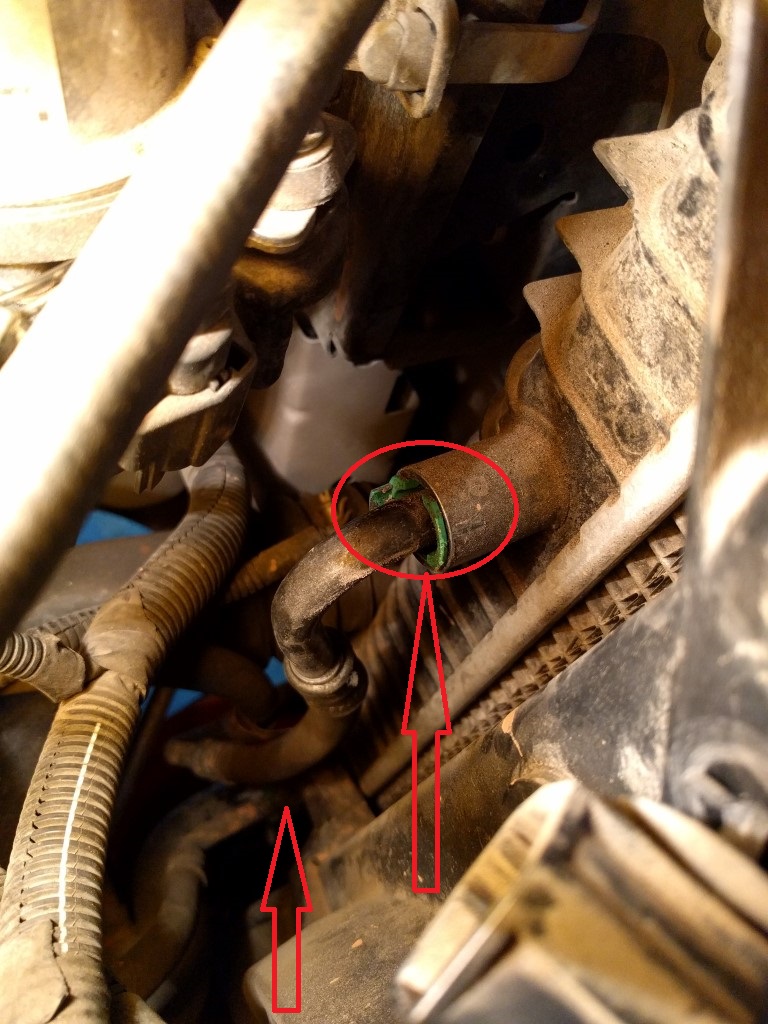
12. Undo the transmission coolant lines from the drivers side of the radiator. Squeeze the green clips (you can see my top one has a broken tab), then rotate and pull. You will loose some transmission fluid, I had to top up about 400-500ml. You can choose to replace the clips and o-rings during assembly, mine don't seem to leak, so I re-used the existing ones. If they start leaking, I'll pull them and replace them:
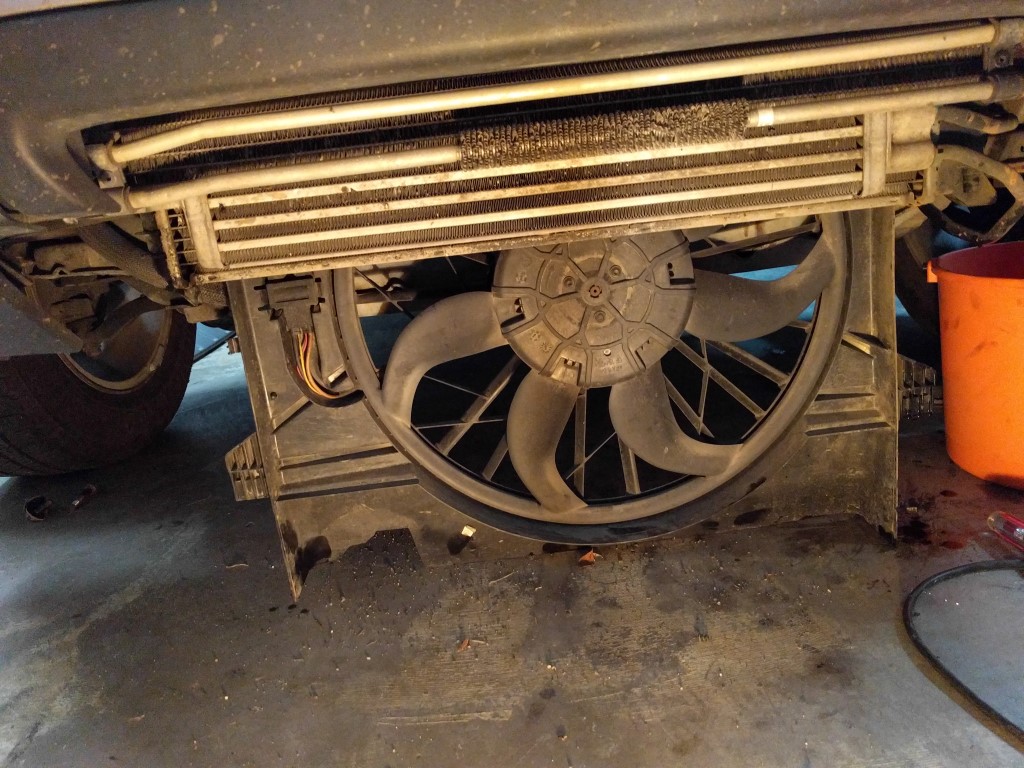
13. Remove the fan shroud. It goes UP first, so the two tabs that locate it to the radiator at the bottom can clear, and then can be dropped down:
Hi,
The radiator on my 2005 XC90 developed a leak, and I could not find anything super useful, other than a 40min long youtube video where the guy seems to be stumbling through the process, and there isn't much detail on what he actually does... The video is here: https://www.youtube.com/watch?v=4OsEYpnJk1A). So, here are the steps I took, with some photos, hopefully this helps someone else. Time estimate - 2-4 hours, It took me 4ish due to stopping to take pics, and an additional almost hour dealing with a faulty captive nut in the new radiator (see note about that in the end)...
All images:
https://imgur.com/a/PWrMq
1. Tools I used - no specialty tools needed, and can all be done with a small socket set and few wrenches. The torx key needed is #27, most other bolts are 10mm or 12mm, with the 7mm used for the hose clamps.
You will also need:
- cable ties
- Coolant
- transmission fluid for top up (I lost about half a quart).
2. Take out the air intake pipe, 2 10mm bolts. Air intake pipe pulls out of the airbox:
3. Take out the two top bolts that hold the fan shroud assembly to the top of the radiator. They are a little tricky to get to as they are up under the front cross-brace, but can be done with a flex joint, nimble fingers and a bit of patience. It might also help to undo the BOTTOM radiator bolts (see step #19 further below), which should allow the radiator to drop a little, and make this easier. I didn't have to do it, but I can see how it might help provide some extra clearance:
4. Remove bolts that stabilize the top of the radiator. 2 10mm bolts, come straight up. They fit inside rubber mounts at the top of the radiator:
5. Undo electrical connector on the top of the fan shroud, driver side:
6. Undo (cut) cable ties that hold electrical wires to the top of the shroud, and move them out of the way (towards the engine). There are a few clips that go into the shroud, you can leave those in there, and just use new cable ties through them for the assembly:
7. Undo the fan electrical connector on the passenger side, and take the hose (power steering) out from its clip. Also take out the electrical wires from the brackets on the fan shroud and move them away:
8. Under the top cross member, on top of the radiator, are the coolant overflow tank hose, and the cable for the hood latches. You could leave the coolant overflow hose for later, but I undid the hose from the little tabs that keep it in place. Tight in there, but can be done just with your fingers. No need to touch the cable for the hood latches:
9. Under the car, remove the bolts that hold the front lower valance (metal thing that forms the bottom middle of the bumper). 3 12mm bolts on each side. The assembly then can be wiggled out, you can bend the bumper a bit to make it clear:
10. Time to drain the coolant, use the lower radiator hose, driver side:
11. Undo the top radiator hose (passenger side). A 7mm wrench fits in there:
12. Undo the transmission coolant lines from the drivers side of the radiator. Squeeze the green clips (you can see my top one has a broken tab), then rotate and pull. You will loose some transmission fluid, I had to top up about 400-500ml. You can choose to replace the clips and o-rings during assembly, mine don't seem to leak, so I re-used the existing ones. If they start leaking, I'll pull them and replace them:
13. Remove the fan shroud. It goes UP first, so the two tabs that locate it to the radiator at the bottom can clear, and then can be dropped down:
Last edited by jordank; Jan 23, 2017 at 10:26 PM. Reason: typos
Thread Starter
|
Member
Joined: Jan 2012
Posts: 31
Likes: 5
2005 Volvo XC90 Radiator Replacement DIY - Part 2
Continued ....
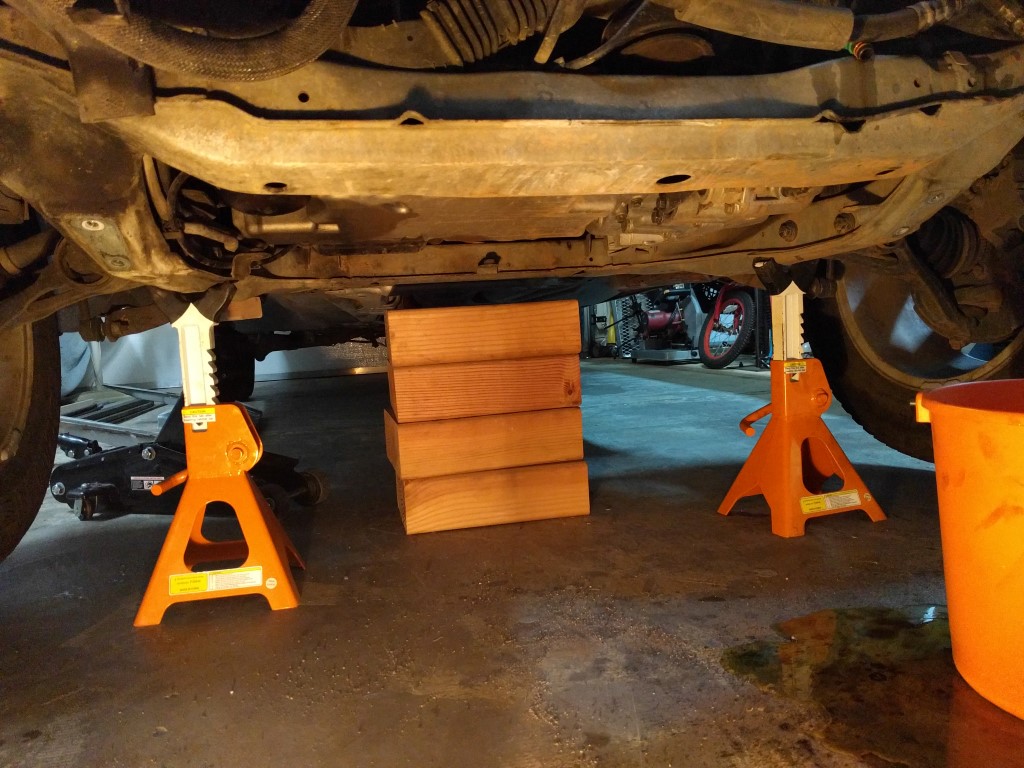
14. Time to raise the car, radiator comes out from UNDER. Thank you volvo engineers... You need about 20" clearance, the radiator is about 22" high. Secure the car properly, e-brake on, blocks behind the rear wheels, axle stands. Note the 'safety' wood blocks under the rear of the sub-frame, and the jack still in up position. Whenever lifting a car, make sure you have at least 2 points of failure covered, never trust just the jack, or just the axle stands even:
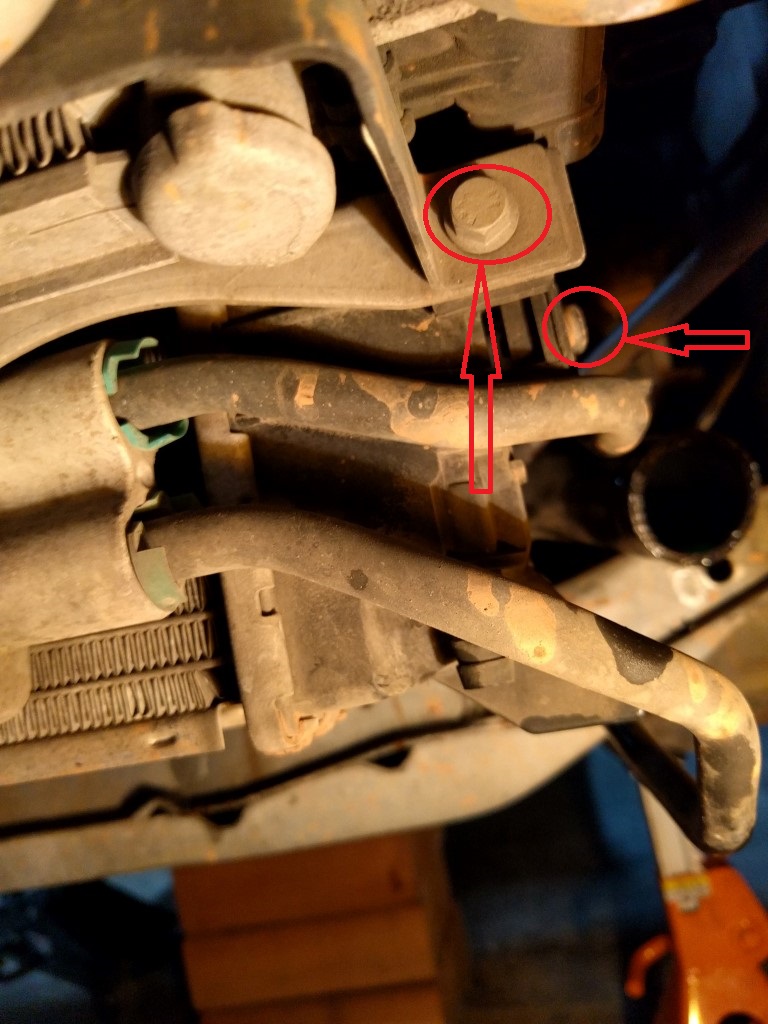
15. Undo attachment of transmission and power steering cooling lines from the radiator, drivers side. There are two bolts - a 10mm and a torx #27 that is from the side:
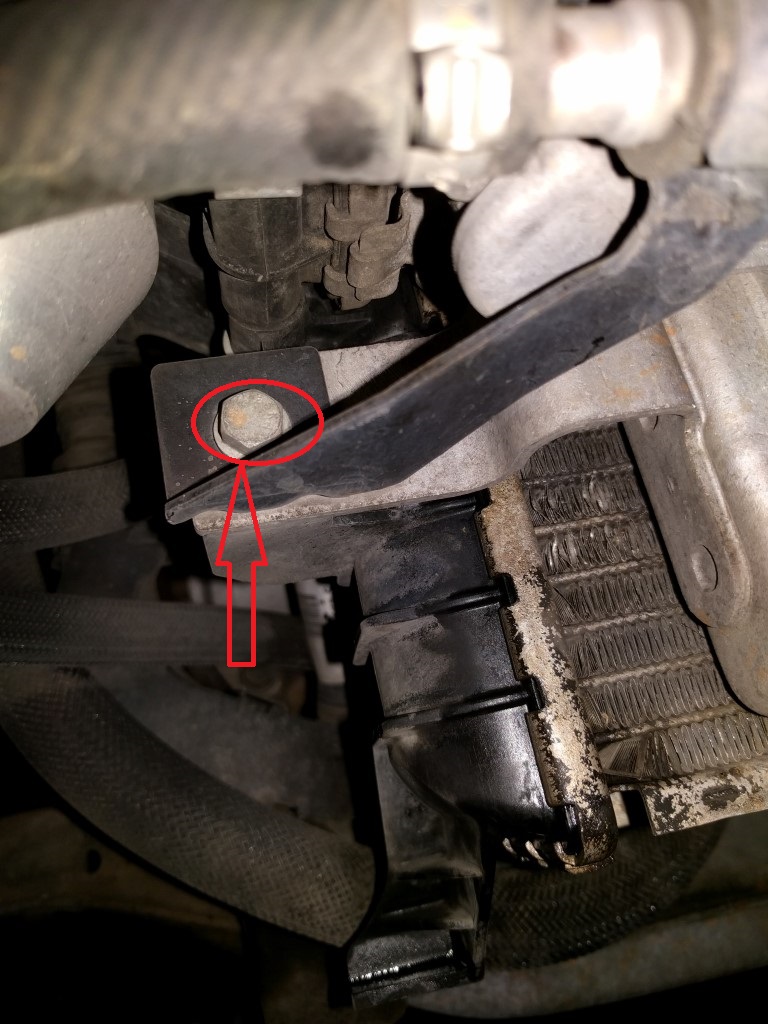
16. Undo attachment of transmission cooler on passenger site - one 10mm bolt. At this point, you can wiggle the assembly away for some clearance. It might help you to cable tie it temporarily to something, so it doesn't get in your way. The power steering cooler (U-shaped pipe with a some fins on it) can be completely swung out of the way as it is attached with rubber hoses:
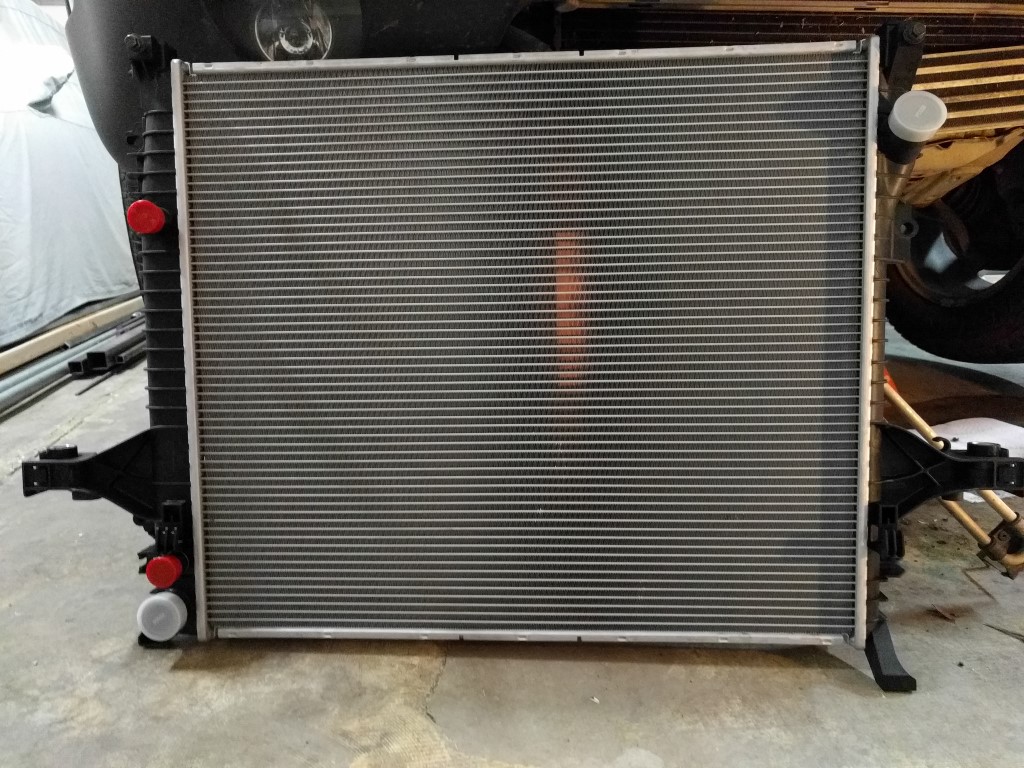
17. New radiator - I opted for the cheapest option ($100 from Amazon), made by TYC. There are others by Spectra Premium, or Nissen that were more expensive, but I really couldn't see the difference. I have used TYC parts before, here is to hoping that was the right choice... Note: Appears the v8 xc90 uses the same radiator too... I was investigating if an 'upgrade' was available, mine is a 2.5L but I am in Phoenix AZ, so I would like to have as much cooling as possible... Same part number for the v8, so hopefully it is over-engineered:
18. Undo the 4 10mm bolts that sandwich the radiator to the intercooler and condenser. The radiator is attached to the body, the other things hang off it. This means that if you take out the radiator, the other things are not supported by anything other than hoses... To help with this, I used cable ties to 'hang' the condenser from the top cross-brace. After taking out the top 2 bolts that hold things together (access them from inside the engine bay, 10mm, you will see them go through the radiator) - you can use the 10mm bolts from the air intake pipe to create something the cable ties can hold to. Thread in those bolts backwards through the nut brackets, then the cable ties have something to go around. Then remove the bottom two bolts:
19. Now from under the car, undo the bolts that hold the radiator to the body:
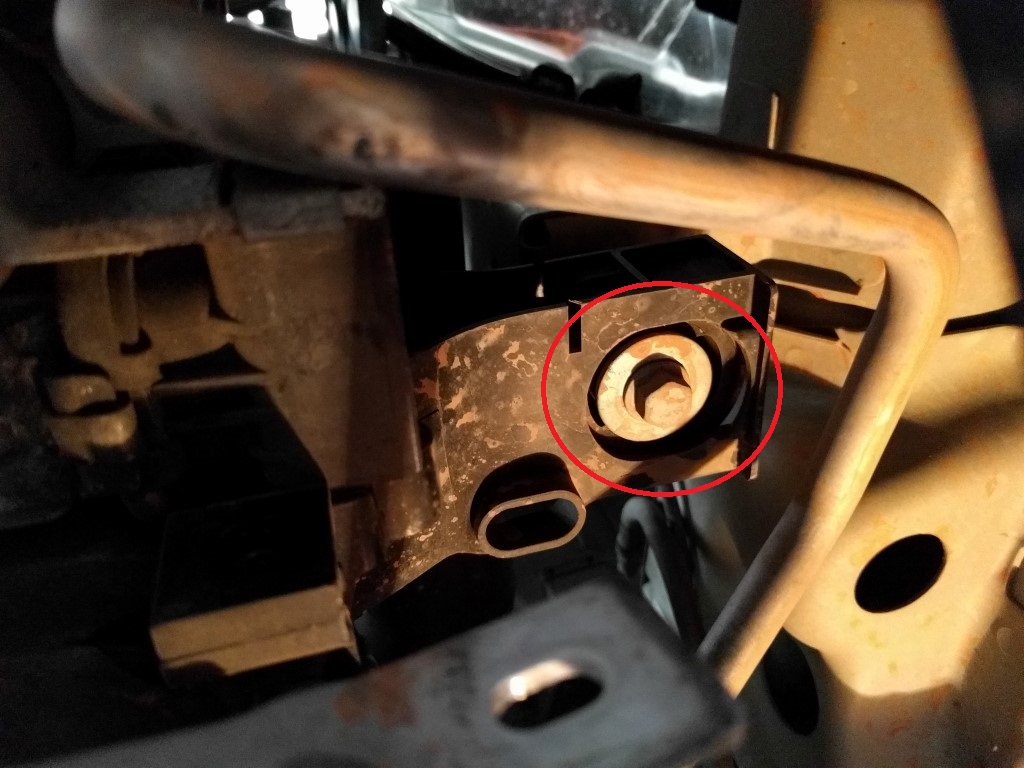

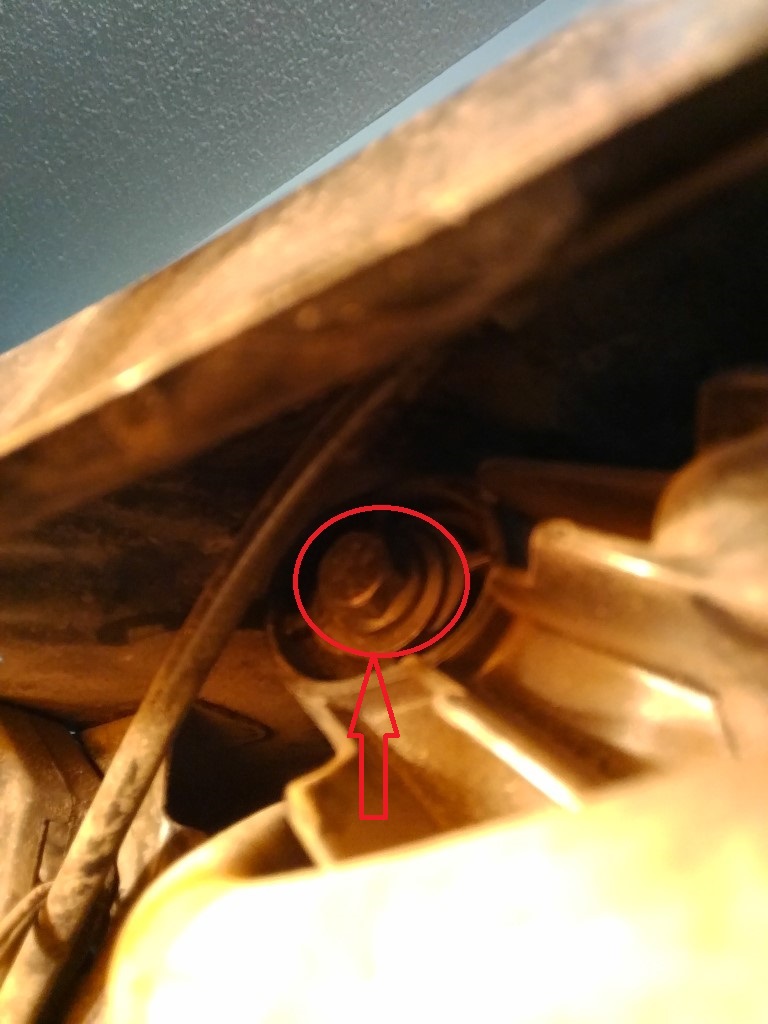
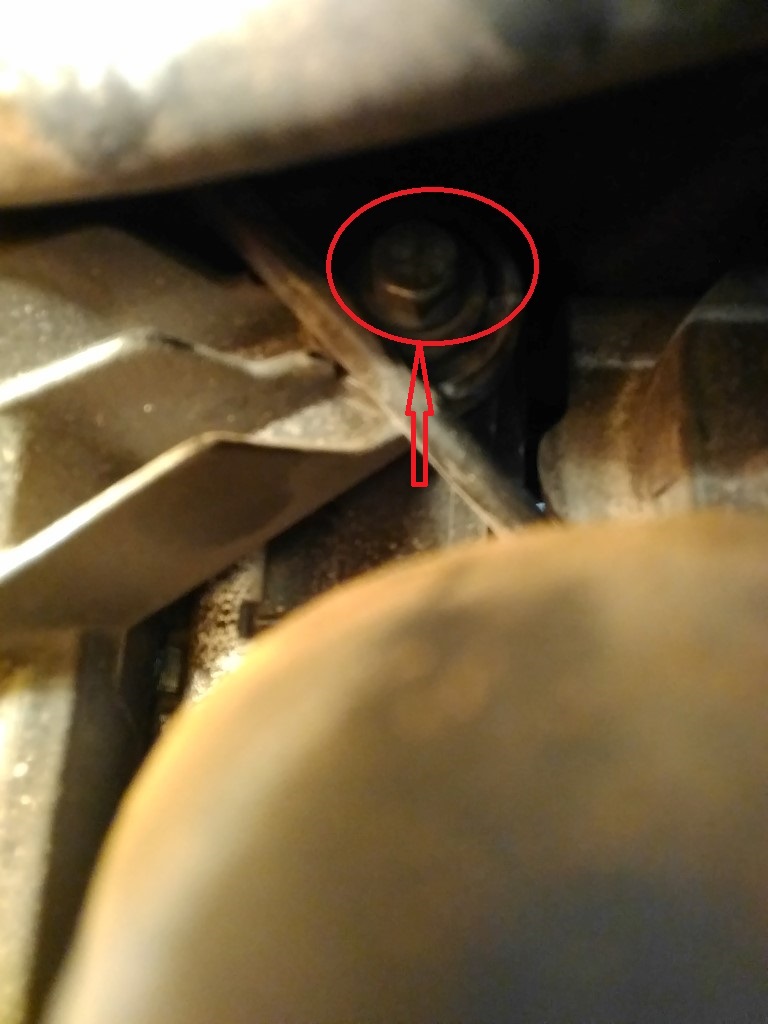
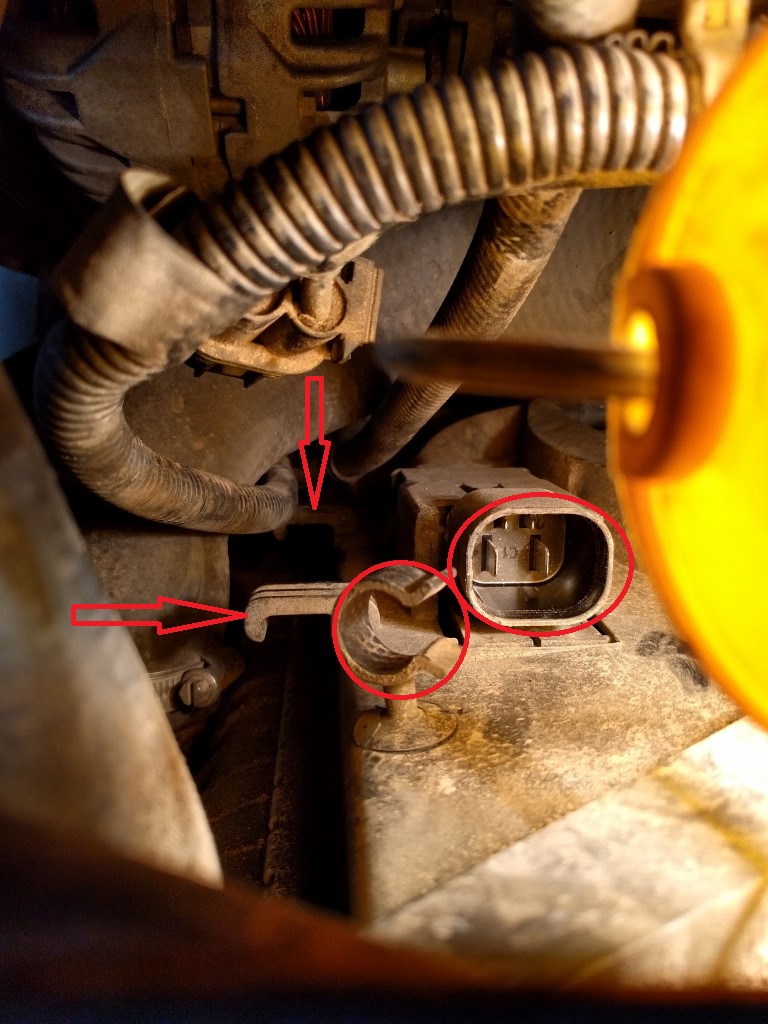
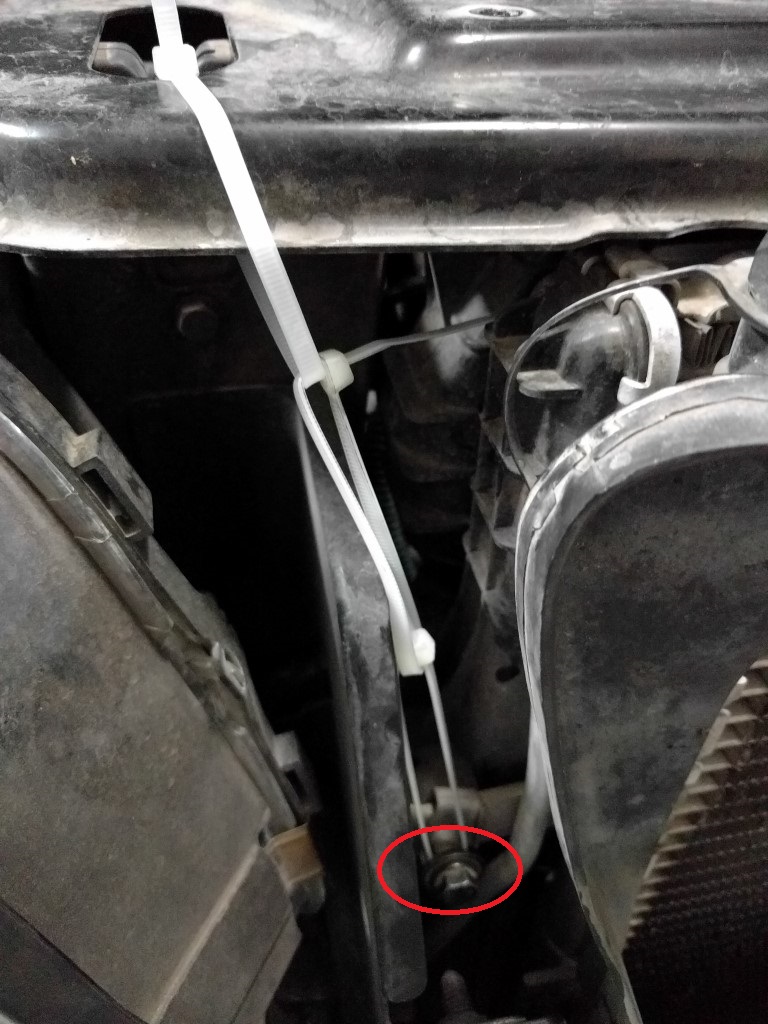
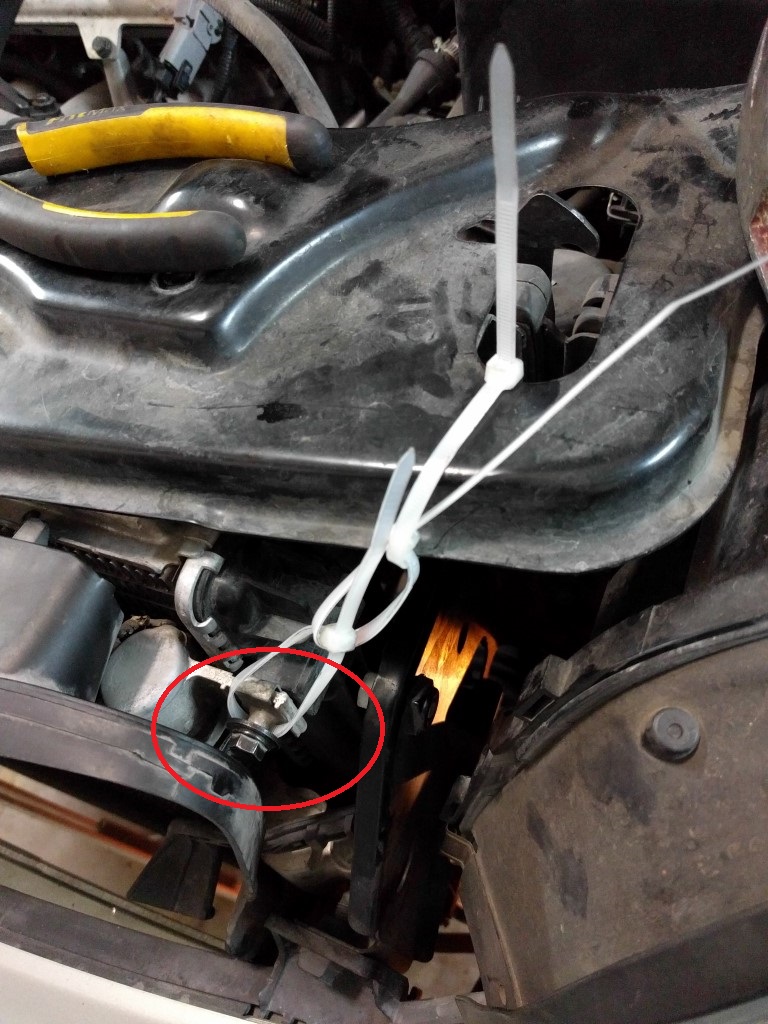
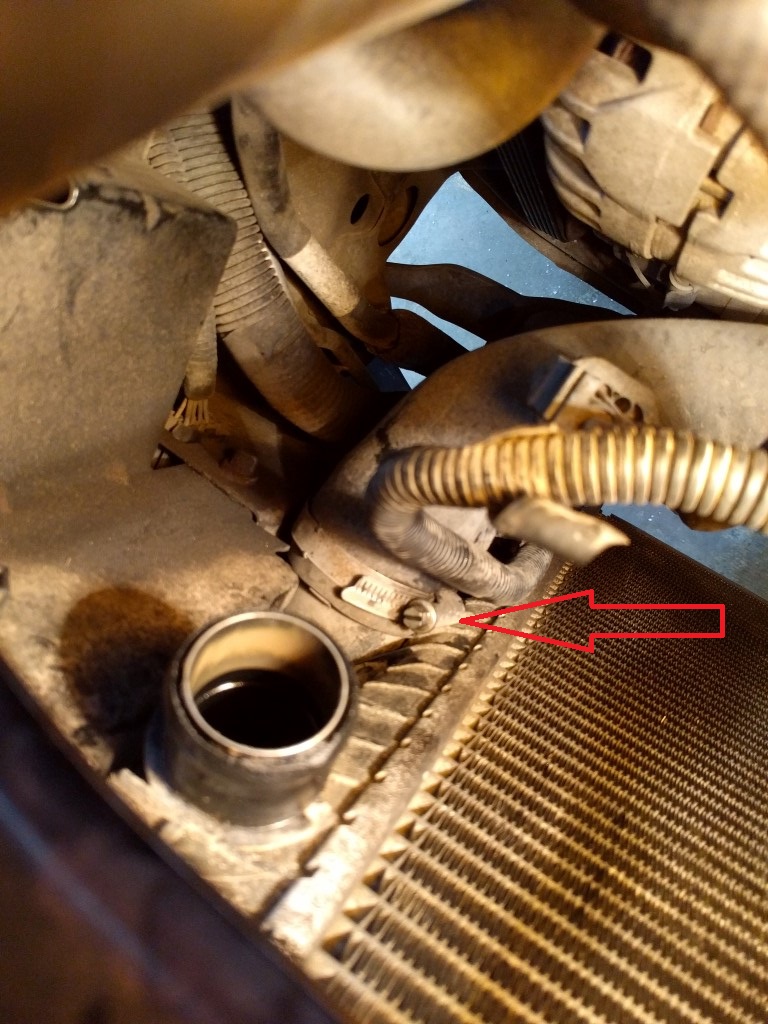
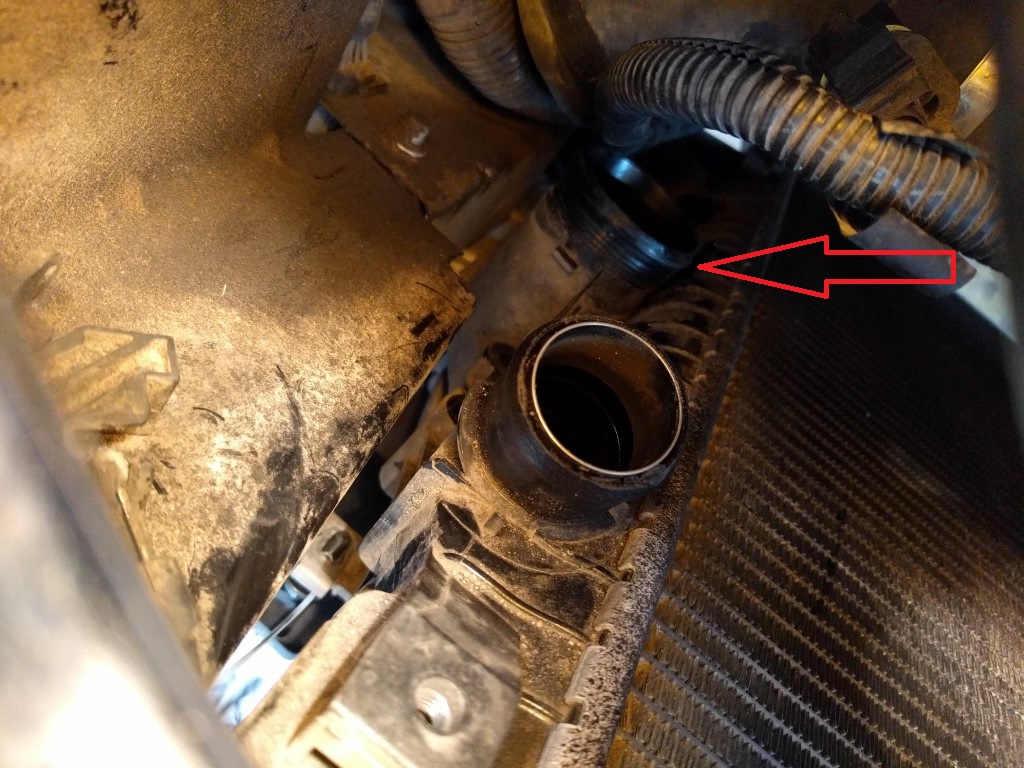
20. On the passenger side, the intercooler hose and clamp get in the way of taking the radiator out. Undo that side. You can see the space created for the radiator to then clear the intercooler. Note: in the same side, there is a small wire that clips into the round bracket on top of the radiator side mount. Feel with your fingers in there to dislodge it, see pic below for location. It is impossible to see, and if you don't take it out - the radiator will hang on it:

21. Old radiator out. It is fiddly to get it out of there, you wiggle it backwards towards the engine, then let it drop. You have to tilt it sideways so the large plastic mount brackets on the side can go around and under the steel pipes on the drivers side (AC lines, transmission cooler lines, etc):

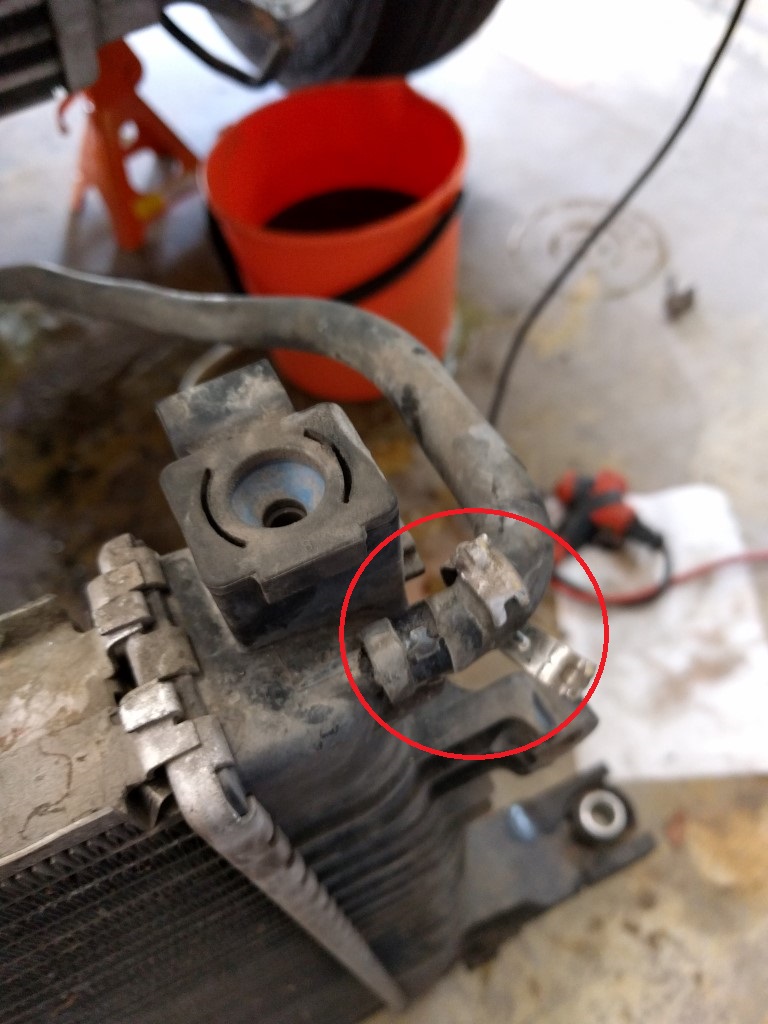
22. Undo the clamp that holds the coolant tank overflow hose to the top of the radiator. You can use a worm screw type clamp in there, I have a set of the OEM compression ones, so used one of those. Note, you can undo the hose from the overflow tank first, like I did, and then from the radiator. Or you can work on undoing it while the radiator is still in the car, but half way out, so you have access. Otherwise it is completely covered and you have no access:
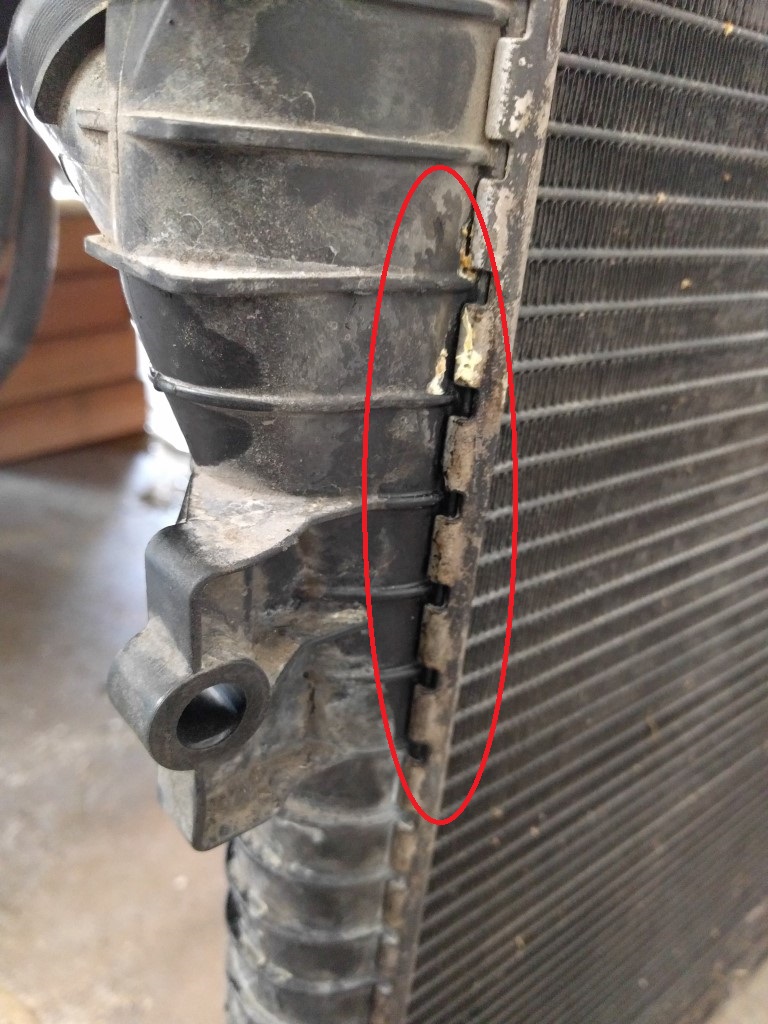
23. My leak was from the end cover, passenger side up high. Not horrible for an original radiator at 165,000 miles:
24. A picture of the space with the radiator out. You can see the back of the intercooler. This is a good time to blow some compressed air around in there, dislodge any bugs and dirt that have collected over the years. Careful not to damage any fins, obviously:
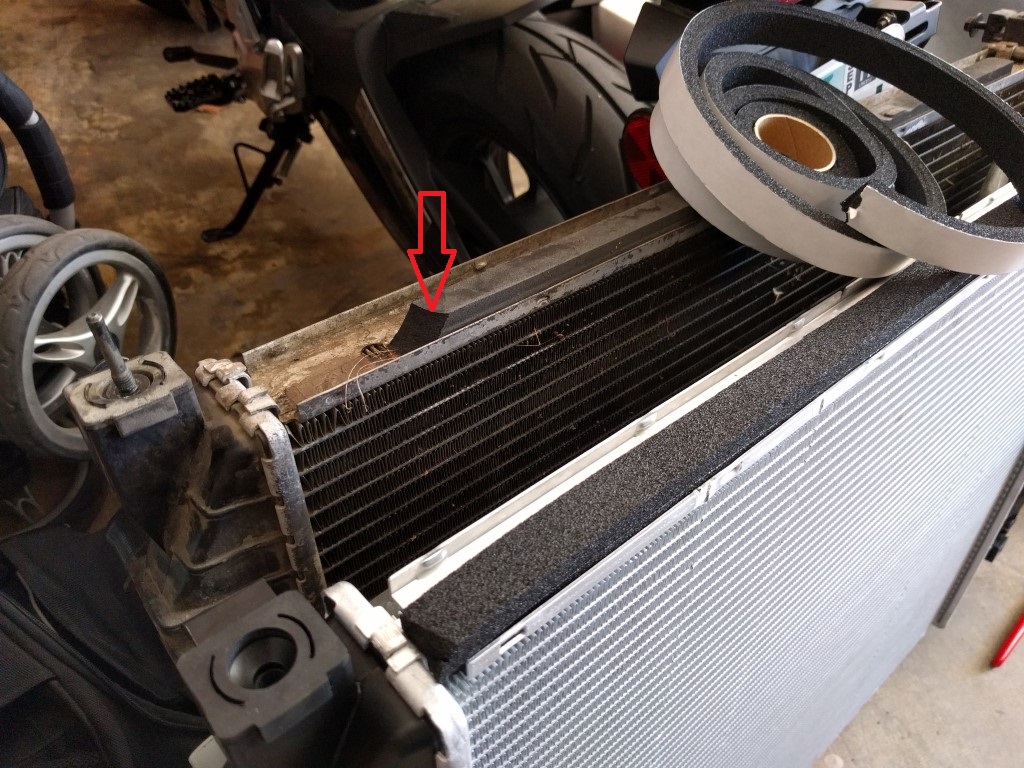
25. The top of the radiator has some foam, which seals it to the top member. It was brittle, and impossible to re-use. I happened to have some weather stripping from a previous project, so put two layers of that on. My guess is you can probably NOT put that foam in at all, I did because I had it:
Installation is reversal of the disassembly.
Some more notes that might help:
- Make sure you TEST all the captive nuts in your NEW radiator, and test-thread all bolts that go into them. Last thing you want is a crappy captive nut. If you have a bad (or missing) one, take one out of your old radiator, and replace it into the new. I had one missing, and one whose thread was crappy and the bolt wouldn't thread in. I found out AFTER the radiator was mostly in place, and that killed about 45min of my life trying to get the bolt to thread in. If other things are missing from your new radiator - like the rubber mounts on the side, re-use the ones from your old radiator, if they are in good enough shape. Mine came with them.
- An extra pair of hands could be helpful during the lifting of the new radiator in place, I managed to do it by myself though, so it is doable.
- Don't forget to top up transmission fluid, BEFORE you drive the car. There is a DIY on transmission flush that shows where the transmission dipstick is, and the procedure for checking the level. I topped it up first until it was visible on the 'cold' part of the dipstick, then took the car for a spin until the fluid warmed up to operating temp, and topped it up again until right at the top of the 'hot' range. You check the level with the car hot, engine running and transmission in 'P' Park.
- Don't forget to fill up coolant. Run the engine for a while, keeping an eye on it, as it will suck in more fluid once the thermostat opens up. I did a test drive and had to stop twice to top up fluid. Check for leaks at that time as well.
- Obviously, be very careful when wiggling the new radiator in there. Last thing you want is to puncture it as you're installing it.
Continued ....
14. Time to raise the car, radiator comes out from UNDER. Thank you volvo engineers... You need about 20" clearance, the radiator is about 22" high. Secure the car properly, e-brake on, blocks behind the rear wheels, axle stands. Note the 'safety' wood blocks under the rear of the sub-frame, and the jack still in up position. Whenever lifting a car, make sure you have at least 2 points of failure covered, never trust just the jack, or just the axle stands even:
15. Undo attachment of transmission and power steering cooling lines from the radiator, drivers side. There are two bolts - a 10mm and a torx #27 that is from the side:
16. Undo attachment of transmission cooler on passenger site - one 10mm bolt. At this point, you can wiggle the assembly away for some clearance. It might help you to cable tie it temporarily to something, so it doesn't get in your way. The power steering cooler (U-shaped pipe with a some fins on it) can be completely swung out of the way as it is attached with rubber hoses:
17. New radiator - I opted for the cheapest option ($100 from Amazon), made by TYC. There are others by Spectra Premium, or Nissen that were more expensive, but I really couldn't see the difference. I have used TYC parts before, here is to hoping that was the right choice... Note: Appears the v8 xc90 uses the same radiator too... I was investigating if an 'upgrade' was available, mine is a 2.5L but I am in Phoenix AZ, so I would like to have as much cooling as possible... Same part number for the v8, so hopefully it is over-engineered:
18. Undo the 4 10mm bolts that sandwich the radiator to the intercooler and condenser. The radiator is attached to the body, the other things hang off it. This means that if you take out the radiator, the other things are not supported by anything other than hoses... To help with this, I used cable ties to 'hang' the condenser from the top cross-brace. After taking out the top 2 bolts that hold things together (access them from inside the engine bay, 10mm, you will see them go through the radiator) - you can use the 10mm bolts from the air intake pipe to create something the cable ties can hold to. Thread in those bolts backwards through the nut brackets, then the cable ties have something to go around. Then remove the bottom two bolts:
19. Now from under the car, undo the bolts that hold the radiator to the body:
20. On the passenger side, the intercooler hose and clamp get in the way of taking the radiator out. Undo that side. You can see the space created for the radiator to then clear the intercooler. Note: in the same side, there is a small wire that clips into the round bracket on top of the radiator side mount. Feel with your fingers in there to dislodge it, see pic below for location. It is impossible to see, and if you don't take it out - the radiator will hang on it:
21. Old radiator out. It is fiddly to get it out of there, you wiggle it backwards towards the engine, then let it drop. You have to tilt it sideways so the large plastic mount brackets on the side can go around and under the steel pipes on the drivers side (AC lines, transmission cooler lines, etc):
22. Undo the clamp that holds the coolant tank overflow hose to the top of the radiator. You can use a worm screw type clamp in there, I have a set of the OEM compression ones, so used one of those. Note, you can undo the hose from the overflow tank first, like I did, and then from the radiator. Or you can work on undoing it while the radiator is still in the car, but half way out, so you have access. Otherwise it is completely covered and you have no access:
23. My leak was from the end cover, passenger side up high. Not horrible for an original radiator at 165,000 miles:
24. A picture of the space with the radiator out. You can see the back of the intercooler. This is a good time to blow some compressed air around in there, dislodge any bugs and dirt that have collected over the years. Careful not to damage any fins, obviously:
25. The top of the radiator has some foam, which seals it to the top member. It was brittle, and impossible to re-use. I happened to have some weather stripping from a previous project, so put two layers of that on. My guess is you can probably NOT put that foam in at all, I did because I had it:
Installation is reversal of the disassembly.
Some more notes that might help:
- Make sure you TEST all the captive nuts in your NEW radiator, and test-thread all bolts that go into them. Last thing you want is a crappy captive nut. If you have a bad (or missing) one, take one out of your old radiator, and replace it into the new. I had one missing, and one whose thread was crappy and the bolt wouldn't thread in. I found out AFTER the radiator was mostly in place, and that killed about 45min of my life trying to get the bolt to thread in. If other things are missing from your new radiator - like the rubber mounts on the side, re-use the ones from your old radiator, if they are in good enough shape. Mine came with them.
- An extra pair of hands could be helpful during the lifting of the new radiator in place, I managed to do it by myself though, so it is doable.
- Don't forget to top up transmission fluid, BEFORE you drive the car. There is a DIY on transmission flush that shows where the transmission dipstick is, and the procedure for checking the level. I topped it up first until it was visible on the 'cold' part of the dipstick, then took the car for a spin until the fluid warmed up to operating temp, and topped it up again until right at the top of the 'hot' range. You check the level with the car hot, engine running and transmission in 'P' Park.
- Don't forget to fill up coolant. Run the engine for a while, keeping an eye on it, as it will suck in more fluid once the thermostat opens up. I did a test drive and had to stop twice to top up fluid. Check for leaks at that time as well.
- Obviously, be very careful when wiggling the new radiator in there. Last thing you want is to puncture it as you're installing it.
Last edited by jordank; Jan 23, 2017 at 10:35 PM. Reason: typos


Junior Member
Joined: Jun 2022
Posts: 2
Likes: 1
I registered just to say thanks for this awesome write up! Really appreciate it.
Some things I found when I did this job:
- I didn't need to raise the car to swap the radiator. There was easily enough room without this. I have the D5 engine in a 2007 XC90.
- I needed about 6 litres of fresh coolant to replace what drained out. I bought the genuine Volvo coolant because it was the same price as aftermarket coolant, and I do think there's a difference between the Volvo specifications and the generic stuff.
- I lost hardly any transmission fluid.

Junior Member
Joined: Dec 2023
Posts: 1
Likes: 0
I registered just to say thanks for this awesome write up! Really appreciate it.
Some things I found when I did this job:
- I didn't need to raise the car to swap the radiator. There was easily enough room without this. I have the D5 engine in a 2007 XC90.
- I needed about 6 litres of fresh coolant to replace what drained out. I bought the genuine Volvo coolant because it was the same price as aftermarket coolant, and I do think there's a difference between the Volvo specifications and the generic stuff.
- I lost hardly any transmission fluid.
Some things I found when I did this job:
- I didn't need to raise the car to swap the radiator. There was easily enough room without this. I have the D5 engine in a 2007 XC90.
- I needed about 6 litres of fresh coolant to replace what drained out. I bought the genuine Volvo coolant because it was the same price as aftermarket coolant, and I do think there's a difference between the Volvo specifications and the generic stuff.
- I lost hardly any transmission fluid.

Thread
Thread Starter
Forum
Replies
Last Post
rationull
Volvo 850
2
Aug 27, 2008 11:43 PM