
New XC90 Project - Transmission Replacement!


Senior Member
Joined: May 2012
Posts: 1,988
Likes: 52
From: Kingsport, TN
That other thread about replacing the transmission from the top has some good pictures of what's inside the angle drive. It has no "interesting" internals. It just sends power to the back. The shaft turns at a speed proportional to the front drive. The rear axle will only take power off it by engaging a clutch. There's no reason it would do anything during normal driving.

Thread Starter
|
Senior Member
Joined: May 2013
Posts: 155
Likes: 0
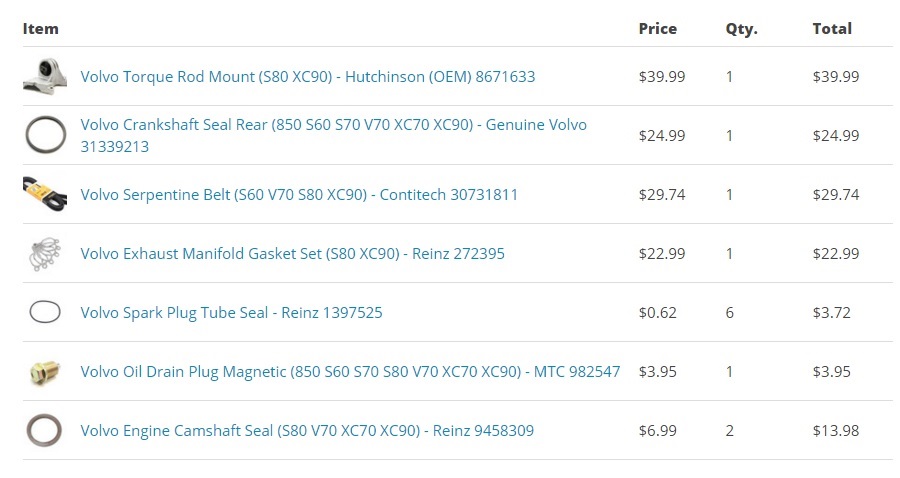
Alrighty, ordered some parts today. Chose Amazon Prime and FCP Euro for most of the stuff. FCP seems to have the best prices compared to IPD, and I hear the customer service is top notch, tho I have never used them before.
Here is what I ordered:
Hutchinson top Engine Mount
OEM Volvo Rear Main Seal
Contitech Serpentine
Reinz exhaust gasket set
Reinz spark plug o ring for valve cover
Drain Plug (the one on there is stripped to hell...which worries me)
2x Camshaft seals.
Now I think I need 2x more of the camshaft seals, but wasn't sure which. Maybe someone can help me out with that.
Thread Starter
|
Senior Member
Joined: May 2013
Posts: 155
Likes: 0
And from Amazon a Conitech timing belt kit w/ water pump. Previous owner says it was done less than 30k ago, but I just want the peace of mind. Plus I don't know if they did the water pump or not.

If anyone can think of some reasonable other parts to add to the list I'm all ears. I think I might do the turbo cooling lines.
Speaking of the turbo. Not sure if I should go ahead and rebuild them or not. I found this site here:
http://gpopshop.com/products-page/mi...-rebuild-kits/
Seems to be about $120 for the kit. I assume that's for only one, so I would need two. Dunno. Never done a turbo before, but it might be a good $240 spent. I do know they leak after a while. Then again there is a chance I might screw it up by putting my hands into something that should just be left alone. Hmm. Not sure. Thoughts?
BTW....removed 2 bolts today. The remaining 2 on the rear driveshaft! Finally got a helper to step on the brake for me while I broke them loose. At this rate I should be finished around.....2019. Ha!
Actually I figure I have put about 8-10 hours of labor into it so far. That is everything, and a lot of just staring at the thing trying to figure out the best approach. Not going for any speed records, thats for sure. I think it will go back together MUCH quicker providing no big snags.
Alex
Thread Starter
|
Senior Member
Joined: May 2013
Posts: 155
Likes: 0
Hey, I can't seem to find the one you are talking about. You mean one of the stickies? Didn't see anything related up there.

Senior Member
Joined: May 2012
Posts: 1,988
Likes: 52
From: Kingsport, TN
The one you posted yourself. That guy took apart the "transfer case" thing. Although, when I looked back, I only saw one picture. I thought it was more.
Senior Member
Joined: May 2012
Posts: 1,988
Likes: 52
From: Kingsport, TN
There are definitely 4 cam seals. Two on each cam. I am not sure but I think they're the same on both ends.
I would think you want to do the breather box job (oil trap, PCV system). If you take the oil pan off to clean out the drain line, then that will allow you to catch the o-rings connecting the oil pan and particularly the oil pickup tube. I had one car that did not have any oil pressure due to the o-ring on the pick tube. On a 5 cylinder you can get that pan off in the car pretty easily, but that might be impossible on a 6, I don't know. They make a kit the covers all the oil pan connections (it's overkill). Good opportunity to clean gunk out of the oil pan.
https://www.fcpeuro.com/products/vol...ictor-30750783
Last edited by firebirdparts; Feb 20, 2016 at 06:05 PM.
Thread Starter
|
Senior Member
Joined: May 2013
Posts: 155
Likes: 0
Thanks for the tip on the oil catch! I think you are right. I might hold off on dong the turbo in favor of that. Not sure yet.
The last thing I had to disconnect today (or so I thought) was the front axles. Not too hard to be honest. The drivers side just popped right out. On the passenger side I went ahead and removed the whole thing. It only takes one little bolt on the hub for it to come out of the hub as well, so I recommend doing that first before pulling it out of the transaxle. BTW, all I removed was the two bolts to separate it from the strut. That was all it needed.


Just about to come out of the bay!

My beautiful assistant who is excited about her new tricycle motor hauler.

So as it turns out you need to remove ALL of the engine mounts. Who knew. I thought 80% was a passing grade, but apparently not.

To get to it you need to remove this plate. 4 bolts and it comes right off, easy peasey. I was worried for a moment that I might have to pull the pulley.

There she is.

Ok, it was tighter than.... (insert your own dirty joke.)
The back side became very familiar with the brake booster. I did my best to avoid it but there was still a lot of rubbage. I don't think I hurt anything but it was much more than I was comfortable with.

Also it was very tricky getting the rear engine mount to properly clear the bolt that sticks up through the middle of it. If you tilt the engine before it comes out it puts a torque on it and will never come out. So you need to pick the engine up straight at first, get it out, and then set it back down but not let it go through the hole again, pick it back up at an angle and finagle it out. Not super easy. Very tight. But manageable. Clearly it does come out.
The back side. You can see where the brake booster interferes.

One thing I was not expecting... this is a big engine. Volume wise it almost competes with a V8. I was expecting more something along the lines of a dinky little Honda engine. Nope.

I was really worried that the forward sensor on the master cylinder was bent, but I think it is supposed to be angled like that. I did bend a couple brake lines, but I think they are OK. My wife and I did agree, however, that brakes are a required feature on this car, so more inspections will be in order.

Oh, and speaking of forgetting to disconnect things: This is the fuel line. It got stretched. How much, I don't know, so if any has a picture of what this is SUPPOSED to look like, please share. The rubber line which attaches to it stretched a lot too. Didn't see it until the engine was nearly half way out. Moral of the story: Make sure everything is disconnected. Novel concept.

It looks so big like this.

And there she is. I was planning to drain it, but forgot! I need to be better about that.

Oh, and here is something. Guess what I found. This puppy has been replaced before. At 142K it is getting it's 3rd tranny. At least. Well I guess thats 70k each. If the trend continues it should be good till 220k. Hopefully more since we will service it regularly and my tranny guy says he is putting some upgrades into it.

The last thing I had to disconnect today (or so I thought) was the front axles. Not too hard to be honest. The drivers side just popped right out. On the passenger side I went ahead and removed the whole thing. It only takes one little bolt on the hub for it to come out of the hub as well, so I recommend doing that first before pulling it out of the transaxle. BTW, all I removed was the two bolts to separate it from the strut. That was all it needed.
Just about to come out of the bay!
My beautiful assistant who is excited about her new tricycle motor hauler.
So as it turns out you need to remove ALL of the engine mounts. Who knew. I thought 80% was a passing grade, but apparently not.
To get to it you need to remove this plate. 4 bolts and it comes right off, easy peasey. I was worried for a moment that I might have to pull the pulley.
There she is.
Ok, it was tighter than.... (insert your own dirty joke.)
The back side became very familiar with the brake booster. I did my best to avoid it but there was still a lot of rubbage. I don't think I hurt anything but it was much more than I was comfortable with.
Also it was very tricky getting the rear engine mount to properly clear the bolt that sticks up through the middle of it. If you tilt the engine before it comes out it puts a torque on it and will never come out. So you need to pick the engine up straight at first, get it out, and then set it back down but not let it go through the hole again, pick it back up at an angle and finagle it out. Not super easy. Very tight. But manageable. Clearly it does come out.
The back side. You can see where the brake booster interferes.
One thing I was not expecting... this is a big engine. Volume wise it almost competes with a V8. I was expecting more something along the lines of a dinky little Honda engine. Nope.
I was really worried that the forward sensor on the master cylinder was bent, but I think it is supposed to be angled like that. I did bend a couple brake lines, but I think they are OK. My wife and I did agree, however, that brakes are a required feature on this car, so more inspections will be in order.
Oh, and speaking of forgetting to disconnect things: This is the fuel line. It got stretched. How much, I don't know, so if any has a picture of what this is SUPPOSED to look like, please share. The rubber line which attaches to it stretched a lot too. Didn't see it until the engine was nearly half way out. Moral of the story: Make sure everything is disconnected. Novel concept.
It looks so big like this.
And there she is. I was planning to drain it, but forgot! I need to be better about that.
Oh, and here is something. Guess what I found. This puppy has been replaced before. At 142K it is getting it's 3rd tranny. At least. Well I guess thats 70k each. If the trend continues it should be good till 220k. Hopefully more since we will service it regularly and my tranny guy says he is putting some upgrades into it.
Senior Member
Joined: May 2012
Posts: 1,988
Likes: 52
From: Kingsport, TN
Hey, I thought of something else you could do to it while it's apart. Might be a waste of time. You can clean all the wax out of the AWD driveshaft universal joint and put in some new grease.
Thread Starter
|
Senior Member
Joined: May 2013
Posts: 155
Likes: 0
More progress today! Got the angle gear off. Not hard at all.

I screwed up tho. While taking it apart some oil came out onto the driveway. I shoveled some kitty litter near it and some went inside. So I guess I will rebuilding this one too! Not sure if I will to bearings or now, but at least will take it apart and do seals and gaskets.
Picture of the brackets holding it in. Nothing special.

I was a little disappointed to see this. An exhaust gasket. Not sure which one, but I will be taking these off and redoing the turbos anyways, so I will find out which one. Anyways, I am glad I'm doing this myself now. I will make sure it goes back together right.

Didn't get a picture, but the POS tranny is in the back of the pickup now. I will drop it off tomorrow along with my deposit. Hopefully it will be done by next weekend.
In the mean time I will work on some other things on it. Pressure wash the engine bay and engine will be a good start. Then it's time for timing belt, spark plug O rings, cam seals, etc.
Time for some celebration. Dinner.

I screwed up tho. While taking it apart some oil came out onto the driveway. I shoveled some kitty litter near it and some went inside. So I guess I will rebuilding this one too! Not sure if I will to bearings or now, but at least will take it apart and do seals and gaskets.
Picture of the brackets holding it in. Nothing special.
I was a little disappointed to see this. An exhaust gasket. Not sure which one, but I will be taking these off and redoing the turbos anyways, so I will find out which one. Anyways, I am glad I'm doing this myself now. I will make sure it goes back together right.
Didn't get a picture, but the POS tranny is in the back of the pickup now. I will drop it off tomorrow along with my deposit. Hopefully it will be done by next weekend.
In the mean time I will work on some other things on it. Pressure wash the engine bay and engine will be a good start. Then it's time for timing belt, spark plug O rings, cam seals, etc.
Time for some celebration. Dinner.
Senior Member
Joined: May 2012
Posts: 1,988
Likes: 52
From: Kingsport, TN
The hole that goes all the way through the angle drive should have been full of transmission fluid I think. No insult there. But I would still put seals in it and top it off. Or even change the oil. Not that I know anything, but it seems like the thing to do.
Thread Starter
|
Senior Member
Joined: May 2013
Posts: 155
Likes: 0
Dropped the transmission off today. If everything works out and I have a working transmission at the end I will be super happy.
The shop is kinda exactly what I hoped for. An old hot rod sitting in the driveway in front of a one stall shop. It's run by an old guy with thick rimmed glasses, smoking a cigarette and covered in grease. Transmissions everywhere. A big sign handing in the window said something about "$50/hour. $75 if you watch. $100 if you help. $150 if you tried working on it yourself first." The "hours" sign literally read "I'm usually in the shop by 7AM, but sometimes I come in at 10. Noon at the latest. I stay until 5 but sometimes I work all night. Some days I don't come in at all. I don't work weekends,but sometimes I do."
As I walked up he was talking with another gentleman, griping about Obama and this years tax bill. Then they talked about their favorite transmissions for a bit and which cars they would or would not buy based on it.
I think this is EXACTLY the guy I was looking for. $900 should get me out the door. Sure hope so at least. Like I said, if it works and works well I will be happy.
Alex
Thread Starter
|
Senior Member
Joined: May 2013
Posts: 155
Likes: 0
Alright, got some more progress done! First thing I did was pressure wash the engine bay and engine. Didn't go nuts, but got it quite a bit cleaner. Not worried about getting it spotless. I will shine up parts and I put them back on.


Much prettier now.

Removed the rear main seal. The old one came out super easy, and the new one went in fine too. Didn't take long at all. Super glad I took the time to do it.

New one installed.

Got it on the stand.

My helper getting his hands dirty.

Pulled the pulley to get to the front crank seal. Oh, so unlike other (non Volvos) had the pulley and timing belt sprocket as separate parts. So if you pull the pulley for the accessories take the timing belt off first.

Front seal was a piece of cake too. No worries at all. But it was also $12. Yikes.

Much prettier now.
Removed the rear main seal. The old one came out super easy, and the new one went in fine too. Didn't take long at all. Super glad I took the time to do it.
New one installed.
Got it on the stand.
My helper getting his hands dirty.
Pulled the pulley to get to the front crank seal. Oh, so unlike other (non Volvos) had the pulley and timing belt sprocket as separate parts. So if you pull the pulley for the accessories take the timing belt off first.
Front seal was a piece of cake too. No worries at all. But it was also $12. Yikes.
Thread Starter
|
Senior Member
Joined: May 2013
Posts: 155
Likes: 0
You are right. I mis-spoke. The pulley for the accessories are not the same as the sprocket, but the "hub" is attached to the sprocket. I was expecting the sprocket to remain when that hub is pulled but what wasn't the case.
Thread Starter
|
Senior Member
Joined: May 2013
Posts: 155
Likes: 0
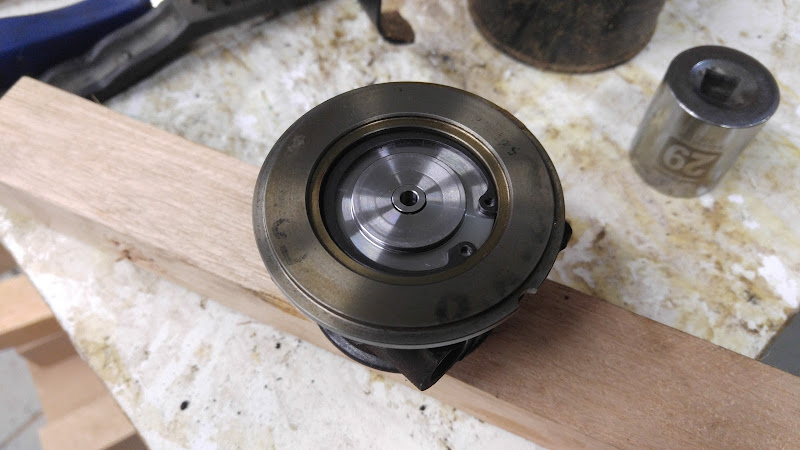
More progress! Today was a turbo day.
I have never rebuilt a turbo before. This was my first time. It went really well! I started with some kits off of eBay. My engine has the TD-03's, so I needed two kits. Cost about $35 each from seller "gyturbo". They showed up in just a couple of days too, which I am grateful for.
My buddy came to help, since he has done a few before and I am new to these. He did one while I copied him.

Took a picture for reference since there are a lot of hoses going to it.

And another.

Saw a little of this going on, which made me think it would be a good idea to just go ahead and do them. For $70 it seems like a no brainer.

Here is one of them on the bench. I only photographed one, and didn't take a picture every step.

After undoing the V band it came right apart. My buddy had to work his off a little harder, but mine wasn't too bad.

Disassembly.


New and old parts.

I realize this isn't enough to do your own based just on this. Honestly I was having trouble keeping up with my friend so I didn't have time to document the steps. But it is fairly straight forward. Things just tap out once you remove the clips. If you take your time, be sure to label everything, and make clock marks so you know the orientation when it goes back together you will be fine. Resist the urge to beat on it, light finesse should do just fine.
Anyways, one more step down. Will mount them back up to the engine tomorrow.
I have never rebuilt a turbo before. This was my first time. It went really well! I started with some kits off of eBay. My engine has the TD-03's, so I needed two kits. Cost about $35 each from seller "gyturbo". They showed up in just a couple of days too, which I am grateful for.
My buddy came to help, since he has done a few before and I am new to these. He did one while I copied him.
Took a picture for reference since there are a lot of hoses going to it.
And another.
Saw a little of this going on, which made me think it would be a good idea to just go ahead and do them. For $70 it seems like a no brainer.
Here is one of them on the bench. I only photographed one, and didn't take a picture every step.
After undoing the V band it came right apart. My buddy had to work his off a little harder, but mine wasn't too bad.
Disassembly.
New and old parts.
I realize this isn't enough to do your own based just on this. Honestly I was having trouble keeping up with my friend so I didn't have time to document the steps. But it is fairly straight forward. Things just tap out once you remove the clips. If you take your time, be sure to label everything, and make clock marks so you know the orientation when it goes back together you will be fine. Resist the urge to beat on it, light finesse should do just fine.
Anyways, one more step down. Will mount them back up to the engine tomorrow.
Thread Starter
|
Senior Member
Joined: May 2013
Posts: 155
Likes: 0
I am planning to replace it. Thanks! It is one more of those little piece of mind things. Especially since I'm putting new seals everywhere.