
New XC90 Project - Transmission Replacement!


Thread Starter
|
Senior Member
Joined: May 2013
Posts: 155
Likes: 0
Ok, time for a sanity check. I was an idiot (no new information here) and removed the VVT (variable valve timing) without marking the location. What complicates matters even more is they move back and forth about 15 or so degrees.
So I got online and checked a few things, and here is what I came up with. I just wanted you folks to double check my work. If I have anything wrong here I will go back and edit it so I don't mislead anyone in the future.
Basically I'm doing the timing from scratch with a VVT system on my 2003 XC90 T6.
I started with the crank set at "0" which isn't really TDC as I understand it but rather a "safe" position where values and cylinders can coexist no matter where the cams are turned to.
The notch on the pulley AND the hump on the hub are lined up with the mark on the block. On others I have seen a mark in the valleys and you straddle the marks on the block, but on mine there was only one mark on the top of a tooth.

I don't have a CAM locking tool, but as I have read the offset slot should be on the top side on the intake and the bottom side on the exhaust side. With the crank on its mark you can wheel the cams into position if you don't currently have your place.

On the VVT hubs there will be a certain amount of "play" back and forth. If the bolt securing the VVT isn't tight enough there won't be enough friction to slide the internal mechanisms. So the bolt needs to be just tight enough that you can turn the VVT gears on the cam and be in the "forward" position, but not spin the cam itself. Spin the VVT hubs CLOCKWISE until the marks on the pulley gear (very small tick marks, I marked mine yellow to see better) align with the marks in the timing cover. They look a little off in the picture due to parallax, but they are indeed aligned there. NOT spinning the CAM's at this time. Turn the pulley and NOT the bolt. I did it for both the exhaust and intake.

With the marks aligned everywhere and the cam in still in the position shown above I tightened the VVT hubs to the camshaft.
I then installed the timing belt, keeping things fairly tight on the tense side. After setting the tensioner tension I used a big wrench and CAREFULLY rotated the crank around twice, bringing the crank timing mark back to position. Going very slow just in case a piston and valve hit I would not force it forward.
The tick marks on the cam pulleys both perfectly align with marks on the timing cover, and the slots in the back return exactly to the position shown above. Again in the picture it looks a little off but is not, thats just the camera angle.

So I think I'm good! If I'm wrong about any of this please let me know and I will edit it, and of course fix it on the car!
Alex
So I got online and checked a few things, and here is what I came up with. I just wanted you folks to double check my work. If I have anything wrong here I will go back and edit it so I don't mislead anyone in the future.
Basically I'm doing the timing from scratch with a VVT system on my 2003 XC90 T6.
I started with the crank set at "0" which isn't really TDC as I understand it but rather a "safe" position where values and cylinders can coexist no matter where the cams are turned to.
The notch on the pulley AND the hump on the hub are lined up with the mark on the block. On others I have seen a mark in the valleys and you straddle the marks on the block, but on mine there was only one mark on the top of a tooth.
I don't have a CAM locking tool, but as I have read the offset slot should be on the top side on the intake and the bottom side on the exhaust side. With the crank on its mark you can wheel the cams into position if you don't currently have your place.
On the VVT hubs there will be a certain amount of "play" back and forth. If the bolt securing the VVT isn't tight enough there won't be enough friction to slide the internal mechanisms. So the bolt needs to be just tight enough that you can turn the VVT gears on the cam and be in the "forward" position, but not spin the cam itself. Spin the VVT hubs CLOCKWISE until the marks on the pulley gear (very small tick marks, I marked mine yellow to see better) align with the marks in the timing cover. They look a little off in the picture due to parallax, but they are indeed aligned there. NOT spinning the CAM's at this time. Turn the pulley and NOT the bolt. I did it for both the exhaust and intake.
With the marks aligned everywhere and the cam in still in the position shown above I tightened the VVT hubs to the camshaft.
I then installed the timing belt, keeping things fairly tight on the tense side. After setting the tensioner tension I used a big wrench and CAREFULLY rotated the crank around twice, bringing the crank timing mark back to position. Going very slow just in case a piston and valve hit I would not force it forward.
The tick marks on the cam pulleys both perfectly align with marks on the timing cover, and the slots in the back return exactly to the position shown above. Again in the picture it looks a little off but is not, thats just the camera angle.
So I think I'm good! If I'm wrong about any of this please let me know and I will edit it, and of course fix it on the car!
Alex

Senior Member
Joined: Dec 2015
Posts: 123
Likes: 0
I seen your timing belt was a Conitech, is there the gates one as good?
Thanks
Thanks
Thread Starter
|
Senior Member
Joined: May 2013
Posts: 155
Likes: 0
Don't see why the Gates wouldn't be as good. The one you listed is for the 5 cyl engine. I have used Gates serpentine belts before without issue. I simply Googled the Conitech belts to make sure people were not having issues with the brand in general. Typically I feel better with OEM, but I read the Conitech actually made the OEM belts for several car manufactures. Not Volvo though. Seemed ok, so I went with it.
Alex
Alex
Thread Starter
|
Senior Member
Joined: May 2013
Posts: 155
Likes: 0
Ok, I have a question now. Does anyone know if I can install the engine/transmission as a unit but wait to put the angle gear in later without repulling the engine? Is it a huge hassle to do? I think I want to rebuild it, but don't have the kit. Would like the get the motor/transmission back in so I can start putting stuff back together.
Alex
Alex
Thread Starter
|
Senior Member
Joined: May 2013
Posts: 155
Likes: 0
Got the transmission yesterday. $900 out the door. Feeling pretty good about it. The guy seemed very thorough. Forgot to snap some pics of the clutches, but they were toast. Smelled very burnt, had pretty bad pitting... the whole nine yards. Not the worst he has ever seen but most certainly toast and in need of an overhaul.

The source of my frustration.

He drilled a hole in the side of the torque converter, flushed it, and rewelded. Then he painted it. Not sure if what was needed, but hey, it's a nice touch.

Now I am waiting to order a kit for the angle gear. I think I should go ahead and do it while I'm in there. FCP has a kit I think I will get. I wish there was a way to drain and fill it when it's in the car.
https://www.fcpeuro.com/products/vol...glegearsealkit
The source of my frustration.
He drilled a hole in the side of the torque converter, flushed it, and rewelded. Then he painted it. Not sure if what was needed, but hey, it's a nice touch.
Now I am waiting to order a kit for the angle gear. I think I should go ahead and do it while I'm in there. FCP has a kit I think I will get. I wish there was a way to drain and fill it when it's in the car.
https://www.fcpeuro.com/products/vol...glegearsealkit
Thread Starter
|
Senior Member
Joined: May 2013
Posts: 155
Likes: 0
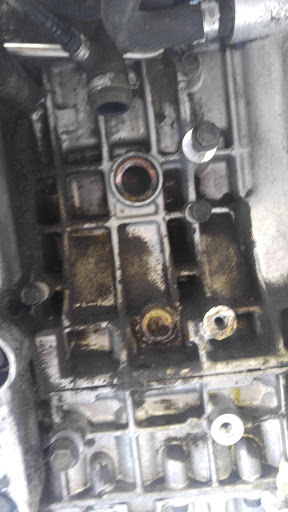
Good thing you mentioned the oil trap ES6T. The pictures don't show it...but the lines were completely clogged. Inside the block it was solid yellow sludge. I cleaned it out with brake cleaner and compressed air and blew the stuff out of the block pretty well. Just from the outside, I didn't open up the case. But this thing most definitely needed attention.
Alex


You can see the sludge built up in the block. Yuck. Glad to get that out of there.
Alex
You can see the sludge built up in the block. Yuck. Glad to get that out of there.
Last edited by crane550; Mar 19, 2016 at 11:04 PM.
Thread Starter
|
Senior Member
Joined: May 2013
Posts: 155
Likes: 0
So there are 2 long 10mm bolts that go up on the bottom side of the block just below flywheel. I thought that they might be holding stuff together when I was pulling everything apart so I removed them. Well they don't seem to be going back in. They just spin, even though the head of the bolts has met the case. Any idea on what these are? Is there a trick to them?
Alex
Alex
Thread Starter
|
Senior Member
Joined: May 2013
Posts: 155
Likes: 0
Those bolts are for the pan. I think they are stripped.  That is why they are spinning. They are easy to get to when the motor is in the car. I will worry about it later. Might have to pull the pan and put in a heli-coil later if it leaks. We will see.
Banjo bolt and PVC nipple... I was looking online trying to find out where this PCV nipple is located with no luck. Mind describing it for me?
I was looking closer at the old oil trap. It had some water in. Not a ton, maybe a teaspoon that drained out when I held it upside down. Also the sludge is a mustard color. Hopefully there isn't something else going on. But from what I understand Volvos like to get condensation in the crank case.
Alex
That is why they are spinning. They are easy to get to when the motor is in the car. I will worry about it later. Might have to pull the pan and put in a heli-coil later if it leaks. We will see.Banjo bolt and PVC nipple... I was looking online trying to find out where this PCV nipple is located with no luck. Mind describing it for me?
I was looking closer at the old oil trap. It had some water in. Not a ton, maybe a teaspoon that drained out when I held it upside down. Also the sludge is a mustard color. Hopefully there isn't something else going on. But from what I understand Volvos like to get condensation in the crank case.
Alex

Super Moderator
Joined: Oct 2010
Posts: 5,517
Likes: 73
I thought you meant the oil pan bolts, just wasn't sure why they were removed.
The banjo bolt is the 17mm bolt that is on the bottom of the intake. It goes through the PCV nipple, which has two coolant lines and a small plastic line. The small plastic line often either cracks or becomes clogged. If it is in tact and not clogged, no need to replace it. Just be careful not to break it on reassembly. The bolt can be cleaned with carb cleaner.
The water is condensation, I wouldn't be too worried.

Senior Member
Joined: May 2012
Posts: 1,988
Likes: 52
From: Kingsport, TN
Those long bolts going straight up near the flywheel, I guess just make sure the bolt you are looking at is long enough to reach.
I suppose they don't do a whole lot. However, if you take the oil pan off now, you'll get to clean out where that oil drain from the PCV goes.
I suppose they don't do a whole lot. However, if you take the oil pan off now, you'll get to clean out where that oil drain from the PCV goes.
Thread Starter
|
Senior Member
Joined: May 2013
Posts: 155
Likes: 0
Didn't take the pan off. Had to draw the line somewhere. I did run brake cleaner up through the oil catch holes and pushed some air into it. Hopefully that does it.
This isn't going to be the most cheerful post. Made a few dumb mistakes today, but also got a lot done. Mated the tranny back to the engine. My transmission guy made a slight mistake that cost me a good part of the day and a cracked block. Yup.
But don't worry. We will be fine.
On the nose cone of the transmission there are several bolts to hold the nose on. One of those doubles as a mount- so the bolt goes through the mount, through the nose cone, and screws into the 4T65-crap. The problem is it's on the back side so I couldn't see it. I slid the torque converter onto the transmission, and proceeded to mate the tranny on the engine. Except there was a bolt head keeping it from seating all the way.
Now I KNOW not to use the mounting bolts to bring the case together....but I did. On the bottom I was hand tightening one when I heard a big SNAP. I was just using a 14mm wrench, and really wasn't torquing it down that hard but it was enough. My heart sank. I could feel the dread all the way down to my bones.
Luckily, it just broke a mount. The area broken only leads to the "outside" of the crank case, and no where else. (Inside the bell housing is still pretty much "outside" as there are many holes/drains in the bottom.)
So I got really lucky.

Feel free to call me dumb names. I deserve it. I promise, I am a competent person. With streaks of idiocy from time to time.
So I drove down the Wally World to pick up a solution.

Funny thing is I decided to gently tap it into place to make sure it would fit without separating the case before mising the epoxy. Well it seated and then I couldn't get it back out. So I just put the bolt in and called it good.

This is my "sad face" when I opened up my camera to snap a pic only to have it on selfie mode.

However there is a silver lining.
The crank position sensor (at least thats what I assume it is) that sits kinda next to the starter was broke when I took it off. Now I promise- this time it wasn't me. They tried to glue it, but it didn't seem to work that well. So I needed the epoxy anyways.
Broken.

Fixed.

Time for a beer.
This isn't going to be the most cheerful post. Made a few dumb mistakes today, but also got a lot done. Mated the tranny back to the engine. My transmission guy made a slight mistake that cost me a good part of the day and a cracked block. Yup.
But don't worry. We will be fine.
On the nose cone of the transmission there are several bolts to hold the nose on. One of those doubles as a mount- so the bolt goes through the mount, through the nose cone, and screws into the 4T65-crap. The problem is it's on the back side so I couldn't see it. I slid the torque converter onto the transmission, and proceeded to mate the tranny on the engine. Except there was a bolt head keeping it from seating all the way.
Now I KNOW not to use the mounting bolts to bring the case together....but I did. On the bottom I was hand tightening one when I heard a big SNAP. I was just using a 14mm wrench, and really wasn't torquing it down that hard but it was enough. My heart sank. I could feel the dread all the way down to my bones.
Luckily, it just broke a mount. The area broken only leads to the "outside" of the crank case, and no where else. (Inside the bell housing is still pretty much "outside" as there are many holes/drains in the bottom.)
So I got really lucky.
Feel free to call me dumb names. I deserve it. I promise, I am a competent person. With streaks of idiocy from time to time.
So I drove down the Wally World to pick up a solution.
Funny thing is I decided to gently tap it into place to make sure it would fit without separating the case before mising the epoxy. Well it seated and then I couldn't get it back out. So I just put the bolt in and called it good.
This is my "sad face" when I opened up my camera to snap a pic only to have it on selfie mode.
However there is a silver lining.
The crank position sensor (at least thats what I assume it is) that sits kinda next to the starter was broke when I took it off. Now I promise- this time it wasn't me. They tried to glue it, but it didn't seem to work that well. So I needed the epoxy anyways.
Broken.
Fixed.
Time for a beer.
Thread Starter
|
Senior Member
Joined: May 2013
Posts: 155
Likes: 0
This engine is IN!
Huge engine. Tiny hole. For a while I didn't think it was going to make it. But we got it! Boy that brake booster sure gets in the way. Not a whole lot of fun. Actually we broke the brake booster reservoir while squeezing it in. To be fair I was actually UNDER the car pushing up on the rear output to rotate the motor closer to it's proper angle. The angle you see here in the 1st photo is needed to make it, however. Otherwise it's just too long to put in. The output for the rear driveline needs to clear the firewall, so our trick was to use this very steep angle. Meanwhile I was under the car pressing up on the rear drive output as we lowered it.
Seems to have worked, cause now it's in. Finally. Oh, and as you see in the 1st picture take off the little plastic shroud that goes around the output for the passenger CV. You can put it in later.
Which reminds me: Here are a few things to have on or off the motor when you put it in. Some things are easier to put on the motor first (duh) but some will get in the way should you want to add it later. This is not a complete list.
Things to have ON:
-Cam sensor for the exhuast. Not a huge deal, but I wish I had stuck it on before.
-The two "middle" tubes to the turbos. The side ones may get in the way while putting it in. But the two in the middle are a bit tight to put on once you have it in. Perfectly possible, but just do it ahead of time.
-Heat shield over the drivers side turbo. A bit counter intuitive, but just secure it with one bolt. When you go to put the manifold back on you can unscrew it and move it to the side. But trying to get it in there from the top is a nightmare. In fact these things just suck. The passenger side one slides in a bit easier.
-Timing belt, water pump, tensioners, etc. This kinda goes without saying but if you can do it before dropping in the motor it's a definite cakewalk comparatively speaking.
-Transmission dipstick. As much as it's in the way I don't think it would be easy to put on after having it in. Not at all.
Things NOT to have attached:
-Outer hard turbo lines. Drivers side is a bit hairy to put on, but it's worth it to have the extra room.
-The plastic shroud that shields the passenger CV output. It's easy to put on later.
The install.
My brother manning the hoist.

The steep angle trying to clear the firewall.

Closer.

Huge engine. Tiny hole. For a while I didn't think it was going to make it. But we got it! Boy that brake booster sure gets in the way. Not a whole lot of fun. Actually we broke the brake booster reservoir while squeezing it in. To be fair I was actually UNDER the car pushing up on the rear output to rotate the motor closer to it's proper angle. The angle you see here in the 1st photo is needed to make it, however. Otherwise it's just too long to put in. The output for the rear driveline needs to clear the firewall, so our trick was to use this very steep angle. Meanwhile I was under the car pressing up on the rear drive output as we lowered it.
Seems to have worked, cause now it's in. Finally. Oh, and as you see in the 1st picture take off the little plastic shroud that goes around the output for the passenger CV. You can put it in later.
Which reminds me: Here are a few things to have on or off the motor when you put it in. Some things are easier to put on the motor first (duh) but some will get in the way should you want to add it later. This is not a complete list.
Things to have ON:
-Cam sensor for the exhuast. Not a huge deal, but I wish I had stuck it on before.
-The two "middle" tubes to the turbos. The side ones may get in the way while putting it in. But the two in the middle are a bit tight to put on once you have it in. Perfectly possible, but just do it ahead of time.
-Heat shield over the drivers side turbo. A bit counter intuitive, but just secure it with one bolt. When you go to put the manifold back on you can unscrew it and move it to the side. But trying to get it in there from the top is a nightmare. In fact these things just suck. The passenger side one slides in a bit easier.
-Timing belt, water pump, tensioners, etc. This kinda goes without saying but if you can do it before dropping in the motor it's a definite cakewalk comparatively speaking.
-Transmission dipstick. As much as it's in the way I don't think it would be easy to put on after having it in. Not at all.
Things NOT to have attached:
-Outer hard turbo lines. Drivers side is a bit hairy to put on, but it's worth it to have the extra room.
-The plastic shroud that shields the passenger CV output. It's easy to put on later.
The install.
My brother manning the hoist.
The steep angle trying to clear the firewall.
Closer.
Thread Starter
|
Senior Member
Joined: May 2013
Posts: 155
Likes: 0
Probably have run into my most frustrating snag yet. There is something that is below the timing cover and under the two cam sprockets. No idea what it is, what it does, or why it is there. It appears to have a vacuum component to it.
I hate it.
Getting the clip off of it was a nightmare in the first place. Then I bumped it while installing the serpentine belt and broke it off. So I tried to put it back with superglue several times and keep breaking it off again trying to put the timing cover back on. The timing cover has this indentation in it that makes it very hard to slide the clips on the bottom in while avoiding this little plug. I even cut away part of the timing cover to see if I could make avoiding it easier, but I still broke it off again. Plus I'm not too optimistic that it will survive pushing that aweful plug back on.
This is something I can't really say often about Volvo's, but this is kinda a bad design.
I used JB Weld on it this time to see if that holds better, but if not I might have to come up with a plan C.
So my question: What the heck is this thing? Can it just be plugged? Is it important? WHY WHY WHY???
For what it's worth, I don't really break stuff that often when working on things. But I have broke a couple things on this build so far. Ugh. This is making me look bad.
Super Moderator
Joined: Oct 2010
Posts: 5,517
Likes: 73
That's the thermostat. That plastic nipple is for the bleed hose that goes to the coolant reservoir. Its common to break. Whenever I sell a timing belt job, I sell the thermostat and hose, just in case.
Since you already cut the cover, you can rig up a ****** fitting to attach to the hose instead. Or buy a thermostat and bleed hose.
Edit: apparently "b-a-r-b-e-d" is censored?
Since you already cut the cover, you can rig up a ****** fitting to attach to the hose instead. Or buy a thermostat and bleed hose.
Edit: apparently "b-a-r-b-e-d" is censored?