When you click on links to various merchants on this site and make a purchase, this can result in this site earning a commission. Affiliate programs and affiliations include, but are not limited to, the eBay Partner Network.
I'm writing this because the information I found online was incomplete or not very detailed regarding the XC90. Even some of the Volvo VADIS information was somewhat sparse. I did a horrible job of taking pictures along the way so I used others I found on the web along with some of my own. Hopefully someone finds this helpful.
Overall This job isn't that hard, it just takes time. If you follow what I have here along with some of the other resources listed at the bottom of this page you'll be just fine.
A Few Tips The lock rings are on tight. You'll probably need a special tool. Buy one or make one but a screwdriver and hammer probably won't cut it.
Keep a vacuum handy. Both access areas had a ton of dirt in them and if you don't vacuum it up it goes right in the tank.
The Pump There are different pumps for different chassis numbers (last 6 numbers of your VIN) so make sure you get the right one. My pump was part number 31261819. I was able to find on at TascaParts.com. I paid $260 shipped for an OEM pump.
Getting Started First thing to do is disconnect the negative lead to the battery, let the car sit for a few minutes to avoid any unwanted airbag deployment.
Back Seats Next you need to remove the back seats. Mine only has the single row of back seats so if yours has the third row, I can't help with that. NOTE: the middle seat has an electrical connector that needs to be unhooked.
Each seat is held on by (4) 13mm bolts. The front bolts are easy to get to after removing the plastic covers. There's a single tab you push down and the plastic covers slide forward. To remove the rear bolts I removed the floor panel in the cargo space. It's not even bolted down so it's easy to remove. After removing all the bolts the seats come out easily.
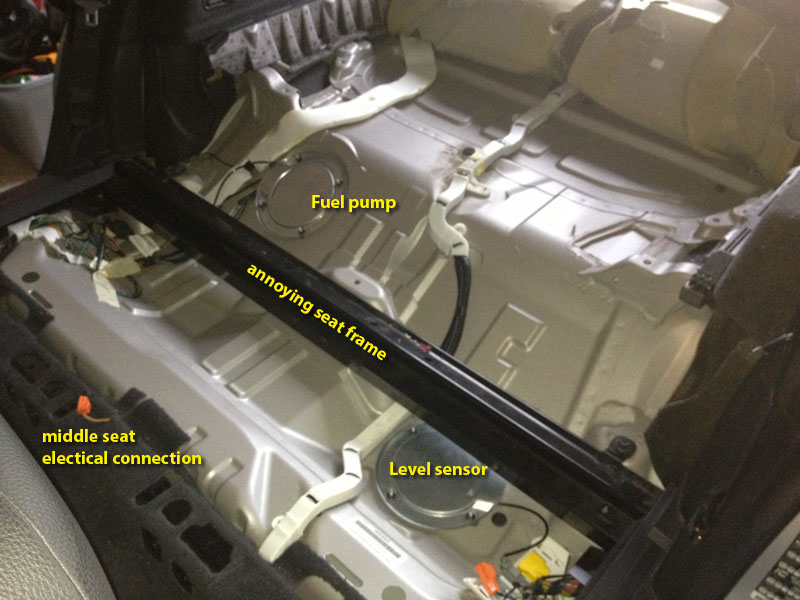
Carpet Removal The carpet comes up easily. There are two foam inserts that need to be removed also. This will reveal the two access panels for the fuel pump and level sensor. Why two access panels? Because the pump unit has hoses and electrical connections coming off it that stretch across the gas tank to the level sensor. If you want more details…I got nothing
Fuel Level Sensor Side (drivers side) One thing I didn't plan on was the seat frame being potentially in the way. After looking at what it would take to remove it I decided to move forward to see what would happen. Thankfully it wasn't an issue for me.
The access panel is held on by (4) 10mm nuts. Simply remove them and work the access panel off the studs. The one nut under the seat frame isn't pleasant but easy enough with a 10mm wrench. Carefully remove the rubber gasket from the access panel and set the panel aside.The gasket has one wire going through it. I unplugged the wire, removed it from the gasket and set the gasket aside. This made it a little easier to work.
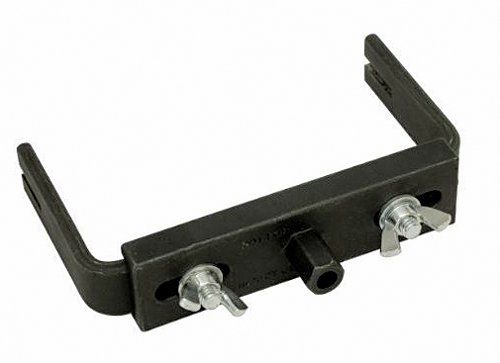
Next is removal of the plastic lock ring. This is where you need to make or buy a special tool. I got this one on Amazon and it worked great.
Mine was held on very tightly! I actually broke off one of the lock ring "ears" but was able to finally remove it. Because of the seat frame being in the way this is slow as you have about 1/8 of a turn to work with.
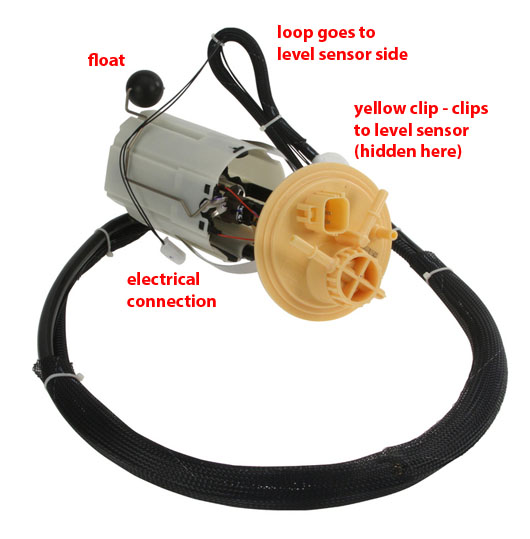
Once you get that off you need to remove the fuel pump hoses from the level sensor. There is one yellow plastic clip attached the the level sensor and one electrical connection (black wires). I removed the level sensor from the tank also. There might be a way to do it without unclipping the float but I couldn't figure it out. So I unclipped the float being VERY CAREFUL not to lose it in the tank. I also made a note of exactly how it needed to be reassembled.
Vacuum up the dirt around the edge and remove the o-ring also. I re-used the old one. You may want to use a new one. They're about $10 a piece. NOTE: be very careful not to vacuum up any gas…I've seen YouTube videos of this…hilarious unless it's you.
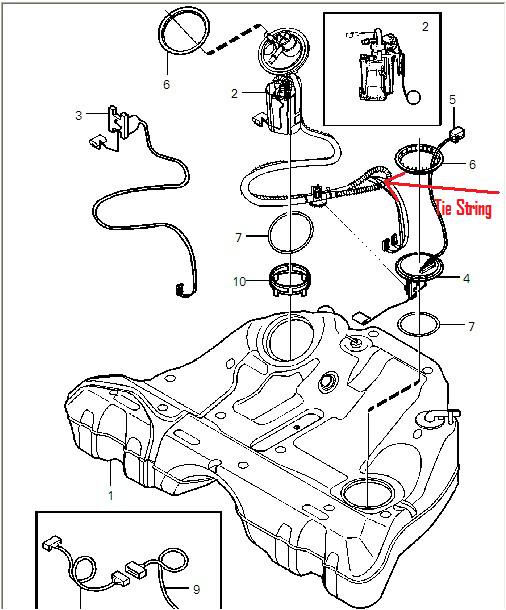
Finally you're ready to tie a wire or string (I used some old speaker wire) to the fuel pump hoses so when you pull them to the other side as you remove the pump you can feed the new hoses back through. Don't screw this up. Fishing the hoses from one side to the other would be a nightmare.
Fuel Pump Side (passenger side) Remove the access panel as described above.
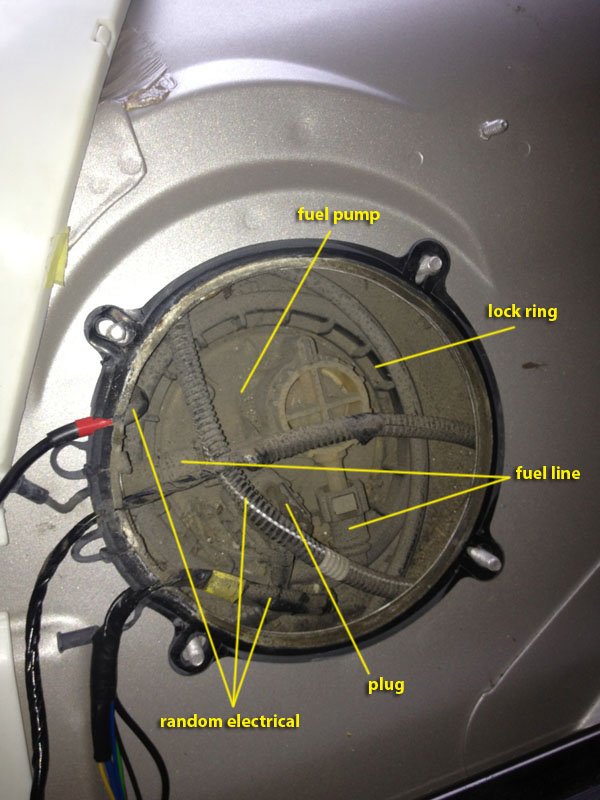
This side has a lot more connections and hoses to deal with. It can be a pretty annoying juggling act of one of the electrical connections or fuel lines getting in the way as you work. Just keep at it, you'll be fine.
Remove the electrical connection and gas lines. Move all the connections and hoses out of the way as much as possible.
Remove the lock ring as described above, this side is thankfully easier.
Remove the fuel pump assembly. Be careful as my basket was full of gas. I had to use a turkey baster to suck some of it out. I had less than 1/8 of a tank of gas and I'm glad. You DON'T want to dump a bunch of fuel on the floor of your car.
Once again I had to unclip the float, once again being careful not to drop it in the tank.
Pull the fuel pump out with the hoses bringing the string or wire with it. Remove the string or wire from the old pump hoses and attach them to the new ones. You'll also want to remove the o-ring just as above.
Pull the hoses from the new pump over to the fuel sensor access hole. This took a few tries for me. Don't force it, eventually it will find it's way. Now install the new pump. Again I found it easier to remove the float and reattach it after getting both in the tank. It just seems like the fuel pump hole is too small to fit both. You might be able to make it work…if so great. Keep on working the pump into the tank. Don't force it, eventually it will find it's home.
Reinstall the o-ring and then work the lock ring back into the hole. Tighten the lock ring making sure the arrow on the fuel pump is facing to the rear of the car.
Install the access panel gasket making sure the wires are going through the appropriate holes. For any holes not used make sure to use the plugs attached to the gasket.
Replace the access panel and tighten the nuts.
Back To The Fuel Level Sensor Side Remove the string or wire from the new pump hoses. Make sure you have reinstalled the o-ring.
Reinstall the yellow clip to the fuel level sensor and electrical connection.
Install the fuel level sensor and (in my case) reattach the float.
Push down into the fuel tank and reinstall the lock ring. Once again make sure the arrow is pointing straight back.
Install the access panel gasket and run the wire through the gasket. Make sure any other holes are plugged with the plugs attached to the gasket.
Replace the access panel and tighten the nuts.
Finishing Up Replace the foam and carpet.
Reinstall the seats making sure to reconnect the electrical connection under the middle seat.
Replace the batter cable following the VADIS guidelines below.
You mentioned that there are 2 fuel pump part numbers used for 2 different chassis.
Do you have the series of vins that are for either one of the fuel pump part numbers?
Thank you. Wonderful job on the tutorial.
Just wanted to add a note on the third row of seats. I did manage to change the fuel pump on mine WITHOUT removing the 3rd row. The third row seat assembly is mounted to the floor with 2 bolts at the front, 5 in the middle under the center console (4 in a cluster, 1 by itself), and 2 on each side UNDER the seats (access those from the trunk area). Remove the front two and the middle ones, but only need to loosen the 2 on each side so the frame starts moving. After that I lifted it slightly until I could pull the carpet out. Feeding the carpet back under it was a little harder, I ended up cutting off a small piece on each side, where the carpet goes up the wheel wells.
It *may* be possible to do it with simply folding and clamping the carpet out of the way too...
Also, I made the lock ring tool out of a PVC adapter bought for $3 from Home Depot, slots in it are every 20 degrees (you can print out a PDF 360 degree protractor template off the Internet). I cut the notches with a dremel. It was definitely worth the 20 min fabrication time:
I'm writing this because the information I found online was incomplete or not very detailed regarding the XC90. Even some of the Volvo VADIS information was somewhat sparse. I did a horrible job of taking pictures along the way so I used others I found on the web along with some of my own. Hopefully someone finds this helpful.
Overall
This job isn't that hard, it just takes time. If you follow what I have here along with some of the other resources listed at the bottom of this page you'll be just fine.
A Few Tips
The lock rings are on tight. You'll probably need a special tool. Buy one or make one but a screwdriver and hammer probably won't cut it.
Keep a vacuum handy. Both access areas had a ton of dirt in them and if you don't vacuum it up it goes right in the tank.
The Pump
There are different pumps for different chassis numbers (last 6 numbers of your VIN) so make sure you get the right one. My pump was part number 31261819. I was able to find on at TascaParts.com. I paid $260 shipped for an OEM pump.
Getting Started
First thing to do is disconnect the negative lead to the battery, let the car sit for a few minutes to avoid any unwanted airbag deployment.
Back Seats
Next you need to remove the back seats. Mine only has the single row of back seats so if yours has the third row, I can't help with that. NOTE: the middle seat has an electrical connector that needs to be unhooked.
Each seat is held on by (4) 13mm bolts. The front bolts are easy to get to after removing the plastic covers. There's a single tab you push down and the plastic covers slide forward. To remove the rear bolts I removed the floor panel in the cargo space. It's not even bolted down so it's easy to remove. After removing all the bolts the seats come out easily.
Carpet Removal
The carpet comes up easily. There are two foam inserts that need to be removed also. This will reveal the two access panels for the fuel pump and level sensor. Why two access panels? Because the pump unit has hoses and electrical connections coming off it that stretch across the gas tank to the level sensor. If you want more details�I got nothing
Fuel Level Sensor Side (drivers side)
One thing I didn't plan on was the seat frame being potentially in the way. After looking at what it would take to remove it I decided to move forward to see what would happen. Thankfully it wasn't an issue for me.
The access panel is held on by (4) 10mm nuts. Simply remove them and work the access panel off the studs. The one nut under the seat frame isn't pleasant but easy enough with a 10mm wrench. Carefully remove the rubber gasket from the access panel and set the panel aside.The gasket has one wire going through it. I unplugged the wire, removed it from the gasket and set the gasket aside. This made it a little easier to work.
Next is removal of the plastic lock ring. This is where you need to make or buy a special tool. I got this one on Amazon and it worked great.
Mine was held on very tightly! I actually broke off one of the lock ring "ears" but was able to finally remove it. Because of the seat frame being in the way this is slow as you have about 1/8 of a turn to work with.
Once you get that off you need to remove the fuel pump hoses from the level sensor. There is one yellow plastic clip attached the the level sensor and one electrical connection (black wires). I removed the level sensor from the tank also. There might be a way to do it without unclipping the float but I couldn't figure it out. So I unclipped the float being VERY CAREFUL not to lose it in the tank. I also made a note of exactly how it needed to be reassembled.
Vacuum up the dirt around the edge and remove the o-ring also. I re-used the old one. You may want to use a new one. They're about $10 a piece. NOTE: be very careful not to vacuum up any gas�I've seen YouTube videos of this�hilarious unless it's you.
Finally you're ready to tie a wire or string (I used some old speaker wire) to the fuel pump hoses so when you pull them to the other side as you remove the pump you can feed the new hoses back through. Don't screw this up. Fishing the hoses from one side to the other would be a nightmare.
Fuel Pump Side (passenger side)
Remove the access panel as described above.
This side has a lot more connections and hoses to deal with. It can be a pretty annoying juggling act of one of the electrical connections or fuel lines getting in the way as you work. Just keep at it, you'll be fine.
Remove the electrical connection and gas lines. Move all the connections and hoses out of the way as much as possible.
Remove the lock ring as described above, this side is thankfully easier.
Remove the fuel pump assembly. Be careful as my basket was full of gas. I had to use a turkey baster to suck some of it out. I had less than 1/8 of a tank of gas and I'm glad. You DON'T want to dump a bunch of fuel on the floor of your car.
Once again I had to unclip the float, once again being careful not to drop it in the tank.
Pull the fuel pump out with the hoses bringing the string or wire with it. Remove the string or wire from the old pump hoses and attach them to the new ones. You'll also want to remove the o-ring just as above.
Pull the hoses from the new pump over to the fuel sensor access hole. This took a few tries for me. Don't force it, eventually it will find it's way. Now install the new pump. Again I found it easier to remove the float and reattach it after getting both in the tank. It just seems like the fuel pump hole is too small to fit both. You might be able to make it work�if so great. Keep on working the pump into the tank. Don't force it, eventually it will find it's home.
Reinstall the o-ring and then work the lock ring back into the hole. Tighten the lock ring making sure the arrow on the fuel pump is facing to the rear of the car.
Install the access panel gasket making sure the wires are going through the appropriate holes. For any holes not used make sure to use the plugs attached to the gasket.
Replace the access panel and tighten the nuts.
Back To The Fuel Level Sensor Side
Remove the string or wire from the new pump hoses. Make sure you have reinstalled the o-ring.
Reinstall the yellow clip to the fuel level sensor and electrical connection.
Install the fuel level sensor and (in my case) reattach the float.
Push down into the fuel tank and reinstall the lock ring. Once again make sure the arrow is pointing straight back.
Install the access panel gasket and run the wire through the gasket. Make sure any other holes are plugged with the plugs attached to the gasket.
Replace the access panel and tighten the nuts.
Finishing Up
Replace the foam and carpet.
Reinstall the seats making sure to reconnect the electrical connection under the middle seat.
Replace the batter cable following the VADIS guidelines below.
I can�t get the string attachment to go to the other side. It�s like it�s stuck in the middle on something, is their a technique you used to get it to the other side?