
Evaperator replacement instructions


Junior Member
Joined: Aug 2007
Posts: 7
Likes: 0
My 1994 850 needs the evaporater replaced and I have looked at the instructions and photos. Is it possible tocut the dash with a dremel tool and only remove the right side of the dash to get at the evaporater, etc??? I understand I will have a cut line when I am done,
Thanks.
Thanks.

Joined: Nov 2007
Posts: 21
Likes: 0
From:
Hi All,
I am trying to be sure that my evaporator does its job or not. Since I already opened up my dash for odometer gear replacement, I would like to fix as many item as possible while it's open.
During the summer, my A/C was not doing well while I was not pushing the gas. While I stop at the red light or stop sign, A/C was blowing just the outside air only. When I accelarate then it was back to cool mode. Woul it be related to evaporator? Or is it just related to the belts?
If you have other fixes in your mind for an open dash panel, let me know. Thanks.

Junior Member
Joined: Jun 2007
Posts: 6
Likes: 0
I posted pictures of my Evap core replacement in other areas of this forum, but I thought I would give you a link here.
Link to Forum Topic: Replacing Evap Core
Cut and paste this in case the link doesn't work above: http://www.VolvoForums.com/m_64718/tm.htm
Here's a direct link to the album: Kodak Gallery Album of Evap Core Replacement
Cut and past this in case the link doesn't work: http://www.kodakgallery.com/ShareLan...localeid=en_US
Everyone can see it, but you have to login to add comments. Kodak gallery account are free. SIgn up at www.kodakgallery.com

Administrator
Joined: Mar 2009
Posts: 15,736
Likes: 36
From: Albuquerque, NM
I'm about to do the evap change. From what I can tell I will need the following:
1. Evaporator
2. O-Ring seals
3. Evaporator seals?
4. Special tools to unlock the evaporator springs.
Is there anything else you guys think I will need? I'm going to do the speedo gear while there.
1. Evaporator
2. O-Ring seals
3. Evaporator seals?
4. Special tools to unlock the evaporator springs.
Is there anything else you guys think I will need? I'm going to do the speedo gear while there.
Administrator
Joined: Mar 2009
Posts: 15,736
Likes: 36
From: Albuquerque, NM

Senior Member
Joined: Dec 2010
Posts: 1,264
Likes: 0
From: Miami, FL
This part here? That's not to bad...
Volvo AC Accumulator 850/S70/V70/C70 (94-97) 9187629
Volvo AC Accumulator 850/S70/V70/C70 (94-97) 9187629
If your doing the evaporator make sure if you need one you get the orifice tube.
and Make sure You get the system vacuumed really well before you recharge it.
Last edited by MattyXXL; Jun 20, 2011 at 03:38 PM.
Senior Member
Joined: Dec 2010
Posts: 1,264
Likes: 0
From: Miami, FL
All Data is saying 10 hours..
If you have a helper you should be able to knock it out in 5 or 6 hours.
Drive it down to Miami, Ill help you...
If you have a helper you should be able to knock it out in 5 or 6 hours.
Drive it down to Miami, Ill help you...
Administrator
Joined: Mar 2009
Posts: 15,736
Likes: 36
From: Albuquerque, NM
Well, I did it. I did NOT do the dryer. It took me between 11 and 12 hours. A lot of work that simply is NOT worth paying someone to do and not worth doing yourself if you do not plan to drive the car for at least 4 years.
I planned to do the job because I thought the R134 was bad on the OZone but I found out that it is not. I was only going through 1 can per month so that's about $10. The parts cost about $200 they you should factor in breaking something and your time so 4 years is my cut off.
I took some pictures and made some notes on the instructions above so I may post some ammended instructions that a cave man could follow.


Administrator
Joined: Mar 2009
Posts: 15,736
Likes: 36
From: Albuquerque, NM
It wasn't that bad. I break down laptop computers and like digging into stuff though. Pictures will help and not being in a apartment complex parking lot hiding from the manager would have been nice as well. I also like an adventure so that was fun for me to.  Going back together I missed the wire at the bottom of the air bag real and had to pull the steering wheel off again. I also had a few more wire connectors than was normal.
I had a hard time getting the heater hoses loose and I broke the recycle door lever ($7) because it spins around and will almost go on backwards.
Going back together I missed the wire at the bottom of the air bag real and had to pull the steering wheel off again. I also had a few more wire connectors than was normal. I had a hard time getting the heater hoses loose and I broke the recycle door lever ($7) because it spins around and will almost go on backwards.
Administrator
Joined: Mar 2009
Posts: 15,736
Likes: 36
From: Albuquerque, NM
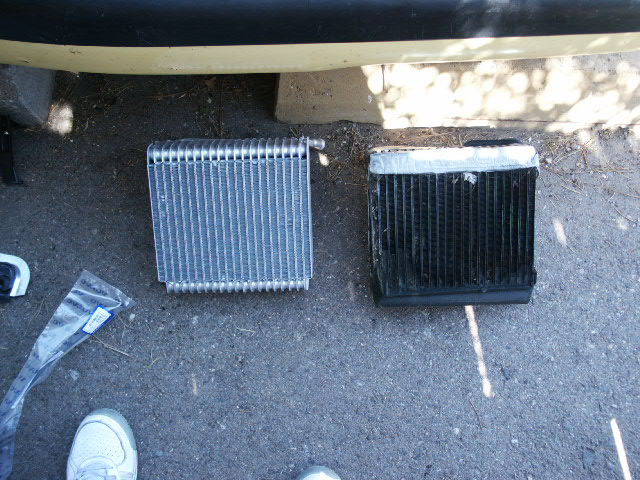
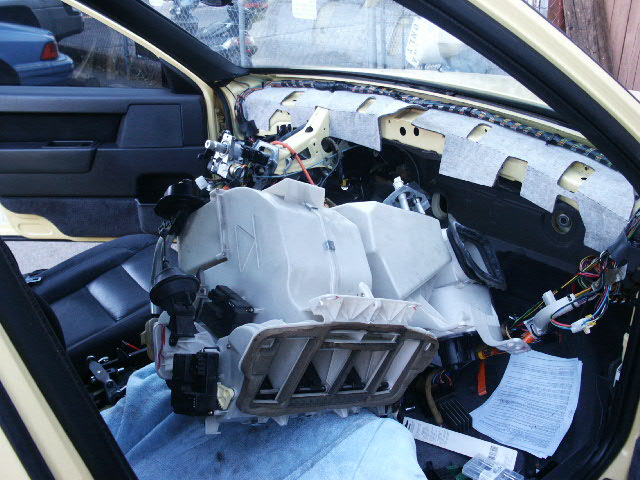
Here is a couple of pics. I will post my caveman instructions when I find the instructions I used. I made notes on it.
These pics are of the dirty nasty cracked evaporator and the new one.

These 2 pics are of everything out of the interior. If that's doesn't change your mind you are stranger than me.

These pics are of the dirty nasty cracked evaporator and the new one.
These 2 pics are of everything out of the interior. If that's doesn't change your mind you are stranger than me.
Last edited by rspi; Jan 6, 2012 at 08:02 PM. Reason: typos

Thread
Thread Starter
Forum
Replies
Last Post