
Headlight Replacement Instructions?


Thread Starter
|
Senior Member
Joined: Apr 2012
Posts: 239
Likes: 0
Anyone here have a instructions on how to replace a headlight assembly for a 1995 Volvo 850?
My car was recently backed into while I was at school, so my passenger headlight is destroyed and the plastic strip of trim below is cracked. Fortunately, those are the only parts of my car the trailer ball managed to damage! My bumper, turn signal, grille, and hood are completely untouched!
I ordered a new headlight assembly and a new white trim piece, and they are on their way.
I was inspecting the headlight assembly in my car and it seems like replacing it would be relatively straightforward. Still, I haven't ever replaced an 850 headlight assembly before, and I figured someone out there must have a how-to instructional on how to exchange it, which might come in handy. So, I thought I'd come here and find out if anyone had a how-to on replacing it.
Thanks in advance!
1995Volvo850

Robert,
How difficult is it to change the headlight wiper motor / gearbox assemblies?
My passenger side doesn't work, so I unplugged it for the meantime. Got a used motor and gearbox from a fellow Volvo enthusiast, but haven't dived in to change it yet.
How difficult is it to change the headlight wiper motor / gearbox assemblies?
My passenger side doesn't work, so I unplugged it for the meantime. Got a used motor and gearbox from a fellow Volvo enthusiast, but haven't dived in to change it yet.

Senior Member
Joined: Dec 2011
Posts: 445
Likes: 2
From: Adelaide, Australia
Which side wiper motor assembly? Left hand side is easy, right hand side is a PITA.
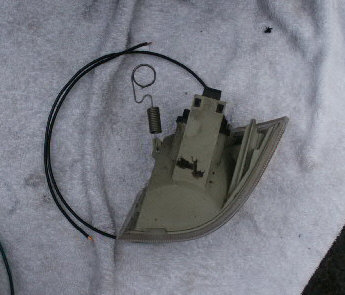
Changing the headlight is simple, remove the plastic trim under headlight. Remove the side marker/turn signal assembly with the spring loaded clamp behind the headlight. 3x 10mm bolts on the back of the headlight come off and the headlight should pop straight out. One of the easiest cars I have changed headlights on too.
Changing the headlight is simple, remove the plastic trim under headlight. Remove the side marker/turn signal assembly with the spring loaded clamp behind the headlight. 3x 10mm bolts on the back of the headlight come off and the headlight should pop straight out. One of the easiest cars I have changed headlights on too.

Senior Member
Joined: Jun 2012
Posts: 472
Likes: 1
From: Sonoma County, California
Which side wiper motor assembly? Left hand side is easy, right hand side is a PITA.
Changing the headlight is simple, remove the plastic trim under headlight. Remove the side marker/turn signal assembly with the spring loaded clamp behind the headlight. 3x 10mm bolts on the back of the headlight come off and the headlight should pop straight out. One of the easiest cars I have changed headlights on too.
Changing the headlight is simple, remove the plastic trim under headlight. Remove the side marker/turn signal assembly with the spring loaded clamp behind the headlight. 3x 10mm bolts on the back of the headlight come off and the headlight should pop straight out. One of the easiest cars I have changed headlights on too.

Administrator
Joined: Mar 2009
Posts: 15,736
Likes: 36
From: Albuquerque, NM
What he said. I started to tear into a passenger side wiper motor before to change it and an hour later, I backed up and put the car back together. You basically have to pull the entire front end of the car off to get one of the bolts out. It's not worth it.
Senior Member
Joined: Dec 2011
Posts: 445
Likes: 2
From: Adelaide, Australia
I only remove the trim piece so I dont damage it. It is not entirely neccessary, correct.

Administrator
Joined: Mar 2010
Posts: 4,517
Likes: 12
From: Cape Coral, FL
To pull that side marker light out I just use a 10" screwdriver to get into the springs loop and move it enough to slip free. Same in reverse to slip it into it's "V" that holds it.
It's easier to remove them but I'm not sure it's required to get the headlight out or in.
It's easier to remove them but I'm not sure it's required to get the headlight out or in.
Thread Starter
|
Senior Member
Joined: Apr 2012
Posts: 239
Likes: 0
I just wanted to let you all know I replaced my broken headlight housing and trim piece no problem, and the car looks just as good and 100% symmetrical as before!
The turn signal was really easy to remove. Just pull on the loop with your index finger and pop the spring out of its "V" groove. Easy!
The headlight housing was also really easy to remove. I found that if I removed the passenger side hood latch it would make the headlight housing bolts more accessible. Everything was really straight forward.
I also removed my broken trim before changing my headlight and installed my new one after I installed my replacement headlight, but I feel that removing the trim just to change the light would not have been necessary had I not been replacing it anyways.
My only SNAFU was that my new(used) housing from Ebay had a completely ruined wiring harness with all of the insulation cracked off. This was a fire hazard that was not mentioned on Ebay when the seller said the light was "used, but completely functional". Thankfully, the harness that was in my broken housing was in perfect shape, so I just pried the burned up harness out of my replacement housing and popped in my intact one. No more fire hazard!
The whole project took $70 total and an hour of my time. Not bad!
Lastly, anyone have instructions/specs on the headlight aim? I was just going to eyeball it on a wall, but I figured if someone out there has the actual aim specifications, I might as well go by those.
Last edited by 1995Volvo850; Nov 3, 2013 at 03:44 PM.

Thread
Thread Starter
Forum
Replies
Last Post