
S60 2006 Door Warning Light Retrofit


Thread Starter
|
Junior Member
Joined: Aug 2022
Posts: 14
Likes: 0
Hi,
just finished (well, half-finished more like) my latest project and thought i would share my findings, maybe someone will find it useful, it took me quite a while to figure everything out :-)
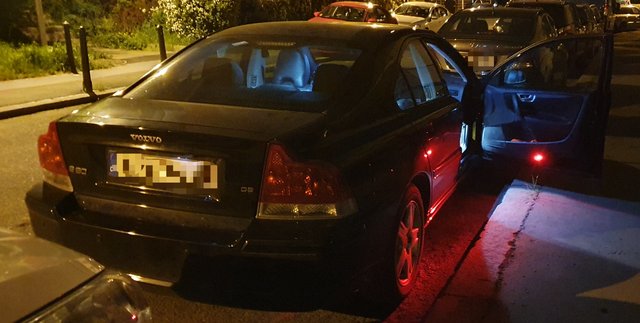

It is necessary to route a cable from the footwell light +12V ACC terminal, which includes the following:
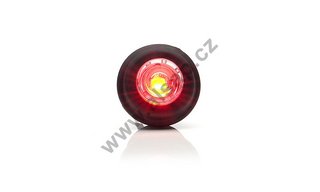
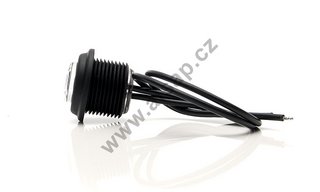
0) get some electrical cable (ideally something like 2x0.5mm stranded wire, different wire colors are useful), which will power the door warning light, choose a LED light of reasonable quality and/or pick one with replacable bulb, although that might prove tougher to come by and install (I went for a generic round �LED position light, Red, W80 29/21mm diameter, 0, 25m cord�), and figure out how and where in the door panel it will be mounted; heat shrink tubing and terminal crimping tools, so that all cables can be properly terminated
1) remove the door panel (just check out YouTube � for example �speaker replacement�); prepare a thin screwdriver/stick, TX25 bit/screwdriver
2) remove the plastic cover under the steering wheel; again TX25
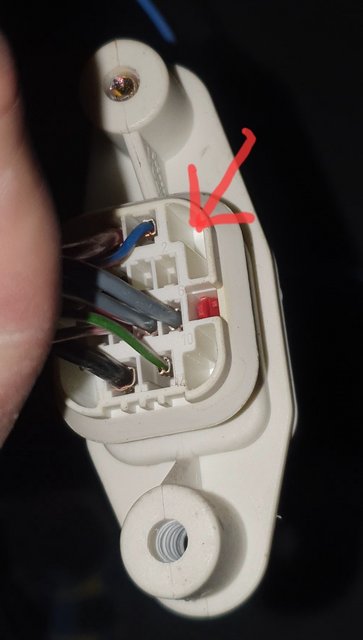
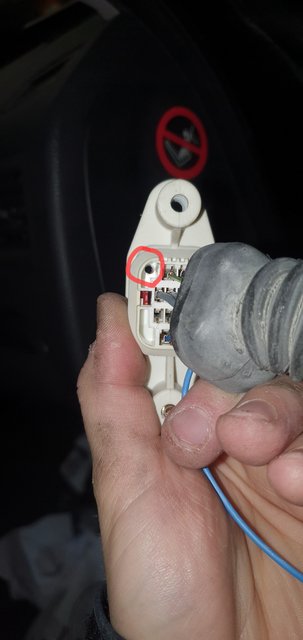
3) loosen and dismantle the door connector (2 nuts from the inside of the door behind the door checker; preferably using small ratchet wrench (nut size 11 I think)
3) pull the cable through the rubber wire loom tubing and through the connector using a fish tape
3a) one tube is inside the door behind the black plastic cover, which can be simply clicked off, and leads to the white part of the door connector � it is fairly easy to pull out quite a bit and stretch, which makes getting the fish tape through simple
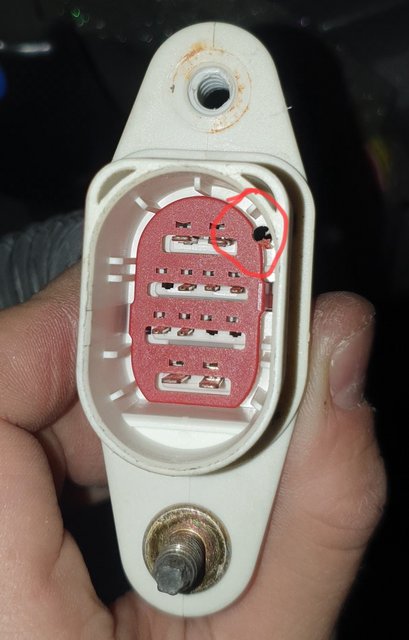
3b) CAREFULLY drill a hole the connector (both parts) � there is quite enough space for a 3-4mm drill near the corners around the contacts inside the oval inner part of the connector � and get the cable through the hole
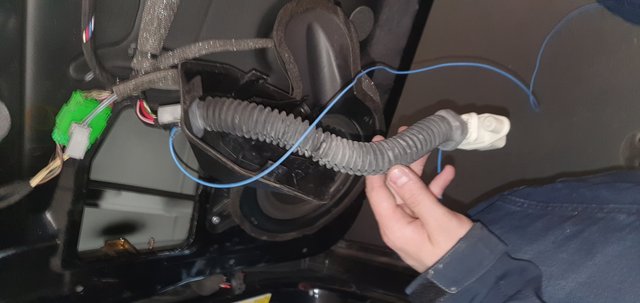
3c) pull the fish tape through the rubber wire loom tube leading from the space between the door and the dashboard all the way to the footwell light � this tube is really long and wavy, I was struggling with it for about half an hour and had to pull it out quite a bit from the car, make a small hole halfway for the fish tape tip and the cable taped to it, and then come back with the fish tape from the other side (i.e. from the car), tape the cable again and pull it inside. It is much easier to pull off with soap, I got it for the passenger side and it did make a difference, though the tube seemed shorter on the passenger side, too
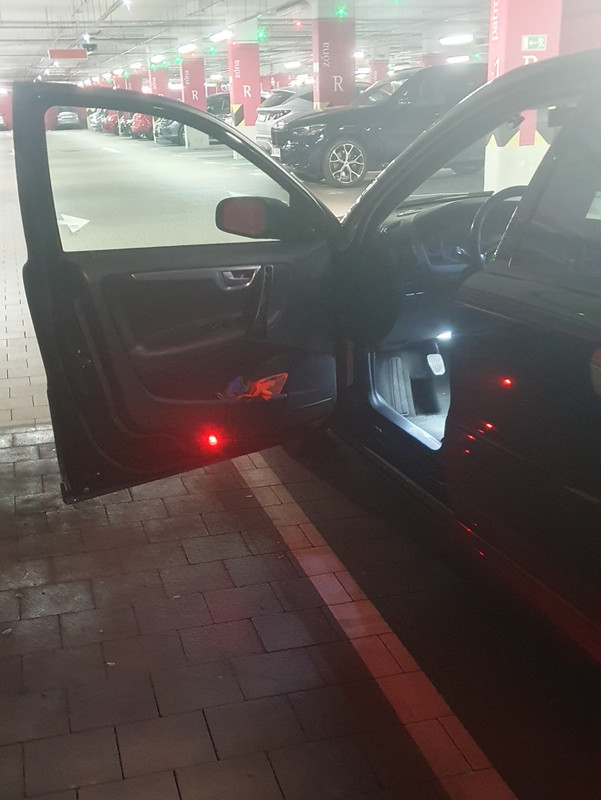
4) connect the newly installed cable to the +12V ACC terminal of the footwell light � it is the terminal on the opposite side of the light (from the direction of the connector), i.e. the one further away from the connector � I opted for soldering a short cable from the terminal to the outside of the light, where it went into a 3-terminal WAGO cage clamp (in order for other cables to connect easily, including the one from the rear door warning light later on); the cable must be routed from the footwell light towards the car door, where there is an opening through which the cables go in
5) connect the +12V ACC cable from the footwell light, which you now have inside the door, to the corresponding terminal of your LED warning light (check the polarity first)
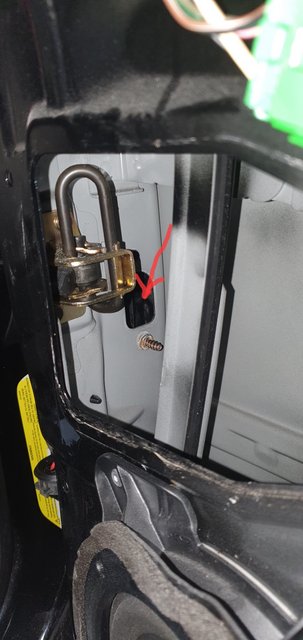
6) connect the -terminal of the LED warning light to the ground wire � it�s the thick black cable leading to the gray connector of the door unit � in the bottom row of pins (it�s on the side of the connector where the clamp is, second from right; the rightmost wire is gray); I solved it with quick clamps and straight WAGO cage clamps
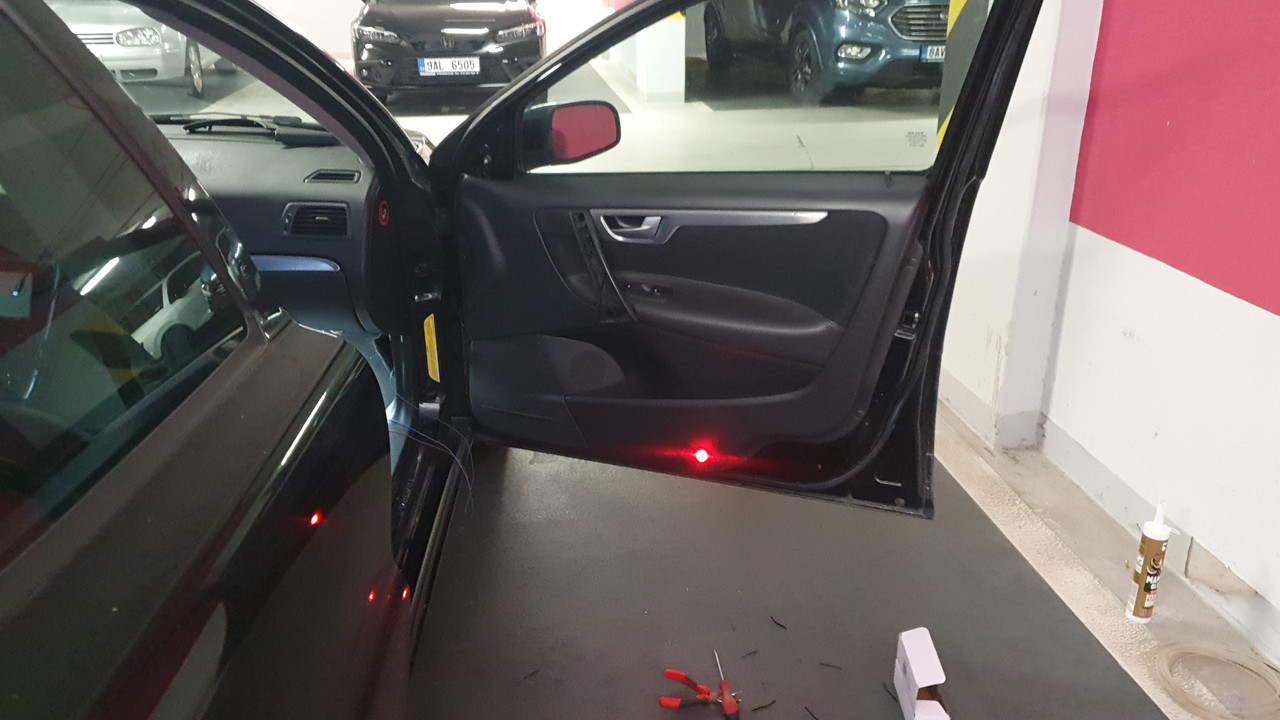
7) make sure that everything works and that the door warning light turns off with the footwell lights; leave the cables to the LED light inside the door long enough in order for the door panel to be easy to remove, or play around some more and install some kind of connector system
8) seal the hole you drilled in the connector around the wire where it is not covered by the rubber wire loom tube with some kind of glue/sealant
9) reassemble everything, fasten the tightened cables to the original door wiring, plug in the connectors, insulate the connectors/terminals with shrink tubes/electrical tape, push the hems of the rubber wire loom tubes back over the connectors; I also wrapped the fastened cables with foam pipe insulation so that they could not be loose inside the door
just finished (well, half-finished more like) my latest project and thought i would share my findings, maybe someone will find it useful, it took me quite a while to figure everything out :-)
It is necessary to route a cable from the footwell light +12V ACC terminal, which includes the following:
0) get some electrical cable (ideally something like 2x0.5mm stranded wire, different wire colors are useful), which will power the door warning light, choose a LED light of reasonable quality and/or pick one with replacable bulb, although that might prove tougher to come by and install (I went for a generic round �LED position light, Red, W80 29/21mm diameter, 0, 25m cord�), and figure out how and where in the door panel it will be mounted; heat shrink tubing and terminal crimping tools, so that all cables can be properly terminated
1) remove the door panel (just check out YouTube � for example �speaker replacement�); prepare a thin screwdriver/stick, TX25 bit/screwdriver
2) remove the plastic cover under the steering wheel; again TX25
3) loosen and dismantle the door connector (2 nuts from the inside of the door behind the door checker; preferably using small ratchet wrench (nut size 11 I think)
3) pull the cable through the rubber wire loom tubing and through the connector using a fish tape
3a) one tube is inside the door behind the black plastic cover, which can be simply clicked off, and leads to the white part of the door connector � it is fairly easy to pull out quite a bit and stretch, which makes getting the fish tape through simple
3b) CAREFULLY drill a hole the connector (both parts) � there is quite enough space for a 3-4mm drill near the corners around the contacts inside the oval inner part of the connector � and get the cable through the hole
3c) pull the fish tape through the rubber wire loom tube leading from the space between the door and the dashboard all the way to the footwell light � this tube is really long and wavy, I was struggling with it for about half an hour and had to pull it out quite a bit from the car, make a small hole halfway for the fish tape tip and the cable taped to it, and then come back with the fish tape from the other side (i.e. from the car), tape the cable again and pull it inside. It is much easier to pull off with soap, I got it for the passenger side and it did make a difference, though the tube seemed shorter on the passenger side, too
4) connect the newly installed cable to the +12V ACC terminal of the footwell light � it is the terminal on the opposite side of the light (from the direction of the connector), i.e. the one further away from the connector � I opted for soldering a short cable from the terminal to the outside of the light, where it went into a 3-terminal WAGO cage clamp (in order for other cables to connect easily, including the one from the rear door warning light later on); the cable must be routed from the footwell light towards the car door, where there is an opening through which the cables go in
5) connect the +12V ACC cable from the footwell light, which you now have inside the door, to the corresponding terminal of your LED warning light (check the polarity first)
6) connect the -terminal of the LED warning light to the ground wire � it�s the thick black cable leading to the gray connector of the door unit � in the bottom row of pins (it�s on the side of the connector where the clamp is, second from right; the rightmost wire is gray); I solved it with quick clamps and straight WAGO cage clamps
7) make sure that everything works and that the door warning light turns off with the footwell lights; leave the cables to the LED light inside the door long enough in order for the door panel to be easy to remove, or play around some more and install some kind of connector system
8) seal the hole you drilled in the connector around the wire where it is not covered by the rubber wire loom tube with some kind of glue/sealant
9) reassemble everything, fasten the tightened cables to the original door wiring, plug in the connectors, insulate the connectors/terminals with shrink tubes/electrical tape, push the hems of the rubber wire loom tubes back over the connectors; I also wrapped the fastened cables with foam pipe insulation so that they could not be loose inside the door
Last edited by JiFi; May 14, 2023 at 12:02 AM.

Thread
Thread Starter
Forum
Replies
Last Post

