
07 S80 V8 AWD Front strut replacement DIY


Thread Starter
|
Junior Member
Joined: May 2015
Posts: 11
Likes: 0
Guys,
Last weekend I took on the task of replacing my front struts. After many failed google attempts, I found little to no instruction on how to do this job. So I am writing this from memory and hopefully this will help you in your installation.
Tools you will need...
PB blaster!
Spring compressor tool (buy or rent a good one trust me)
Ball Joint separator tool,
Outer Tie rod removal tool (I improvised)
Impact driver 3/8" and 1/2"
Zip ties
Pry bar
Metric Allen key set
Flat screw driver
Metric sockets 3mm, 4mm, 5mm, 13mm, 15mm, 17mm, 18mm, 19mm, 21mm.
Metric wrenches 15mm, 21mm (1 regular and 1 ratcheting wrench)
T50 torques socket (so you can remove the rotor)
Small torques. I�m not sure of the size but it�s the same size as the one you use to remove the engine bay cover to change your oil.
If I�m forgetting anything, then it can be picked up at home depot.
Parts you need...
2 new front struts of your choice
2 new strut bearings
(Obviously buying a new complete strut assembly is the fastest and easiest way but they use brands that I never heard of)
Since you�re in there you could chose to replace the lower control arms and anything else that looks warn. Example - tie rod ends, front sway bar links and bushings.
Good luck and this is just a guide to help you understand what�s involved before you attack it! Know your ability!
The first side took me 7 hours and once I knew what I was doing, the other took me 3 hours. It also helped to have a buddy around to help when you need to do some heavy lifting, spring compression, and lining up.
Alright, here we go�
1. Open the hood.
2. Jack up the side of the car that you will be working on and safely place jacks to hold up your car at the correct locations.
3. Now that the car is safely jacked up, remove the front wheel with a 19mm socket.
4. Spray pb blaster on shock pinch bolt located behind the bottom of the shock, tie rod nut, and the lower ball joint nut. Let soak.
5. Next, remove the inner tire well lining with small torques driver. ( you don�t have to but it gives you more space to work and a place to zip tie your caliper)
6. Remove the 2 caliper bolts with 21mm socket. Then remove the brake line from the bracket that it goes through. Spray some lube on it and it will pull right out of the bracket and zip tie the caliper to the body of the car, out of the way.
7. Remove Rotor with T50 Torques.
8. Remove dust shield. 3 bolts. I believe these are 3mm, 4mm, or 5mm.
9. Next, remove the lower ball joint from the spindle using the ball joint separator. You have to get it free to give you enough room to get everything out.
10. Remove the CV joint bolt using 15mm socket.
11. Remove the tie rod nut and use the Outer tie rod removal tool. (I used an Allen key socket and small extension in the top of the bolt and a hammer to free it from the spindle without busting up the threads.)
12. Unclip, remove from bracket, and put aside the black Wheel sensor cable
13. Remove upper sway bar nut. 15mm socket. You may need to use a wrench and an allen key to get the nut off.
14. Using the impact, remove the pinch bolt at the bottom of the shock. I think this is 15mm or 17mm.
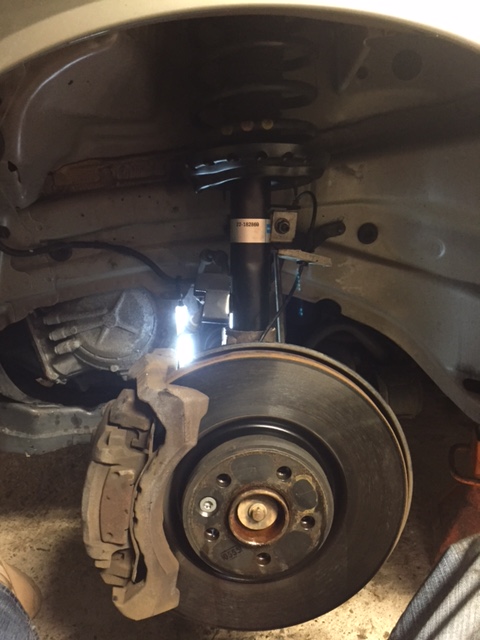
15. Now you are ready to remove the front strut assembly. This is where a buddy is handy.
16. Now go underneath the hood and locate the top of the strut tower. To access this, remove the battery cover. Then remove the 3 or 4 plastic cover fasteners by prying out the round center part with a screw driver. Once this is completed you will be able to lift the plastic cover high enough to access the 3 13mm bolts. Have your buddy hold the strut assembly as you remove the 3 bolts. Once it�s free, use a pry bar to separate the loose lower ball joint from the spindle and at the same time, slide out the CV shaft from the wheel bearing. This may take some finesse.
17. Now that you have the strut assembly out of the car, you can take the pry bar, wedge it in-between the pinch bolt area and lightly hammering enough to spread the pinch bolt mounts farther apart. It doesn�t take much. This will allow you to remove the strut from the spindle. Leave the pry bar wedged in there so you can slide the new strut in later.
18. Now carefully use the spring compressor on your springs. Follow the instructions and look up youtube videos on how to use one properly. Once the spring is compressed, then and only then, you can remove the top nut on the strut using an impact gun. 17mm I think. Take your time on this part. It can be very dangerous if you are not careful.
19. Carefully remove and transfer everything over to the new strut in the same order. Replacing the old Strut bearing with your brand new one. Line the spring back up in its proper location. The flat side of the upper mounting bracket needs to face towards in inside of the car. Then secure the new top strut nut and washer onto the strut using an impact. You may need your buddy to push down on the strut assembly so that you can get enough threads to start the strut nut. Once the strut nut is secure, you can then start backing off the bolts of the strut compressor. Do this slowly and evenly on both sides.
20. Now that you have successfully swapped your strut and strut bearing, you can now start the installation of the strut in the exact order that you disassembled.
21. Slide the new strut into the spindle down to the limit tab. Then remove the pry bar and install the pinch bolt and tighten to the recommended torque. Have your buddy hold the new strut assembly into place so that you can get 1 shock tower bolt started. This will hold the strut up and also give you enough movement to get the lower ball joint back into place and line up the CV shaft back into the wheel bearing. It�s tricky but it will go. You may need to use the pry bar to get the control arm low enough to insert the ball joint to the spindle.
22. Once the ball joint is in, you can put the rest of the shock tower bolts in and tighten to spec.
23. If the ball joint spins, use a jack and jack up underneath it so that it doesn�t spin and you can install the lower ball joint nut properly. There is barely any room to get an allen key in there.
24. The hard part is over! You can now reinstall the same way you took everything apart.
25. Finally, Double check that all your nuts and bolts are tight and take it for a test drive.
26. Get an alignment. (You just saved 600-1000 bucks so you can afford it)
This was a lot of grief but in the end, it was worth every penny. Now you know all about how your front end is put together and you�re that much closer to being a better mechanic.

Last weekend I took on the task of replacing my front struts. After many failed google attempts, I found little to no instruction on how to do this job. So I am writing this from memory and hopefully this will help you in your installation.
Tools you will need...
PB blaster!
Spring compressor tool (buy or rent a good one trust me)
Ball Joint separator tool,
Outer Tie rod removal tool (I improvised)
Impact driver 3/8" and 1/2"
Zip ties
Pry bar
Metric Allen key set
Flat screw driver
Metric sockets 3mm, 4mm, 5mm, 13mm, 15mm, 17mm, 18mm, 19mm, 21mm.
Metric wrenches 15mm, 21mm (1 regular and 1 ratcheting wrench)
T50 torques socket (so you can remove the rotor)
Small torques. I�m not sure of the size but it�s the same size as the one you use to remove the engine bay cover to change your oil.
If I�m forgetting anything, then it can be picked up at home depot.
Parts you need...
2 new front struts of your choice
2 new strut bearings
(Obviously buying a new complete strut assembly is the fastest and easiest way but they use brands that I never heard of)
Since you�re in there you could chose to replace the lower control arms and anything else that looks warn. Example - tie rod ends, front sway bar links and bushings.
Good luck and this is just a guide to help you understand what�s involved before you attack it! Know your ability!
The first side took me 7 hours and once I knew what I was doing, the other took me 3 hours. It also helped to have a buddy around to help when you need to do some heavy lifting, spring compression, and lining up.

Alright, here we go�
1. Open the hood.
2. Jack up the side of the car that you will be working on and safely place jacks to hold up your car at the correct locations.
3. Now that the car is safely jacked up, remove the front wheel with a 19mm socket.
4. Spray pb blaster on shock pinch bolt located behind the bottom of the shock, tie rod nut, and the lower ball joint nut. Let soak.
5. Next, remove the inner tire well lining with small torques driver. ( you don�t have to but it gives you more space to work and a place to zip tie your caliper)
6. Remove the 2 caliper bolts with 21mm socket. Then remove the brake line from the bracket that it goes through. Spray some lube on it and it will pull right out of the bracket and zip tie the caliper to the body of the car, out of the way.
7. Remove Rotor with T50 Torques.
8. Remove dust shield. 3 bolts. I believe these are 3mm, 4mm, or 5mm.
9. Next, remove the lower ball joint from the spindle using the ball joint separator. You have to get it free to give you enough room to get everything out.
10. Remove the CV joint bolt using 15mm socket.
11. Remove the tie rod nut and use the Outer tie rod removal tool. (I used an Allen key socket and small extension in the top of the bolt and a hammer to free it from the spindle without busting up the threads.)
12. Unclip, remove from bracket, and put aside the black Wheel sensor cable
13. Remove upper sway bar nut. 15mm socket. You may need to use a wrench and an allen key to get the nut off.
14. Using the impact, remove the pinch bolt at the bottom of the shock. I think this is 15mm or 17mm.
15. Now you are ready to remove the front strut assembly. This is where a buddy is handy.
16. Now go underneath the hood and locate the top of the strut tower. To access this, remove the battery cover. Then remove the 3 or 4 plastic cover fasteners by prying out the round center part with a screw driver. Once this is completed you will be able to lift the plastic cover high enough to access the 3 13mm bolts. Have your buddy hold the strut assembly as you remove the 3 bolts. Once it�s free, use a pry bar to separate the loose lower ball joint from the spindle and at the same time, slide out the CV shaft from the wheel bearing. This may take some finesse.
17. Now that you have the strut assembly out of the car, you can take the pry bar, wedge it in-between the pinch bolt area and lightly hammering enough to spread the pinch bolt mounts farther apart. It doesn�t take much. This will allow you to remove the strut from the spindle. Leave the pry bar wedged in there so you can slide the new strut in later.
18. Now carefully use the spring compressor on your springs. Follow the instructions and look up youtube videos on how to use one properly. Once the spring is compressed, then and only then, you can remove the top nut on the strut using an impact gun. 17mm I think. Take your time on this part. It can be very dangerous if you are not careful.
19. Carefully remove and transfer everything over to the new strut in the same order. Replacing the old Strut bearing with your brand new one. Line the spring back up in its proper location. The flat side of the upper mounting bracket needs to face towards in inside of the car. Then secure the new top strut nut and washer onto the strut using an impact. You may need your buddy to push down on the strut assembly so that you can get enough threads to start the strut nut. Once the strut nut is secure, you can then start backing off the bolts of the strut compressor. Do this slowly and evenly on both sides.
20. Now that you have successfully swapped your strut and strut bearing, you can now start the installation of the strut in the exact order that you disassembled.
21. Slide the new strut into the spindle down to the limit tab. Then remove the pry bar and install the pinch bolt and tighten to the recommended torque. Have your buddy hold the new strut assembly into place so that you can get 1 shock tower bolt started. This will hold the strut up and also give you enough movement to get the lower ball joint back into place and line up the CV shaft back into the wheel bearing. It�s tricky but it will go. You may need to use the pry bar to get the control arm low enough to insert the ball joint to the spindle.
22. Once the ball joint is in, you can put the rest of the shock tower bolts in and tighten to spec.
23. If the ball joint spins, use a jack and jack up underneath it so that it doesn�t spin and you can install the lower ball joint nut properly. There is barely any room to get an allen key in there.
24. The hard part is over! You can now reinstall the same way you took everything apart.
25. Finally, Double check that all your nuts and bolts are tight and take it for a test drive.
26. Get an alignment. (You just saved 600-1000 bucks so you can afford it)
This was a lot of grief but in the end, it was worth every penny. Now you know all about how your front end is put together and you�re that much closer to being a better mechanic.

Thread
Thread Starter
Forum
Replies
Last Post
HummerGuy
Volvo V70
24
Feb 14, 2009 09:23 PM
1999S80T6
Volvo S80
6
Oct 13, 2007 01:20 PM