When you click on links to various merchants on this site and make a purchase, this can result in this site earning a commission. Affiliate programs and affiliations include, but are not limited to, the eBay Partner Network.
I have a 1986 Volvo 240DL (automatic transmission) and am trying to remove the top **** on the gear shifter. I removed the plastic casing on the lower base of the gears already but don't see any screws or anything to get the **** on top off.
Any ideas?
It's pressure fitted, at least on the 7/9 series, and I believe on the 240 as well. You have to pop it straight up and it could be challenging, it takes force. I use a 5/8 open end wrench on the shaft under the ****, leverage the wrench, press down, the **** pops up--at least that works on the 7/9 series...
Got around to trying this today with no luck. I had my 5/8 open end wrench under the **** and it wouldn't budge. I tried hitting the underside of the wrench with a hammer too and it didn't move.
When you said to press down did you mean on the gear shift button or to just put downward force on the ****?
Also once the **** is removed are there some kinda wires connecting it that make the overdrive button work? Tx.
the OD button has two wires which go down to a 3 pin connector on the right side of the transmission hump, and just about where the vertical console meets the hump. the 3rd wire on this connector goes to the OD solenoid in the side of the transmission. I'm not sure, but I think the button stays behind when you remove the ****. or wait, maybe you have to remove the switch from the skdie of the **** and disconnect the two wires from it, not sure.
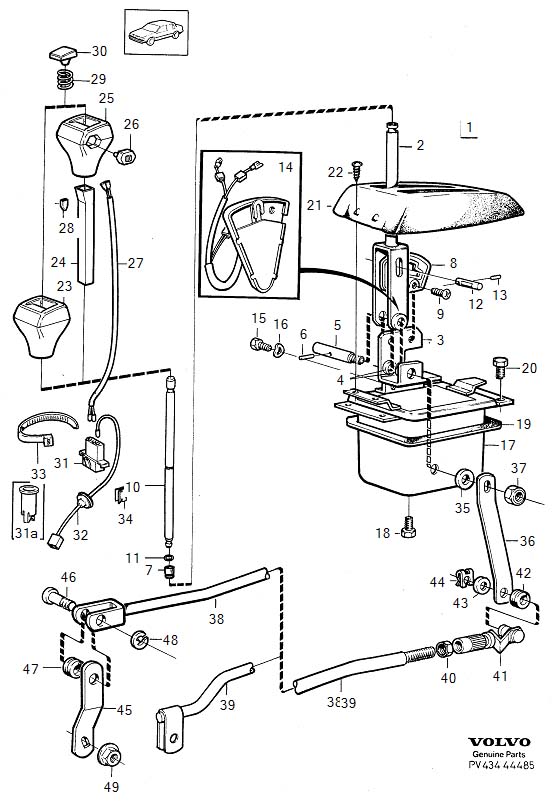
on the parts drawing of a 240 shifter, it kinda looks like you might have to remove the shiftlock button from the top by removing a 'jesus clip' from the bottom of the shaft it pushes on before the **** can come out. here's the parts drawing.
note that square tube 24 is NOT whats holding the **** down, thats just cosmetic. the **** is secured onto the shift shaft 2... 10 is the lock button rod, that slides inside of 2.
The OD button has to be pried out with a small flat head screwdiver first, the two wires attached to it have to be unsoldered. And, after looking at the diagram I realize that the 240 **** is much smaller (shorter) than the 940's so the pry-up method would not work... The instructions call for a straight up pull, I guess super human force is needed...
The OD button has to be pried out with a small flat head screwdiver first, the two wires attached to it have to be unsoldered. And, after looking at the diagram I realize that the 240 **** is much smaller (shorter) than the 940's so the pry-up method would not work... The instructions call for a straight up pull, I guess super human force is needed...
I bet warming it up, maybe with a hair dryer, long enough that the plastic is warm all the way through, would help... or do it in the summer on a hot day
It's still on as you can see it the pic below. I'm swapping out the heater core, blower motor and blower motor resistor and finally got to everything. I'll deal with getting the **** off later when the rest of the job is done. The gear shifter plastic cover case that is under the **** wouldn't come off without removing the ****, therefore blocking me from bringing the carpet completely back and out of the way. While working on something else I leaned on the plastic cover case by mistake and it cracked partially so I busted the rest of it off and now even though the **** is still on I was able to swing the carpet back and out of the car. I bought a replacement plastic cover case and that cover case can only be put on now once that **** is off, but I have lots of other stuff to do before getting to that!
I replaced the shattered plastic bezel around the shifter on our 240 by carefully slicing the new one at the center of the front-facing side using a hacksaw blade, and sliding it around the shaft... when screwed down, you really couldn't tell it had been sliced. our car had the brittle-with-age tan interior and carpet, I used a black bezel, as black goes quite nicely with tan, in fact if you didn't know it was supposed to be tan, it looked like it belonged.
So you had to cut the center console base piece and the little bezel that's contained within it as well correct? From your description it sounds like you made the cut in between the two screw holes correct?
black center console
Originally Posted by pierce
I replaced the shattered plastic bezel around the shifter on our 240 by carefully slicing the new one at the center of the front-facing side using a hacksaw blade, and sliding it around the shaft... when screwed down, you really couldn't tell it had been sliced. our car had the brittle-with-age tan interior and carpet, I used a black bezel, as black goes quite nicely with tan, in fact if you didn't know it was supposed to be tan, it looked like it belonged.
I slit it from between the screw holes to the middle of the 'brush' area. that let me twist-spread it enough to get it past the shifter shaft. I had planned to use some plastic cement when I put it on, but I couldn't see the slit as is and the screws held it firmly in place, so I never bothered.
use the thinnest saw blade you can find. that's usually a fairly fine tooth hacksaw, and take your time , don't force it. fine tooth hack saws will gum up pretty fast cutting abs, so every so often, retract the blade, and brush the crumbs off the teeth. you don't even need a hacksaw, just the blade, although I've found a tool like this to be handy for this sort of thing...
Yeah that tool looks nice. Was actually gonna experiment on the original cracked center console piece I still have with my Dremel tool to see how it cuts.
It arrived today and I cut it by hand with a 32 teeth hacksaw blade. I haven't gotten up to installing it yet. In the second pic I am squeezing it together and that's more likely how it will appear when installed.
You can thermal glue that crack with a soldering iron if you need to... I still don't understand why that **** wouldn't come of, somebody might have glued it on.